2016 INFINITI Q50 HYBRID display
[x] Cancel search: displayPage 10 of 36
8
first drive features
Infiniti InTouch™ Services1 (if so equipped)
Infiniti InTouch Services combine personalized convenience, concierge se\
ttings and personal
security features to compliment the Total Ownership Experience®. For more details on Infiniti
InTouch Services or to enroll your vehicle, please visit usa.infinitiintouch.com or
call 800-334-7858.
To access Infiniti InTouch Services:
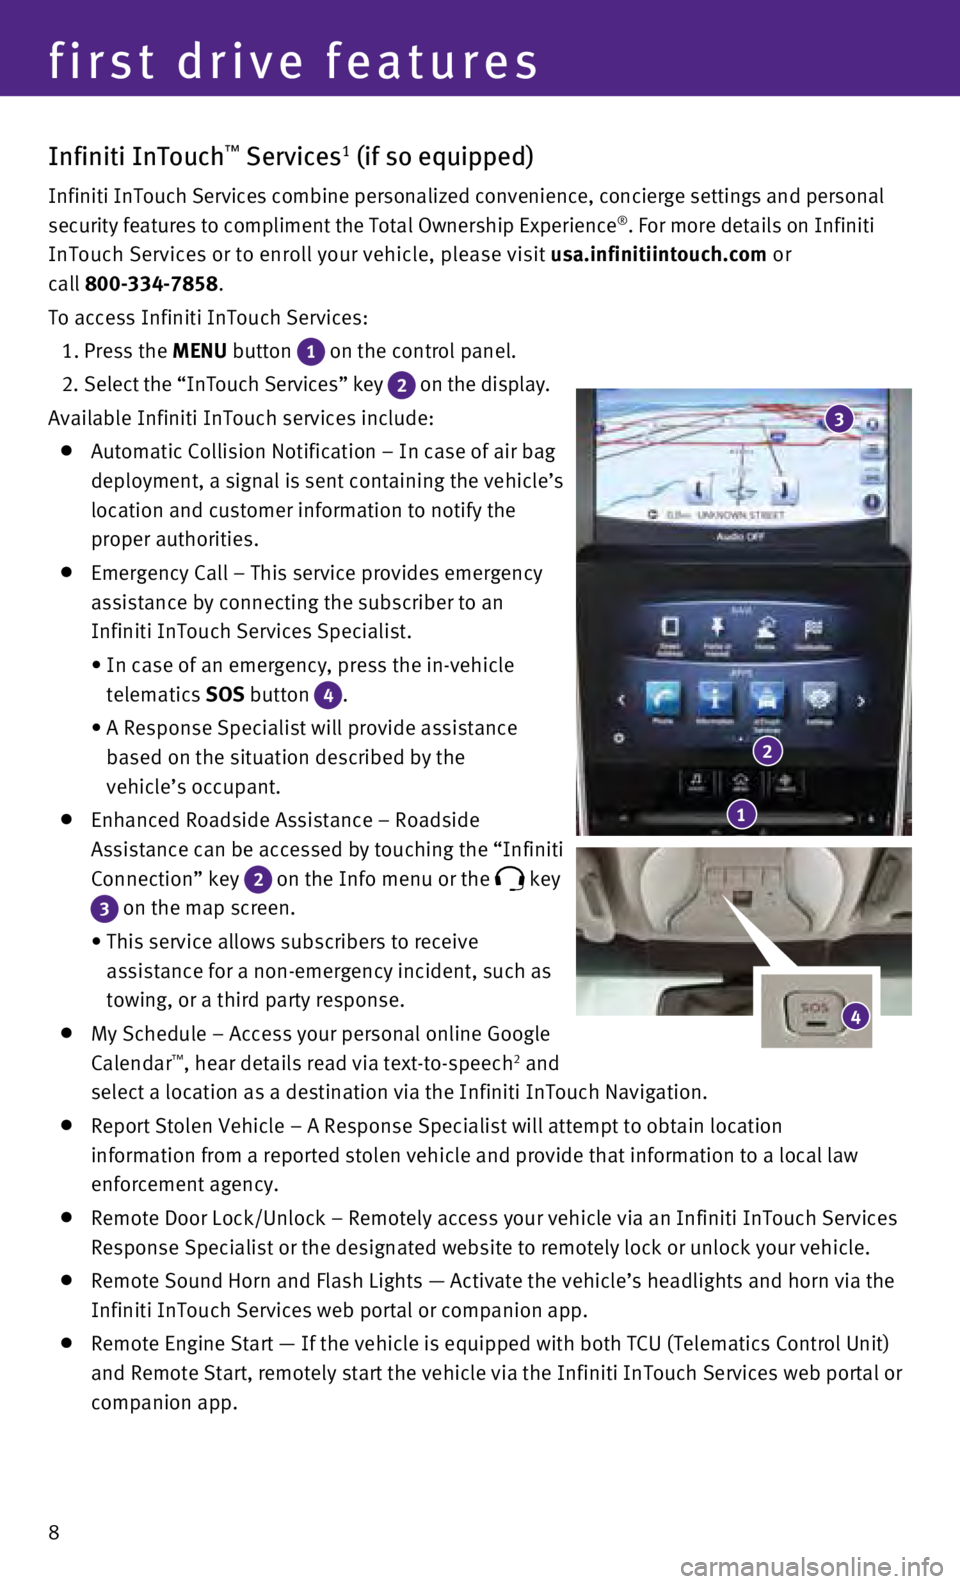
1. Press the
MENU button
1 on the control panel.
2
. Select the “InTouch Services” key
2 on the display.
Available Infiniti InTouch services include:
Automatic Collision Notification – In case of air bag
deployment, a signal is sent containing the vehicle’s
location and customer information to notify the
proper authorities.
Emergency Call – This service provides emergency
assistance by connecting the subscriber to an
Infiniti InTouch Services Specialist.
•
In case of an emergency, press the in-vehicle
telematics
SOS button
4.
•
A Response Specialist will provide assistance
based on the situation described by the
vehicle’s occupant.
Enhanced Roadside Assistance – Roadside
Assistance can be accessed by touching the “Infiniti
Connection” key
2 on the Info menu or the key
3 on the map screen.
•
This service allows subscribers to receive
assistance for a non-emergency incident, such as
towing, or a third party response.
My Schedule – Access your personal online Google
Calendar™, hear details read via text-to-speech2 and
select a location as a destination via the Infiniti InTouch Navigation.
Report Stolen Vehicle – A Response Specialist will attempt to obtain \
location
information from a reported stolen vehicle and provide that information \
to a local law
enforcement agency.
Remote Door Lock/Unlock – Remotely access your vehicle via an Infinit\
i InTouch Services
Response Specialist or the designated website to remotely lock or unlock\
your vehicle.
Remote Sound Horn and Flash Lights — Activate the vehicle’s headli\
ghts and horn via the
Infiniti InTouch Services web portal or companion app.
Remote Engine Start — If the vehicle is equipped with both TCU (Tele\
matics Control Unit)
and Remote Start, remotely start the vehicle via the Infiniti InTouch Se\
rvices web portal or
companion app.
4
1
2
3
Page 12 of 36
10
Infiniti Intelligent Key System
The Infiniti Intelligent Key system allows you to lock or
unlock the vehicle, open the trunk and start the hybrid
system. It is important to make sure the Intelligent Key
is with you (that is, in your pocket or purse).
The operating range of the Intelligent Key is within
31.5 in (80 cm) from each request switch.
LOCKING AND UNLOCKING DOORS
Using the Intelligent Key:
•
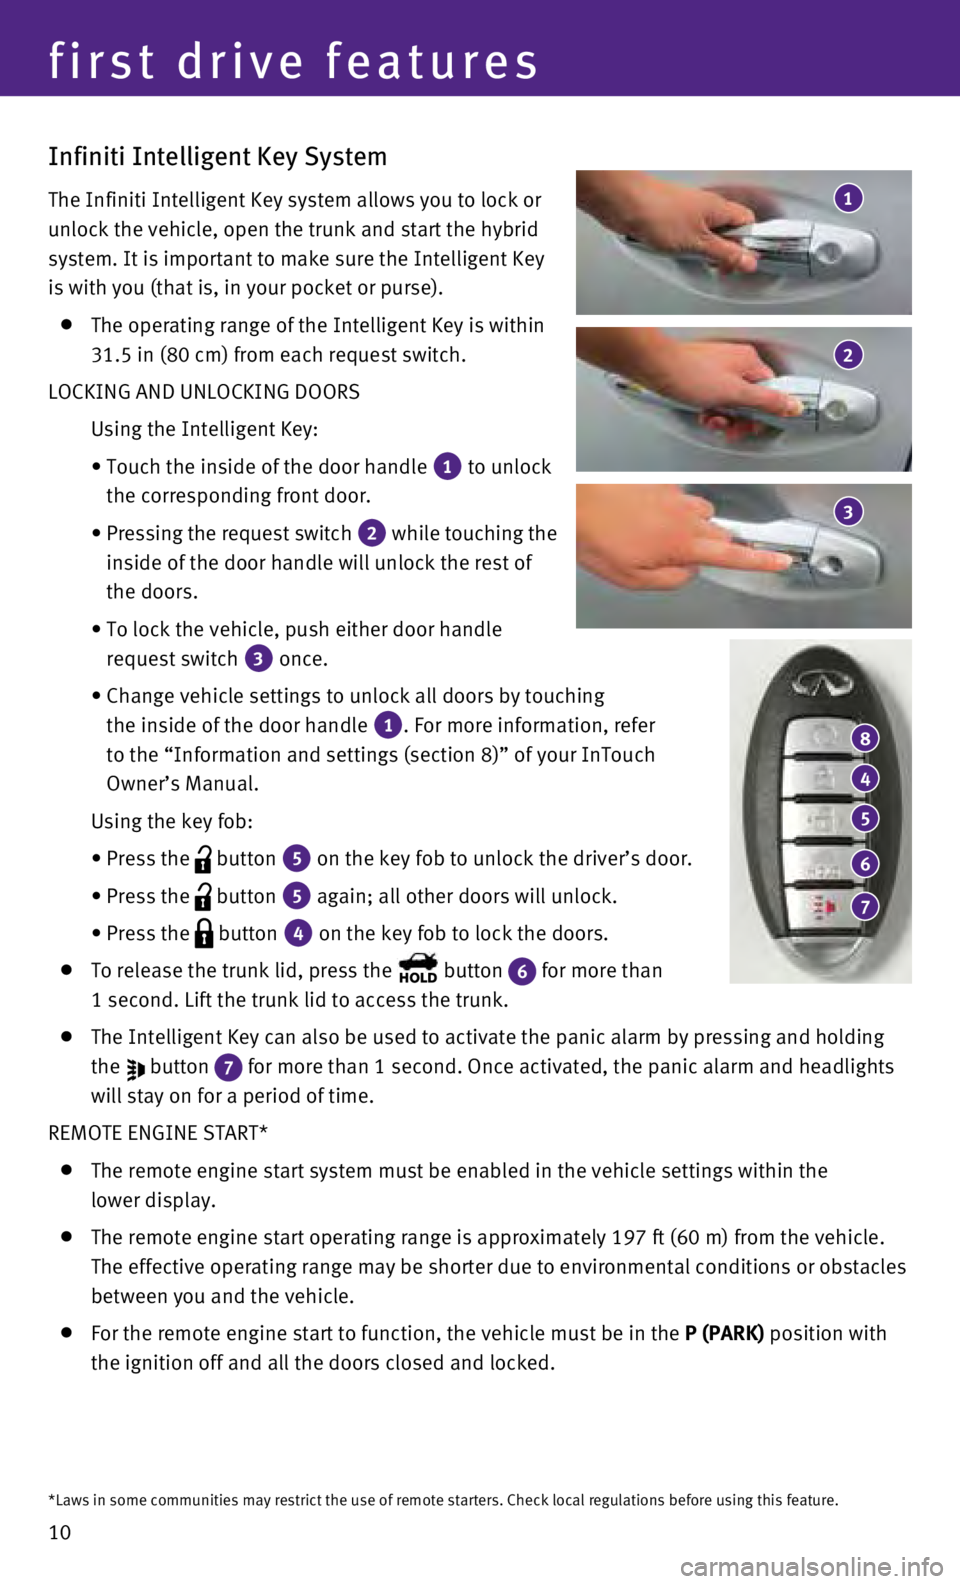
Touch the inside of the door handle 1 to unlock
the corresponding front door.
•
Pressing the request switch 2 while touching the
inside of the door handle will unlock the rest of
the doors.
•
To lock the vehicle, push either door handle
request switch
3 once.
•
Change vehicle settings to unlock all doors by touching
the inside of the door handle
1. For more information, refer
to the “Information and settings (section 8)” of your InTouch
Owner’s Manual.
Using the key fob:
•
Press the button 5 on the key fob to unlock the driver’s door.
•
Press the button 5 again; all other doors will unlock.
• Press the button 4 on the key fob to lock the doors.
To release the trunk lid, press the button 6 for more than
1 second. Lift the trunk lid to access the trunk.
The Intelligent Key can also be used to activate the panic alarm by pres\
sing and holding
the
button 7 for more than 1 second. Once activated, the panic alarm and headlights \
will stay on for a period of time.
REMOTE ENGINE START*
The remote engine start system must be enabled in the vehicle settings w\
ithin the
lower display.
The remote engine start operating range is approximately 197 ft (60 m)\
from the vehicle.
The effective operating range may be shorter due to environmental condit\
ions or obstacles
between you and the vehicle.
For the remote engine start to function, the vehicle must be in the P (PARK) position with
the ignition off and all the doors closed and locked.
4
8
5
6
7
3
1
2
first drive features
*Laws in some communities may restrict the use of remote starters. Check\
local regulations before using this feature.
Page 13 of 36
11
To start your vehicle remotely:
1. Press the button 4.
2.
Within 5 seconds, press and hold the remote engine start button 8 for
at least 2 seconds.
The engine will start, and the parking lights will turn on.
The automatic climate control system will automatically adjust the passe\
nger compartment
to the appropriate set temperature when the Remote Engine Start feature \
is used.
The engine will run for 10 minutes and then turn off.
Repeat steps 1 and 2 to extend the time for an additional 10-minute peri\
od.
•
After two remote starts, the ignition switch must be cycled before the r\
emote start can be
used again.
To start driving, depress the brake pedal and push the ignition switch START/STOP
button.
INFINITI INTELLIGENT KEY BATTERY DISCHARGE
If the battery of the Intelligent Key is discharged
or environmental conditions interfere with the
Intelligent Key operation, start the hybrid system
according to the following procedure:
1.
Move the shift lever to the
P (PARK) position.
2.
Firmly apply the foot brake.
3.
Touch the ignition switch with the Intelligent Key,
and a chime will sound.
4.
Within 10 seconds after the chime sounds, push the ignition switch START/STOP
button while depressing the brake pedal and the hybrid system will start\
.
For more information, refer to the “Instruments and controls (section 2)”, the “Pre-driving checks and adjustments (section 3)”,
the “Starting and driving (section 5)” and the “Maintenance and Do-it-yourself (section 8)” of your Owner’s Manual.
Around View® Monitor (AVM) with Moving Object Detection (MOD)
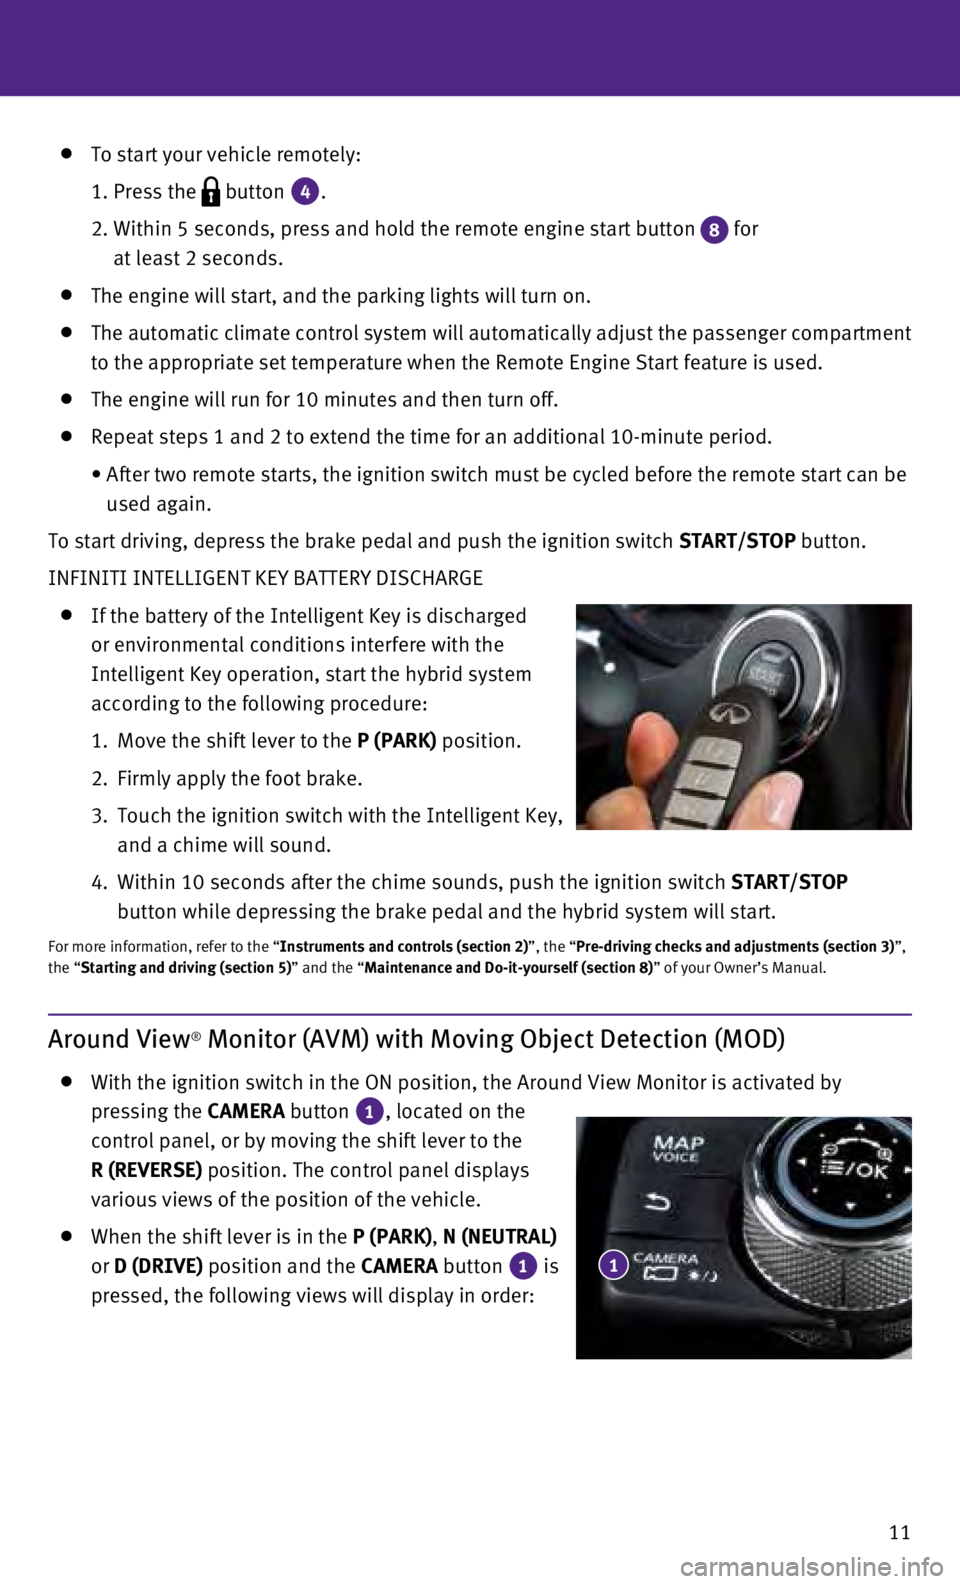
With the ignition switch in the ON position, the Around View Monitor is \
activated by
pressing the CAMERA button
1, located on the
control panel, or by moving the shift lever to the
R (REVERSE) position. The control panel displays
various views of the position of the vehicle.
When the shift lever is in the P (PARK), N (NEUTRAL)
or D (DRIVE) position and the CAMERA button
1 is
pressed, the following views will display in order: 1
Page 14 of 36

12
Rear view and bird’s-eye viewPress
Press
Press Rear view and front-side view
Rear wide view
Start from any Control Panel screen
Press
Press Press
Press
Front wide view Front view and bird’s-eye view
Front view and front-side view
When the shift lever is in the R (REVERSE) position and the CAMERA button 1 is pressed,
the following views will display in order:
The colored guide lines on the display screen indicate vehicle
width and approximate distances to objects with
reference to the vehicle body line.
•
Red 1.5 ft (0.5 m); Yellow 3 ft (1 m); Green 7 ft
(2 m) and 10 ft (3 m)
There are some areas where the system will not
show objects.
•
When in the front or the rear view display, an
object below the bumper or on the ground may
not be viewed
2. 3
2
first drive features
Page 15 of 36
13
•
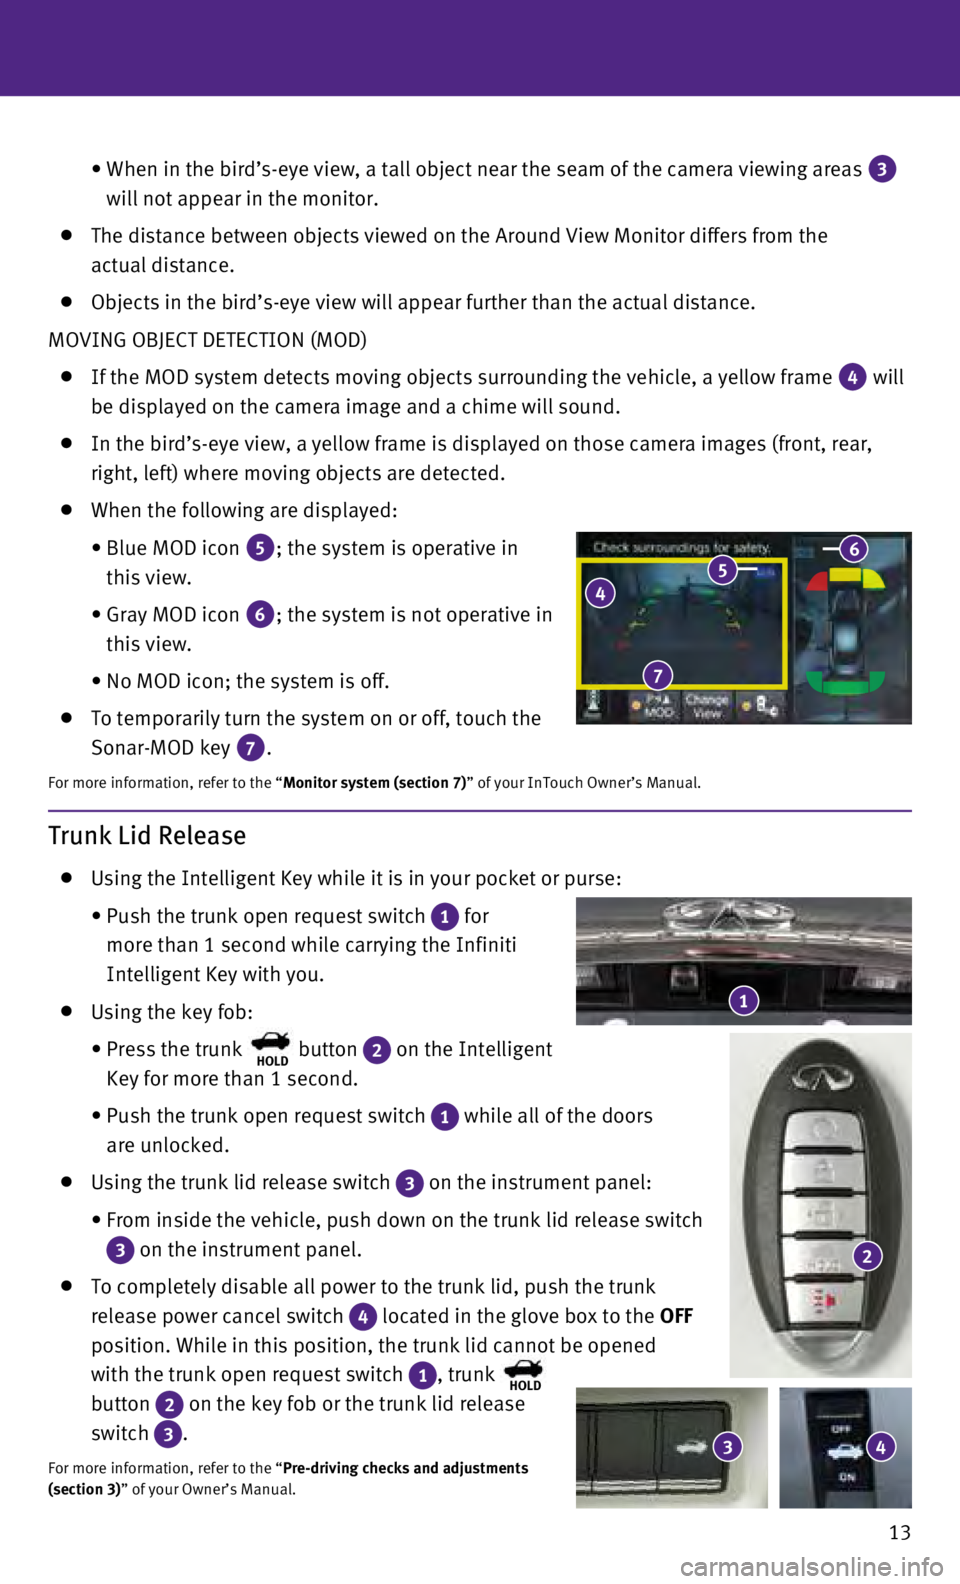
When in the bird’s-eye view, a tall object near the seam of the camer\
a viewing areas 3
will not appear in the monitor.
The distance between objects viewed on the Around View Monitor differs f\
rom the
actual distance.
Objects in the bird’s-eye view will appear further than the actual di\
stance.
MOVING OBJECT DETECTION (MOD)
If the MOD system detects moving objects surrounding the vehicle, a yell\
ow frame 4 will
be displayed on the camera image and a chime will sound.
In the bird’s-eye view, a yellow frame is displayed on those camera i\
mages (front, rear,
right, left) where moving objects are detected.
When the following are displayed:
•
Blue MOD icon 5; the system is operative in
this view.
•
Gray MOD icon 6; the system is not operative in
this view.
•
No MOD icon; the system is off.
To temporarily turn the system on or off, touch the
Sonar-MOD key
7.
For more information, refer to the “Monitor system (section 7)” of your InTouch Owner’s Manual.
4 5 6
7
Trunk Lid Release
Using the Intelligent Key while it is in your pocket or purse:
•
Push the trunk open request switch 1 for
more than 1 second while carrying the Infiniti
Intelligent Key with you.
Using the key fob:
•
Press the trunk HOLD button 2 on the Intelligent
Key for more than 1 second.
•
Push the trunk open request switch 1 while all of the doors
are unlocked.
Using the trunk lid release switch 3 on the instrument panel:
•
From inside the vehicle, push down on the trunk lid release switch
3 on the instrument panel.
To completely disable all power to the trunk lid, push the trunk
release power cancel switch
4 located in the glove box to the OFF
position. While in this position, the trunk lid cannot be opened
with the trunk open request switch
1, trunk HOLD
button 2 on the key fob or the trunk lid release
switch
3.
For more information, refer to the “Pre-driving checks and adjustments
(section 3)” of your Owner’s Manual.
1
3 4
2
Page 16 of 36
14
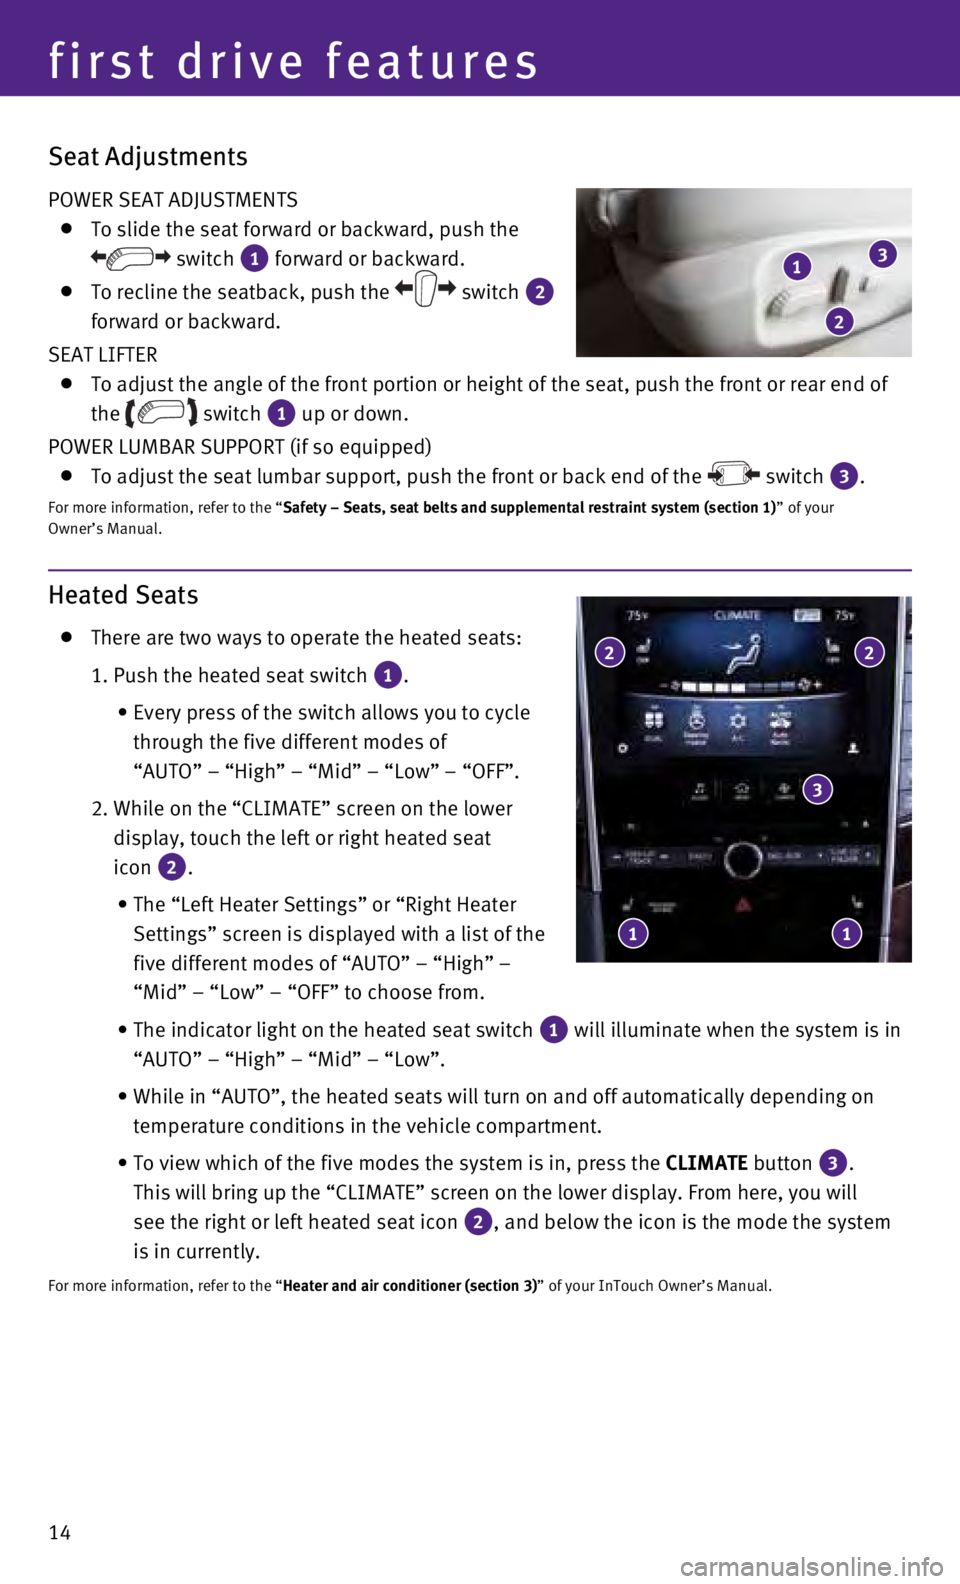
Heated Seats
There are two ways to operate the heated seats:
1. Push the heated seat switch 1.
•
Every press of the switch allows you to cycle
through the five different modes of
“AUTO” – “High” – “Mid” – “Low” – “\
OFF”.
2.
While on the “CLIMATE” screen on the lower
display, touch the left or right heated seat
icon
2.
•
The “Left Heater Settings” or “Right Heater
Settings” screen is displayed with a list of the
five different modes of “AUTO” – “High” –
“Mid” – “Low” – “OFF” to choose from.
•
The indicator light on the heated seat switch 1 will illuminate when the system is in
“AUTO” – “High” – “Mid” – “Low”.
•
While in “AUTO”, the heated seats will turn on and off automatical\
ly depending on
temperature conditions in the vehicle compartment.
•
To view which of the five modes the system is in, press the CLIMATE
button
3.
This will bring up the “CLIMATE” screen on the lower display. From\
here, you will
see the right or left heated seat icon
2, and below the icon is the mode the system
is in currently.
For more information, refer to the “Heater and air conditioner (section 3)” of your InTouch Owner’s Manual.
2 2
3
1 1
first drive features
Seat Adjustments
POWER SEAT ADJUSTMENTS
To slide the seat forward or backward, push the
switch 1 forward or backward.
To recline the seatback, push the switch 2
forward or backward.
SEAT LIFTER
To adjust the angle of the front portion or height of the seat, push the\
front or rear end of
the
switch 1 up or down.
POWER LUMBAR SUPPORT (if so equipped)
To adjust the seat lumbar support, push the front or back end of the switch 3.
For more information, refer to the “Safety – Seats, seat belts and supplemental restraint system (sectio\
n 1) ” of your
Owner’s Manual.
1
2
3
Page 21 of 36

19
Heater and Air Conditioner (automatic)
1 CLIMATE BUTTON
Press to display the “CLIMATE” screen on the lower display.
2 DRIVER’S SIDE TEMPERATURE CONTROL BUTTONS
Press the driver’s side temperature control buttons up for warmer air\
or down
for cooler air.
3 PASSENGER’S SIDE TEMPERATURE CONTROL BUTTONS
To manually adjust the passenger’s side temperature, press the passen\
ger’s side
temperature control buttons up for warmer air or down for cooler air.
4 FAN SPEED CONTROL BUTTONS
To manually adjust the fan speed, press the button or touch the key to increase
the fan speed. Press the
button or touch the key to decrease the fan speed.
5 AUTO BUTTON
Press the AUTO button to turn the system on, and the system will automatically control\
the inside temperature (automatic cooling and/or dehumidified heating)\
, air flow
distribution and fan speed.
6 MODE CONTROL BUTTON
Press the button or touch the key in the center of the lower display to cycle
through the following air flow outlets:
Air flows from the center and side vents.
Air flows from the center, side and foot vents.
Air flows mainly from the foot vents.
Air flows from the front defroster and foot vents.
6
4
5
2
6
4
7 910
1
3
8
11
12
13
Page 23 of 36

21
FM/AM/HD Radio®/SiriusXM®* Satellite Radio
1 AUDIO BUTTON
Press to display the “AUDIO” screen on the lower display.
2 (power) BUTTON/VOL (volume) CONTROL KNOB
Press the (power) button to turn the system on or off.
Turn the VOL (volume) control knob right or left to increase or decrease the volum\
e.
3 SEEK•CAT/TRACK BUTTON
To scan quickly through each broadcasting station, press the SEEK•CAT/TRACK button
to stop at the previous or next broadcast station.
For satellite radio, press the SEEK•CAT/TRACK button to switch to the first channel of
the previous or next category.
For HD Radio®, press the SEEK•CAT/TRACK button to change the station.
Press the SEEK•CAT/TRACK button to change tracks on a CD.
Press and hold the SEEK•CAT/TRACK button to rewind or fast forward a track on a CD.
4 TUNE•CH/FOLDER BUTTON
To manually tune the radio, press the TUNE•CH/FOLDER button left or right.
Press and hold the TUNE•CH/FOLDER button left or right to accelerate radio tuning.
5 RADIO BUTTON
Press to select the radio band in the order of AM, FM and satellite radi\
o.
6 DISC•AUX BUTTON
Press to change the audio source (CD, iPod®, USB, Bluetooth® Streaming Audio or AUX).
7 STATION PRESET KEYS
Up to 36 stations/channels can be set for AM, FM and satellite radio.
To store a station in a preset, you must first select a radio band by pr\
essing the RADIO
button then tune to the desired AM, FM or satellite radio station.
Now select and hold the desired station memory key ( 1-36) until the preset number is
updated on the display and a beep is heard. Programing is now complete.
To retrieve a previously set station, press the right or left arrow 8 and touch the
memory key (1-36) that contains the stored station/channel you wish to listen to.
*SiriusXM® Satellite Radio is only available on vehicles equipped with an optional\
satellite radio subscription service.
For more information, refer to the “Audio system (section 4)” of your InTouch Owner’s Manual.
1
2
7
3
8
5 6 4
8