2016 HYUNDAI VELOSTER TURBO ECO mode
[x] Cancel search: ECO modePage 34 of 406
Safety features of your vehicle
18 3
Seat belts - Front passenger and rear
seat 3-point system with combination
locking retractor
To fasten your seat belt:
Combination retractor type seat belts are
installed in the rear seat positions to help
accommodate the installation of child
restraint systems. Although a combina-
tion retractor is also installed in the front
passenger seat position, it is strongly
recommended that children always be
seated in the rear seat. NEVER place
any infant restraint system in the front
seat of the vehicle.
This type of seat belt combines the fea-
tures of both an emergency locking
retractor seat belt and an automatic lock-
ing retractor seat belt. To fasten your seat
belt, pull it out of the retractor and insert
the metal tab into the buckle. There will
be an audible "click" when the tab locks
into the buckle. When not securing a
child restraint, the seat belt operates in
the same way as the driver's seat belt
(Emergency Locking Retractor Type). It
automatically adjusts to the proper length
only after the lap belt portion of the seat
belt is adjusted manually so that it fits
snugly around your hips.When the seat belt is fully extended from
the retractor to allow the installation of a
child restraint system, the seat belt oper-
ation changes to allow the belt to retract,
but not to extend (Automatic Locking
Retractor Type). Refer to “Using a child
restraint system” in this section.
✽NOTICE
Although the combination retractor
provides the same level of protection for
seated passengers in either emergency
or automatic locking modes, it is recom-
mended that seated passengers use the
emergency locking feature for improved
convenience. The automatic locking
function is intended to facilitate child
restraint installation. To convert from
the automatic locking feature to the
emergency locking operation mode,
allow the unbuckled seat belt to fully
retract.
B200A02NF
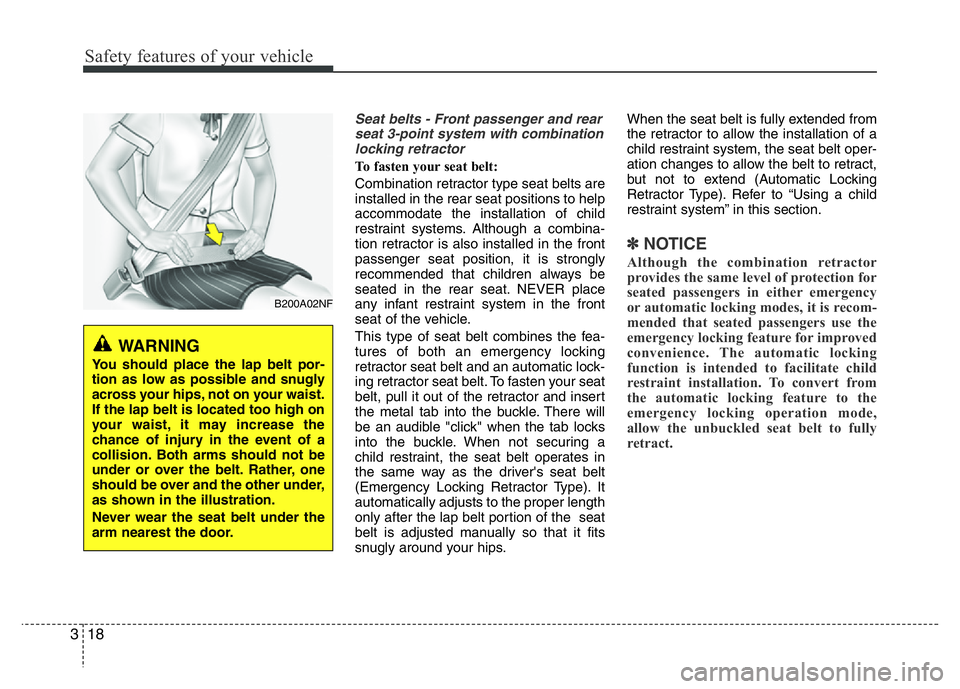
WARNING
You should place the lap belt por-
tion as low as possible and snugly
across your hips, not on your waist.
If the lap belt is located too high on
your waist, it may increase the
chance of injury in the event of a
collision. Both arms should not be
under or over the belt. Rather, one
should be over and the other under,
as shown in the illustration.
Never wear the seat belt under the
arm nearest the door.
Page 44 of 406
Safety features of your vehicle
28 3
For safety reasons, we recommend that
the child restraint system be used in the
rear seats.
Since all passenger seat belts move
freely under normal conditions and only
lock under extreme or emergency condi-
tions (emergency locking mode), you
must manually change these seat belts
to the automatic locking mode to secure
a child restraint.
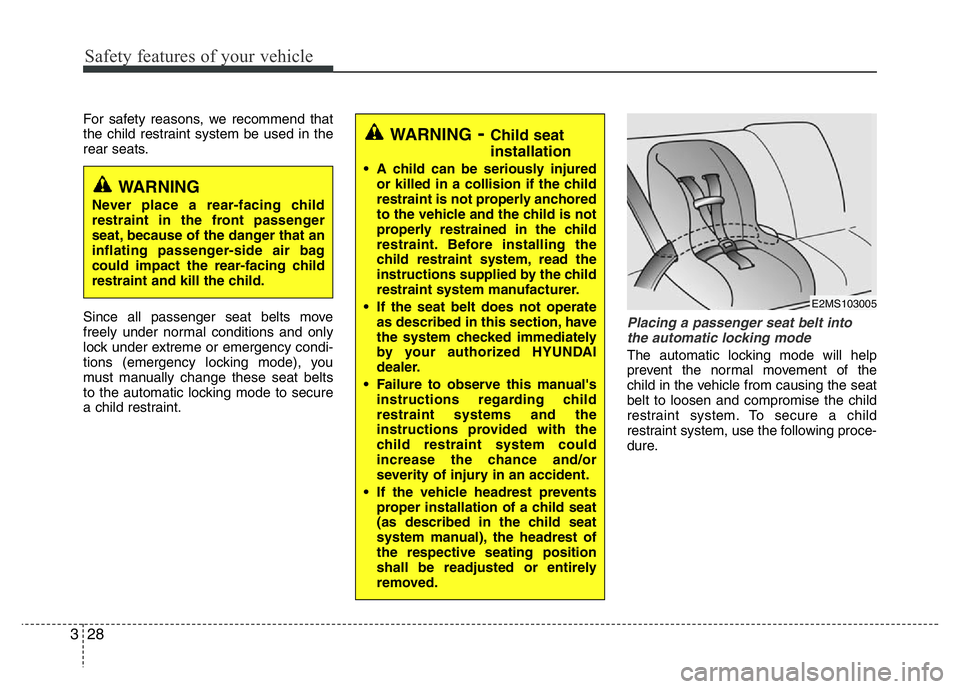
Placing a passenger seat belt into
the automatic locking mode
The automatic locking mode will help
prevent the normal movement of the
child in the vehicle from causing the seat
belt to loosen and compromise the child
restraint system. To secure a child
restraint system, use the following proce-
dure.
WARNING- Child seat
installation
• A child can be seriously injured
or killed in a collision if the child
restraint is not properly anchored
to the vehicle and the child is not
properly restrained in the child
restraint. Before installing the
child restraint system, read the
instructions supplied by the child
restraint system manufacturer.
• If the seat belt does not operate
as described in this section, have
the system checked immediately
by your authorized HYUNDAI
dealer.
• Failure to observe this manual's
instructions regarding child
restraint systems and the
instructions provided with the
child restraint system could
increase the chance and/or
severity of injury in an accident.
• If the vehicle headrest prevents
proper installation of a child seat
(as described in the child seat
system manual), the headrest of
the respective seating position
shall be readjusted or entirely
removed.
WARNING
Never place a rear-facing child
restraint in the front passenger
seat, because of the danger that an
inflating passenger-side air bag
could impact the rear-facing child
restraint and kill the child.
E2MS103005
Page 82 of 406

45
Features of your vehicle
This device complies with Industry
Canada Standard RSS-210.
Operation is subject to the following two
conditions:
1. This device may not cause harmful
interference, and
2. This device must accept any interfer-
ence received, including interference
that may cause undesired operation."Limp Home" Mode and Related
Procedures
If the immobilizer warning indicator blinks
for five seconds when the ignition key is
turned to the "ON" position, this indicates
the immobilizer system requires service.
The engine cannot be started without
using the procedure below.
The following procedure describes how
to start the engine using the limp home
function (0, 1, 2, 3 as a sample pass-
word).
✽NOTICE
You can get a limp home password when
the vehicle is first delivered to you. If
you do not have a password, consult
your authorized HYUNDAI dealer.
1. To activate the password, turn the igni-
tion key "ON" and "OFF" according to
the digit numbers. The immobilizer indi-
cator will blink along with the operation
of the ignition key. For example, turn
the ignition key once for digit number
"1", and twice for "2", and so on. For
the digit number "0", you must cycle
the ignition key 10 times.
2. Wait for 3~10 seconds.3. You may set the remaining number of
digits by following steps 1 and 2.
4. If all of the four password digits have
been successfully entered, turn the
ignition key "ON" and check that the
immobilizer indicator illuminates. From
this time, you have to start your engine
within 30 seconds. If you try to start
your engine after 30 seconds, your
engine will not start.
✽NOTICE
If the engine stalls while driving in the
"limp home" mode, you can start your
engine within 3 seconds without re-
entering the password.
If the immobilizer indicator blinks for five
seconds, you must re-enter the password
(steps 1~4).
After performing the limp home activation
procedure, consult with your authorized
HYUNDAI dealer as soon as possible.
WARNING
Changes or modifications not
expressly approved by the party
responsible for compliance could
void the user’s authority to operate
the equipment.
Page 89 of 406
Features of your vehicle
12 4
Remote keyless entry system
operations
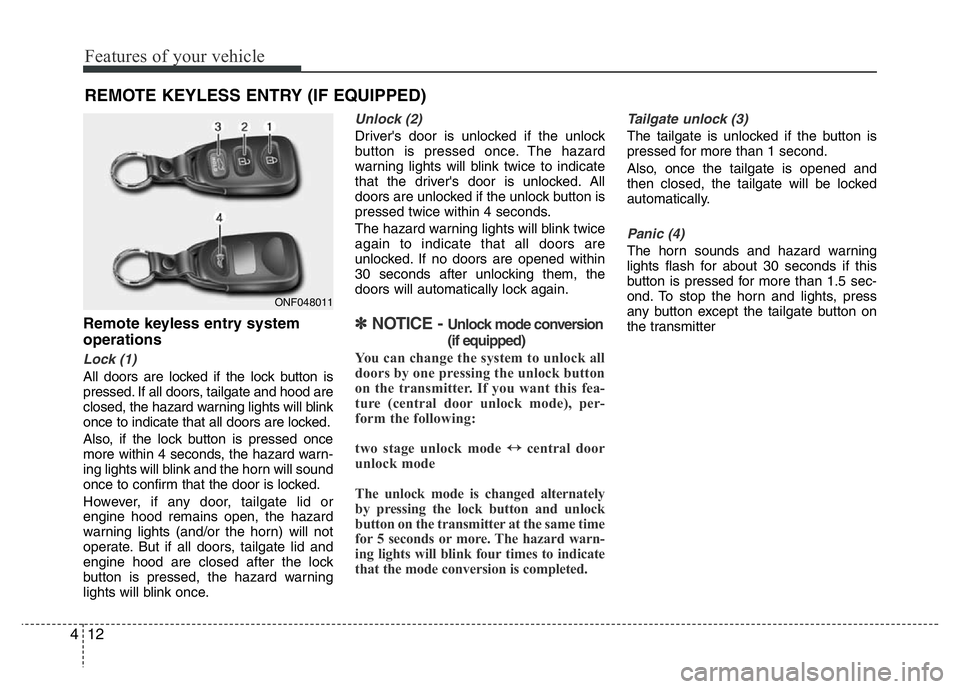
Lock (1)
All doors are locked if the lock button is
pressed. If all doors, tailgate and hood are
closed, the hazard warning lights will blink
once to indicate that all doors are locked.
Also, if the lock button is pressed once
more within 4 seconds, the hazard warn-
ing lights will blink and the horn will sound
once to confirm that the door is locked.
However, if any door, tailgate lid or
engine hood remains open, the hazard
warning lights (and/or the horn) will not
operate. But if all doors, tailgate lid and
engine hood are closed after the lock
button is pressed, the hazard warning
lights will blink once.
Unlock (2)
Driver's door is unlocked if the unlock
button is pressed once. The hazard
warning lights will blink twice to indicate
that the driver's door is unlocked. All
doors are unlocked if the unlock button is
pressed twice within 4 seconds.
The hazard warning lights will blink twice
again to indicate that all doors are
unlocked. If no doors are opened within
30 seconds after unlocking them, the
doors will automatically lock again.
✽NOTICE - Unlock mode conversion
(if equipped)
You can change the system to unlock all
doors by one pressing the unlock button
on the transmitter. If you want this fea-
ture (central door unlock mode), per-
form the following:
two stage unlock mode
↔central door
unlock mode
The unlock mode is changed alternately
by pressing the lock button and unlock
button on the transmitter at the same time
for 5 seconds or more. The hazard warn-
ing lights will blink four times to indicate
that the mode conversion is completed.
Tailgate unlock (3)
The tailgate is unlocked if the button is
pressed for more than 1 second.
Also, once the tailgate is opened and
then closed, the tailgate will be locked
automatically.
Panic (4)
The horn sounds and hazard warning
lights flash for about 30 seconds if this
button is pressed for more than 1.5 sec-
ond. To stop the horn and lights, press
any button except the tailgate button on
the transmitter
REMOTE KEYLESS ENTRY (IF EQUIPPED)
ONF048011
Page 96 of 406
419
Features of your vehicle
Operating door locks from out-
side the vehicle
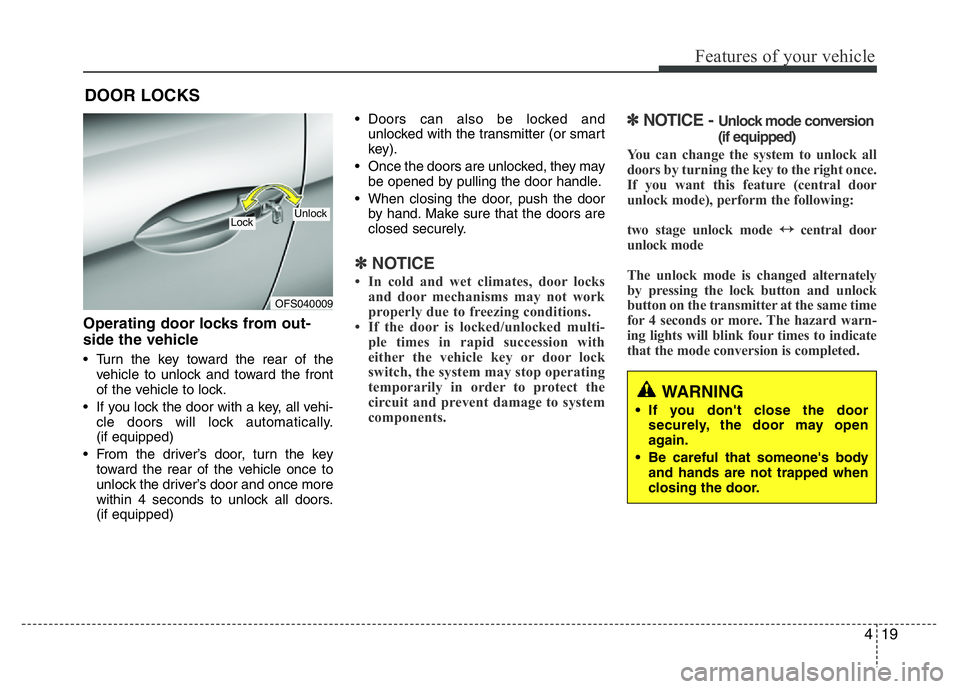
• Turn the key toward the rear of the
vehicle to unlock and toward the front
of the vehicle to lock.
• If you lock the door with a key, all vehi-
cle doors will lock automatically.
(if equipped)
• From the driver’s door, turn the key
toward the rear of the vehicle once to
unlock the driver’s door and once more
within 4 seconds to unlock all doors.
(if equipped)• Doors can also be locked and
unlocked with the transmitter (or smart
key).
• Once the doors are unlocked, they may
be opened by pulling the door handle.
• When closing the door, push the door
by hand. Make sure that the doors are
closed securely.
✽NOTICE
• In cold and wet climates, door locks
and door mechanisms may not work
properly due to freezing conditions.
• If the door is locked/unlocked multi-
ple times in rapid succession with
either the vehicle key or door lock
switch, the system may stop operating
temporarily in order to protect the
circuit and prevent damage to system
components.
✽NOTICE - Unlock mode conversion
(if equipped)
You can change the system to unlock all
doors by turning the key to the right once.
If you want this feature (central door
unlock mode), perform the following:
two stage unlock mode
↔central door
unlock mode
The unlock mode is changed alternately
by pressing the lock button and unlock
button on the transmitter at the same time
for 4 seconds or more. The hazard warn-
ing lights will blink four times to indicate
that the mode conversion is completed.
DOOR LOCKS
WARNING
• If you don't close the door
securely, the door may open
again.
• Be careful that someone's body
and hands are not trapped when
closing the door.
OFS040009
UnlockLock
Page 119 of 406
Features of your vehicle
42 4
Flex steering wheel
(if equipped)
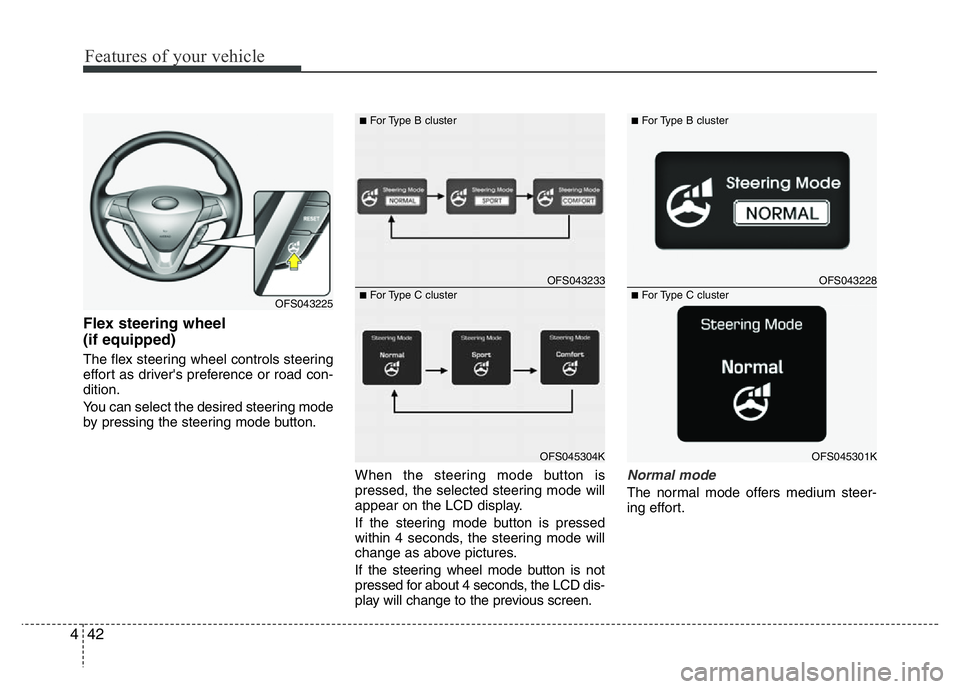
The flex steering wheel controls steering
effort as driver's preference or road con-
dition.
You can select the desired steering mode
by pressing the steering mode button.
When the steering mode button is
pressed, the selected steering mode will
appear on the LCD display.
If the steering mode button is pressed
within 4 seconds, the steering mode will
change as above pictures.
If the steering wheel mode button is not
pressed for about 4 seconds, the LCD dis-
play will change to the previous screen.
Normal mode
The normal mode offers medium steer-
ing effort.
OFS043225
OFS043233
■For Type B cluster
OFS045304K
■For Type C clusterOFS043228
■For Type B cluster
OFS045301K
■For Type C cluster
Page 120 of 406
443
Features of your vehicle
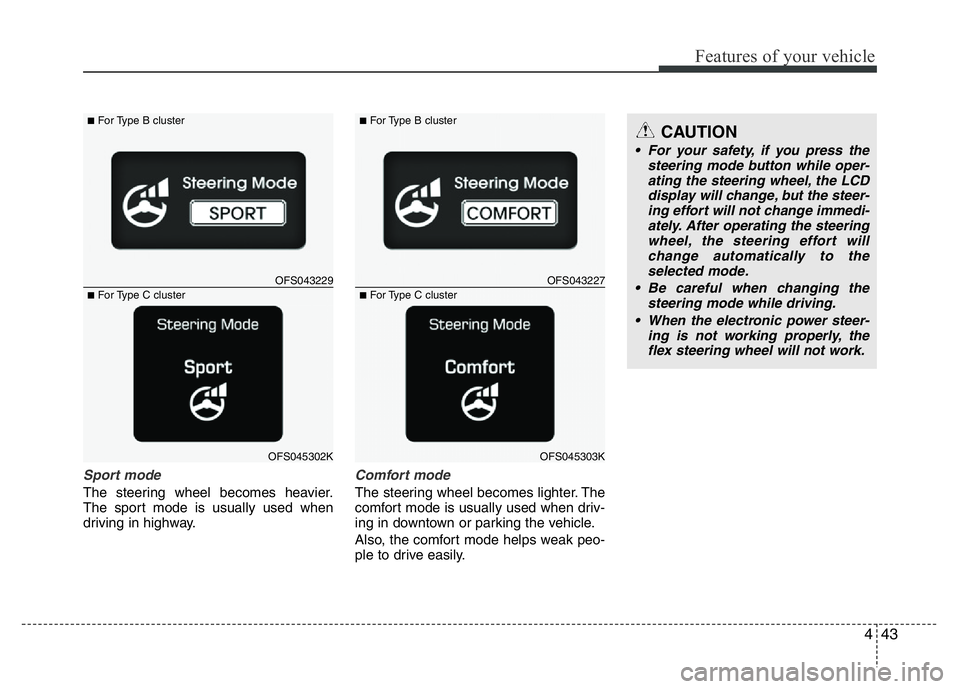
Sport mode
The steering wheel becomes heavier.
The sport mode is usually used when
driving in highway.
Comfort mode
The steering wheel becomes lighter. The
comfort mode is usually used when driv-
ing in downtown or parking the vehicle.
Also, the comfort mode helps weak peo-
ple to drive easily.
OFS043229
■For Type B cluster
OFS045302K
■For Type C clusterOFS043227
■For Type B cluster
OFS045303K
■For Type C cluster
CAUTION
• For your safety, if you press the
steering mode button while oper-
ating the steering wheel, the LCD
display will change, but the steer-
ing effort will not change immedi-
ately. After operating the steering
wheel, the steering effort will
change automatically to the
selected mode.
• Be careful when changing the
steering mode while driving.
• When the electronic power steer-
ing is not working properly, the
flex steering wheel will not work.
Page 130 of 406
453
Features of your vehicle
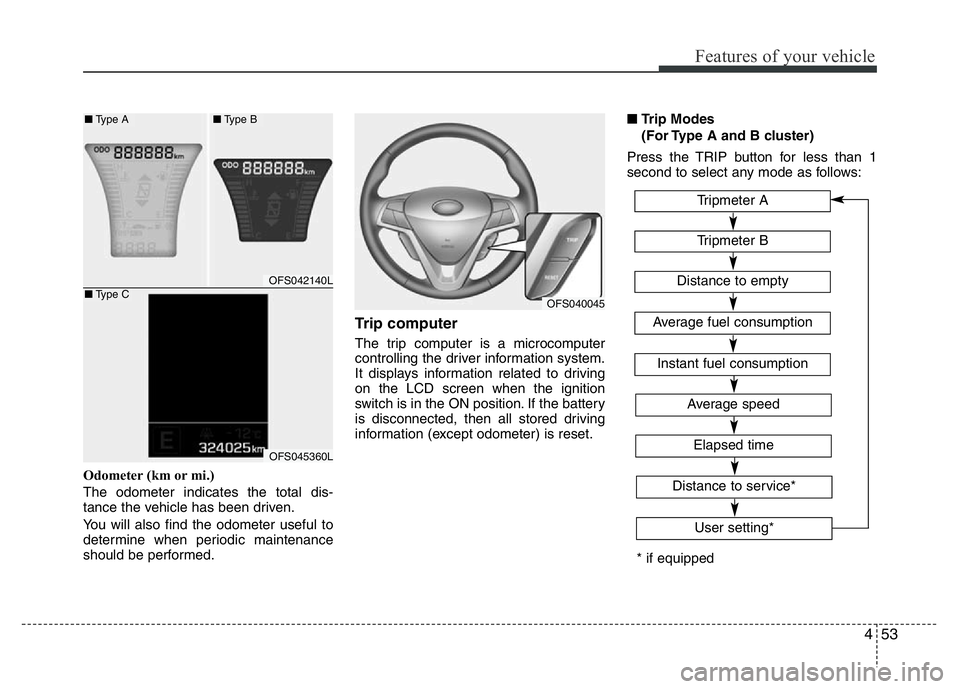
Odometer (km or mi.)
The odometer indicates the total dis-
tance the vehicle has been driven.
You will also find the odometer useful to
determine when periodic maintenance
should be performed.
Trip computer
The trip computer is a microcomputer
controlling the driver information system.
It displays information related to driving
on the LCD screen when the ignition
switch is in the ON position. If the battery
is disconnected, then all stored driving
information (except odometer) is reset.■Trip Modes
(For Type A and B cluster)
Press the TRIP button for less than 1
second to select any mode as follows:
OFS040045
OFS042140L
OFS045360L
■Type A■Type B
■Type C
* if equippedTripmeter B
Instant fuel consumption
Tripmeter A
Distance to empty
Average fuel consumption
Elapsed time
Average speed
Distance to service*
User setting*