2016 HYUNDAI VELOSTER TURBO sensor
[x] Cancel search: sensorPage 156 of 406
479
Features of your vehicle
• The sensing distance while the rear
parking assist system is in operation is
approximately 120 cm (47 in.).
• When more than two objects are
sensed at the same time, the closest
one will be recognized first.Types of warning sound
• When an object is 120 cm to 81 cm (47
in. to 32 in.) from the rear bumper:
Buzzer beeps intermittently
• When an object is 80 cm to 41 cm (31
in. to 16 in.) from the rear bumper:
Buzzer beeps more frequently
• When an object is within 40 cm (15 in.)
of the rear bumper:
Buzzer sounds continuously.
Non-operational conditions of
rear parking assist system
The rear parking assist system may
not operate properly when:
1. Moisture is frozen to the sensor. (It will
operate normally when the moisture
has been cleared.)
2. The sensor is covered with foreign
matter, such as snow or water, or the
sensor cover is blocked. (It will operate
normally when the material is removed
or the sensor is no longer blocked.)
3. Driving on uneven road surfaces
(unpaved roads, gravel, bumps, gradi-
ent).
4. Objects generating excessive noise
(vehicle horns, loud motorcycle
engines, or truck air brakes) are within
range of the sensor.
5. Heavy rain or water spray exists.
6. Wireless transmitters or mobile
phones are within range of the sensor.
7. Trailer towing.
Page 157 of 406
Features of your vehicle
80 4
The detecting range may decrease
when:
1. The sensor is stained with foreign mat-
ter such as snow or water. (The sens-
ing range will return to normal when
removed.)
2. Outside air temperature is extremely
hot or cold.
The following objects may not be rec-
ognized by the sensor:
1. Sharp or slim objects such as ropes,
chains or small poles.
2. Objects which tend to absorb the sen-
sor frequency such as clothes, spongy
material or snow.
3. Undetectable objects smaller than 1 m
(40 in.) and narrower than 14 cm (6 in.)
in diameter.Rear parking assist system pre-
cautions
• The rear parking assist system may
not sound sequentially depending on
the speed and shapes of the objects
detected.
• The rear parking assist system may
malfunction if the vehicle bumper
height or sensor installation has been
modified or damaged. Any non-factory
installed equipment or accessories
may also interfere with the sensor per-
formance.
• The sensor may not recognize objects
less than 40 cm (15 in.) from the sen-
sor, or it may sense an incorrect dis-
tance. Use caution.
• When the sensor is frozen or stained
with snow, dirt, or water, the sensor
may be inoperative until the stains are
removed using a soft cloth.
• Do not push, scratch or strike the sen-
sor. Sensor damage could occur.
✽NOTICE
This system can only sense objects with-
in the range and location of the sensors;
it can not detect objects in other areas
where sensors are not installed. Also,
small or slim objects, such as poles or
objects located between sensors may not
be detected by the sensors.
Always visually check behind the vehi-
cle when backing up.
Be sure to inform any drivers of the
vehicle that may be unfamiliar with the
system regarding the systems capabili-
ties and limitations.
WARNING
Pay close attention when the vehi-
cle is driven close to objects on the
road, particularly pedestrians, and
especially children. Be aware that
some objects may not be detected
by the sensors, due to the object’s
distance, size or material, all of
which can limit the effectiveness of
the sensor. Always perform a visu-
al inspection to make sure the vehi-
cle is clear of all obstructions
before moving the vehicle in any
direction.
Page 162 of 406
485
Features of your vehicle
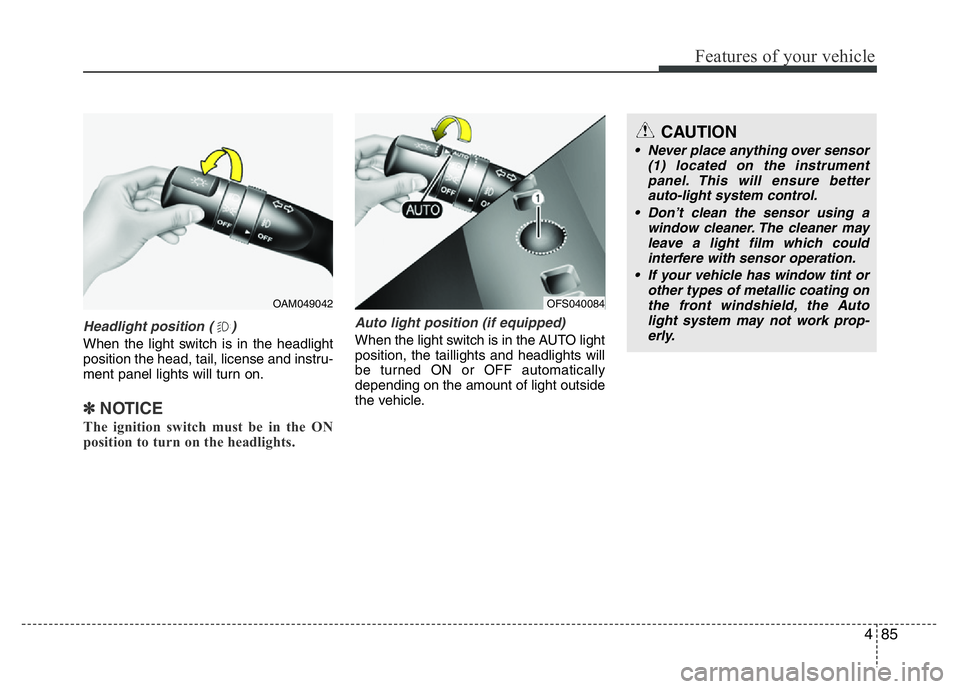
Headlight position ( )
When the light switch is in the headlight
position the head, tail, license and instru-
ment panel lights will turn on.
✽NOTICE
The ignition switch must be in the ON
position to turn on the headlights.
Auto light position (if equipped)
When the light switch is in the AUTO light
position, the taillights and headlights will
be turned ON or OFF automatically
depending on the amount of light outside
the vehicle.
CAUTION
• Never place anything over sensor
(1) located on the instrument
panel. This will ensure better
auto-light system control.
• Don’t clean the sensor using a
window cleaner. The cleaner may
leave a light film which could
interfere with sensor operation.
• If your vehicle has window tint or
other types of metallic coating on
the front windshield, the Auto
light system may not work prop-
erly.
OFS040084OAM049042
Page 183 of 406
Features of your vehicle
106 4
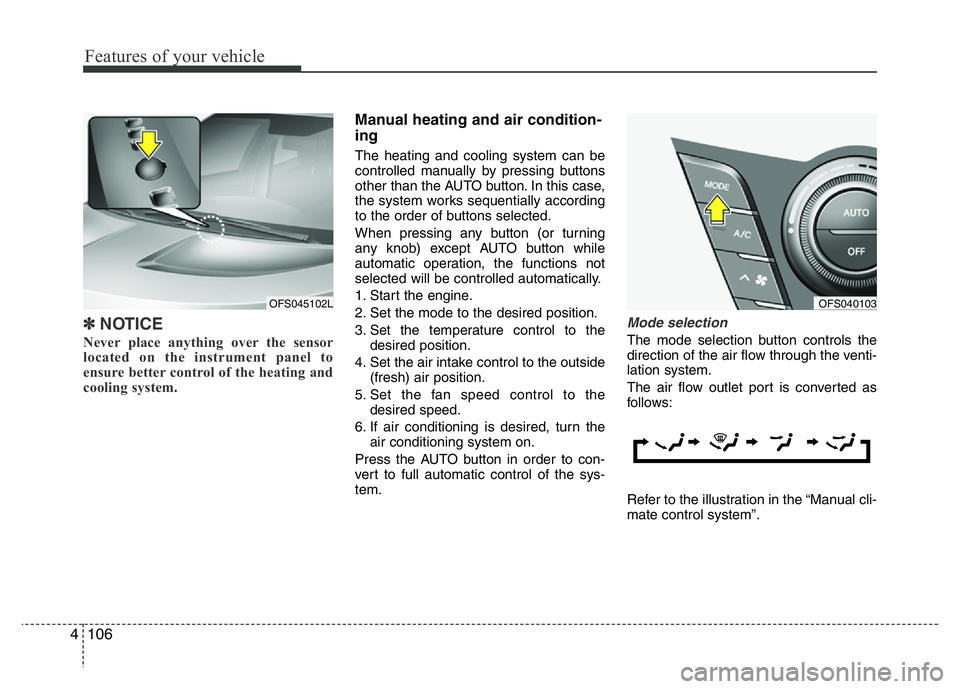
✽NOTICE
Never place anything over the sensor
located on the instrument panel to
ensure better control of the heating and
cooling system.
Manual heating and air condition-
ing
The heating and cooling system can be
controlled manually by pressing buttons
other than the AUTO button. In this case,
the system works sequentially according
to the order of buttons selected.
When pressing any button (or turning
any knob) except AUTO button while
automatic operation, the functions not
selected will be controlled automatically.
1. Start the engine.
2. Set the mode to the desired position.
3. Set the temperature control to the
desired position.
4. Set the air intake control to the outside
(fresh) air position.
5. Set the fan speed control to the
desired speed.
6. If air conditioning is desired, turn the
air conditioning system on.
Press the AUTO button in order to con-
vert to full automatic control of the sys-
tem.
Mode selection
The mode selection button controls the
direction of the air flow through the venti-
lation system.
The air flow outlet port is converted as
follows:
Refer to the illustration in the “Manual cli-
mate control system”.
OFS040103OFS045102L
Page 192 of 406
4115
Features of your vehicle
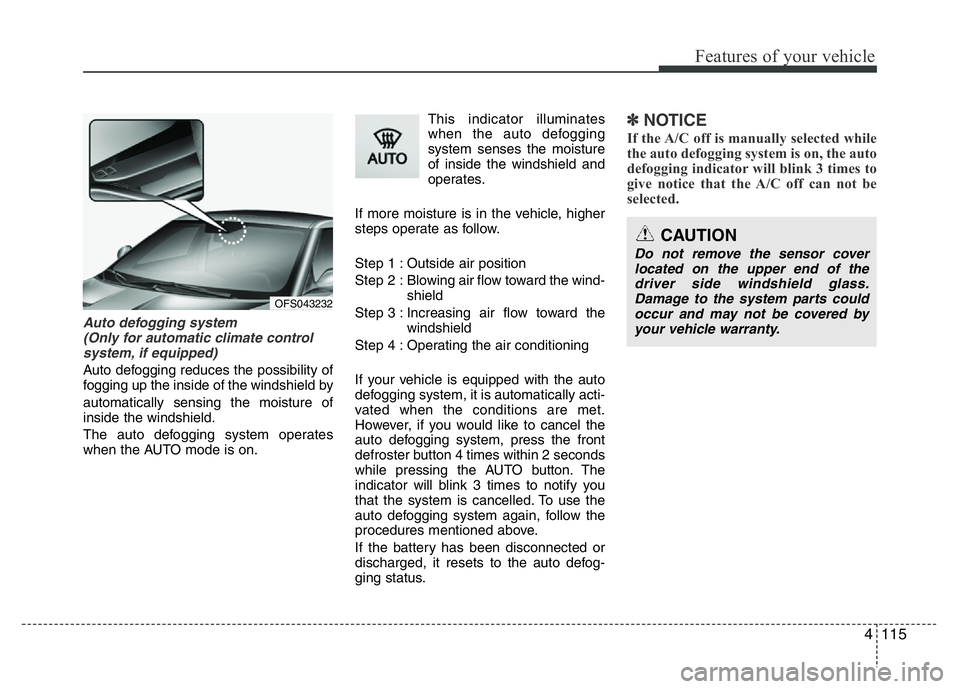
Auto defogging system
(Only for automatic climate control
system, if equipped)
Auto defogging reduces the possibility of
fogging up the inside of the windshield by
automatically sensing the moisture of
inside the windshield.
The auto defogging system operates
when the AUTO mode is on.This indicator illuminates
when the auto defogging
system senses the moisture
of inside the windshield and
operates.
If more moisture is in the vehicle, higher
steps operate as follow.
Step 1 : Outside air position
Step 2 : Blowing air flow toward the wind-
shield
Step 3 : Increasing air flow toward the
windshield
Step 4 : Operating the air conditioning
If your vehicle is equipped with the auto
defogging system, it is automatically acti-
vated when the conditions are met.
However, if you would like to cancel the
auto defogging system, press the front
defroster button 4 times within 2 seconds
while pressing the AUTO button. The
indicator will blink 3 times to notify you
that the system is cancelled. To use the
auto defogging system again, follow the
procedures mentioned above.
If the battery has been disconnected or
discharged, it resets to the auto defog-
ging status.
✽NOTICE
If the A/C off is manually selected while
the auto defogging system is on, the auto
defogging indicator will blink 3 times to
give notice that the A/C off can not be
selected.
OFS043232
CAUTION
Do not remove the sensor cover
located on the upper end of the
driver side windshield glass.
Damage to the system parts could
occur and may not be covered by
your vehicle warranty.
Page 289 of 406
611
What to do in an emergency
Changing a tire with TPMS
If you have a flat tire, the Low Tire
Pressure will come on. Have the flat
tire repaired by an authorized
HYUNDAI dealer as soon as possi-
ble or replace the flat tire with the
spare tire (if equipped).Each wheel is equipped with a tire
pressure sensor mounted inside the
tire behind the valve stem. You must
use TPMS specific wheels. It is rec-
ommended that you always have
your tires serviced by an authorized
HYUNDAI dealer.
Even if you replace the low pressure
tire with the spare tire, the Low Tire
Pressure Telltale will blink or remain
on until the low pressure tire is
repaired and placed on the vehicle.
After you replace the low pressure
tire with the spare tire (if equipped),
the Low Tire Pressure Telltale may
blink or illuminate after a few minutes
because no TPMS sensor mounted
on the spare wheel.
Once the low pressure tire is reinflat-
ed to the recommended pressure
and installed on the vehicle the
TPMS malfunction indicator and the
low tire pressure telltale will extin-
guish within a few minutes of driving.If the indicator is not extinguished
after a few minutes of driving, please
visit an authorized HYUNDAI dealer.
You may not be able to identify a low
tire by simply looking at it. Always
use a good quality tire pressure
gauge to measure the tire's inflation
pressure. Please note that a tire that
is hot (from being driven) will have a
higher pressure measurement than a
tire that is cold.
A cold tire means the vehicle has
been sitting for 3 hours and driven for
less than 1.6 km (1 mile) in that 3
hour period.
Allow the tire to cool before measur-
ing the inflation pressure. Always be
sure the tire is cold before inflating to
the recommended pressure.
CAUTION
Never use a puncture-repairing
agent not approved by HYUNDAI
to repair and/or inflate a low
pressure tire. The tire sealant not
approved by HYUNDAI may dam-
age the tire pressure sensor.
The sealant on the tire pressure
sensor and wheel shall be elem-
inated when you replace the tire
with a new one.
Page 290 of 406
What to do in an emergency
12 6
This device complies with Industry
Canada Standard RSS-210
Operation is subject to the following
two conditions:
1.This device may not cause harmful
interference, and
2.This device must accept any inter-
ference received, including inter-
ference that may cause undesired
operation.
CAUTION
Do not use any tire sealant
except the Tire Mobility Kit
approved by HYUNDAI if your
vehicle is equipped with a Tire
Pressure Monitoring System.
The liquid sealant can damage
the tire pressure sensors.
WARNING - Protecting
TPMS
Tampering with, modifying, or
disabling the Tire Pressure
Monitoring System (TPMS) com-
ponents may interfere with the
system's ability to warn the driv-
er of low tire pressure condi-
tions and/or TPMS malfunctions.
Tampering with, modifying, or
disabling the Tire Pressure
Monitoring System (TPMS) com-
ponents may void the warranty
for that portion of the vehicle.
WARNING- TPMS
• The TPMS cannot alert you to
severe and sudden tire dam-
age caused by external fac-
tors such as nails or road
debris.
• If you feel any vehicle instabil-
ity, immediately take your foot
off the accelerator, apply the
brakes gradually and with
light force, and slowly move to
a safe position off the road.WARNING
Changes or modifications not
expressly approved by the party
responsible for compliance
could void the user’s authority
to operate the equipment.
Page 303 of 406
625
What to do in an emergency
Distributing the sealant
11. Immediately drive approximately
7~10km (4~6miles or, about
10min) to evenly distribute the
sealant in the tire.
Do not exceed a speed of 80 km/h
(50 mph). If possible, do not fall
below a speed of 20 km/h (12 mph).
While driving, if you experience any
unusual vibration, ride disturbance or
noise, reduce your speed and drive
with caution until you can safely pull
off of the side of the road.
Call for road side service or towing.
When you use the Tire Mobility Kit,
the tire pressure sensors and wheel
may be damaged by sealant, remove
the sealant stained with tire pressure
sensors and wheel and inspect in
authorized dealer.Checking the tire inflation pres-
sure
1.After driving approximately 7~10km
(4~6miles or about 10min), stop at
a safety location.
2.Connect connection hose (9) of the
compressor directly to the tire
valve.
3.Plug the compressor power cord
into the vehicle power outlet.
4.Adjust the tire inflation pressure to
the recomended tire inflation.
With the ignition swithched on, pro-
ceed as follows.
- To increase the inflation pres-
sure :Switch on the compressor,
position I. To check the current
inflation pressure setting, briefly
switch off the compressor.✽NOTICE
The pressure gauge may show high-
er than actual reading when the
compressor is running. To get an
accurate tire pressure, the compres-
sor needs to be turned off.
- To reduce the inflation pres-
sure:Press the button (8) on the
compressor.