2016 HYUNDAI VELOSTER TURBO warning
[x] Cancel search: warningPage 294 of 406

What to do in an emergency
16 6
8. Place the jack at the front or rear
jacking position closest to the tire
you are changing. Place the jack
at the designated locations under
the frame.9. Insert the jack handle into the jack
and turn it clockwise, raising the
vehicle until the tire just clears the
ground. This measurement is
approximately 30 mm (1.2 in).
Before removing the wheel lug
nuts, make sure the vehicle is sta-
ble and that there is no chance for
movement or slippage.
10. Loosen the wheel nuts and
remove them with your fingers.
Slide the wheel off the studs and
lay it flat so it cannot roll away. To
put the wheel on the hub, pick up
the spare tire, line up the holes
with the studs and slide the wheel
onto them.If this is difficult, tip the wheel
slightly and get the top hole in the
wheel lined up with the top stud.
Then jiggle the wheel back and
forth until the wheel can be slid
over the other studs.
WARNING- Jack location
To reduce the possibility of
injury, be sure to use only the
jack provided with the vehicle
and in the correct jack position;
never use any other part of the
vehicle for jack support.
OFS060011OFS062012
WARNING
Wheels may have sharp edges.
Handle them carefully to avoid
possible severe injury. Before
putting the wheel into place, be
sure that there is nothing on the
hub or wheel (such as mud, tar,
gravel, etc.) that prevents the
wheel from fitting firmly against
the hub.
If there is, remove it. If there is
not good contact on the mount-
ing surface between the wheel
and hub, the wheel nuts could
come loose and cause the loss
of a wheel. Loss of a wheel may
result in loss of control of the
vehicle. This may cause serious
injury or death.
Page 296 of 406
What to do in an emergency
18 6
To prevent the jack, jack handle,
wheel lug nut wrench and spare tire
from rattling while the vehicle is in
motion, store them properly.
Important - use of compact spare tire
(if equipped)
If your vehicle is equipped with a
compact spare tire, it will take up less
space than a regular-size tire. This
tire is smaller than a conventional tire
and is designed for temporary use
only.
CAUTION
Your vehicle has metric threads
on the wheel studs and nuts.
Make certain during wheel
removal that the same nuts that
were removed are reinstalled -
or, if replaced, that nuts with
metric threads and the same
chamfer configuration are used.
Installation of a non-metric
thread nut on a metric stud or
vice-versa will not secure the
wheel to the hub properly and
will damage the stud so that it
must be replaced.
Note that most lug nuts do not
have metric threads. Be sure to
use extreme care in checking
for thread style before installing
aftermarket lug nuts or wheels.
If in doubt, consult an author-
ized HYUNDAI dealer.
WARNING- Wheel studs
If the studs are damaged, they
may lose their ability to retain
the wheel. This could lead to the
loss of the wheel and a collision
resulting in serious injuries.
WARNING - Inadequate
spare tire pressure
Check the inflation pressures as
soon as possible after installing
the spare tire. Adjust it to the
specified pressure, if necessary.
Refer to “Tires and wheels” sec-
tion 8.
CAUTION
• You should drive carefully
when the compact spare is in
use. The compact spare
should be replaced by the
proper conventional tire and
rim at the first opportunity.
• The operation of this vehicle
is not recommended with
more than one compact spare
tire in use at the same time.
Page 297 of 406
619
What to do in an emergency
The compact spare should be inflat-
ed to 420 kPa (60 psi).
✽NOTICE
Check the inflation pressure after
installing the spare tire. Adjust it to
the specified pressure, as necessary.
When using a compact spare tire,
observe the following precautions:
• Under no circumstances should you
exceed 80 km/h (50 mph); a higher
speed could damage the tire.
• Ensure that you drive slowly enough
for the road conditions to avoid all
hazards. Any road hazard, such as a
pothole or debris, could seriously
damage the compact spare.
• Any continuous road use of this tire
could result in tire failure, loss of
vehicle control, and possible per-
sonal injury.
• Do not exceed the vehicle’s maxi-
mum load rating or the load-carry-
ing capacity shown on the sidewall
of the compact spare tire.
• Avoid driving over obstacles. The
compact spare tire diameter is
smaller than the diameter of a con-
ventional tire and reduces the
ground clearance approximately
25 mm (1 inch), which could result
in damage to the vehicle.
• Do not take this vehicle through an
automatic car wash while the com-
pact spare tire is installed.• Do not use the compact spare tire
on any other vehicle because this
tire has been designed especially
for your vehicle.
• The compact spare tire’s tread life is
shorter than a regular tire. Inspect
your compact spare tire regularly
and replace worn compact spare
tires with the same size and design,
mounted on the same wheel.
• The compact spare tire should not
be used on any other wheels, nor
should standard tires, snow tires,
wheel covers or trim rings be used
with the compact spare wheel. If
such use is attempted, damage to
these items or other car compo-
nents may occur.
• Do not use more than one compact
spare tire at a time.
• Do not tow a trailer while the com-
pact spare tire is installed.
WARNING
The compact spare tire is for
emergency use only. Do not
operate your vehicle on this
compact spare at speeds over
80 km/h (50 mph). The original
tire should be repaired or
replaced as soon as is possible
to avoid failure of the spare
possibly leading to personal
injury or death.
Page 299 of 406
621
What to do in an emergency
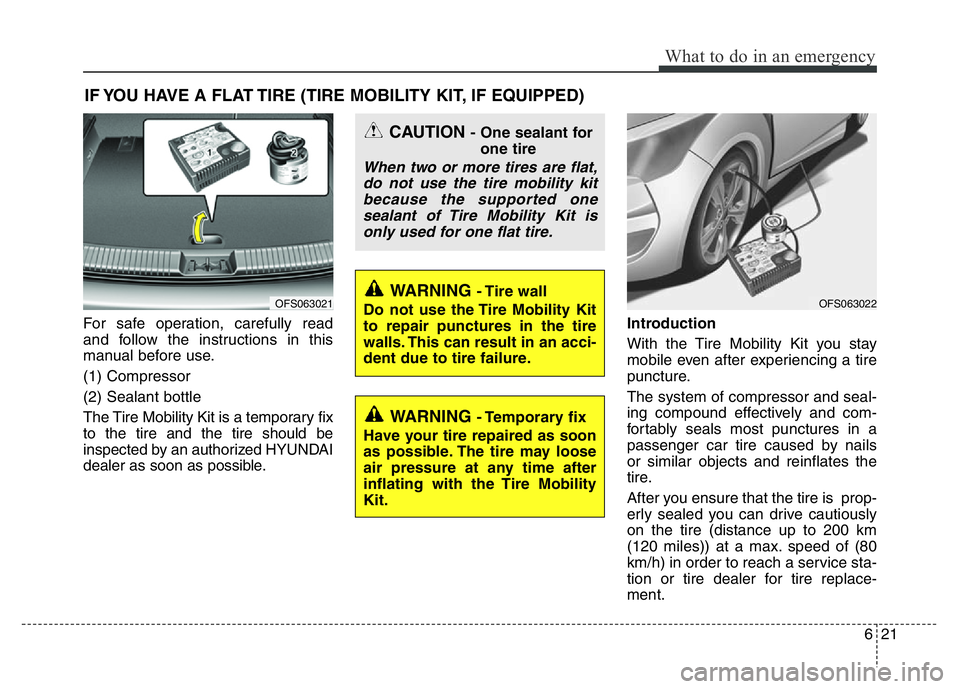
IF YOU HAVE A FLAT TIRE (TIRE MOBILITY KIT, IF EQUIPPED)
For safe operation, carefully read
and follow the instructions in this
manual before use.
(1) Compressor
(2) Sealant bottle
The Tire Mobility Kit is a temporary fix
to the tire and the tire should be
inspected by an authorized HYUNDAI
dealer as soon as possible.Introduction
With the Tire Mobility Kit you stay
mobile even after experiencing a tire
puncture.
The system of compressor and seal-
ing compound effectively and com-
fortably seals most punctures in a
passenger car tire caused by nails
or similar objects and reinflates the
tire.
After you ensure that the tire is prop-
erly sealed you can drive cautiously
on the tire (distance up to 200 km
(120 miles)) at a max. speed of (80
km/h) in order to reach a service sta-
tion or tire dealer for tire replace-
ment.
OFS063021
CAUTION - One sealant for
one tire
When two or more tires are flat,
do not use the tire mobility kit
because the supported one
sealant of Tire Mobility Kit is
only used for one flat tire.
WARNING - Tire wall
Do not use the Tire Mobility Kit
to repair punctures in the tire
walls. This can result in an acci-
dent due to tire failure.
WARNING - Temporary fix
Have your tire repaired as soon
as possible. The tire may loose
air pressure at any time after
inflating with the Tire Mobility
Kit.
OFS063022
Page 301 of 406
623
What to do in an emergency
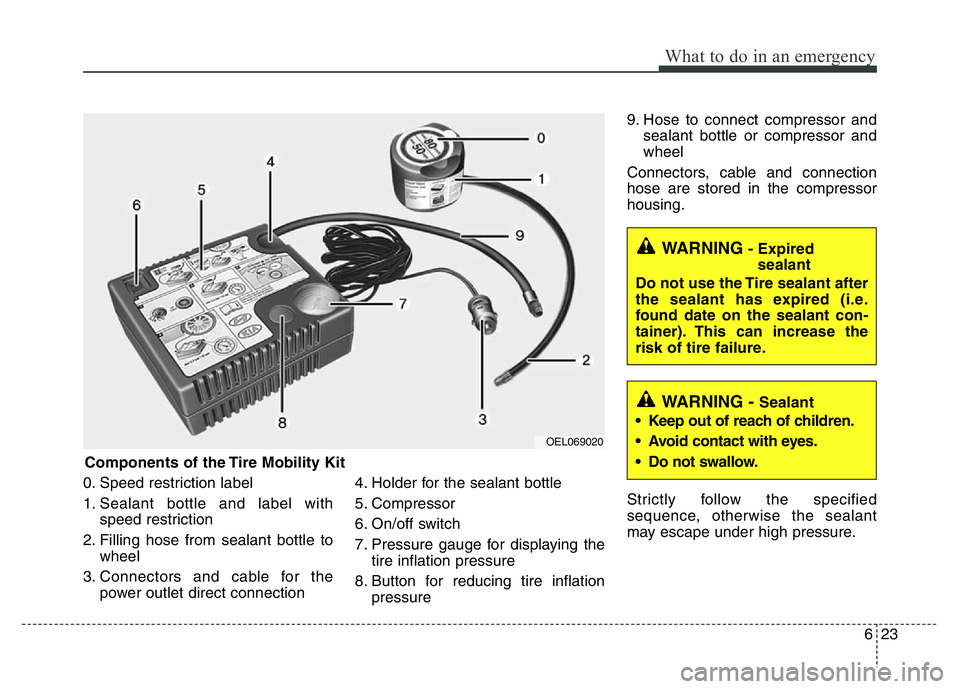
0. Speed restriction label
1. Sealant bottle and label with
speed restriction
2. Filling hose from sealant bottle to
wheel
3. Connectors and cable for the
power outlet direct connection4. Holder for the sealant bottle
5. Compressor
6. On/off switch
7. Pressure gauge for displaying the
tire inflation pressure
8. Button for reducing tire inflation
pressure9. Hose to connect compressor and
sealant bottle or compressor and
wheel
Connectors, cable and connection
hose are stored in the compressor
housing.
Strictly follow the specified
sequence, otherwise the sealant
may escape under high pressure.
WARNING- Expired
sealant
Do not use the Tire sealant after
the sealant has expired (i.e.
found date on the sealant con-
tainer). This can increase the
risk of tire failure.
WARNING - Sealant
• Keep out of reach of children.
• Avoid contact with eyes.
• Do not swallow.
Components of the Tire Mobility Kit
OEL069020
Page 302 of 406
What to do in an emergency
24 6
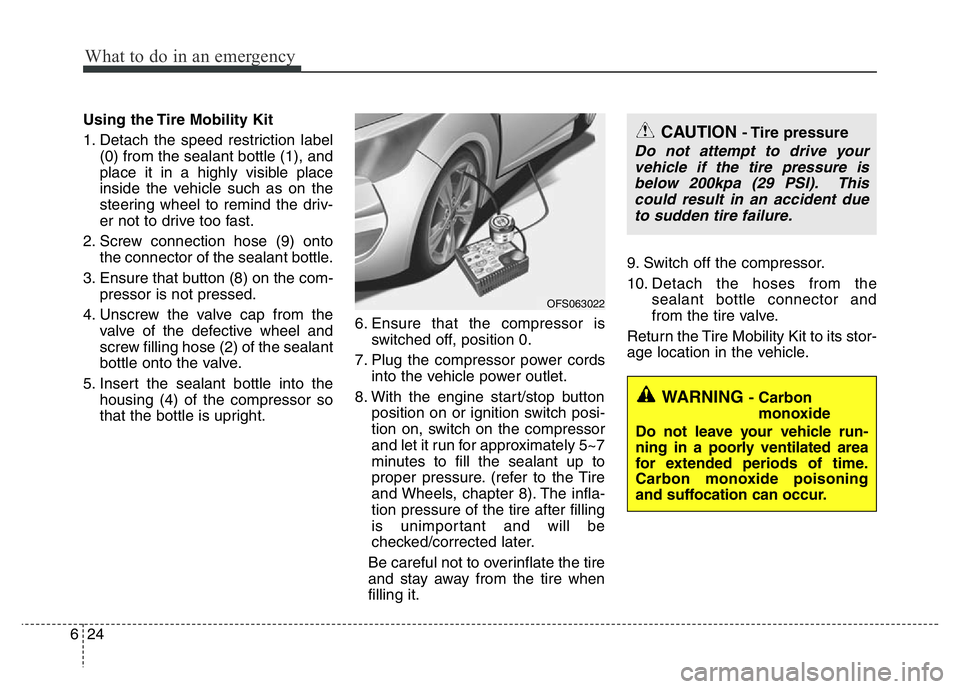
Using the Tire Mobility Kit
1. Detach the speed restriction label
(0) from the sealant bottle (1), and
place it in a highly visible place
inside the vehicle such as on the
steering wheel to remind the driv-
er not to drive too fast.
2. Screw connection hose (9) onto
the connector of the sealant bottle.
3. Ensure that button (8) on the com-
pressor is not pressed.
4. Unscrew the valve cap from the
valve of the defective wheel and
screw filling hose (2) of the sealant
bottle onto the valve.
5. Insert the sealant bottle into the
housing (4) of the compressor so
that the bottle is upright.6. Ensure that the compressor is
switched off, position 0.
7. Plug the compressor power cords
into the vehicle power outlet.
8. With the engine start/stop button
position on or ignition switch posi-
tion on, switch on the compressor
and let it run for approximately 5~7
minutes to fill the sealant up to
proper pressure. (refer to the Tire
and Wheels, chapter 8). The infla-
tion pressure of the tire after filling
is unimportant and will be
checked/corrected later.
Be careful not to overinflate the tire
and stay away from the tire when
filling it.9. Switch off the compressor.
10. Detach the hoses from the
sealant bottle connector and
from the tire valve.
Return the Tire Mobility Kit to its stor-
age location in the vehicle.CAUTION - Tire pressure
Do not attempt to drive your
vehicle if the tire pressure is
below 200kpa (29 PSI). This
could result in an accident due
to sudden tire failure.
WARNING - Carbon
monoxide
Do not leave your vehicle run-
ning in a poorly ventilated area
for extended periods of time.
Carbon monoxide poisoning
and suffocation can occur.
OFS063022
Page 307 of 406
629
What to do in an emergency
If towing service is not available in an
emergency, your vehicle may be tem-
porarily towed using a cable or chain
secured to the emergency towing hook
attached to the front (or under the rear)
of the vehicle.
Use extreme caution when towing the
vehicle. A driver must be in the vehicle to
steer it and operate the brakes.
Towing in this manner may be done only
on hard-surfaced roads for a short dis-
tance and at low speeds. Also, the
wheels, axles, power train, steering and
brakes must all be in good condition.
• Do not use the tow hooks to pull a vehi-
cle out of mud, sand or other condi-
tions from which the vehicle cannot be
driven out under its own power.
• Avoid towing a vehicle heavier than the
vehicle doing the towing.
• The drivers of both vehicles should
communicate with each other frequent-
ly.• Before emergency towing, check that
the hook is not broken or damaged.
• Fasten the towing cable or chain
securely to the hook.
• Do not jerk the hook. Apply steady and
even force.
• To avoid damaging the hook, do not
pull from the side or at a vertical angle.
Always pull straight ahead.CAUTION
• Attach a towing strap to the tow
hook.
• Using a portion of the vehicle
other than the tow hooks for tow-
ing may damage the body of your
vehicle.
• Use only a cable or chain specifi-
cally intended for use in towing
vehicles. Securely fasten the
cable or chain to the towing hook
provided.WARNING
Use extreme caution when towing
the vehicle.
• Avoid sudden starts or erratic
driving maneuvers which would
place excessive stress on the
emergency towing hook and tow-
ing cable or chain. The hook and
towing cable or chain may break
and cause serious injury or dam-
age.
• If the disabled vehicle cannot be
moved, do not forcibly continue
the towing. Contact an authorized
Hyundai dealer or a commercial
tow truck service for assistance.
• Tow the vehicle as straight ahead
as possible.
• Keep away from the vehicle dur-
ing towing.
Page 309 of 406
631
What to do in an emergency
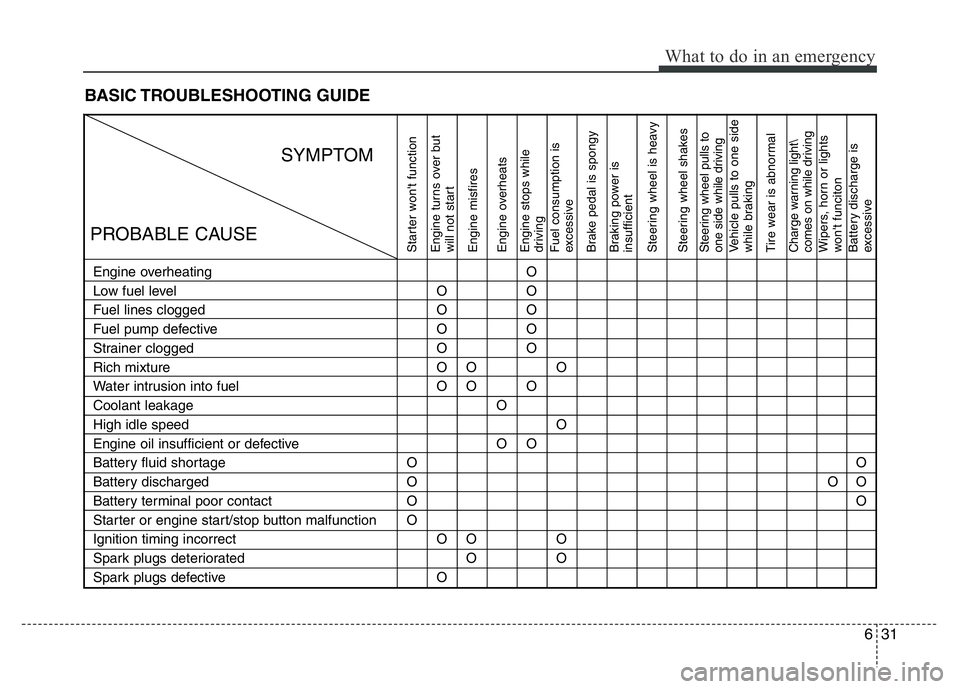
BASIC TROUBLESHOOTING GUIDE
Starter won't function
Engine turns over but
will not start
Engine misfires
Engine overheats
Engine stops while
driving
Fuel consumption is
excessive
Brake pedal is spongy
Braking power is
insufficient
Steering wheel is heavy
Steering wheel shakesSteering wheel pulls to
one side while drivingVehicle pulls to one side
while braking
Tire wear is abnormalCharge warning light\
comes on while drivingWipers, horn or lights
won't funciton
Battery discharge is
excessive
Engine overheating
Low fuel level
Fuel lines clogged
Fuel pump defective
Strainer clogged
Rich mixture
Water intrusion into fuel
Coolant leakage
High idle speed
Engine oil insufficient or defective
Battery fluid shortage
Battery discharged
Battery terminal poor contact
Starter or engine start/stop button malfunction
Ignition timing incorrect
Spark plugs deteriorated
Spark plugs defectiveO
O
O
OO
O
O
O
O
O
O
OO
O
O
OO
OO
O
O
O
O
O
OO
O
O
OOO
O
O
SYMPTOM
PROBABLE CAUSE