2016 HYUNDAI VELOSTER TURBO Rear window
[x] Cancel search: Rear windowPage 14 of 406
Your vehicle at a glance
2 2
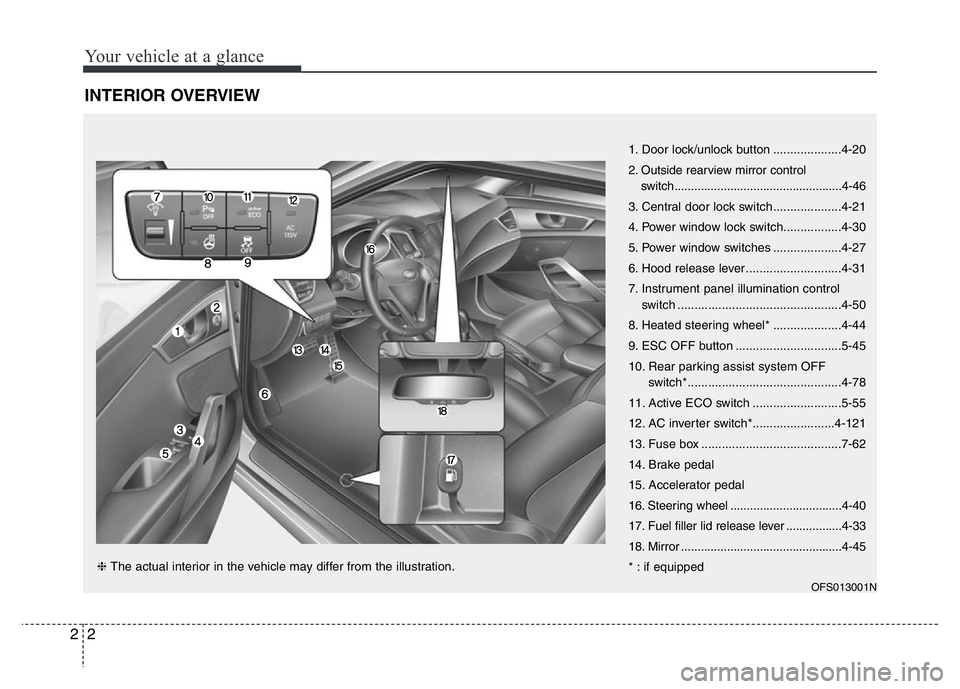
INTERIOR OVERVIEW
OFS013001N
1. Door lock/unlock button ....................4-20
2. Outside rearview mirror control
switch...................................................4-46
3. Central door lock switch....................4-21
4. Power window lock switch.................4-30
5. Power window switches ....................4-27
6. Hood release lever ............................4-31
7. Instrument panel illumination control
switch ................................................4-50
8. Heated steering wheel* ....................4-44
9. ESC OFF button ...............................5-45
10. Rear parking assist system OFF
switch*.............................................4-78
11. Active ECO switch ..........................5-55
12. AC inverter switch*........................4-121
13. Fuse box .........................................7-62
14. Brake pedal
15. Accelerator pedal
16. Steering wheel ..................................4-40
17. Fuel filler lid release lever .................4-33
18. Mirror .................................................4-45
* : if equipped ❈ The actual interior in the vehicle may differ from the illustration.
Page 52 of 406
Safety features of your vehicle
36 3
Noise and smoke
When the air bags inflate, they make a
loud noise and they leave smoke and
powder in the air inside of the vehicle.
This is normal and is a result of the igni-
tion of the air bag inflator. After the air
bag inflates, you may feel substantial dis-
comfort in breathing due to the contact of
your chest with both the seat belt and the
air bag, as well as from breathing the
smoke and powder.Open your doors
and/or windows as soon as possible
after impact in order to reduce dis-
comfort and prevent prolonged expo-
sure to the smoke and powder.
Though smoke and powder are non-
toxic, it may cause irritation to the skin
(eyes, nose and throat, etc.). If this is the
case, wash and rinse with cold water
immediately and consult with the doctor if
the symptom persists.
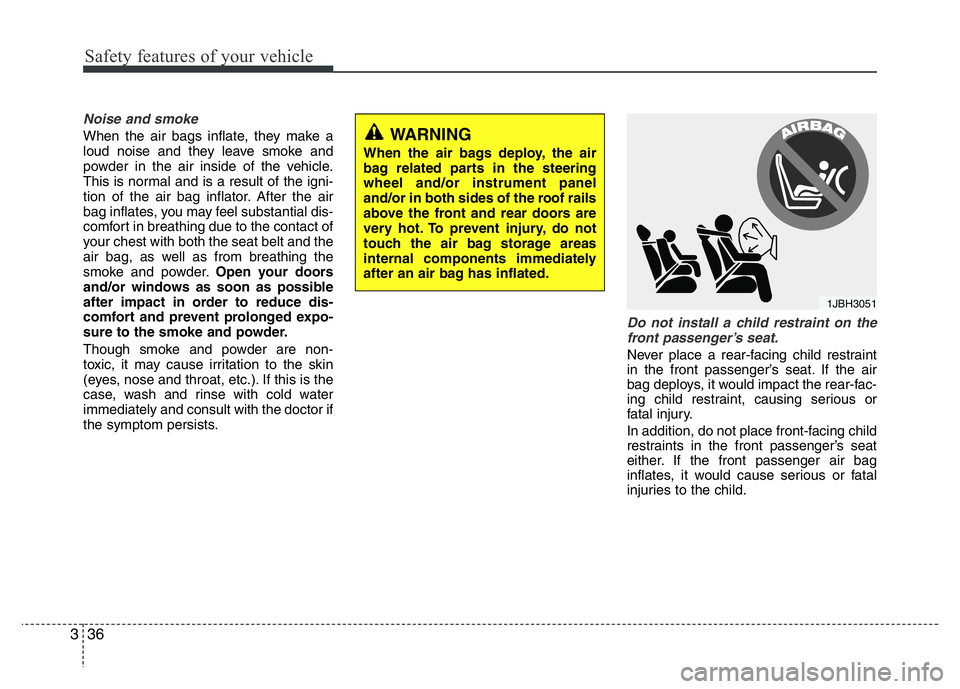
Do not install a child restraint on the
front passenger’s seat.
Never place a rear-facing child restraint
in the front passenger’s seat. If the air
bag deploys, it would impact the rear-fac-
ing child restraint, causing serious or
fatal injury.
In addition, do not place front-facing child
restraints in the front passenger’s seat
either. If the front passenger air bag
inflates, it would cause serious or fatal
injuries to the child.
1JBH3051
WARNING
When the air bags deploy, the air
bag related parts in the steering
wheel and/or instrument panel
and/or in both sides of the roof rails
above the front and rear doors are
very hot. To prevent injury, do not
touch the air bag storage areas
internal components immediately
after an air bag has inflated.
Page 69 of 406
353
Safety features of your vehicle
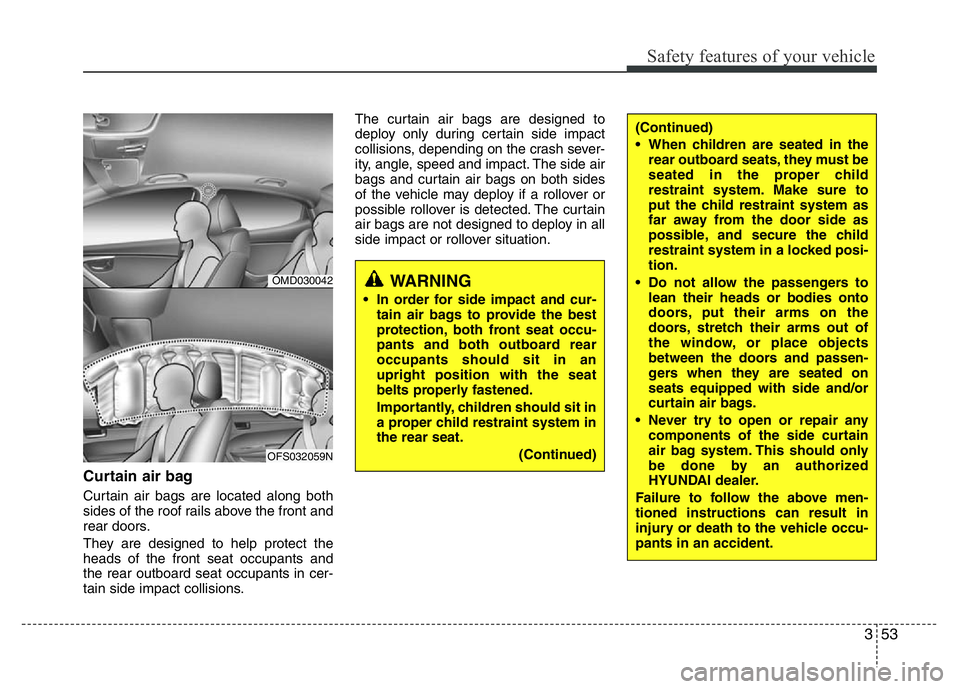
Curtain air bag
Curtain air bags are located along both
sides of the roof rails above the front and
rear doors.
They are designed to help protect the
heads of the front seat occupants and
the rear outboard seat occupants in cer-
tain side impact collisions.The curtain air bags are designed to
deploy only during certain side impact
collisions, depending on the crash sever-
ity, angle, speed and impact. The side air
bags and curtain air bags on both sides
of the vehicle may deploy if a rollover or
possible rollover is detected. The curtain
air bags are not designed to deploy in all
side impact or rollover situation.
WARNING
• In order for side impact and cur-
tain air bags to provide the best
protection, both front seat occu-
pants and both outboard rear
occupants should sit in an
upright position with the seat
belts properly fastened.
Importantly, children should sit in
a proper child restraint system in
the rear seat.
(Continued)
(Continued)
• When children are seated in the
rear outboard seats, they must be
seated in the proper child
restraint system. Make sure to
put the child restraint system as
far away from the door side as
possible, and secure the child
restraint system in a locked posi-
tion.
• Do not allow the passengers to
lean their heads or bodies onto
doors, put their arms on the
doors, stretch their arms out of
the window, or place objects
between the doors and passen-
gers when they are seated on
seats equipped with side and/or
curtain air bags.
• Never try to open or repair any
components of the side curtain
air bag system. This should only
be done by an authorized
HYUNDAI dealer.
Failure to follow the above men-
tioned instructions can result in
injury or death to the vehicle occu-
pants in an accident.
OMD030042
OFS032059N
Page 78 of 406
4
Keys / 4-3
Smart key / 4-6
Remote keyless entry / 4-12
Theft-alarm system / 4-15
Door locks / 4-19
Tailgate / 4-24
Windows / 4-27
Hood / 4-31
Fuel filler lid / 4-33
Sunroof / 4-36
Steering wheel / 4-40
Mirrors / 4-45
Instrument cluster / 4-48
Rear parking assist system / 4-78
Rear view camera / 4-82
Hazard warning flasher / 4-82
Lighting / 4-83
Wipers and washers / 4-88
Interior light / 4-91
Defroster / 4-94
Manual climate control system / 4-95
Automatic climate control system / 4-104
Features of your vehicle
Page 97 of 406
Features of your vehicle
20 4
In case of an emergency
If the power door lock switch does not
operate electrically, the only way to lock
the door(s) is with the ignition key from
the outside key hole.
Doors without the outside key hole, you
can lock the door as follows:
1. Open the door.
2. Lock doors by pushing each lock but-
ton.
3. Close the door securely.
Once the tailgate is closed when the
power door lock switch does not operate
electrically, you will not be able to open
the tailgate.
✽NOTICE
Always remove the ignition key, engage
the parking brake, close all windows
and lock all doors when leaving your
vehicle unattended.
Operating door locks from inside
the vehicle
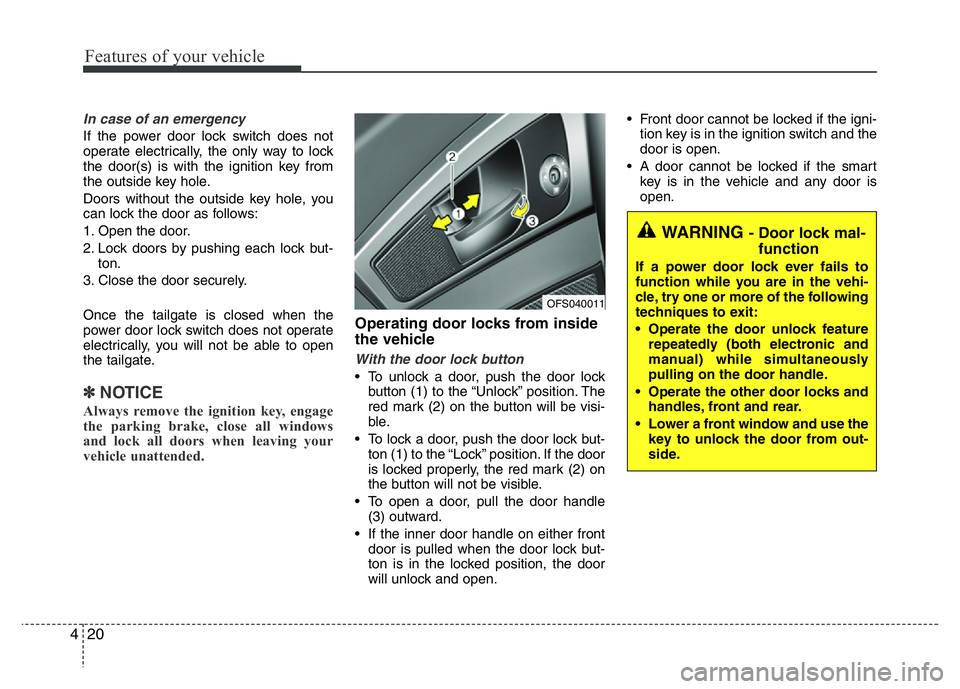
With the door lock button
• To unlock a door, push the door lock
button (1) to the “Unlock” position. The
red mark (2) on the button will be visi-
ble.
• To lock a door, push the door lock but-
ton (1) to the “Lock” position. If the door
is locked properly, the red mark (2) on
the button will not be visible.
• To open a door, pull the door handle
(3) outward.
• If the inner door handle on either front
door is pulled when the door lock but-
ton is in the locked position, the door
will unlock and open.• Front door cannot be locked if the igni-
tion key is in the ignition switch and the
door is open.
• A door cannot be locked if the smart
key is in the vehicle and any door is
open.
WARNING - Door lock mal-
function
If a power door lock ever fails to
function while you are in the vehi-
cle, try one or more of the following
techniques to exit:
• Operate the door unlock feature
repeatedly (both electronic and
manual) while simultaneously
pulling on the door handle.
• Operate the other door locks and
handles, front and rear.
• Lower a front window and use the
key to unlock the door from out-
side.
OFS040011
Page 98 of 406
421
Features of your vehicle
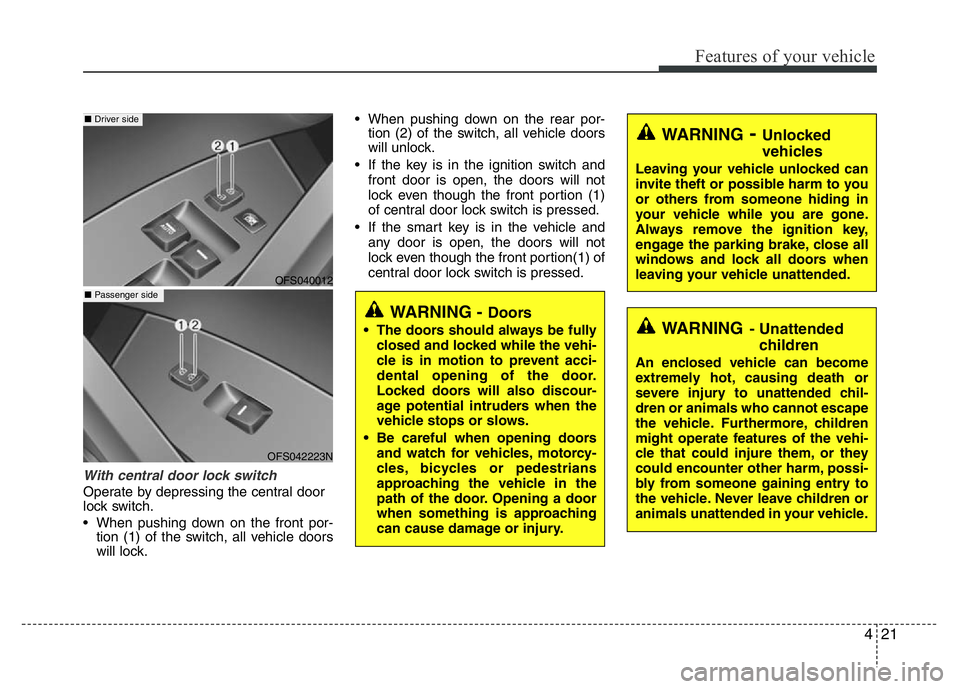
With central door lock switch
Operate by depressing the central door
lock switch.
• When pushing down on the front por-
tion (1) of the switch, all vehicle doors
will lock.• When pushing down on the rear por-
tion (2) of the switch, all vehicle doors
will unlock.
• If the key is in the ignition switch and
front door is open, the doors will not
lock even though the front portion (1)
of central door lock switch is pressed.
• If the smart key is in the vehicle and
any door is open, the doors will not
lock even though the front portion(1) of
central door lock switch is pressed.
WARNING- Unlocked
vehicles
Leaving your vehicle unlocked can
invite theft or possible harm to you
or others from someone hiding in
your vehicle while you are gone.
Always remove the ignition key,
engage the parking brake, close all
windows and lock all doors when
leaving your vehicle unattended.
WARNING- Unattended
children
An enclosed vehicle can become
extremely hot, causing death or
severe injury to unattended chil-
dren or animals who cannot escape
the vehicle. Furthermore, children
might operate features of the vehi-
cle that could injure them, or they
could encounter other harm, possi-
bly from someone gaining entry to
the vehicle. Never leave children or
animals unattended in your vehicle.
WARNING - Doors
• The doors should always be fully
closed and locked while the vehi-
cle is in motion to prevent acci-
dental opening of the door.
Locked doors will also discour-
age potential intruders when the
vehicle stops or slows.
• Be careful when opening doors
and watch for vehicles, motorcy-
cles, bicycles or pedestrians
approaching the vehicle in the
path of the door. Opening a door
when something is approaching
can cause damage or injury.
OFS040012
OFS042223N
■ Driver side
■ Passenger side
Page 104 of 406
427
Features of your vehicle
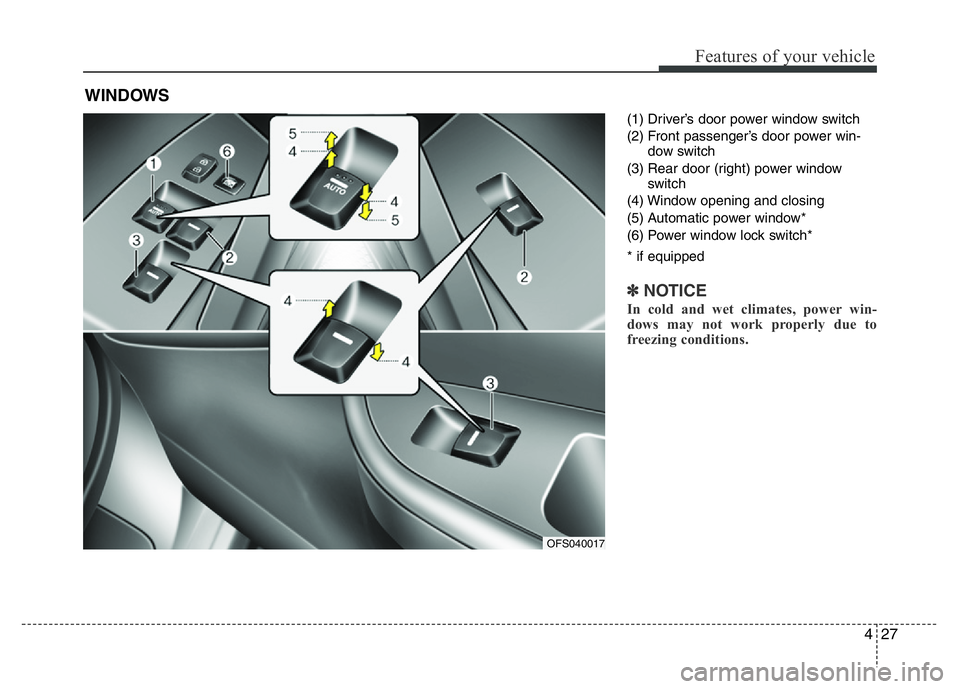
(1) Driver’s door power window switch
(2) Front passenger’s door power win-
dow switch
(3) Rear door (right) power window
switch
(4) Window opening and closing
(5) Automatic power window*
(6) Power window lock switch*
* if equipped
✽NOTICE
In cold and wet climates, power win-
dows may not work properly due to
freezing conditions.
WINDOWS
OFS040017
Page 105 of 406
Features of your vehicle
28 4
Power windows
The ignition switch must be in the ON
position for power windows to operate.
Each door has a power window switch
that controls the door's window. The driv-
er has a master power window switch
that controls all the windows in the vehi-
cle. Also, a power window lock switch
which that can block the operation of rear
passenger windows. The power windows
can be operated for approximately 30
seconds after the ignition key is removed
or turned to the ACC or LOCK position.
However, if the front doors are opened,
the power windows cannot be operated
within the 30 seconds period.
✽NOTICE
While driving with the rear windows
down or with the sunroof (if equipped)
opened (or partially opened), your vehicle
may demonstrate a wind buffeting or pul-
sation noise. This noise is a normal occur-
rence and can be reduced or eliminated by
taking the following actions. If the noise
occurs with the rear windows down, par-
tially lower both front windows approxi-
mately one inch. If you experience the
noise with the sunroof open, slightly
reduce the size of the sunroof opening
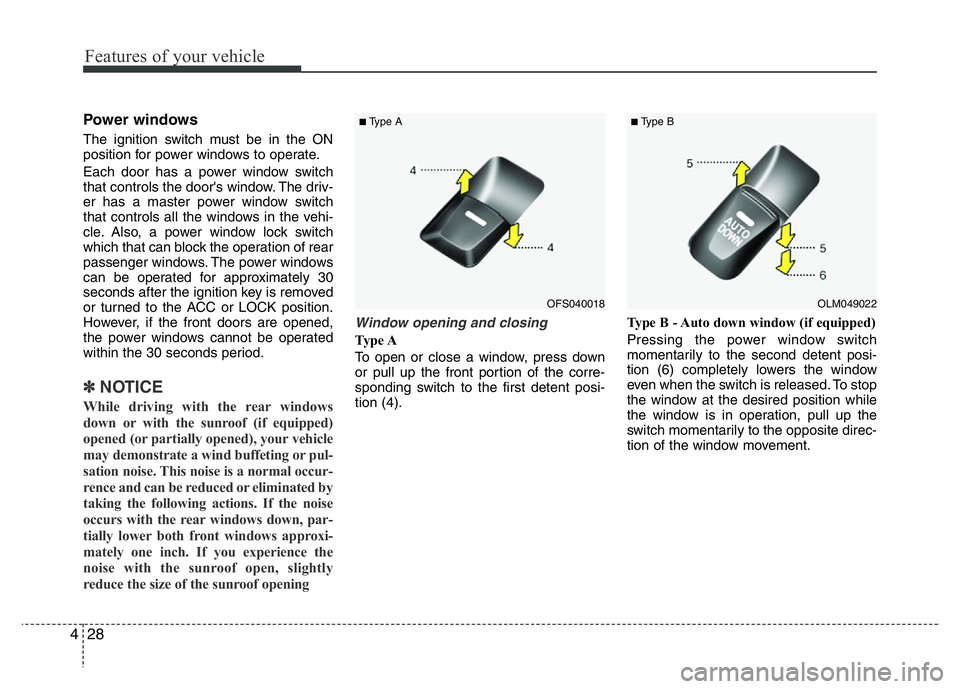
Window opening and closing
Ty p e A
To open or close a window, press down
or pull up the front portion of the corre-
sponding switch to the first detent posi-
tion (4).Type B - Auto down window (if equipped)
Pressing the power window switch
momentarily to the second detent posi-
tion (6) completely lowers the window
even when the switch is released. To stop
the window at the desired position while
the window is in operation, pull up the
switch momentarily to the opposite direc-
tion of the window movement.
OLM049022
■Type B
OFS040018
■Type A