2016 HYUNDAI TUCSON check engine light
[x] Cancel search: check engine lightPage 478 of 642
5-94
Driving your vehicle
Turn signals
When you tow a trailer, your vehicle
has to have a different turn signal
flasher and extra wiring. The green
arrows on your instrument panel will
flash whenever you signal a turn or
lane change. Properly connected,
the trailer lights will also flash to alert
other drivers you're about to turn,
change lanes, or stop.
When towing a trailer, the green
arrows on your instrument panel will
flash for turns even if the bulbs on the
trailer are burned out. Thus, you may
think drivers behind you are seeing
your signals when, in fact, they are
not. It’s important to check occasion-
ally to be sure the trailer bulbs are still
working. You must also check the
lights every time you disconnect and
then reconnect the wires.
Driving on hills
Reduce speed and shift to a lower
gear before you start down a long or
steep downgrade. If you don't shift
down, you might have to use your
brakes so much that they would get
overheated and may not operate effi-
ciently.
On a long uphill grade, shift down
and reduce your speed to around 45mph (70 km/h) to reduce the possi-
bility of engine and transmission
overheating.
If your trailer weighs more than the
maximum trailer weight without trailer
brakes, you should drive in D (Drive)
when towing a trailer. Operating your
vehicle in D (Drive) when towing a
trailer will minimize heat build-up and
extend the life of your transmission.
Do not connect a trailer lighting
system directly to your vehi-
cle’s lighting system. Use an
approved trailer wiring harness.
Failure to do so could result in
damage to the vehicle electrical
system and/or personal injury.
Consult an authorized HYUNDAI
dealer for assistance.WARNING
Page 481 of 642
5-97
Driving your vehicle
5
Maintenance when trailer tow- ing
Your vehicle will need service more
often when you regularly pull a trail-
er. Important items to pay particularattention to include engine oil, auto-
matic transmission fluid, axle lubri-
cant and cooling system fluid. Brake
condition is another important item to
frequently check. If you’re trailering,
it’s a good idea to review these items
before you start your trip. Don't forget
to also maintain your trailer and
hitch. Follow the maintenance sched-
ule that accompanied your trailer and
check it periodically. Preferably,
inspect the vehicle and trailer at the
start of each day's driving. Inspect
the hitch mounting to make sure the
hitch is properly secured to the vehi-
cle. Inspect the trailer electrical
wiring to make sure brake lights, turn
signal lights, running lights, and haz-
ard lights are working properly.To prevent vehicle damage:
Due to higher load during
trailer usage, overheating
might occur on hot days or
during uphill driving. If the
coolant gauge indicates over-
heating, switch off the air con-
ditioner and stop the vehicle
in a safe area to cool down the
engine.
When towing check the auto- matic transmission fluid more
frequently.
(Note: This is not applicable
for vehicles equipped with the
Ecoshift dual clutch transmis-sion.)
CAUTION
Page 490 of 642
6-3
What to do in an emergency
If you Have a Flat Tire While Driving
If a tire goes flat while you are driving:
Take your foot off the acceleratorpedal and let the vehicle slow down
while driving straight ahead. Do not
apply the brakes immediately orattempt to pull off the road as this
may cause loss of vehicle control
resulting in an accident. When the
vehicle has slowed to such a speed
that it is safe to do so, brake care-
fully and pull off the road. Drive off
the road as far as possible and park
on firm, level ground. If you are on
a divided highway, do not park in
the median area between the two
traffic lanes.
When the vehicle is stopped, press the hazard warning flasher button,
move the shift lever into P(Park),
and apply the parking brake, and
place the ignition switch in the LOCK/OFF position.
Have all passengers get out of the vehicle. Be sure they all get out on
the side of the vehicle that is away
from traffic.
When changing a flat tire, follow the instructions provided later in
this chapter.
If the Engine Doesn't Turn
Over or Turns Over Slowly
Be sure the shift lever is in N
(Neutral) or P (Park). The engine
starts only when the shift lever is in
N (Neutral) or P (Park).
Check the battery connections to be sure they are clean and tight.
Turn on the interior light. If the light dims or goes out when you operate
the starter, the battery is drained.
Do not push or pull the vehicle to
start it. This could cause damage to
your vehicle. See instructions for
"Jump Starting" provided in this
chapter.
If the Engine Turns Over
Normally but Doesn't Start
Check the fuel level and add fuel if
necessary.
If the engine still does not start, have
your vehicle checked by an author-
ized HYUNDAI dealer.
6
II FF TT HH EE EE NN GGIINN EE WW IILL LL NN OO TT SS TT AA RRTT
Push or pull starting the vehicle
may cause the catalytic con-
verter to overload which can
lead to damage to the emission
control system.
CAUTION
Page 498 of 642

6-11
What to do in an emergency
6
If any of the below happens, have
the system checked by an author-
ized HYUNDAI dealer.
1. The Low Tire Pressure TPMSMalfunction Indicator does not
illuminate for 3 seconds when
the ignition switch is placed tothe ON position or engine isrunning.
2. The TPMS Malfunction Indicator remains illuminated after blink-
ing for approximately 1 minute.
3. The Low Tire Pressure LCD dis- play remains illuminated
Low tire pressure indicator
Low tire pressure LCD displaywith position indicator
When the tire pressure monitoring
system warning indicators are illumi-
nated and the warning message is
displayed on the cluster LCD display,
one or more of your tires is signifi-
cantly under-inflated. The LCD posi-tion indicator will indicate which tire
is significantly under-inflated by illu-minating the corresponding positionlight. If any of your tire pressures are indi-
cated as being low, immediately
reduce your speed, avoid hard cor-
nering, and anticipate increased
stopping distances. You should stop
and check your tires as soon as pos-
sible. Inflate the tires to the proper
pressure as indicated on the vehi-
cle’s placard or tire inflation pressure
label located on the driver’s side cen-ter pillar outer panel.
If you cannot reach a service station
or if the tire cannot hold the newly
added air, replace the low pressure
tire with the spare tire.
The Low Tire Pressure LCD position indicator will remain on and the
TPMS Malfunction Indicator may
blink for one minute and then remain
illuminated until you have the lowpressure tire repaired and replaced
on the vehicle. The spare tire is not equipped with
a tire pressure sensor.
NOTICE
NOTICE
OTL045154L
Page 520 of 642
7-7
7
Maintenance
Owner Maintenance Schedule
When you stop for fuel:
Check the engine oil level.
Check coolant level in the enginecoolant reservoir.
Check the windshield washer fluid level.
Check for low or under-inflated tires.
While operating your vehicle:
Note any changes in the sound ofthe exhaust or any smell of
exhaust fumes in the vehicle.
Check for vibrations in the steering wheel. Notice if there is any
increased steering effort or loose-
ness in the steering wheel, or
change in its straight-ahead posi-tion.
Notice if your vehicle constantly turns slightly or “pulls” to one side
when traveling on smooth, levelroad.
When stopping, listen and check for unusual sounds, pulling to one
side, increased brake pedal travel
or “hard-to-push” brake pedal.
If any slipping or changes in the operation of your transmission
occurs, check the transmission
fluid level.
Check the automatic transmission/ ecoshift dual clutch transmission P
(Park) function. Check the parking brake.
Check for fluid leaks under your
vehicle (water dripping from the air
conditioning system during or after
use is normal).
At least monthly:
Check coolant level in the enginecoolant reservoir.
Check the operation of all exterior lights, including the stoplights, turn
signals and hazard warning flash-
ers.
Check the inflation pressures of all tires including the spare for tires
that are worn, show uneven wear,or are damaged.
Check for loose wheel lug nuts.
Be careful when checking your
engine coolant level when the
engine is hot. This may result in
coolant being blown out of theopening and cause serious
burns and other injuries.
WARNING
Page 577 of 642
7-64
Maintenance
FFUU SSEE SS
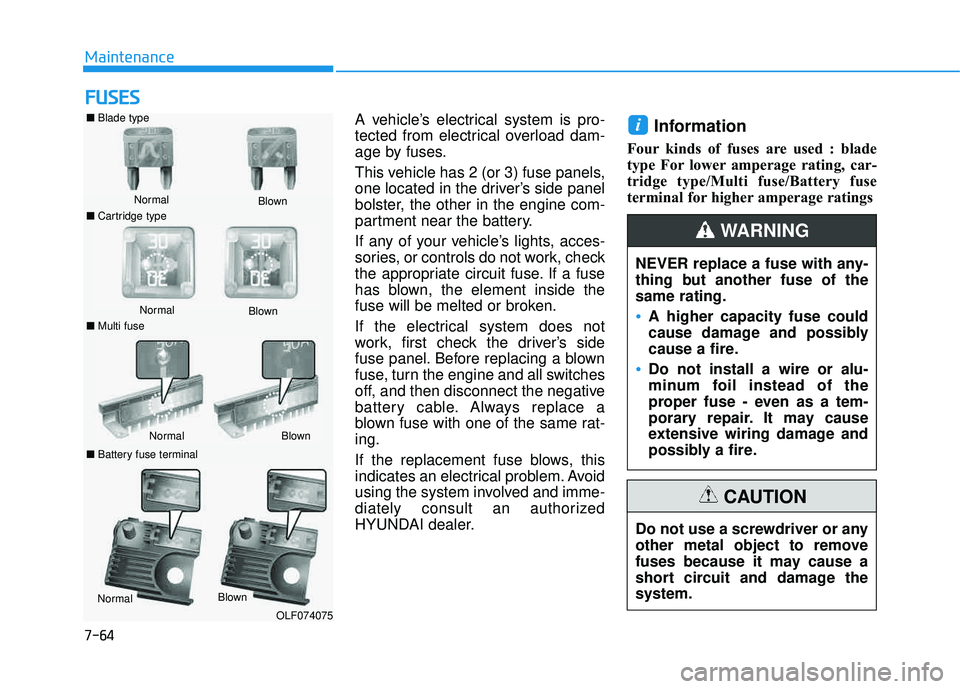
A vehicle’s electrical system is pro-
tected from electrical overload dam-
age by fuses.
This vehicle has 2 (or 3) fuse panels,
one located in the driver’s side panel
bolster, the other in the engine com-
partment near the battery.
If any of your vehicle’s lights, acces-
sories, or controls do not work, check
the appropriate circuit fuse. If a fuse
has blown, the element inside the
fuse will be melted or broken.
If the electrical system does not
work, first check the driver’s side
fuse panel. Before replacing a blown
fuse, turn the engine and all switches
off, and then disconnect the negative
battery cable. Always replace a
blown fuse with one of the same rat-ing.
If the replacement fuse blows, this
indicates an electrical problem. Avoid
using the system involved and imme-
diately consult an authorized
HYUNDAI dealer.Information
Four kinds of fuses are used : blade
type For lower amperage rating, car-
tridge type/Multi fuse/Battery fuse
terminal for higher amperage ratings
i
Do not use a screwdriver or any
other metal object to remove
fuses because it may cause a
short circuit and damage thesystem.
CAUTION
NEVER replace a fuse with any-
thing but another fuse of thesame rating.
A higher capacity fuse could
cause damage and possibly
cause a fire.
Do not install a wire or alu-
minum foil instead of the
proper fuse - even as a tem-
porary repair. It may cause
extensive wiring damage and
possibly a fire.
WARNING
■ Blade type
Normal
■ Cartridge type Blown
Normal
Blown
■ Multi fuse
Normal Blown
■
Battery fuse terminal
Normal Blown
OLF074075
Page 578 of 642
7-65
7
Maintenance
Instrument Panel Fuse Replacement
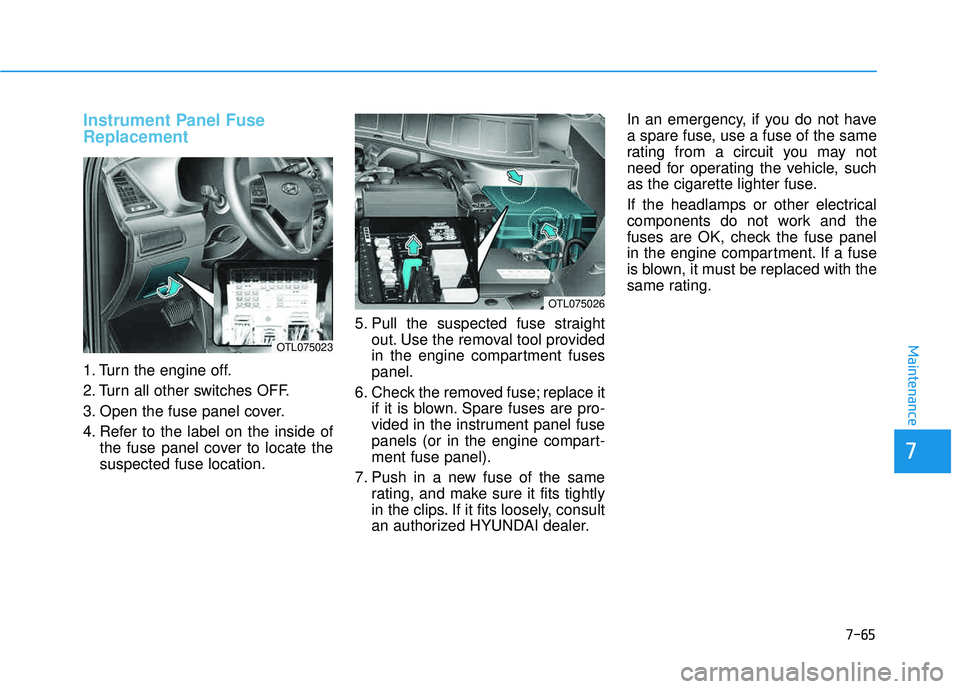
1. Turn the engine off.
2. Turn all other switches OFF.
3. Open the fuse panel cover.
4. Refer to the label on the inside ofthe fuse panel cover to locate the suspected fuse location. 5. Pull the suspected fuse straight
out. Use the removal tool provided
in the engine compartment fusespanel.
6. Check the removed fuse; replace it if it is blown. Spare fuses are pro-
vided in the instrument panel fuse
panels (or in the engine compart-ment fuse panel).
7. Push in a new fuse of the same rating, and make sure it fits tightly
in the clips. If it fits loosely, consult
an authorized HYUNDAI dealer. In an emergency, if you do not have
a spare fuse, use a fuse of the same
rating from a circuit you may not
need for operating the vehicle, such
as the cigarette lighter fuse.
If the headlamps or other electrical
components do not work and the
fuses are OK, check the fuse panel
in the engine compartment. If a fuse
is blown, it must be replaced with the
same rating.
OTL075026
OTL075023
Page 634 of 642
I-3
California perchlorate notice ........................................7-105
Capacities (Lubricants) .....................................................8-6
CareExterior care ...............................................................7-94
Interior care ................................................................7-99
Tire care ......................................................................7-48
Cargo security screen ....................................................3-161
Center console storage ..................................................3-153
Central door lock switch .................................................3-16
Certification label ...........................................................8-10
Chains Tire chains ..................................................................5-85
Checking tire inflation pressure ......................................7-50
Child restraint system (CRS) ..........................................2-37 Children always in the rear ........................................2-37
Installing a Child Restraint System (CRS) ................2-40
Selecting a Child Restraint System (CRS).................2-38
Child-protector rear door lock ........................................3-18
Climate control air filter ......................................3-135, 7-40
Clock .............................................................................3-157
Clothes hanger ..............................................................3-159
Combined instrument, see instrument cluster ................3-63
Compact spare tire ..........................................................6-20
Compass with Electric chromic mirror...........................3-28
Consumer information ....................................................8-12 Coolant ............................................................................7-32
Cooling fluid, see engine coolant ...................................7-32
Crankcase emission control system ..............................7-101
Cruise control system .....................................................5-75
Cup holder.....................................................................3-155
Dashboard illumination, see instrument panel
illumination..................................................................3-64
Dashboard, see instrument cluster ..................................3-63
Day/night rearview mirror ..............................................3-23
Daytime running light ...................................................3-112
Defogging (Windshield) ...............................................3-149
Defroster (Rear window) ..............................................3-126
Defrosting (Windshield) ...............................................3-149
Dimensions .......................................................................8-2
Display illumination, see instrument panel illumination..................................................................3-64
Displays, see instrument cluster .....................................3-63
Do not install a child restraint on the front passenger seat ..............................................................2-63
Door locks .......................................................................3-14 Central door lock switch ............................................3-16
Child-protector rear door lock....................................3-18
Downhill brake control (DBC) .......................................5-39
Drinks holders, see cup holders ....................................3-155
Drive mode integrated control system ............................5-49
I
Index
C
D