Page 127 of 642

3-29
Convenient features of your vehicle
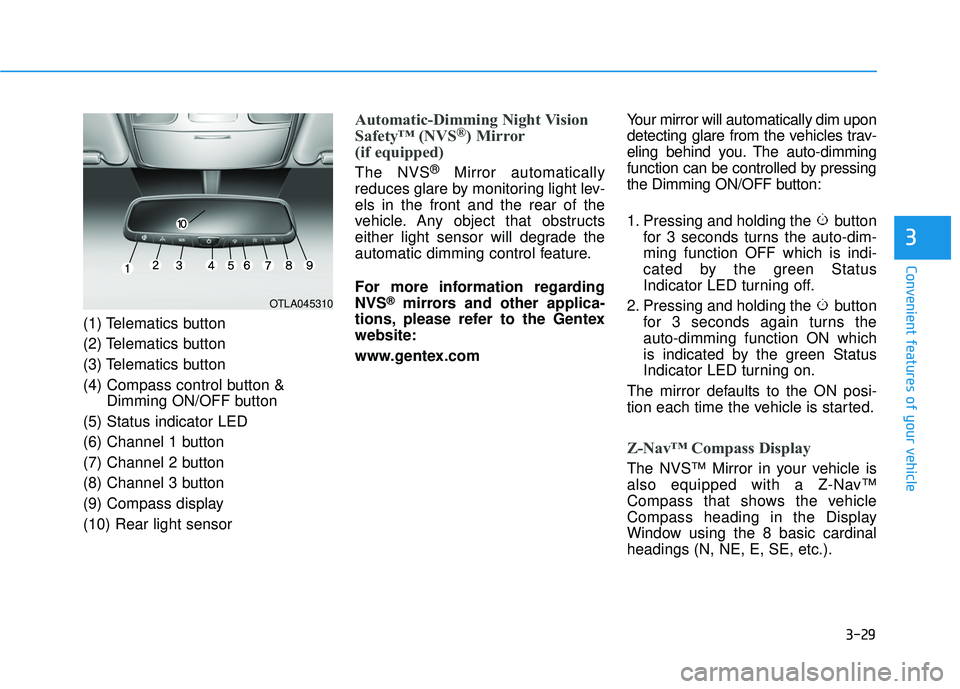
(1) Telematics button
(2) Telematics button
(3) Telematics button
(4) Compass control button &Dimming ON/OFF button
(5) Status indicator LED
(6) Channel 1 button
(7) Channel 2 button
(8) Channel 3 button
(9) Compass display (10) Rear light sensor
Automatic-Dimming Night Vision
Safety™ (NVS®) Mirror
(if equipped)
The NVS ®
Mirror automatically
reduces glare by monitoring light lev- els in the front and the rear of the
vehicle. Any object that obstructs
either light sensor will degrade the
automatic dimming control feature.
For more information regarding NVS
®mirrors and other applica-
tions, please refer to the Gentexwebsite:
www.gentex.com Your mirror will automatically dim upon
detecting glare from the vehicles trav-
eling behind you. The auto-dimming
function can be controlled by pressing
the Dimming ON/OFF button:
1. Pressing and holding the button
for 3 seconds turns the auto-dim- ming function OFF which is indi-
cated by the green Status
Indicator LED turning off.
2. Pressing and holding the button for 3 seconds again turns theauto-dimming function ON which
is indicated by the green Status
Indicator LED turning on.
The mirror defaults to the ON posi-
tion each time the vehicle is started.
Z-Nav™ Compass Display
The NVS™ Mirror in your vehicle is
also equipped with a Z-Nav™
Compass that shows the vehicle
Compass heading in the Display
Window using the 8 basic cardinalheadings (N, NE, E, SE, etc.).
3
OTLA045310
Page 128 of 642
3-30
Convenient features of your vehicle
Compass function
The Compass can be turned ON and OFF and will remember the last state
when the ignition is cycled. To turn
the display feature ON/OFF:
1. Press and release the buttonwithin 1 second to turn the display
feature OFF.
2. Press and release the button again within 1 second to turn the
display back ON.
Additional options can be set withpress and hold sequences of the
button and are detailed below.
There is a difference between mag-
netic north and true north. To com-
pensate for this difference you willneed to adjust the Zone setting based
on where you live.
B520C05NF
Page 129 of 642

3-31
Convenient features of your vehicle
3
To adjust the Zone setting:
1. Determine the desired ZoneNumber based upon your current
location on the Zone Map.
2. Press and hold the button for 6 seconds, the current Zone
Number will appear on the display.
3. Pressing and holding the button again will cause the numbers to
increment (Note: they will repeat
…13, 14, 15, 1, 2, …). Releasing
the button when the desired Zone
Number appears on the display
will set the new Zone.
4. Within about 5 seconds the com- pass will start displaying a com-pass heading again.
There are some conditions that can
cause changes to the vehicle mag-
nets, such as installing a ski rack or
a CB antenna. Body repair work on
the vehicle can also cause changes
to the vehicle’s magnetic field. In
these situations, the compass will
need to be re-calibrated to quickly
correct these changes. If you need to recalibrate the com-pass:
1. Press and hold the button for
more than 9 seconds. When the
compass memory is cleared a "C"
will appear in the display.
2. Drive the vehicle in 2 complete cir- cles at less than 5 mph (8 km/h).Integrated HomeLink ®
Wireless
Control System
The HomeLink®Wireless Control
System can replace up to three hand-
held radio-frequency (RF) transmit-
ters with a single built-in device. This
innovative feature will learn the radiofrequency codes of most current
transmitters to operate devices such
as gate operators, garage door open-
ers, entry door locks, security sys-
tems, even home lighting. Both stan-
dard and rolling code-equipped trans-
mitters can be programmed by fol-
lowing the outlined procedures. Additional HomeLink
®information
can be found at: www.homelink.com
or by calling 1-800-355-3515.
Retain the original transmitter of the
RF device you are programming for
use in other vehicles as well as forfuture HomeLink
®programming. It is
also suggested that upon the sale of
the vehicle, the programmedHomeLink
®buttons be erased for
security purposes.
Page 150 of 642

3-52
Emergency liftgate safetyrelease
Your vehicle is equipped with the
emergency liftgate safety release
lever located on the bottom of the lift-
gate. To unlock and open the liftgate
manually from inside the luggage
compartment, perform the followingsteps:
1. Remove the cover.
2. Push the release lever to the right.
3. Push up the liftgate.
Power liftgate (if equipped)
Power liftgate button
When the ignition switch is in the ON
position and the shift lever is in Park
(P), the power liftgate can be opened
by using the console button on thedash.
Before using the power liftgate, make
sure the power liftgate option isselected in the User Setting Modes
in the cluster LCD display.
For more details, refer to "LCD
Display" in this chapter.
Convenient features of your vehicle
OTL045038
For emergencies, be fully
aware of the location of the
emergency liftgate safety
release lever in this vehicle
and how to open the liftgate if
you are accidentally locked in
the luggage compartment.
No one should be allowed to
occupy the luggage compart-
ment of the vehicle at any time.
The luggage compartment is a
very dangerous location in the
event of a crash.
Use the release lever for
emergencies only. Use
extreme caution, especially
while the vehicle is in motion.
WARNING
OTL045039
Page 157 of 642

3-59
Convenient features of your vehicle
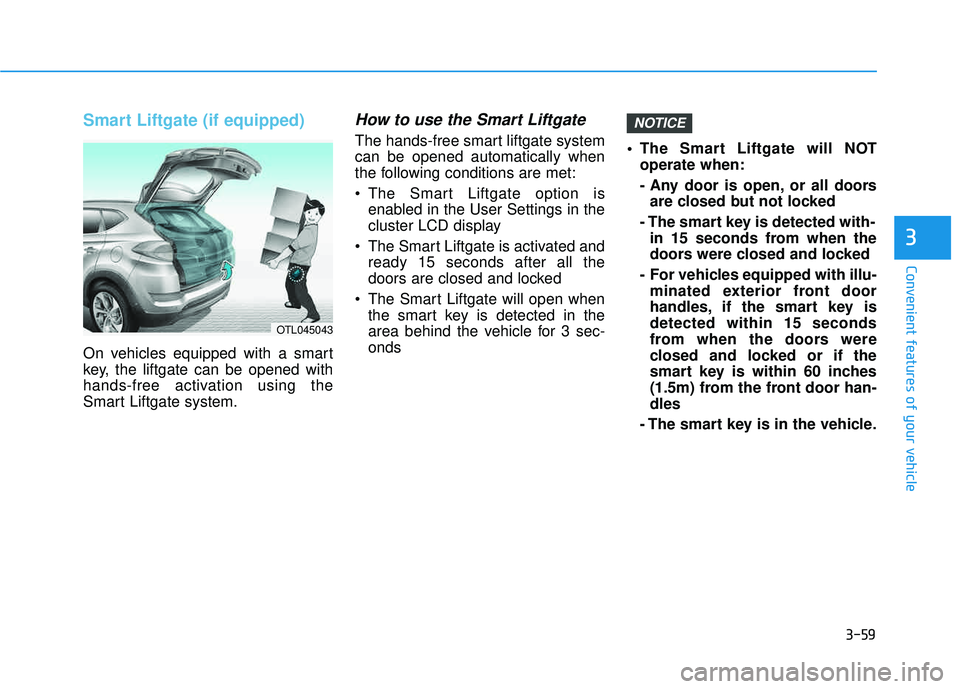
Smart Liftgate (if equipped)
On vehicles equipped with a smart
key, the liftgate can be opened with
hands-free activation using the
Smart Liftgate system.
How to use the Smart Liftgate
The hands-free smart liftgate systemcan be opened automatically when
the following conditions are met:
The Smart Liftgate option isenabled in the User Settings in the
cluster LCD display
The Smart Liftgate is activated and ready 15 seconds after all the
doors are closed and locked
The Smart Liftgate will open when the smart key is detected in the
area behind the vehicle for 3 sec-onds The Smart Liftgate will NOT
operate when:
- Any door is open, or all doorsare closed but not locked
- The smart key is detected with- in 15 seconds from when the
doors were closed and locked
- For vehicles equipped with illu- minated exterior front door
handles, if the smart key isdetected within 15 seconds
from when the doors were
closed and locked or if the
smart key is within 60 inches
(1.5m) from the front door han-dles
- The smart key is in the vehicle.
NOTICE
3
OTL045043
Page 158 of 642
3-60
1. Setting
To activate the Smart Liftgate, go to User Settings Mode and select
Smart Liftgate on the LCD display. ❈For more details, refer to "LCD
Display" in this chapter.
2. Detect and Alert
The Smart Liftgate detecting area
extends approximately 20-40 in (50-
100 cm) behind the vehicle. If youare positioned in the detecting area
and are carrying the smart key, the
hazard warning lights will blink and
the chime will sound for about 3 sec-
onds to alert you that the smart lift-gate will open. Do not approach the detecting
area if you do not want the liftgate
to open. If you have unintentional-
ly entered the detecting area and
the hazard warning lights and
chime starts to operate, move
away from the area behind the
vehicle with the smart key. The lift-
gate will remain closed.NOTICE
Convenient features of your vehicle
OTL045044
Page 161 of 642
3-63
Convenient features of your vehicle
3
IINN SSTT RR UU MM EENN TT CC LLUU SSTT EERR
1. Tachometer
2. Speedometer
3. Engine coolant temperature gauge
4. Fuel gauge
5. Warning and indicator lights
6. LCD display (including Trip computer)
OTLA045100/OTLA045101
■■
Type A
The actual cluster in the vehicle may dif-
fer from the illustration.
■■Type B
Page 162 of 642
3-64
Convenient features of your vehicle
Instrument Cluster Control
Adjusting instrument clusterillumination
When the vehicle’s parking lights or headlights are on, press the illumina-
tion control button to adjust the
brightness of the instrument panelillumination. When pressing the illumination con-
trol button, the interior switch illumi-nation intensity is also adjusted. The brightness of the instrument
panel illumination is displayed.
If the brightness reaches the maxi- mum or minimum level, a chimewill sound.
LCD Display Control
The LCD display modes can be
changed by using the control buttons
on the steering wheel.
(1) : MODE button for changing modes
(2) ▲, ▼ : MOVE switch for chang-
ing items
(3) OK : SELECT/RESET button for setting or resetting the selected item
For more information on LCD
Modes, refer to "LCD Display" in
the next pages of this chapter.OTLA045070
OTLE045112
OTL045150L
OTL045151L
■ Type A
■Type A
■Type B
■ Type B