2016 Hyundai Sonata ECO mode
[x] Cancel search: ECO modePage 7 of 603

F7
Introduction
F
FU
U E
EL
L
R
R E
EQ
Q U
UI
IR
R E
EM
M E
EN
N T
TS
S
NOTICE indicates a situation
which, if not avoided, could result
in vehicle damage. Your new vehicle is designed to
obtain maximum performance with
UNLEADED FUEL, as well as mini-
mize exhaust emissions and spark
plug fouling.
Your new vehicle is designed to use
only unleaded fuel having an octane
number ((R+M)/2) of 87 (Research
Octane Number 91) or higher.
To prevent damage to the engine
and engine components, never
add any fuel system cleaning
agents to the fuel tank other than
what has been specified.
Consult an authorized HYUNDAI
dealer for additional information.
Gasoline containing alcohol or
methanol
Gasohol, a mixture of gasoline and
ethanol (also known as grain alco-
hol) are being marketed along with or
instead of leaded or unleaded gaso-
line.
Do not use gasohol containing more
than 10% ethanol, and do not use
gasoline or gasohol containing any
methanol. Either of these fuels may
cause drivability problems and dam-
age to the fuel system.
Discontinue using gasohol of any
kind if drivability problems occur.
"E85" fuel is an alternative fuel com-
prised of 85 percent ethanol and 15
percent gasoline, and is manufac-
tured exclusively for use in Flexible
Fuel Vehicles. “E85” is not compati-
ble with your vehicle. Use of “E85”
may result in poor engine perform-
ance and damage to your vehicle's
engine and fuel system. HYUNDAI
recommends that customers do not
use fuel with an ethanol content
exceeding 10 percent.
NOTICE
NOTICE
CAUTION indicates a hazardous
situation which, if not avoided,
could result in minor or moder-
ate injury.
CAUTION
•Do not "top off" after the noz-
zle automatically shuts off
when refueling.
Always check that the fuel cap
is installed securely to pre-
vent fuel spillage in the event
of an accident.
WARNING
Page 14 of 603

F14F14
LCD Display ...........................................................3-71
LCD Modes ........................................................................\
3-71
Trip Computer Mode.......................................................3-72
Turn By Turn (TBT) Mode ............................................3-73
SCC/LDWS Mode .............................................................3-73
A/V Mode........................................................................\
..3-73
Information Mode ...........................................................3-74
User Settings Mode ........................................................3-76
Warning Messages..........................................................3-81
Trip computer .......................................................3-88
Trip A/B ........................................................................\
.....3-89
Fuel Economy...................................................................3-90
Digital Speedometer .......................................................3-92
Warning and indicator lights ..............................3-93
Warning Lights .................................................................3-93
Indicator Lights ..............................................................3-100
Light .....................................................................3-1\
05
Exterior Lights ...............................................................3-105
Smart High Beam ..........................................................3-107
Welcome System ...........................................................3-113
Interior Lights ................................................................3-114
Wipers and washers ..........................................3-118
Windshield Wipers ........................................................3-118
Windshield Washers .....................................................3-119
Driver assist system ..........................................3-120
Rear View Camera ........................................................3-120
Rear Parking Assist System .......................................3-121
Defroster .............................................................3-124
Rear Window Defroster ..............................................3-124
Manual climate control system........................3-125
Heating and Air Conditioning .....................................3-126
System Operation .........................................................3-131
System Maintenance....................................................3-133
Automatic climate control system ...................3-135
Automatic Heating and Air Conditioning.................3-136
Manual heating and Air Conditioning ......................3-137
System Operation .........................................................3-143
System Maintenance....................................................3-145
Windshield defrosting and defogging ...............3-147
Manual Climate Control System ................................3-147
Automatic Climate Control System ...........................3-148
Climate control additional features ...................3-149
Automatic Ventilation ...................................................3-149
Sunroof Inside Air Recirculation ...............................3-149
Page 16 of 603

F16F16
System Controllers and Functions
- 5 Inch Color TFT LCD .......................................4-52
Audio Head Unit ..............................................................4-52
Steering-Wheel Mounted Controls ............................4-54
Radio Mode.......................................................................4\
-56
XM
TMRadio Mode ...........................................................4-58
Media Mode......................................................................4-\
60
Audio CD Mode ................................................................4-61
MP3 CD Mode ..................................................................4-63
USB Mode ........................................................................\
.4-66
iPod
®Mode ......................................................................4-\
69
AUX Mode ........................................................................\
.4-71
MY Music Mode ..............................................................4-72
Bluetooth®Wireless Technology Audio Mode ........4-75
Voice Recognition ...........................................................4-91
Setup ........................................................................\
..........4-97
Rear View Camera ........................................................4-102
Blue Link
®.......................................................................4\
-102
Before Driving ........................................................5-4
Before Entering the Vehicle ...........................................5-4
Before Starting ..................................................................5-4
Key Ignition Switch ...........................................................5-6
Ignition Switch ........................................................5-6
Engine Start/Stop Button................................................5-9
Transmission .........................................................5-14
Automatic Transmission .................................................5-14
Dual Clutch Transmission ..............................................5-18
Paddle Shifter .................................................................5-24
Shift-Lock System .........................................................5-25
Shift-Lock Override .......................................................5-25
Parking ........................................................................\
.......5-26
Good Driving Practices .................................................5-26
Braking System ....................................................5-28
Power Brakes ...................................................................5-28
Disc Brakes Wear Indicator ..........................................5-29
Foot Parking Brake.........................................................5-29
Electric Parking Brake (EPB) ......................................5-31
AUTO HOLD .....................................................................5-3\
7
5Driving your vehicle
Page 71 of 603

2-44
Safety system of your vehicle
5. Remove as much slack from the belt as possible by pushing down
on the child restraint system while
feeding the shoulder belt back into
the retractor.
6. Push and pull on the child restraint system to confirm that the seat
belt is holding it firmly in place. If it
is not, release the seat belt and
repeat steps 2 through 6.
7. Double check that the retractor is in the “Automatic Locking” mode
by attempting to pull more of the
seat belt out of the retractor. If you
cannot, the retractor is in the
“Automatic Locking” mode.
If your CRS manufacturer instructs or
recommends you to use a tether
anchor with the lap/shoulder belt,
refer to the previous pages for more
information. When the seat belt is allowed to
retract to its fully stowed position,
the retractor will automatically
switch from the “Automatic
Locking” mode to the emergency
lock mode for normal adult usage.
To remove the child restraint, press
the release button on the buckle and
then pull the lap/shoulder belt out of
the restraint and allow the seat belt
to retract fully.
NOTICE
If the retractor is not in the
“Automatic Locking” mode, the
child restraint can move when
your vehicle turns or stops sud-
denly. A child can be seriously
injured or killed if the child
restraint is not properly anchored
in the car, including manually
pulling the seat belt all the way
out to shift the rectractor to the
“Automatic Locking” mode.
WARNING
Page 74 of 603

2-47
Safety system of your vehicle
2
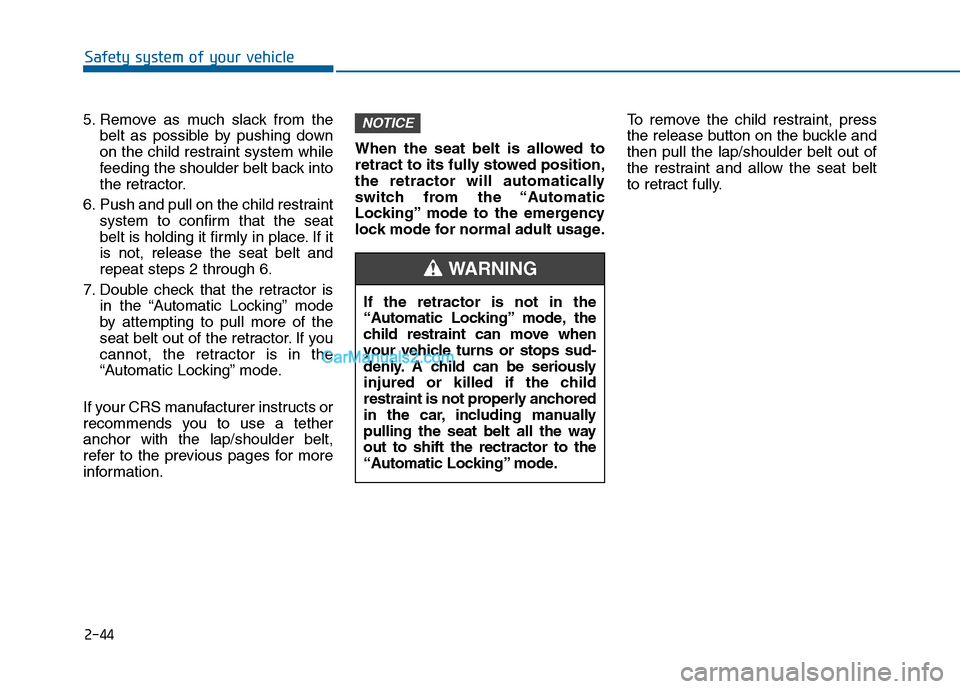
Where Are the Air Bags?
Driver’s and passenger’s frontair bags
Your vehicle is equipped with a
Advanced Supplemental Restraint
System (SRS) and lap/shoulder belts
at both the driver and passenger
seating positions.
The SRS consists of air bags which
are located in the center of the steer-
ing wheel, in the driver's side lower
crash pad below the steering wheel
column and the passenger's side
front panel pad above the glove box.
The air bags are labeled with the let-
ters “AIR BAG” embossed on the pad
covers. The purpose of the SRS is to provide
the vehicle's driver and front passen-
gers with additional protection than
that offered by the seat belt system
alone. The SRS uses sensors to
gather information about the driver's
and front passenger's seat belt
usage and impact severity.
The seat belt buckle sensors deter-
mine if the driver and front passen-
ger's seat belts are fastened. These
sensors provide the ability to control
the SRS deployment based on
whether or not the seat belts are fas-
tened, and how severe the impact is.
The advanced SRS offers the ability
to control the air bag inflation within
two levels. A first stage level is pro-
vided for moderate-severity impacts.
A second stage level is provided for
more severe impacts.
According to the impact severity, and
seat belt usage, the SRS Control
Module (SRSCM) controls the air
bag inflation. Failure to properly wear
seat belts can increase the risk or
severity of injury in an accident.
OLF034039
OLF034040N
OLF034041
■Driver's knee air bag
■Driver’s front air bag
■Passenger’s front air bag
Page 100 of 603

3-5
Convenient features of your vehicle
Unlocking
To unlock:
1.Press the Door Unlock button (2)on the remote key.
2.The driver’s door will unlock. The hazard warning lights will blink two
times.
If you press the Door Unlock button
again within four seconds, then all
the doors will unlock.
Information
After unlocking the doors, the doors
will lock automatically after 30 sec-
onds unless a door is opened.
Trunk unlocking
To unlock:
1. Press the Trunk Unlock button (3) on the remote key for more than
one second.
2. The hazard warning lights will blink two times.
Once the trunk is opened and then
closed, the trunk will lock automati-
cally.
Information
• After unlocking the trunk, the trunk will lock automatically.
• The word "HOLD" is written on the button to inform you that you must
press and hold the button for more
than one second.
Panic button
Press the Panic button (4) for more
than one second. The horn sounds
and hazard warning lights flash for
about 30 seconds.
To cancel the panic mode, press any
button on the remote key.
Start-up
For more information, refer to the
“Key Ignition Switch” section in chap-
ter 5.
To prevent damaging the remote
key:
• Keep the remote key away fromwater or any liquid. If the remote
key is inoperative due to expo-
sure to water or other liquids, it
will not be covered by your man-
ufacturer’s vehicle warranty.
Avoid dropping or throwing the remote key.
Protect the remote key from extreme temperatures.
NOTICE
ii
3
Page 105 of 603

3-10
Convenient features of your vehicle
Panic button
Press the Panic button (4) and hold
for more than one second. The horn
sounds and hazard warning lights
blink for about 30 seconds. To cancel
the panic mode, press any button on
the Smart Key.
Start-up
You can start the engine without
inserting the key.
For more information, refer to the
“Engine Start/Stop Button” sec-
tion in chapter 5.
To prevent damaging the smart key:
Keep the smart key away fromwater or any liquid. If the smart
key is inoperative due to expo-
sure to water or other liquids, it
will not be covered by your man-
ufacturer’s vehicle warranty.
Avoid dropping or throwing the smart key.
Protect the smart key from extreme temperatures.
Mechanical key
If the Smart Key does not operate
normally, you can lock or unlock the
door by using the mechanical key.
Press and hold the release button (1)
and remove the mechanical key (2).
Insert the mechanical key into the
key hole on the door.
To reinstall the mechanical key, put
the key into the hole and push it until
a click sound is heard.
Loss of a smart key
A maximum of two Smart Keys can
be registered to a single vehicle. If
you happen to lose your smart key,
you should immediately take the
vehicle and remaining keys to your
authorized HYUNDAI dealer or tow
the vehicle, if necessary.
NOTICEOLF044007
Page 125 of 603

3-30
Convenient features of your vehicle
Programming HomeLink®
Please note the following:
When programming a garage dooropener, it is advised to park the
vehicle outside of the garage.
It is recommended that a new bat- tery be placed in the hand-held
transmitter of the device being pro-
grammed to HomeLink
®for quicker
training and accurate transmission
of the radio-frequency signal.
Some vehicles may require the ignition switch to be placed in the
ACC (or "Accessories") position for
programming and/or operation of
HomeLink
®.
In the event that there are still pro- gramming difficulties or questions
after following the programming
steps listed below, contact
HomeLink
®at: www.homelink.com
or by calling 1-800-355-3515.
Programming
To train most devices, follow these
instructions:
1. For first-time programming, press and hold the two outside buttons
( ,), HomeLink
®Channel 1
and Channel 3, until the indicator
light begins to flash (after 10 sec-
onds). Release both buttons. Do
not hold the buttons for longer
than 20 seconds.
ODH044413N
Flashing
Before programming HomeLink®
to a garage door opener or gate
operator, make sure people and
objects are out of the way of the
device to prevent potential harm
or damage. Do not use the
HomeLink
®with any garage door
opener that lacks the safety stop
and reverse features required by
U.S. federal safety standards (this
includes any garage door opener
model manufactured before April
1, 1982). A garage door that can-
not detect an object - signaling
the door to stop and reverse -
does not meet current U.S. feder-
al safety standards. Using a
garage door opener without
these features increases the risk
of serious injury or death.
WARNING