Page 180 of 504
3-96
Convenient features of your vehicle
Headlamp delay function
(if equipped)
If you place the ignition switch in to
the ACC or OFF position with the
headlamps ON, the headlamps
(and/or parking lamps) remain on for
about 5 minutes. However, with the
engine off if the driver’s door is
opened and closed, the headlamps
(and/or parking lamps) are turned off
after 15 seconds.
The headlamps (and/or parking
lamps) can be turned off by pressing
the lock button on the smart key
twice or turning the light switch to the
OFF or AUTO position. However, if
you turn the light switch to the AUTO
position when it is dark outside, the
headlamps will not be turned off.
You can activate or deactivate the
Headlamp Delay function from the
User Settings Mode on the LCD dis-
play.For more details, refer to
"LCD Display" in this chapter.If the driver gets out of the vehicle
through other doors (except dri-
ver's door), the battery saver func-
tion does not operate and the
headlamp delay function does not
turn off automatically. Therefore, It
causes the battery to be dis-
charged. In this case, make sure to
turn off the lamp before getting out
of the vehicle.
Daytime running light (DRL)
(if equipped)
The Daytime Running Lights (DRL)
can make it easier for others to see
the front of your vehicle during the
day, especially after dawn and before
sunset.
The DRL system will turn the dedi-
cated lamp OFF when:
1. The headlights or front fog lights
are in the ON position.
2. The parking switch is in the ON
position.
3. The engine is turned off.
NOTICE
Page 182 of 504
3-98
Convenient features of your vehicle
Also, if the outside rearview mirror
folding switch is in the AUTO posi-
tion, the outside rearview mirror will
unfold automatically.
Door handle lamp (if equipped)
When all the doors (and boot) are
closed and locked, the door handle
lamp will come on for about 15 sec-
onds if any of the below is performed.
• When the door unlock button is
pressed on the remote key or
smart key.
• When the button of the outside
door handle is pressed.
• When the vehicle is approached
with the smart key in possession.
Headlamp and Parking lamp
When the headlamp (lamp switch in
the headlamp or AUTO position) is on
and all doors (and boot) are locked
and closed, the parking lamp and
headlamp will come on for 15 seconds
if any of the below is performed.
• When the door unlock button is
pressed on the remote key or
smart key.
At this time, if you press the door lock
or unlock button, the parking lamp and
headlamp will turn off immediately.
You can activate or deactivate the
Welcome Light from the User
Settings Mode on the LCD display.
For more details, refer to "LCD
Display" in this chapter.
Page 192 of 504
3-108
Convenient features of your vehicle
DRIVER ASSIST SYSTEM
Rearview camera
(if equipped)
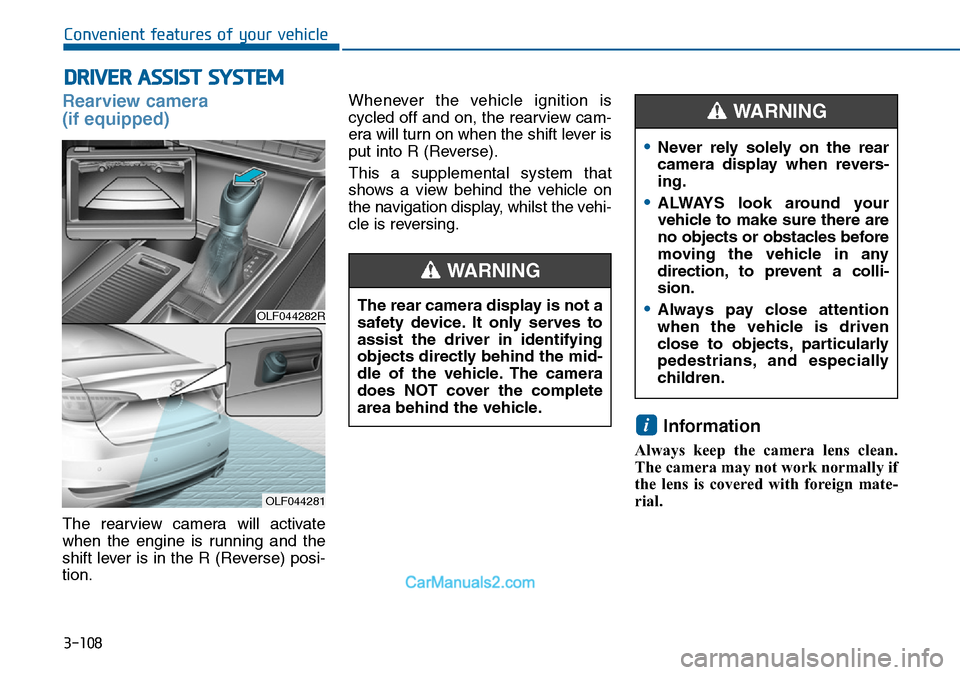
The rearview camera will activate
when the engine is running and the
shift lever is in the R (Reverse) posi-
tion.Whenever the vehicle ignition is
cycled off and on, the rearview cam-
era will turn on when the shift lever is
put into R (Reverse).
This a supplemental system that
shows a view behind the vehicle on
the navigation display, whilst the vehi-
cle is reversing.
Information
Always keep the camera lens clean.
The camera may not work normally if
the lens is covered with foreign mate-
rial.
i
OLF044282R
OLF044281
The rear camera display is not a
safety device. It only serves to
assist the driver in identifying
objects directly behind the mid-
dle of the vehicle. The camera
does NOT cover the complete
area behind the vehicle.
WARNING
•Never rely solely on the rear
camera display when revers-
ing.
•ALWAYS look around your
vehicle to make sure there are
no objects or obstacles before
moving the vehicle in any
direction, to prevent a colli-
sion.
•Always pay close attention
when the vehicle is driven
close to objects, particularly
pedestrians, and especially
children.
WARNING
Page 194 of 504
3-110
Convenient features of your vehicle
Operation of the rear parking
assist systemOperation condition
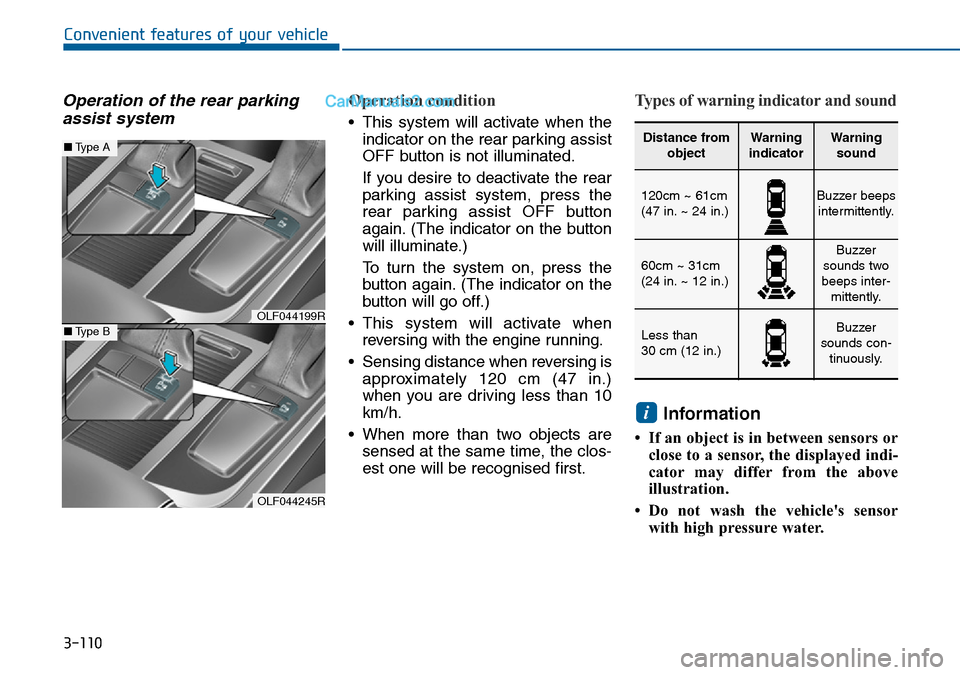
• This system will activate when the
indicator on the rear parking assist
OFF button is not illuminated.
If you desire to deactivate the rear
parking assist system, press the
rear parking assist OFF button
again. (The indicator on the button
will illuminate.)
To turn the system on, press the
button again. (The indicator on the
button will go off.)
• This system will activate when
reversing with the engine running.
• Sensing distance when reversing is
approximately 120 cm (47 in.)
when you are driving less than 10
km/h.
• When more than two objects are
sensed at the same time, the clos-
est one will be recognised first.
Types of warning indicator and sound
Information
• If an object is in between sensors or
close to a sensor, the displayed indi-
cator may differ from the above
illustration.
• Do not wash the vehicle's sensor
with high pressure water.
i
OLF044199R
OLF044245R
■Type A
■Type B
Distance from
objectWarning
indicatorWarning
sound
120cm ~ 61cm
(47 in. ~ 24 in.)Buzzer beeps
intermittently.
60cm ~ 31cm
(24 in. ~ 12 in.)Buzzer
sounds two
beeps inter-
mittently.
Less than
30 cm (12 in.)Buzzer
sounds con-
tinuously.
Page 195 of 504
3-111
Convenient features of your vehicle
3
When you shift into the R (Reverse)
position and one or more of the
below situations occur, this may indi-
cate a malfunction with the parking
assist system.
• You don't hear an audible warning
sound or the buzzer sounds inter-
mittently.
If this occurs, we recommend that
the system be checked by an autho-
rised HYUNDAI dealer.
Non-operational conditions of
rear parking assist system
The rear parking assist system
may not operate normally when:
• Moisture is frozen to the sensor.
• The sensor is covered or stained
with foreign material, such as snow
or water, or the sensor cover is
blocked.There is a possibility of a parking
assist system malfunction when:
• Driving on uneven road surfaces
such as unpaved roads, gravel,
bumps, or gradients.
• Objects generating excessive noise
such as vehicle horns, loud motor-
cycle engines, or truck air brakes
can interfere with the sensor.
• Heavy rain or water spray is present.
• Wireless transmitters or mobile
phones are present near the sensor.
• The sensor is covered with snow.
• Any non-factory equipment or
accessories have been installed, or
if the vehicle bumper height or sen-
sor installation has been modified.
• Trailer towing.Detecting range may decrease
when:
• Outside air temperature is
extremely hot or cold.
• Undetectable objects smaller than
about 1 m (40 in.) and narrower
than about 14 cm (6 in.) in diameter.
The following objects may not be
recognised by the sensor:
• Sharp or slim objects such as
ropes, chains or small poles.
• Objects, which tend to absorb sen-
sor frequency such as clothes,
spongy material or snow.
• is displayed. (if equipped)
Your new vehicle warranty does
not cover any accidents or dam-
age to the vehicle or injuries to
its occupants due to a rear
parking assist system malfunc-
tion. Always drive safely and
cautiously.
WARNING
Page 217 of 504
3-133
Convenient features of your vehicle
3
Temperature conversion
If the battery has been discharged or
disconnected, the temperature mode
display will reset to Centigrade.
This is a normal condition. You can
switch the temperature mode between
Centigrade and Fahrenheit as follows:
Whilst pressing the OFF button,
press the AUTO button for 3 seconds
or more. The display will change from
Centigrade to Fahrenheit, or from
Fahrenheit to Centigrade.
- “User setting mode” in the instru-
ment cluster : You can change the
temperature unit in the “Other fea-
tures - Temperature unit”
Air intake control
This is used to select the outside
(fresh) air position or recirculated air
position.
To change the air intake control posi-
tion, push the control button.
Recirculated air position
With the recirculated air
position selected, air
from the passenger
compartment will be
drawn through the heat-
ing system and heated
or cooled according to
the function selected.
Outside (fresh) air position
With the outside (fresh) air
position selected, air
enters the vehicle from
outside and is heated or
cooled according to the
function selected.
OLF044225
OLF044226
■Type A
■Type B■Type A
■Type B
Page 226 of 504

3-142
Convenient features of your vehicle
Auto defogging system
(only for automatic climate
control system, if equipped)
Auto defogging reduces the possibil-
ity of fogging up the inside of the
windscreen by automatically sensing
the moisture on the inside of the
windscreen.
The auto defogging system operates
when the heater or air conditioning is
on.
Information
The auto defogging system may not
operate normally when the outside
temperature is below -10 °C.When the Auto Defogging
System operates, the indi-
cator will illuminate.
If higher levels of moisture are
sensed in the vehicle, the Auto
Defogging System will operate in the
following order:
Step 1 : Outside air position
Step 2 : Operating the air conditioning
Step 3 : Blowing air toward the wind-
screen
Step 4 : Increasing air flow toward
the windscreen
If the air conditioning is off or recircu-
lated air position is manually selected
whilst Auto Defogging System is ON,
the Auto Defogging System Indicator
will blink 3 times to signal that the
manual operation has been can-
celled.
To cancel or reset the Auto
Defogging System
Press the front windscreen defroster
button for 3 seconds when the igni-
tion switch is in the ON position.
When the Auto Defogging System is
cancelled, ADS OFF symbol will
blink 3 times and the ADS OFF will
be displayed on the climate control
information screen.
When the Auto Defogging System is
reset, ADS OFF symbol will blink 6
times without a signal.
Information
• When the air conditioning is turned
on by the Auto defogging system, if
you try to turn off the air condition-
ing, the indicator will blink 3 times
and the air conditioning will not be
turned off.
• For efficiency, do not select recircu-
lated air position whilst the Auto
defogging system is operating.
i
i
OLF044260
Page 236 of 504
3-152
Convenient features of your vehicle
Clock
Whenever the battery terminals or
related fuses are disconnected, you
must reset the time.To set the time :
The ignition switch must be in the
ACC position or the ON position.
• H (Hour)
Press the "H" button (1) to advance
the time displayed by one hour.
• M (Minute)
Press the "M" button (2) to advance
the time displayed by one minute.
• Display conversion
To change the 12 hour format to the
24 hour format, press the "H" and
"M" button simultaneously for more
than 4 seconds.
For example, if the "H" and "M" but-
ton is pressed when the time is 10:15
p.m., the display will change to
22:15.
OLF044237R
Do not adjust the clock whilst
driving. You may lose your steer-
ing control and cause severe
personal injury or accidents.
WARNING