2016 Hyundai Sonata power steering
[x] Cancel search: power steeringPage 318 of 504
5-5
Driving your vehicle
5
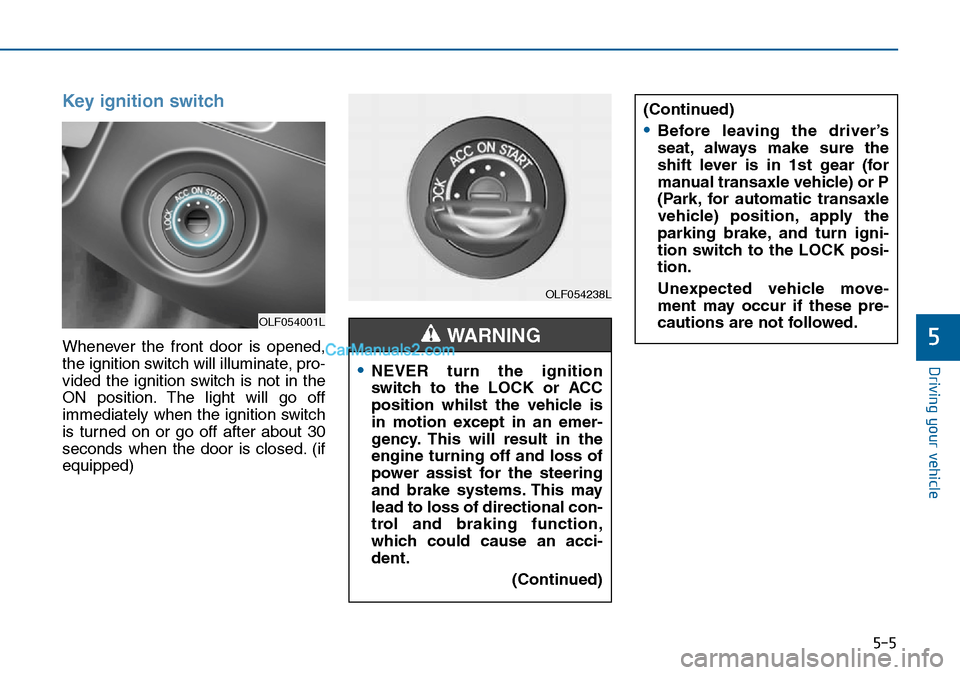
Key ignition switch
Whenever the front door is opened,
the ignition switch will illuminate, pro-
vided the ignition switch is not in the
ON position. The light will go off
immediately when the ignition switch
is turned on or go off after about 30
seconds when the door is closed. (if
equipped)
OLF054001L
OLF054238L
•NEVER turn the ignition
switch to the LOCK or ACC
position whilst the vehicle is
in motion except in an emer-
gency. This will result in the
engine turning off and loss of
power assist for the steering
and brake systems. This may
lead to loss of directional con-
trol and braking function,
which could cause an acci-
dent.
(Continued)
WARNING
(Continued)
•Before leaving the driver’s
seat, always make sure the
shift lever is in 1st gear (for
manual transaxle vehicle) or P
(Park, for automatic transaxle
vehicle) position, apply the
parking brake, and turn igni-
tion switch to the LOCK posi-
tion.
Unexpected vehicle move-
ment may occur if these pre-
cautions are not followed.
Page 321 of 504
5-8
Driving your vehicle
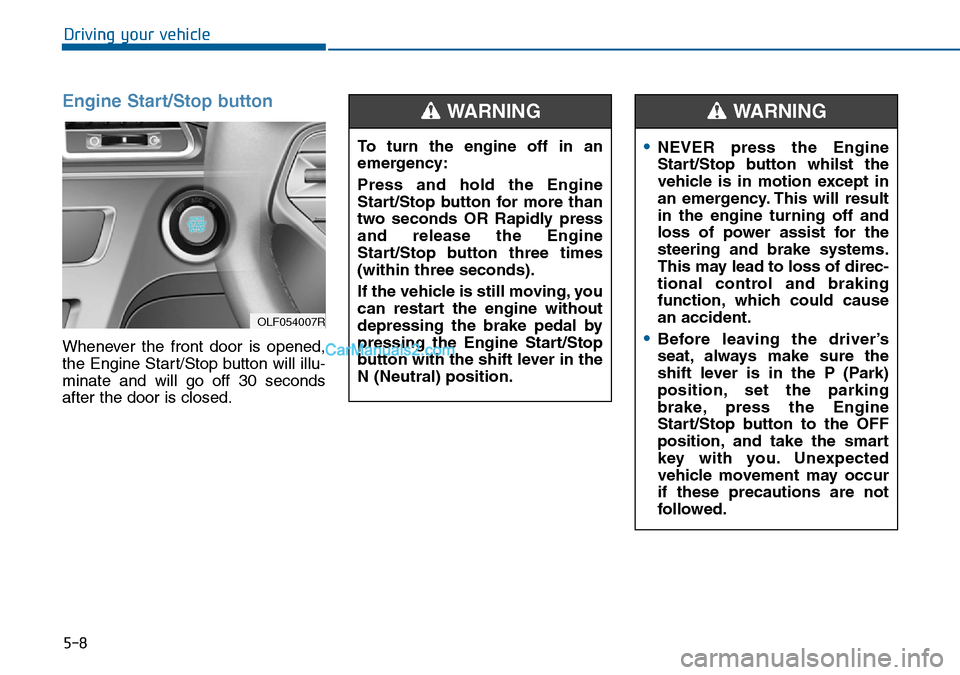
Engine Start/Stop button
Whenever the front door is opened,
the Engine Start/Stop button will illu-
minate and will go off 30 seconds
after the door is closed.
OLF054007R
To turn the engine off in an
emergency:
Press and hold the Engine
Start/Stop button for more than
two seconds OR Rapidly press
and release the Engine
Start/Stop button three times
(within three seconds).
If the vehicle is still moving, you
can restart the engine without
depressing the brake pedal by
pressing the Engine Start/Stop
button with the shift lever in the
N (Neutral) position.
WARNING
•NEVER press the Engine
Start/Stop button whilst the
vehicle is in motion except in
an emergency. This will result
in the engine turning off and
loss of power assist for the
steering and brake systems.
This may lead to loss of direc-
tional control and braking
function, which could cause
an accident.
•Before leaving the driver’s
seat, always make sure the
shift lever is in the P (Park)
position, set the parking
brake, press the Engine
Start/Stop button to the OFF
position, and take the smart
key with you. Unexpected
vehicle movement may occur
if these precautions are not
followed.
WARNING
Page 322 of 504
5-9
Driving your vehicle
5
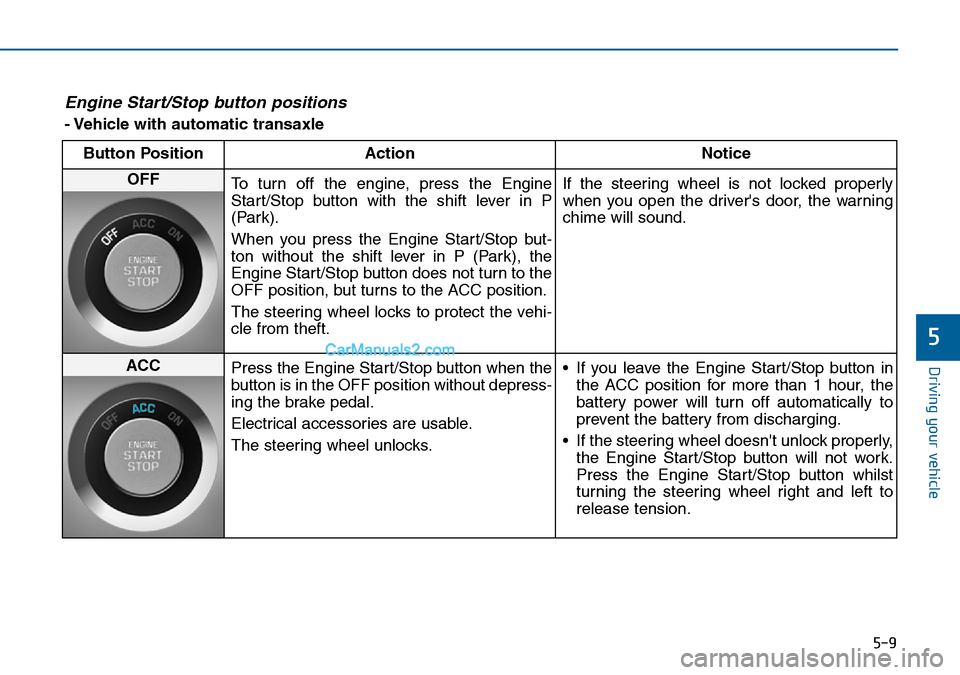
Engine Start/Stop button positions
- Vehicle with automatic transaxle
Button Position Action Notice
OFF
To turn off the engine, press the Engine
Start/Stop button with the shift lever in P
(Park).
When you press the Engine Start/Stop but-
ton without the shift lever in P (Park), the
Engine Start/Stop button does not turn to the
OFF position, but turns to the ACC position.
The steering wheel locks to protect the vehi-
cle from theft.If the steering wheel is not locked properly
when you open the driver's door, the warning
chime will sound.
ACC
Press the Engine Start/Stop button when the
button is in the OFF position without depress-
ing the brake pedal.
Electrical accessories are usable.
The steering wheel unlocks.• If you leave the Engine Start/Stop button in
the ACC position for more than 1 hour, the
battery power will turn off automatically to
prevent the battery from discharging.
• If the steering wheel doesn't unlock properly,
the Engine Start/Stop button will not work.
Press the Engine Start/Stop button whilst
turning the steering wheel right and left to
release tension.
Page 334 of 504
5-21
Driving your vehicle
5
Power brakes
Your vehicle has power-assisted
brakes that adjust automatically
through normal usage.
If the engine is not running or is
turned off whilst driving, the power
assist for the brakes will not work.
You can still stop your vehicle by
applying greater force to the brake
pedal than typical. The stopping dis-
tance, however, will be longer than
with power brakes.
When the engine is not running, the
reserve brake power is partially
depleted each time the brake pedal
is applied. Do not pump the brake
pedal when the power assist has
been interrupted.
Pump the brake pedal only when
necessary to maintain steering con-
trol on slippery surfaces.
BRAKING SYSTEM
Take the following precautions:
•Do not drive with your foot
resting on the brake pedal.
This will create abnormal high
brake temperatures, exces-
sive brake lining and pad
wear, and increased stopping
distances.
•When descending a long or
steep hill, shift to a lower gear
and avoid continuous applica-
tion of the brakes. Applying
the brakes continuously will
cause the brakes to overheat
and could result in a tempo-
rary loss of braking perform-
ance.
(Continued)
(Continued)
•Wet brakes may impair the
vehicle’s ability to safely slow
down; the vehicle may also
pull to one side when the
brakes are applied. Applying
the brakes lightly will indicate
whether they have been
affected in this way. Always
test your brakes in this fash-
ion after driving through deep
water. To dry the brakes, light-
ly tap the brake pedal to heat
up the brakes whilst maintain-
ing a safe forward speed until
brake performance returns to
normal. Avoid driving at high
speeds until the brakes func-
tion correctly.
WARNING
Page 354 of 504
5-41
Driving your vehicle
5
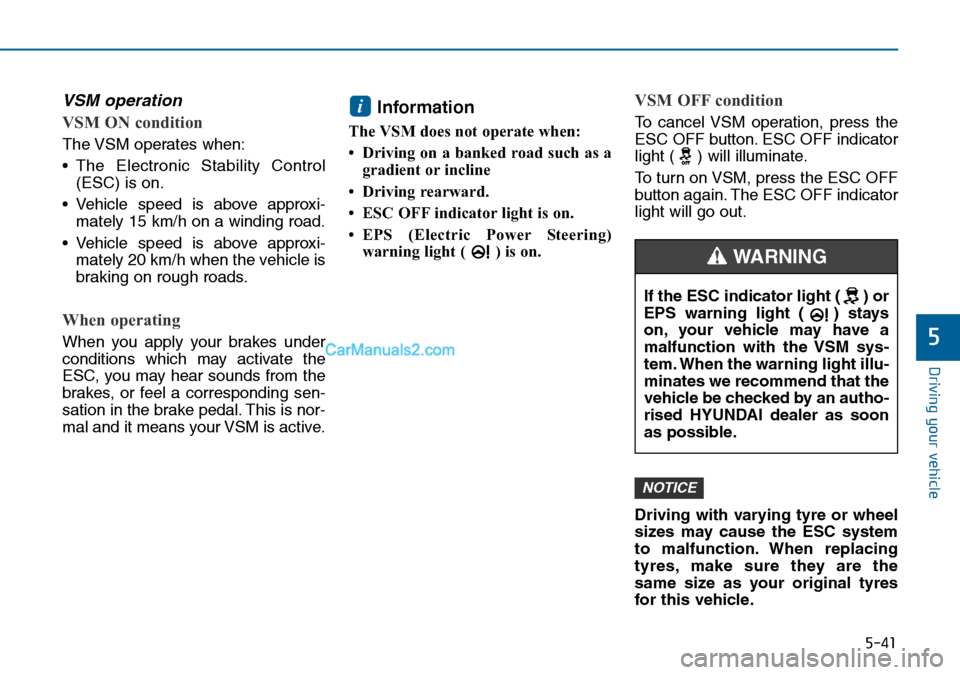
VSM operation
VSM ON condition
The VSM operates when:
• The Electronic Stability Control
(ESC) is on.
• Vehicle speed is above approxi-
mately 15 km/h on a winding road.
• Vehicle speed is above approxi-
mately 20 km/h when the vehicle is
braking on rough roads.
When operating
When you apply your brakes under
conditions which may activate the
ESC, you may hear sounds from the
brakes, or feel a corresponding sen-
sation in the brake pedal. This is nor-
mal and it means your VSM is active.
Information
The VSM does not operate when:
• Driving on a banked road such as a
gradient or incline
• Driving rearward.
• ESC OFF indicator light is on.
• EPS (Electric Power Steering)
warning light ( ) is on.
VSM OFF condition
To cancel VSM operation, press the
ESC OFF button. ESC OFF indicator
light ( ) will illuminate.
To turn on VSM, press the ESC OFF
button again. The ESC OFF indicator
light will go out.
Driving with varying tyre or wheel
sizes may cause the ESC system
to malfunction. When replacing
tyres, make sure they are the
same size as your original tyres
for this vehicle.
NOTICE
i
If the ESC indicator light ( ) or
EPS warning light ( ) stays
on, your vehicle may have a
malfunction with the VSM sys-
tem. When the warning light illu-
minates we recommend that the
vehicle be checked by an autho-
rised HYUNDAI dealer as soon
as possible.
WARNING
Page 359 of 504
5-46
Driving your vehicle
When Active ECO is activated:
• The acceleration response may be
slightly reduced as the accelerator
pedal is depressed moderately.
• The air conditioner performance
may be limited.
• The shift pattern of the automatic
transaxle may change.
• The engine noise may get louder.
The above situations are normal
conditions when the Active ECO sys-
tem is activated to improve fuel effi-
ciency.Limitation of Active ECO opera-
tion:
If the following conditions occur
whilst Active ECO is operating, the
system operation is limited even
though there is no change in the
ECO indicator.
• When the coolant temperature is
low:
The system will be limited until
engine performance becomes nor-
mal.
• When driving up a hill:
The system will be limited to gain
power when driving uphill because
engine torque is restricted.
• When using the automatic
transaxle Sports mode:
The system will be limited accord-
ing to the shift location.
• When the accelerator pedal is
deeply depressed for a few sec-
onds: The system will be limited,
judging that the driver wants to
speed up.
SPORT mode
SPORT mode focuses on
dynamic driving by auto-
matically controlling the
steering wheel, engine
and transaxle system.
• When the DRIVE MODE button is
pressed and the SPORT mode is
selected, the SPORT indicator
(yellow) will illuminate.
• When the SPORT mode is activat-
ed, and the engine is turned off
and on it will change to NORMAL
mode. To turn on the SPORT
mode, press the DRIVE MODE
button again.
• If the system is activated:
- After accelerating and releasing
the accelerator pedal, the gear
and engine speed RPM may not
drop as soon as in NORMAL
mode.
- Up-shifting is delayed.
Information
In SPORT mode, the fuel efficiency
may decrease.
i
SPORT
Page 410 of 504
6-19
What to do in an emergency
6
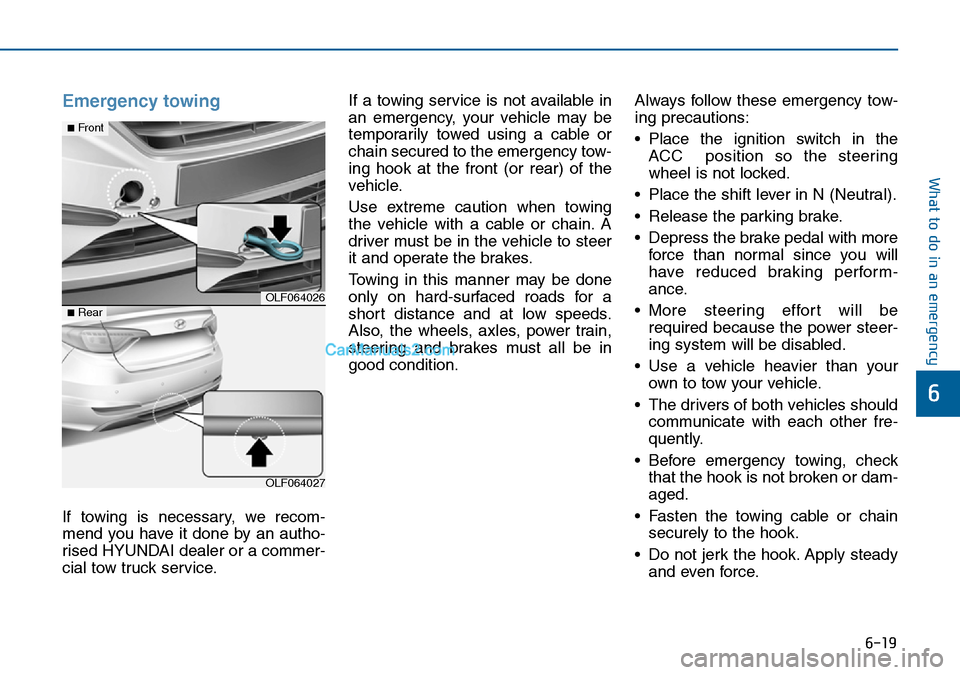
Emergency towing
If towing is necessary, we recom-
mend you have it done by an autho-
rised HYUNDAI dealer or a commer-
cial tow truck service.If a towing service is not available in
an emergency, your vehicle may be
temporarily towed using a cable or
chain secured to the emergency tow-
ing hook at the front (or rear) of the
vehicle.
Use extreme caution when towing
the vehicle with a cable or chain. A
driver must be in the vehicle to steer
it and operate the brakes.
Towing in this manner may be done
only on hard-surfaced roads for a
short distance and at low speeds.
Also, the wheels, axles, power train,
steering and brakes must all be in
good condition.Always follow these emergency tow-
ing precautions:
• Place the ignition switch in the
ACC position so the steering
wheel is not locked.
• Place the shift lever in N (Neutral).
• Release the parking brake.
• Depress the brake pedal with more
force than normal since you will
have reduced braking perform-
ance.
• More steering effort will be
required because the power steer-
ing system will be disabled.
• Use a vehicle heavier than your
own to tow your vehicle.
• The drivers of both vehicles should
communicate with each other fre-
quently.
• Before emergency towing, check
that the hook is not broken or dam-
aged.
• Fasten the towing cable or chain
securely to the hook.
• Do not jerk the hook. Apply steady
and even force.
OLF064026
OLF064027
■Front
■Rear
Page 421 of 504
Maintenance
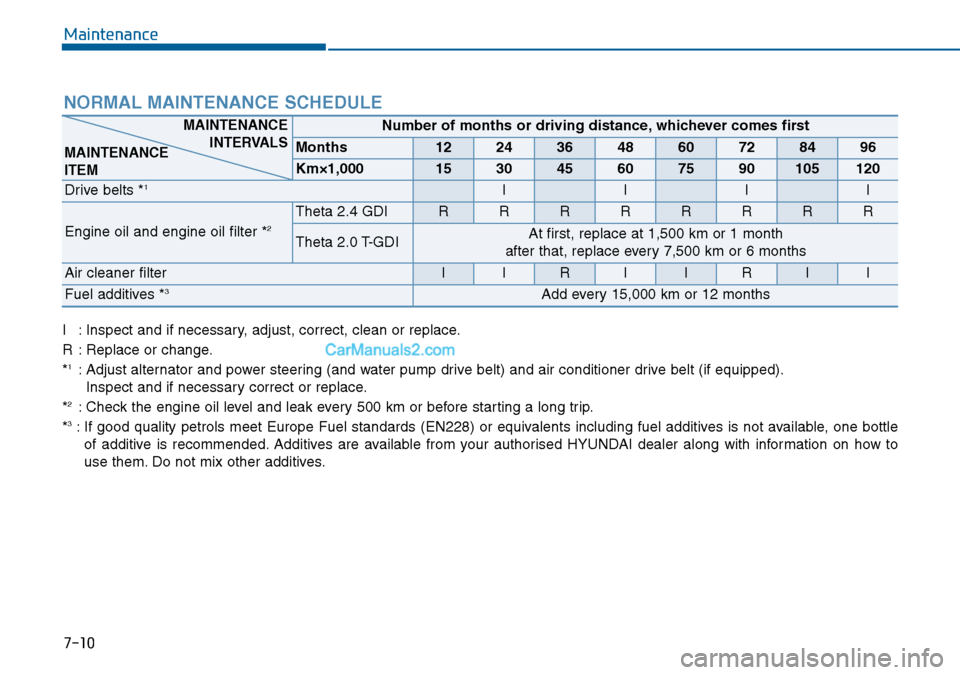
7-10 I : Inspect and if necessary, adjust, correct, clean or replace.
R : Replace or change.
*
1: Adjust alternator and power steering (and water pump drive belt) and air conditioner drive belt (if equipped).
Inspect and if necessary correct or replace.
*
2: Check the engine oil level and leak every 500 km or before starting a long trip.
*3: If good quality petrols meet Europe Fuel standards (EN228) or equivalents including fuel additives is not available, one bottle
of additive is recommended. Additives are available from your authorised HYUNDAI dealer along with information on how to
use them. Do not mix other additives.
NORMAL MAINTENANCE SCHEDULE
Number of months or driving distance, whichever comes first
Months1224364860728496
Km×1,000153045607590105120
Drive belts *1IIII
Engine oil and engine oil filter *2Theta 2.4 GDI RRRRRRRR
Theta 2.0 T-GDI At first, replace at 1,500 km or 1 month
after that, replace every 7,500 km or 6 months
Air cleaner filterIIRIIRII
Fuel additives *3Add every 15,000 km or 12 months
MAINTENANCE
INTERVALS
MAINTENANCE
ITEM