Page 561 of 708
6-23
What to do in an emergency
6
When towing your vehicle in an
emergency without wheel dollies :
1. Place the Engine Start/Stop but-ton in the ACC position.
2. Place the shift lever in N (Neutral).
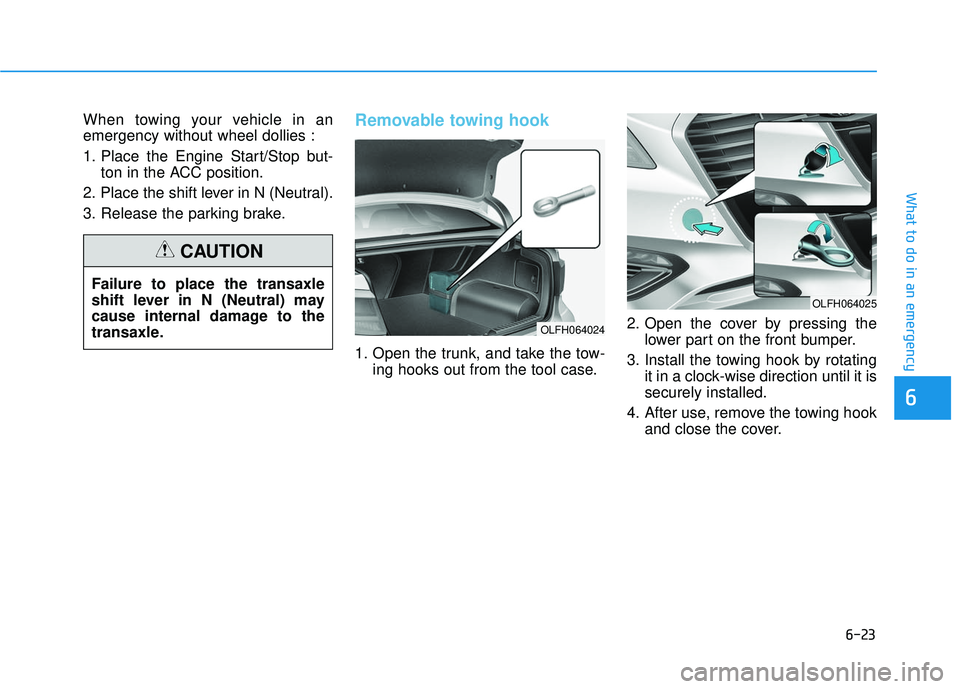
3. Release the parking brake.Removable towing hook
1. Open the trunk, and take the tow- ing hooks out from the tool case. 2. Open the cover by pressing the
lower part on the front bumper.
3. Install the towing hook by rotating it in a clock-wise direction until it is
securely installed.
4. After use, remove the towing hook and close the cover.
Failure to place the transaxle
shift lever in N (Neutral) may
cause internal damage to the
transaxle.
CAUTION
OLFH064024
OLFH064025
Page 562 of 708
6-24
What to do in an emergency
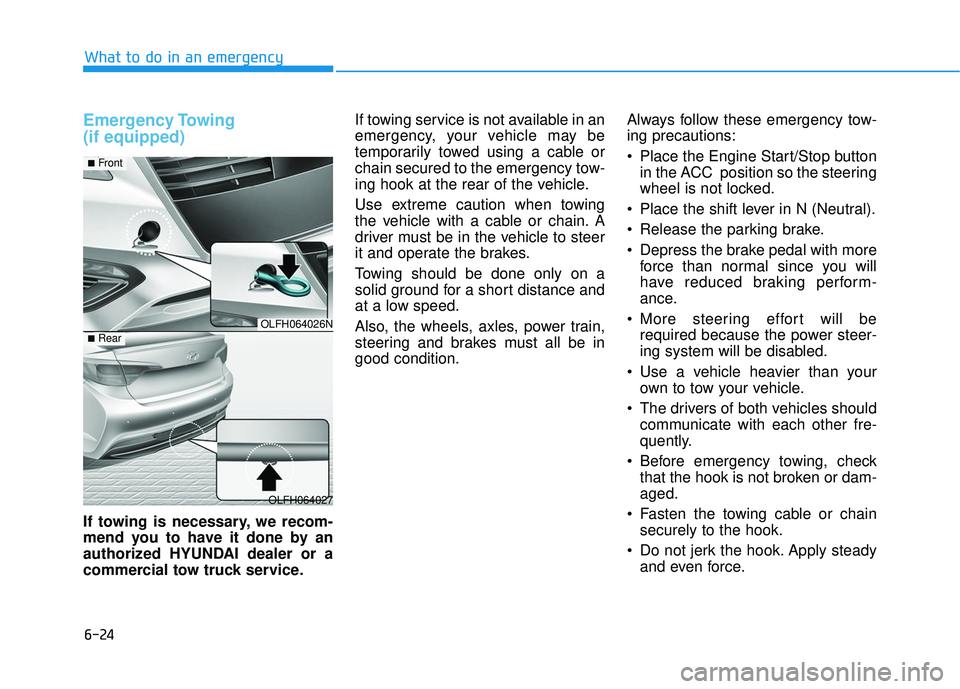
Emergency Towing
(if equipped)
If towing is necessary, we recom-
mend you to have it done by an
authorized HYUNDAI dealer or a
commercial tow truck service.If towing service is not available in an
emergency, your vehicle may be
temporarily towed using a cable or
chain secured to the emergency tow-
ing hook at the rear of the vehicle.
Use extreme caution when towing
the vehicle with a cable or chain. A
driver must be in the vehicle to steer
it and operate the brakes.
Towing should be done only on a
solid ground for a short distance and
at a low speed.
Also, the wheels, axles, power train,
steering and brakes must all be in
good condition.
Always follow these emergency tow-
ing precautions:
Place the Engine Start/Stop button
in the ACC position so the steering
wheel is not locked.
Place the shift lever in N (Neutral).
Release the parking brake.
Depress the brake pedal with more force than normal since you will
have reduced braking perform-
ance.
More steering effort will be required because the power steer-
ing system will be disabled.
Use a vehicle heavier than your own to tow your vehicle.
The drivers of both vehicles should communicate with each other fre-
quently.
Before emergency towing, check that the hook is not broken or dam-
aged.
Fasten the towing cable or chain securely to the hook.
Do not jerk the hook. Apply steady and even force.
OLFH064026N
OLFH064027
■Front
■Rear
Page 598 of 708
7-34
Maintenance
W
WA
AS
SH
H E
ER
R
F
F L
LU
U I
ID
D
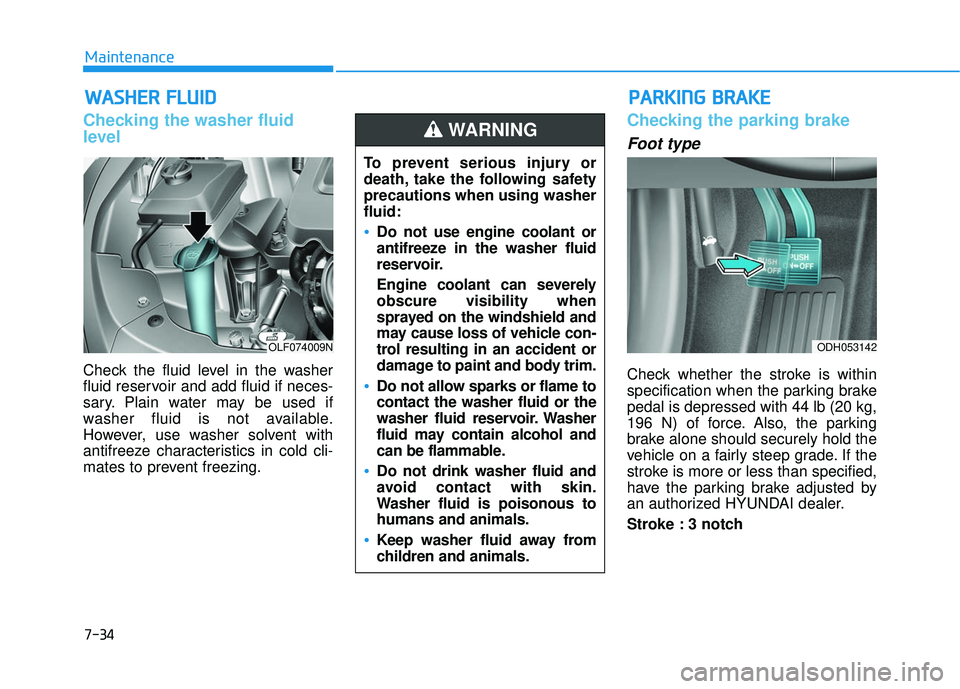
Checking the washer fluid
level
Check the fluid level in the washer
fluid reservoir and add fluid if neces-
sary. Plain water may be used if
washer fluid is not available.
However, use washer solvent with
antifreeze characteristics in cold cli-
mates to prevent freezing.
Checking the parking brake
Foot type
Check whether the stroke is within
specification when the parking brake
pedal is depressed with 44 lb (20 kg,
196 N) of force. Also, the parking
brake alone should securely hold the
vehicle on a fairly steep grade. If the
stroke is more or less than specified,
have the parking brake adjusted by
an authorized HYUNDAI dealer.
Stroke : 3 notch
P P A
A R
RK
K I
IN
N G
G
B
B R
RA
A K
KE
E
ODH053142
To prevent serious injury or
death, take the following safety
precautions when using washer
fluid:
Do not use engine coolant or
antifreeze in the washer fluid
reservoir.
Engine coolant can severely
obscure visibility when
sprayed on the windshield and
may cause loss of vehicle con-
trol resulting in an accident or
damage to paint and body trim.
Do not allow sparks or flame to
contact the washer fluid or the
washer fluid reservoir. Washer
fluid may contain alcohol and
can be flammable.
Do not drink washer fluid and
avoid contact with skin.
Washer fluid is poisonous to
humans and animals.
Keep washer fluid away from
children and animals.
WARNING
OLF074009N
Page 606 of 708
7-42
Maintenance
When you do not use the vehicle for a long time in a low tempera-
ture area, disconnect the battery
and keep it indoors.
Always charge the battery fully to prevent battery case damage
in low temperature areas.
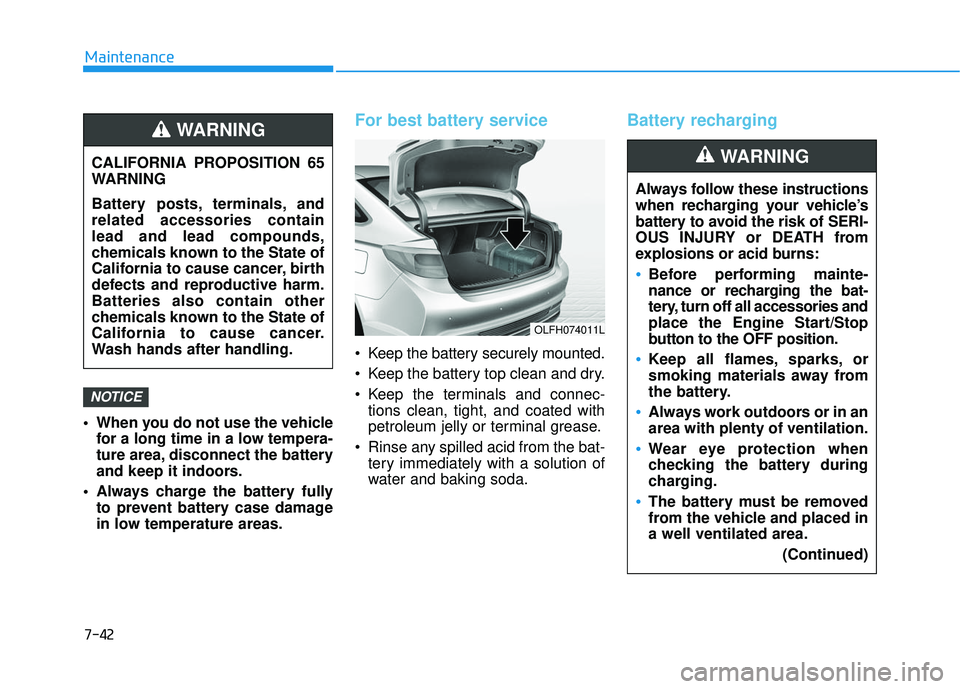
For best battery service
Keep the battery securely mounted.
Keep the battery top clean and dry.
Keep the terminals and connec-tions clean, tight, and coated with
petroleum jelly or terminal grease.
Rinse any spilled acid from the bat- tery immediately with a solution of
water and baking soda.
Battery recharging
NOTICE
CALIFORNIA PROPOSITION 65
WARNING
Battery posts, terminals, and
related accessories contain
lead and lead compounds,
chemicals known to the State of
California to cause cancer, birth
defects and reproductive harm.
Batteries also contain other
chemicals known to the State of
California to cause cancer.
Wash hands after handling.
WARNING
Always follow these instructions
when recharging your vehicle’s
battery to avoid the risk of SERI-
OUS INJURY or DEATH from
explosions or acid burns:
Before performing mainte-
nance or recharging the bat-
tery, turn off all accessories and
place the Engine Start/Stop
button to the OFF position.
Keep all flames, sparks, or
smoking materials away from
the battery.
Always work outdoors or in an
area with plenty of ventilation.
Wear eye protection when
checking the battery during
charging.
The battery must be removed
from the vehicle and placed in
a well ventilated area.
(Continued)
WARNING
OLFH074011L
Page 633 of 708
7-69
7
Maintenance
Engine compartment main fuse panel
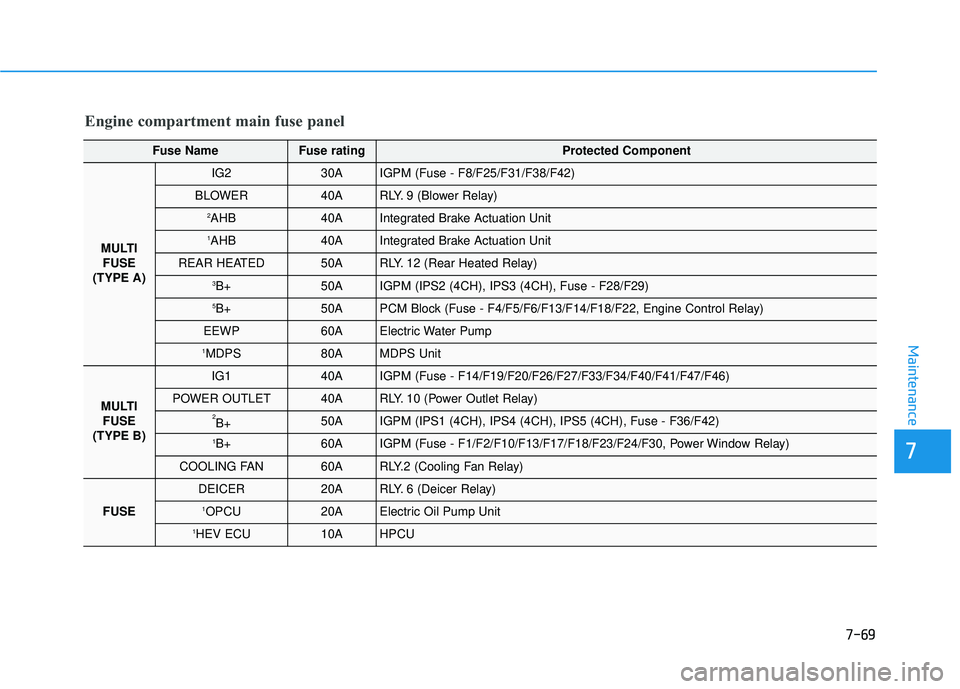
Fuse NameFuse rating Protected Component
MULTIFUSE
(TYPE A)
IG230AIGPM (Fuse - F8/F25/F31/F38/F42)
BLOWER40ARLY. 9 (Blower Relay)
2AHB40AIntegrated Brake Actuation Unit
1AHB40AIntegrated Brake Actuation Unit
REAR HEATED50ARLY. 12 (Rear Heated Relay)
3B+50AIGPM (IPS2 (4CH), IPS3 (4CH), Fuse - F28/F29)
5B+50APCM Block (Fuse - F4/F5/F6/F13/F14/F18/F22, Engine Control Relay)
EEWP60AElectric Water Pump
1MDPS80AMDPS Unit
MULTI FUSE
(TYPE B)
IG140AIGPM (Fuse - F14/F19/F20/F26/F27/F33/F34/F40/F41/F47/F46)
POWER OUTLET40ARLY. 10 (Power Outlet Relay)
2B+50AIGPM (IPS1 (4CH), IPS4 (4CH), IPS5 (4CH), Fuse - F36/F42)
1B+60AIGPM (Fuse - F1/F2/F10/F13/F17/F18/F23/F24/F30, Power Window Relay)
COOLING FAN60ARLY.2 (Cooling Fan Relay)
FUSE
DEICER20ARLY. 6 (Deicer Relay)
1OPCU20AElectric Oil Pump Unit
1HEV ECU10AHPCU
Page 634 of 708
7-70
Maintenance
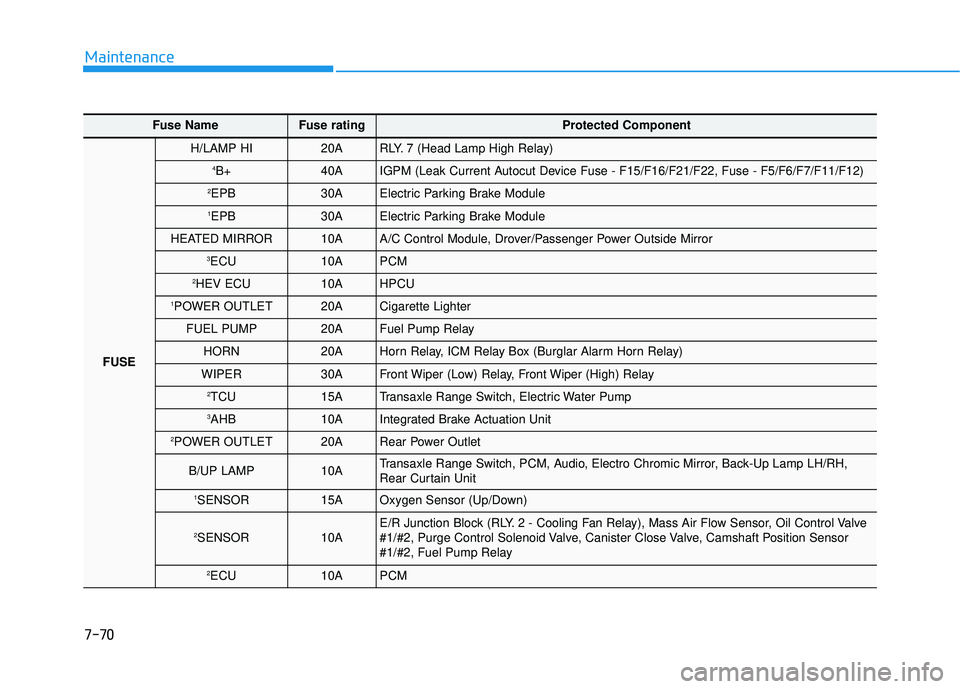
Fuse Name Fuse rating Protected Component
FUSE
H/LAMP HI20ARLY. 7 (Head Lamp High Relay)
4B+40AIGPM (Leak Current Autocut Device Fuse - F15/F16/F21/F22, Fuse - F5/F6/F7/F11/F12)
2EPB30AElectric Parking Brake Module
1EPB30AElectric Parking Brake Module
HEATED MIRROR10AA/C Control Module, Drover/Passenger Power Outside Mirror
3ECU10APCM
2HEV ECU10AHPCU
1POWER OUTLET20ACigarette Lighter
FUEL PUMP20AFuel Pump Relay
HORN20AHorn Relay, ICM Relay Box (Burglar Alarm Horn Relay)
WIPER30AFront Wiper (Low) Relay, Front Wiper (High) Relay
2TCU15ATransaxle Range Switch, Electric Water Pump
3AHB10AIntegrated Brake Actuation Unit
2POWER OUTLET20ARear Power Outlet
B/UP LAMP10ATransaxle Range Switch, PCM, Audio, Electro Chromic Mirror, Back-Up Lamp LH/RH,
Rear Curtain Unit
1SENSOR15AOxygen Sensor (Up/Down)
2SENSOR10AE/R Junction Block (RLY. 2 - Cooling Fan Relay), Mass Air Flow Sensor, Oil Control Valve
#1/#2, Purge Control Solenoid Valve, Canister Close Valve, Camshaft Position Sensor
#1/#2, Fuel Pump Relay
2ECU10APCM
Page 635 of 708
7-71
7
Maintenance
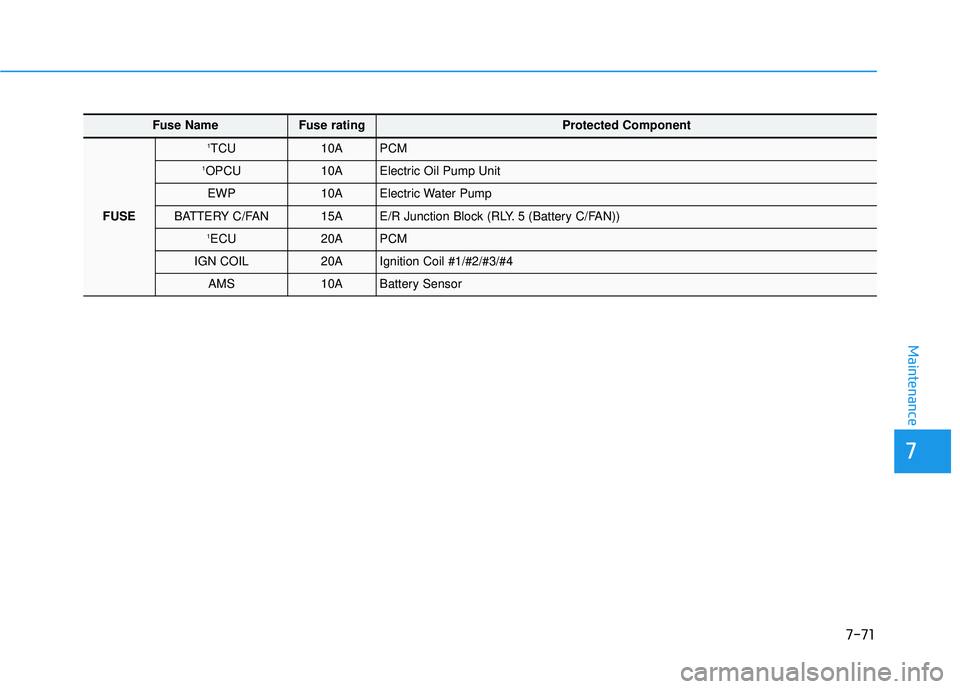
Fuse Name Fuse rating Protected Component
FUSE
1TCU10APCM
1OPCU10AElectric Oil Pump Unit
EWP10AElectric Water Pump
BATTERY C/FAN15AE/R Junction Block (RLY. 5 (Battery C/FAN))
1ECU20APCM
IGN COIL20AIgnition Coil #1/#2/#3/#4
AMS10ABattery Sensor
Page 648 of 708
7-84
Maintenance
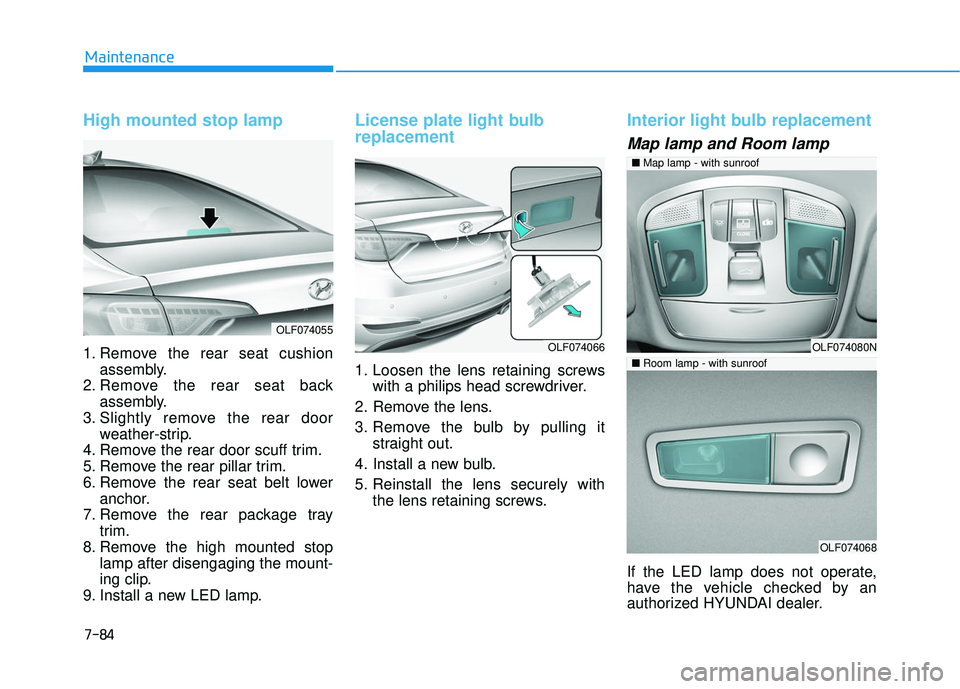
High mounted stop lamp
1. Remove the rear seat cushionassembly.
2. Remove the rear seat back assembly.
3. Slightly remove the rear door weather-strip.
4. Remove the rear door scuff trim.
5. Remove the rear pillar trim.
6. Remove the rear seat belt lower anchor.
7. Remove the rear package tray trim.
8. Remove the high mounted stop lamp after disengaging the mount-
ing clip.
9. Install a new LED lamp.
License plate light bulb
replacement
1. Loosen the lens retaining screws with a philips head screwdriver.
2. Remove the lens.
3. Remove the bulb by pulling it straight out.
4. Install a new bulb.
5. Reinstall the lens securely with the lens retaining screws.
Interior light bulb replacement
Map lamp and Room lamp
If the LED lamp does not operate,
have the vehicle checked by an
authorized HYUNDAI dealer.
OLF074080N
OLF074068
■Map lamp - with sunroof
■Room lamp - with sunroof
OLF074055
OLF074066