Page 238 of 708
3-143
Convenient features of your vehicle
3
Defogging logic (if equipped)
To reduce the probability of fogging
up the inside of the windshield, the
air intake or air conditioning are con-
trolled automatically according to
certain conditions such as or
position. To cancel or return the
defogging logic, do the following.
Automatic climate control sys-tem
1. Turn the ignition switch to the ON
position.
2. Press the defroster button ( ).
3. While pressing the air conditioning button (A/C), press the air intake
control button at least 5 times with-
in 3 seconds.
The climate control information
screen will blink 3 times with 0.5 sec-
onds of interval. It indicates that the
defogging logic is canceled or
returned to the programmed status.
If the battery has been discharged or
disconnected, it resets to the defog
logic status.
Page 239 of 708
3-144
Convenient features of your vehicle
C
CL
LI
IM
M A
AT
TE
E
C
C O
O N
NT
TR
R O
O L
L
A
A D
DD
DI
IT
T I
IO
O N
NA
AL
L
F
F E
E A
A T
TU
U R
RE
ES
S
(
( I
IF
F
E
E Q
Q U
UI
IP
P P
PE
ED
D )
)
Automatic Ventilation
(if equipped)
When the engine is running and tem-
perature is below 59°F (15°C) with
the recirculated air position selected
more than five minutes, the air intake
position will automatically change to
the outside (fresh) air position.
To cancel or reset the Automatic
Ventilation
When the air conditioning system is
on, select Face Level mode and
while pressing the A/C button, press
the recirculated air position button
five times within three seconds.
Sunroof Inside Air
Recirculation (if equipped)
When the heater or air conditioning
system is on with the sunroof
opened, the outside (fresh) air posi-
tion will be automatically selected. At
this time, if you press the recirculated
air position button, the recirculated
air position will be selected but will
change back to the outside (fresh) air
position after 3 minutes.
When the sunroof is closed, the air
intake position will return to the orig-
inal position that was selected.
Page 245 of 708
3-150
Convenient features of your vehicle
Clock
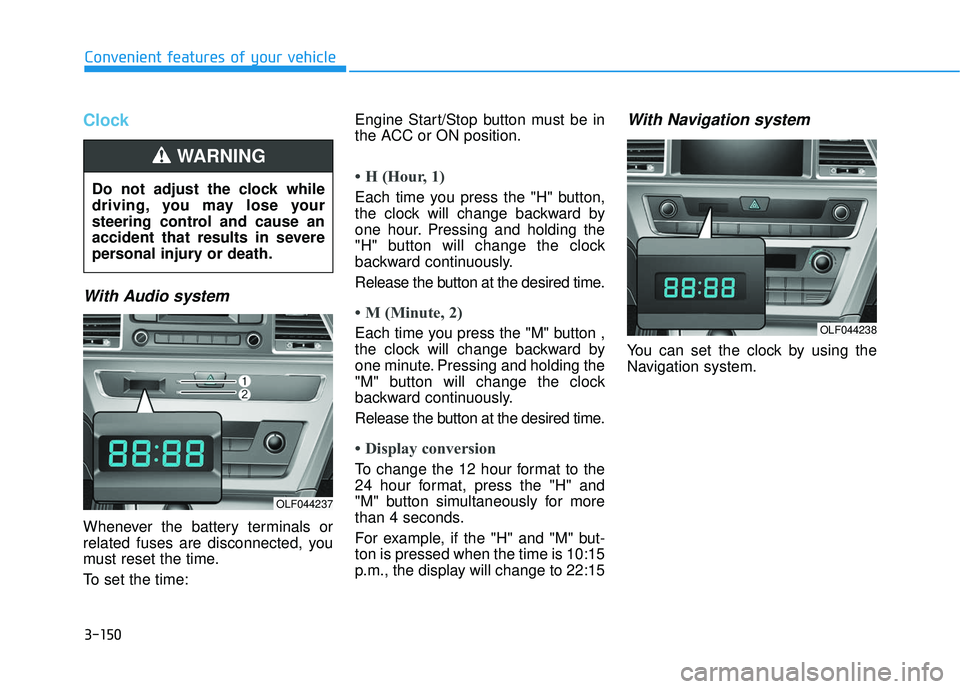
With Audio system
Whenever the battery terminals or
related fuses are disconnected, you
must reset the time.
To set the time:Engine Start/Stop button must be in
the ACC or ON position.
• H (Hour, 1)
Each time you press the "H" button,
the clock will change backward by
one hour. Pressing and holding the
"H" button will change the clock
backward continuously.
Release the button at the desired time.
• M (Minute, 2)
Each time you press the "M" button ,
the clock will change backward by
one minute. Pressing and holding the
"M" button will change the clock
backward continuously.
Release the button at the desired time.
• Display conversion
To change the 12 hour format to the
24 hour format, press the "H" and
"M" button simultaneously for more
than 4 seconds.
For example, if the "H" and "M" but-
ton is pressed when the time is 10:15
p.m., the display will change to 22:15
With Navigation system
You can set the clock by using the
Navigation system.
Do not adjust the clock while
driving, you may lose your
steering control and cause an
accident that results in severe
personal injury or death.
WARNING
OLF044237
OLF044238
Page 251 of 708
4-3
Multimedia System
Do not clean the inside of therear window glass with a cleaner
or scraper to remove foreign
deposits as this may cause dam-
age to the antenna elements.
Avoid adding metallic coatings such as Ni, Cd, and so on. These
can degrade the receiving AM
and FM broadcast signals.
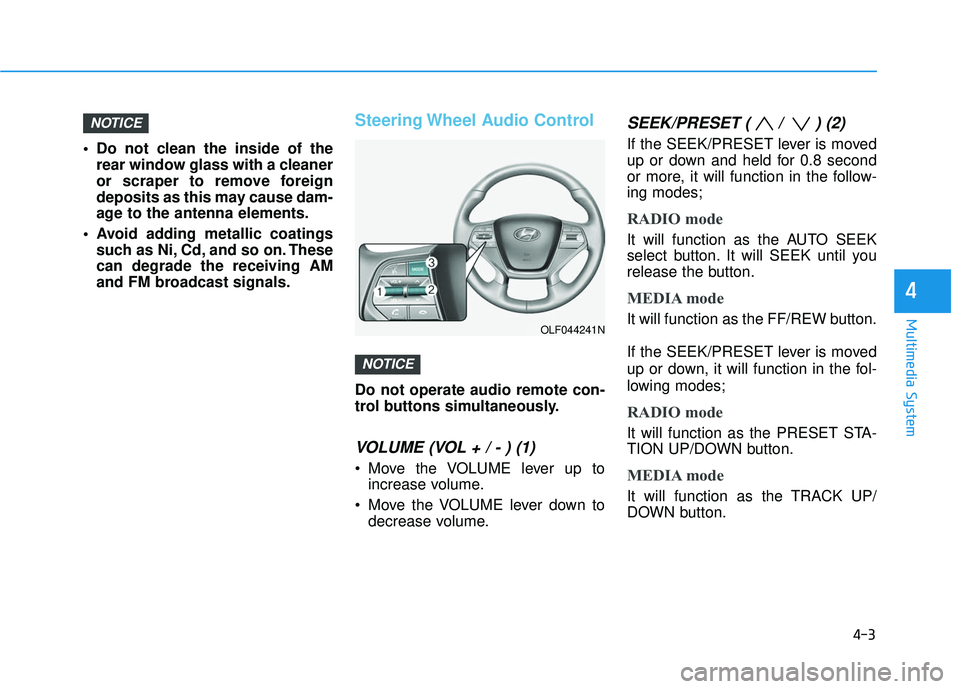
Steering Wheel Audio Control
Do not operate audio remote con-
trol buttons simultaneously.
VOLUME (VOL + / - ) (1)
Move the VOLUME lever up toincrease volume.
Move the VOLUME lever down to decrease volume.
SEEK/PRESET ( / ) (2)
If the SEEK/PRESET lever is moved
up or down and held for 0.8 second
or more, it will function in the follow-
ing modes;
RADIO mode
It will function as the AUTO SEEK
select button. It will SEEK until you
release the button.
MEDIA mode
It will function as the FF/REW button.
If the SEEK/PRESET lever is moved
up or down, it will function in the fol-
lowing modes;
RADIO mode
It will function as the PRESET STA-
TION UP/DOWN button.
MEDIA mode
It will function as the TRACK UP/
DOWN button.
NOTICE
NOTICE
4
OLF044241N
Page 262 of 708
4-14
(Continued)
• If your iPhone
®is connected to both
the Bluetooth®Wireless Technology
and USB, the sound may not be
properly played. In your iPhone
®,
select the Dock c onnector or
Bluetooth
®Wireless Technology to
change the sound output (source).
• iPod mode cannot be operated when the iPod
®cannot be recognized due
to versions that do not support com-
munication protocols.
• For fifth generation iPod
®Nano
devices, the iPod®may not be recog-
nized when the battery level is low.
Please charge the iPod
®for use.
• Search/play orders shown within the iPod
®device may differ with the
orders shown within the audio sys-
tem.
• If the iPod
®malfunctions due to an
iPod®device defect, reset the iPod®
and try again. (To learn more, refer to
your iPod®manual)
(Continued) (Continued)
• Some iPod
®s may not sync with the
System depending on its version. If
the Media is removed before the
Media is recognized, then the sys-
tem may not properly restore the
previously operated mode. (iPad
®
charging is not supported.)
Information - Using the AUX
device
• If an external device connector is connected with the AUX terminal,
then AUX mode will automatically
operate. Once the connector is dis-
connected, the previous mode will
be restored.
• AUX mode can be used only when an external audio player (cam-
corder, car VCR, etc.) has been con-
nected.
• The AUX volume can be controlled separately from other audio modes.
• Connecting a connector jack to the AUX terminal without an external
device will convert the system to
AUX mode, but only output noise.
When an external device is not
being used, also remove the connec-
tor jack.
• When the external device power is connected to the power jack, play-
ing the external device may output
noise. In such cases, disconnect the
power connection before use.
• Fully insert the AUX cable to the AUX jack upon use.i
Multimedia System
Page 266 of 708
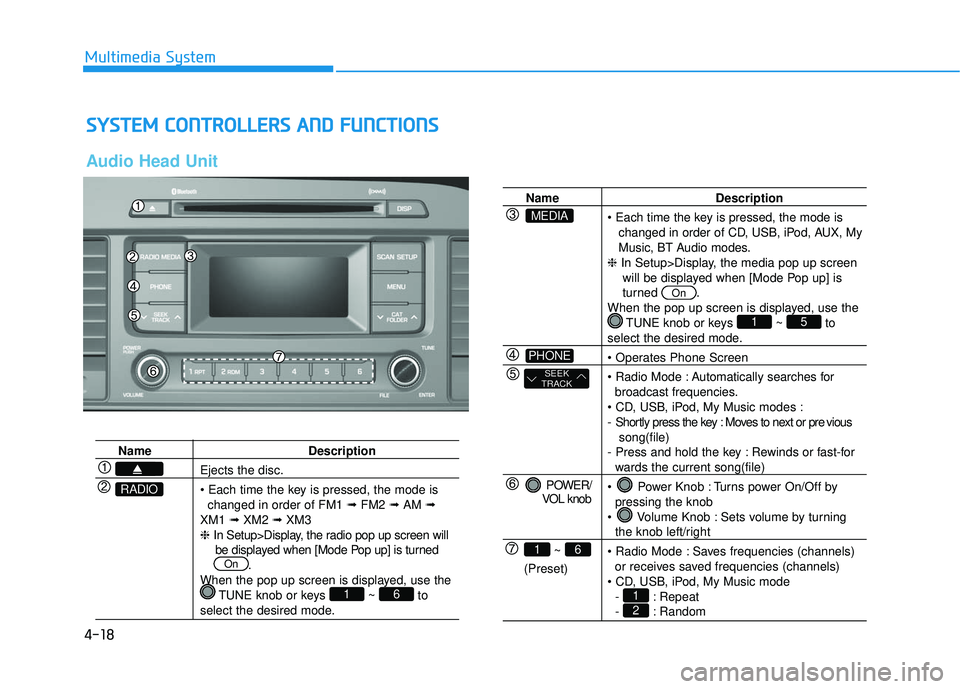
4-18
Multimedia System
S
SY
Y S
ST
T E
EM
M
C
C O
O N
NT
TR
R O
O L
LL
LE
E R
R S
S
A
A N
N D
D
F
F U
U N
NC
CT
T I
IO
O N
NS
S
Audio Head Unit
Name Description
Ejects the disc.
changed in order of FM1 ➟FM2 ➟AM ➟
XM1 ➟XM2 ➟XM3
❈ In Setup>Display, the radio pop up screen will
be displayed when [Mode Pop up] is turned .
When the pop up screen is displayed, use the TUNE knob or keys ~ to
select the desired mode.
61
On
RADIO
Name Description
changed in order of CD, USB, iPod, AUX, My
Music, BT Audio modes.
❈ In Setup>Display, the media pop up screen
will be displayed when [Mode Pop up] is
turned .
When the pop up screen is displayed, use the TUNE knob or keys ~ to
select the desired mode.
Automatically searches for broadcast frequencies.
- Shortly press the key : Moves to next or pre vious song(file)
- Press and hold the key : Rewinds or fast-for
wards the current song(file)
Power Knob : Turns power On/Off by pressing the knob
Volume Knob : Sets volume by turning
the knob left/right
Saves frequencies (channels) or receives saved frequencies (channels)
- : Repeat
- : Random21
51
On
POWER/
VOL knob
~
(Preset)
61
SEEK
TRACK
PHONE
MEDIA
Page 267 of 708
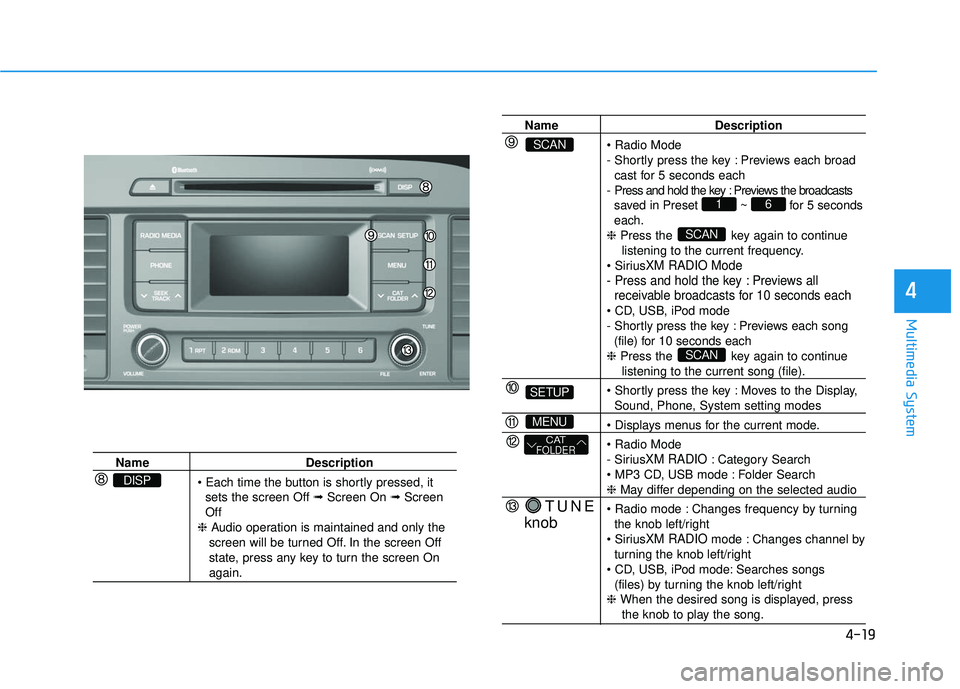
4-19
Multimedia System
4
NameDescription
sets the screen Off ➟ Screen On ➟Screen
Off
❈ Audio operation is maintained and only the
screen will be turned Off. In the screen Off
state, press any key to turn the screen On
again.
DISP
Name Description
- Shortly press the key : Previews each broad cast for 5 seconds each
- Press and hold the key : Previews the broadcasts saved in Preset ~ for 5 seconds
each.
❈ Press the key again to continue
listening to the current frequency.
XM RADIO Mode
- Press and hold the key : Previews all receivable broadcasts for 10 seconds each
- Shortly press the key : Previews each song
(file) for 10 seconds each
❈ Press the key again to continue
listening to the current song (file).
Moves to the Display,
Sound, Phone, System setting modes
- Sirius
XM RADIO: Category Search
Folder Search
❈ May differ depending on the selected audio
Changes frequency by turning the knob left/right
XM RADIO mode : Changes channel by
turning the knob left/right
Searches songs (files) by turning the knob left/right
❈ When the desired song is displayed, press
the knob to play the song.
SCAN
SCAN
61
TUNE
knob
CATFOLDER
MENU
SETUP
SCAN
Page 271 of 708
4-23
Multimedia System
4
R
RA
A D
DI
IO
O
:
:
F
F M
M ,
,
A
A M
M ,
,
S
S i
ir
r i
iu
u s
sX
X M
M
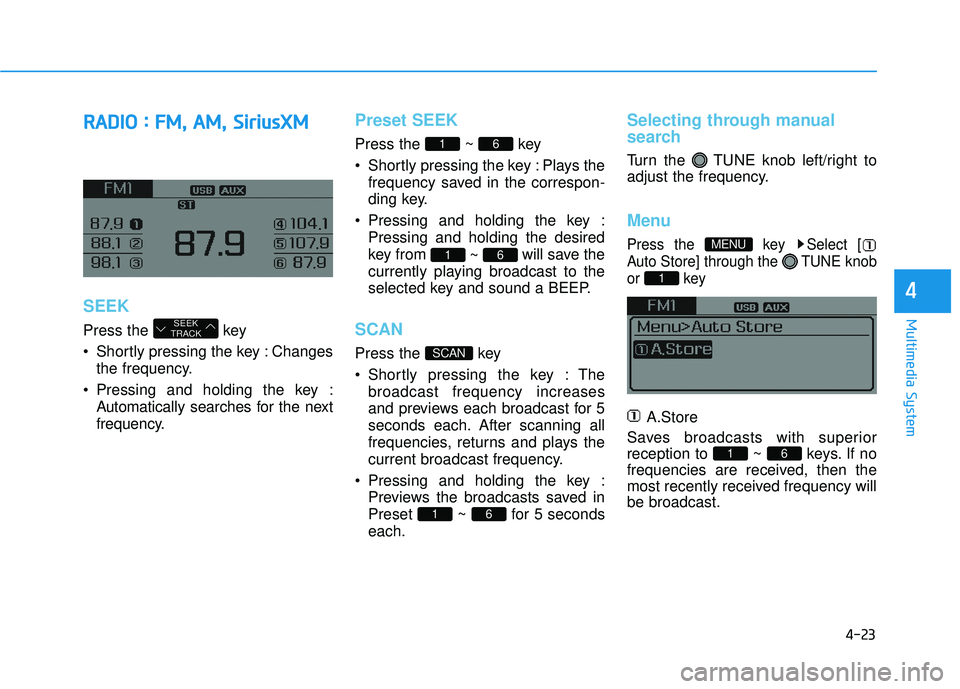
SEEK
Press the key
Shortly pressing the key : Changes
the frequency.
Pressing and holding the key : Automatically searches for the next
frequency.
Preset SEEK
Press the ~ key
Shortly pressing the key : Plays thefrequency saved in the correspon-
ding key.
Pressing and holding the key : Pressing and holding the desired
key from ~ will save the
currently playing broadcast to the
selected key and sound a BEEP.
SCAN
Press the key
Shortly pressing the key : The broadcast frequency increases
and previews each broadcast for 5
seconds each. After scanning all
frequencies, returns and plays the
current broadcast frequency.
Pressing and holding the key : Previews the broadcasts saved in
Preset ~ for 5 seconds
each.
Selecting through manual
search
Turn the TUNE knob left/right to
adjust the frequency.
Menu
Press the key Select [
Auto Store] through the TUNE knob
or key
A.Store
Saves broadcasts with superior
reception to ~ keys. If no
frequencies are received, then the
most recently received frequency will
be broadcast.
61
1
MENU
61
SCAN
61
61
SEEK
TRACK