2016 HYUNDAI SONATA LIMITED navigation
[x] Cancel search: navigationPage 217 of 708
3-122
Convenient features of your vehicle
D
DR
RI
IV
V E
ER
R
A
A S
SS
SI
IS
S T
T
S
S Y
Y S
ST
T E
EM
M
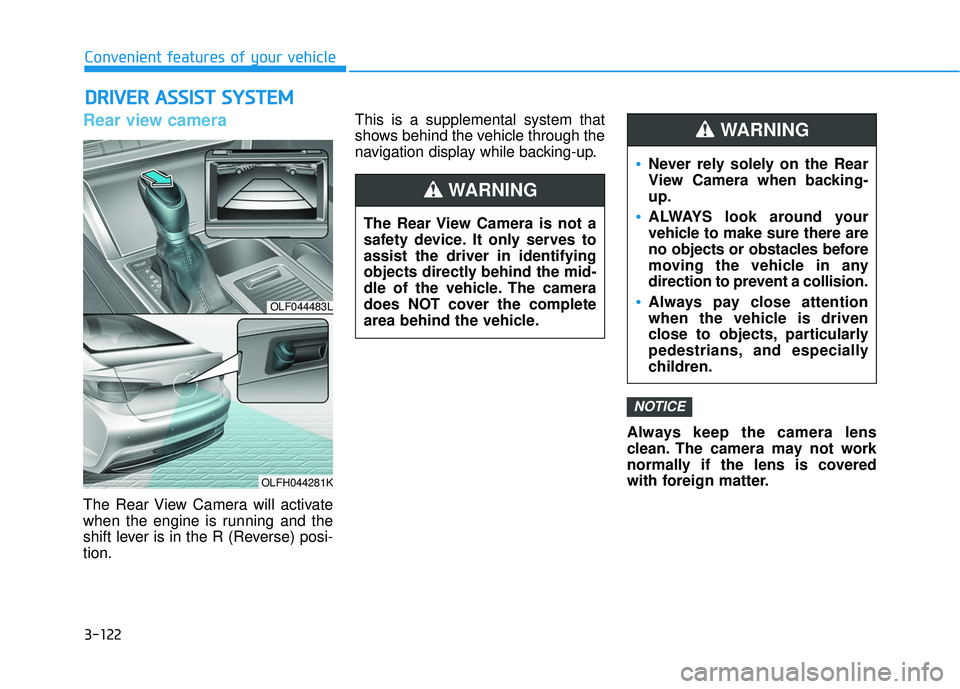
Rear view camera
The Rear View Camera will activate
when the engine is running and the
shift lever is in the R (Reverse) posi-
tion. This is a supplemental system that
shows behind the vehicle through the
navigation display while backing-up.
Always keep the camera lens
clean. The camera may not work
normally if the lens is covered
with foreign matter.
NOTICE
OLF044483L
OLFH044281K
The Rear View Camera is not a
safety device. It only serves to
assist the driver in identifying
objects directly behind the mid-
dle of the vehicle. The camera
does NOT cover the complete
area behind the vehicle.
WARNING
Never rely solely on the Rear
View Camera when backing-
up.
ALWAYS look around your
vehicle to make sure there are
no objects or obstacles before
moving the vehicle in any
direction to prevent a collision.
Always pay close attention
when the vehicle is driven
close to objects, particularly
pedestrians, and especially
children.
WARNING
Page 245 of 708
3-150
Convenient features of your vehicle
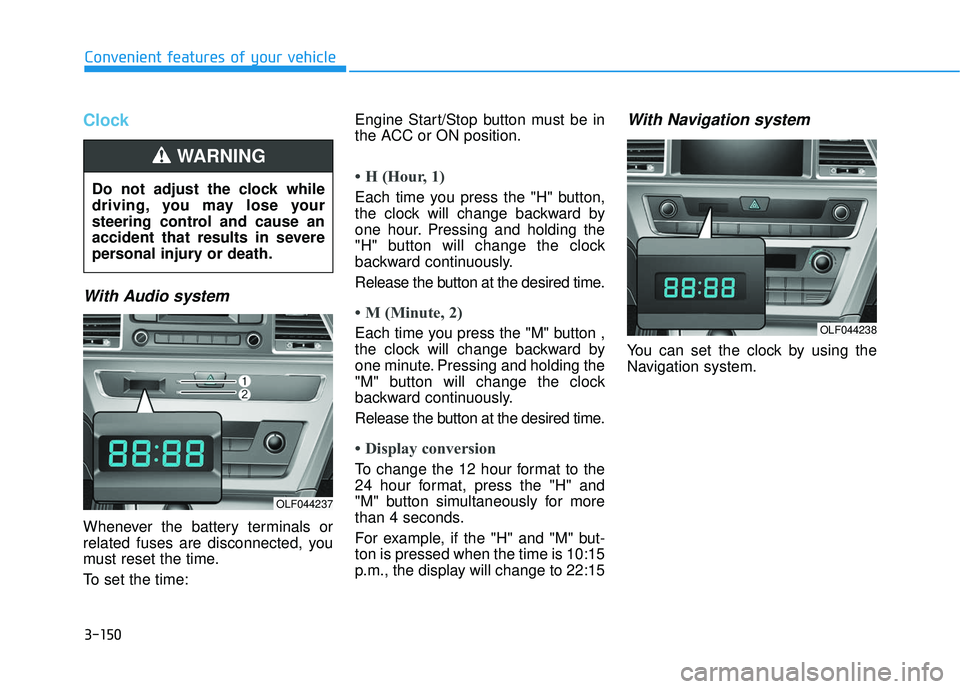
Clock
With Audio system
Whenever the battery terminals or
related fuses are disconnected, you
must reset the time.
To set the time:Engine Start/Stop button must be in
the ACC or ON position.
• H (Hour, 1)
Each time you press the "H" button,
the clock will change backward by
one hour. Pressing and holding the
"H" button will change the clock
backward continuously.
Release the button at the desired time.
• M (Minute, 2)
Each time you press the "M" button ,
the clock will change backward by
one minute. Pressing and holding the
"M" button will change the clock
backward continuously.
Release the button at the desired time.
• Display conversion
To change the 12 hour format to the
24 hour format, press the "H" and
"M" button simultaneously for more
than 4 seconds.
For example, if the "H" and "M" but-
ton is pressed when the time is 10:15
p.m., the display will change to 22:15
With Navigation system
You can set the clock by using the
Navigation system.
Do not adjust the clock while
driving, you may lose your
steering control and cause an
accident that results in severe
personal injury or death.
WARNING
OLF044237
OLF044238
Page 246 of 708
3-151
Convenient features of your vehicle
3
GPS Time check
The clock is automatically updated
through the navigation system.
GPS Time non-check
The clock can be manually adjusted.
1. Select the "System Settings" onthe "INFO/Setup" screen.
2. Select the "Clock Settings".
3. Select the "Time Settings" by rotating the controller on the cen-
ter console panel.
4. Select the "Time Format" to the 12 hour or 24 hour format.
For more information, please refer to
the manual that was separately sup-
plied with your vehicle.
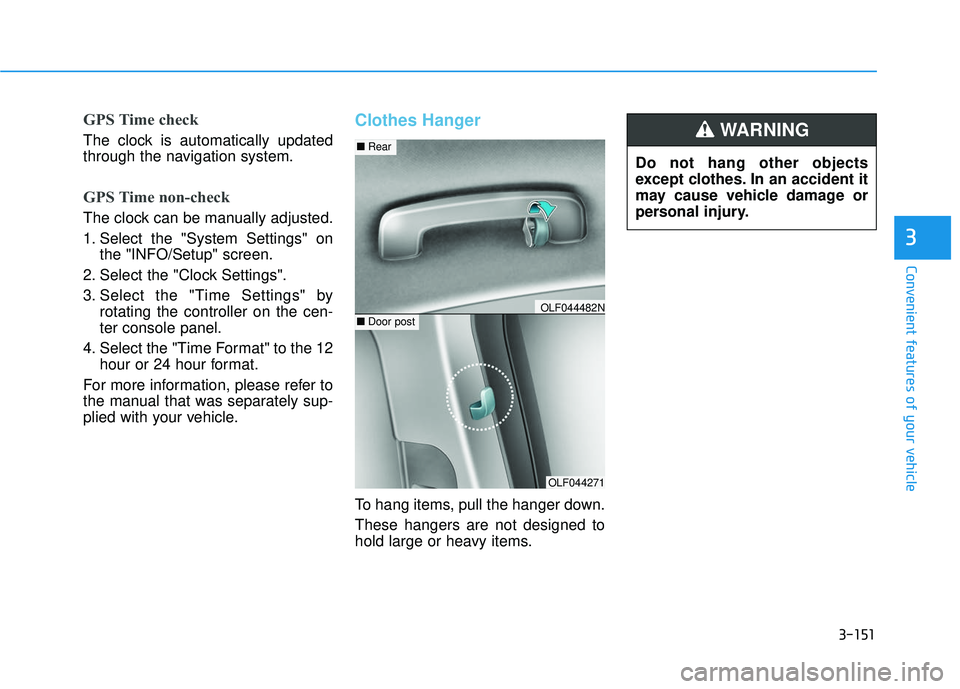
Clothes Hanger
To hang items, pull the hanger down.
These hangers are not designed to
hold large or heavy items. Do not hang other objects
except clothes. In an accident it
may cause vehicle damage or
personal injury.
WARNING
OLF044271
■
Rear
■Door postOLF044482N
Page 249 of 708
Multimedia System
Multimedia System.................................................4-2
AUX, USB and iPod®Port ...............................................4-2
Antenna ........................................................................\
.......4-2
Steering Wheel Audio Control........................................4-3
Audio / Video / Navigation System (AVN) ..................4-4
Bluetooth®Wireless Technology Hands-Free ...........4-4
How Vehicle Audio Works ...............................................4-5
Features of Your Vehicle.................................................4-7
System Controllers and Functions
-3.8 Inch Mono TFT ................................4-18, 4-111
Audio Head Unit .................................................4-18, 4-111
Setup .....................................................................4-2\
0, 4-113
Radio : FM, AM, SiriusXM ...............................4-23, 4-116
SiriusXM, XM
TMRADIO ......................................4-26, 4-117
Basic Method of Use : Audio CD /
MP3 CD / USB / iPod
®/ My Music .............4-28, 4-119
Bluetooth®Wireless Technology Audio .......4-34, 4-125
Bluetooth®Wireless Technology ...................4-36, 4-127
Voice Recognition ..............................................4-47, 4-138
Ending Voice Recognition ................................4-48, 4-139
System Controllers and Functions
- 5 Inch Color TFT LCD ..........................4-55, 4-145
Audio Head Unit .................................................4-55, 4-145
Steering-Wheel Mounted Controls ...............4-57, 4-147
Radio Mode .........................................................4-59, 4-149
SiriusXM, XM
TMRadio Mode ...........................4-63, 4-151
Media Mode ........................................................4-65, 4-153
Audio CD Mode ..................................................4-66, 4-154
MP3 CD Mode.....................................................4-68, 4-156
USB Mode............................................................4-71, 4-159
iPod
®Mode .........................................................4-74, 4-162
AUX Mode ...........................................................4-76, 4-164
MY Music Mode.................................................4-77, 4-165
Bluetooth®Wireless Technology
Audio Mode .........................................................4-80, 4-168
Voice Recognition ..............................................4-95, 4-183
Setup...................................................................4-101\
, 4-190
Rear View Camera ...........................................4-106, 4-194
Blue Link
®..........................................................4-106, 4-194
Declaration of conformity ..........................................4-198
4
Page 252 of 708
4-4
MODE (3)
Press the MODE button to select
Radio, XM, Disc, or AUX.
Information
Detailed information for audio control
buttons are described in the following
pages in this chapter.
Audio / Video / Navigation
System (AVN)
Detailed information for the AVN sys-
tem is described in a separately sup-
plied manual.
Bluetooth®Wireless
Technology Hands-Free
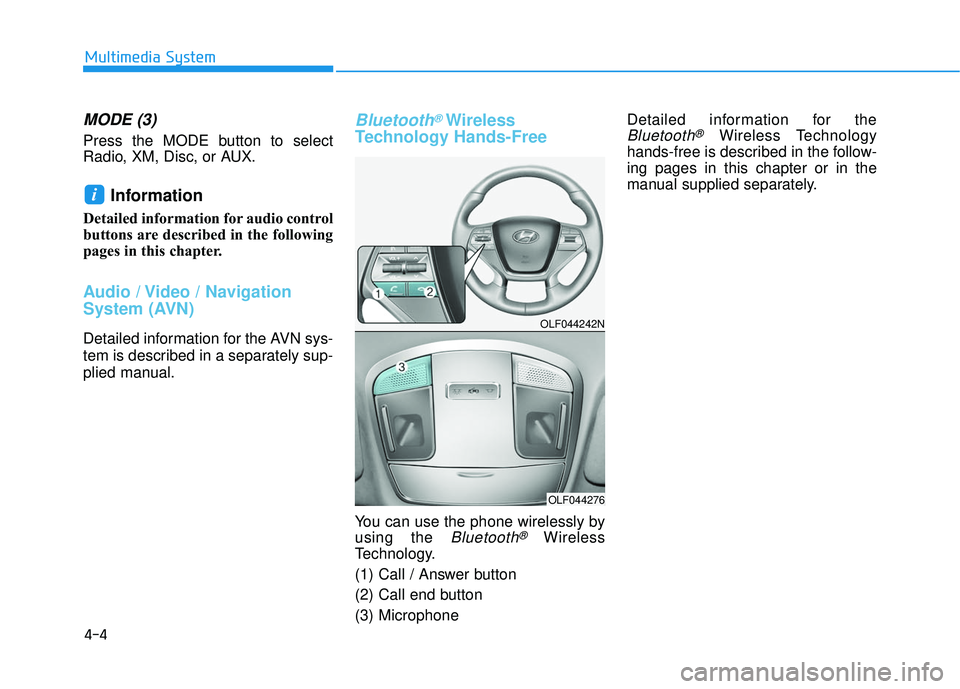
You can use the phone wirelessly by
using the
Bluetooth®Wireless
Technology.
(1) Call / Answer button
(2) Call end button
(3) Microphone Detailed information for the
Bluetooth®Wireless Technology
hands-free is described in the follow-
ing pages in this chapter or in the
manual supplied separately.
i
Multimedia System
OLF044242N
OLF044276
Page 551 of 708
6-13
What to do in an emergency
6
The TPMS Malfunction Indicator
may illuminate after blinking for
one minute if the vehicle is near
electric power supply cables or
radio transmitters such as police
stations, government and public
offices, broadcasting stations,
military installations, airports,
transmitting towers, etc.
Additionally, the TPMS Malfunction
Indicator may illuminate if snow
chains are used or electronic
devices such as computers, charg-
ers, remote starters, navigation,
etc. This may interfere with normal
operation of the TPMS.
Changing a tire with TPMS
If you have a flat tire, the Low Tire
Pressure and Position telltales will
come on. Have the flat tire repaired
by an authorized HYUNDAI dealer
as soon as possible or replace the
flat tire with the spare tire.
The spare tire (if equipped) does not
come with a tire pressure monitoring
sensor. When the low pressure tire or
the flat tire is replaced with the spare
tire, the Low Tire Pressure Telltale
will remain on. Also, the TPMS
Malfunction Indicator will illuminate
after blinking for one minute if the
vehicle is driven at speed above 15.5
mph (25 km/h) for approximately 20
minutes.Once the original tire equipped with
a tire pressure monitoring sensor is
reinflated to the recommended pres-
sure and reinstalled on the vehicle,
the Low Tire Pressure Telltale and
TPMS Malfunction Indicator will go
off within a few minutes of driving.
If the indicators do not extinguish
after a few minutes, please visit an
authorized HYUNDAI dealer.
Each wheel is equipped with a tire
pressure sensor mounted inside the
tire behind the valve stem (except for
the spare tire). You must use TPMS
specific wheels. It is recommended
that you always have your tires serv-
iced by an authorized HYUNDAI
dealer.
You may not be able to identify a tire
with low pressure by simply looking
at it. Always use a good quality tire
pressure gauge to measure. Please
note that a tire that is hot (from being
driven) will have a higher pressure
measurement than a tire that is cold.
NOTICE
Never use a puncture-repairing
agent not approved by HYUNDAI
dealer to repair and/or inflate a
low pressure tire. Tire sealant
not approved by HYUNDAI deal-
er may damage the tire pressure
sensor.
CAUTION
Page 630 of 708
7-66
Maintenance
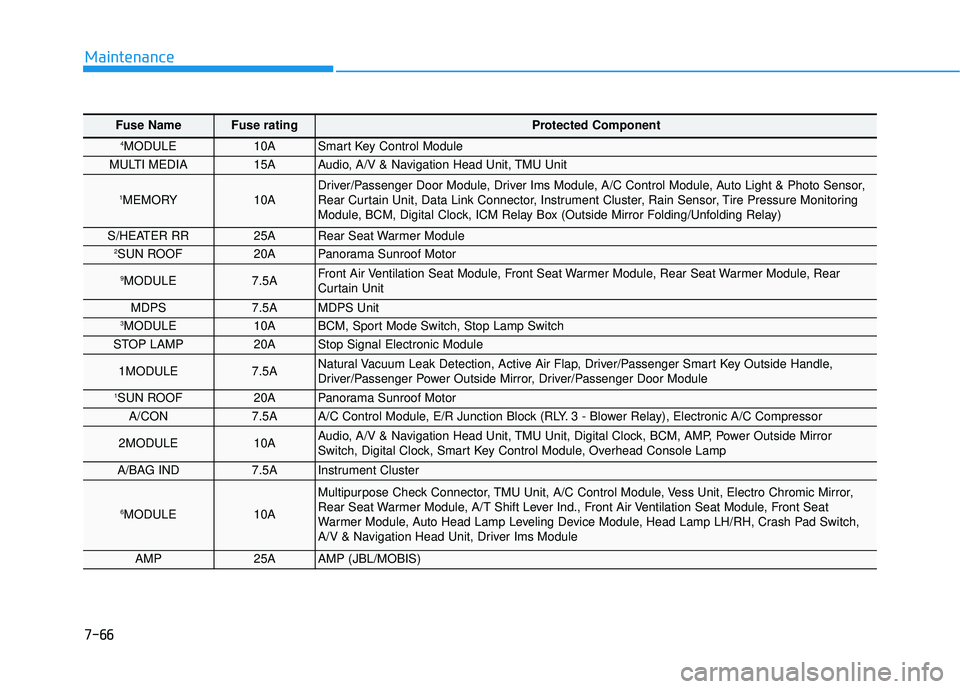
Fuse Name Fuse rating Protected Component
4MODULE10ASmart Key Control Module
MULTI MEDIA15AAudio, A/V & Navigation Head Unit, TMU Unit
1MEMORY10ADriver/Passenger Door Module, Driver Ims Module, A/C Control Module, Auto Light & Photo Sensor,
Rear Curtain Unit, Data Link Connector, Instrument Cluster, Rain Sensor, Tire Pressure Monitoring
Module, BCM, Digital Clock, ICM Relay Box (Outside Mirror Folding/Unfolding Relay)
S/HEATER RR25ARear Seat Warmer Module2SUN ROOF20APanorama Sunroof Motor
9MODULE7.5AFront Air Ventilation Seat Module, Front Seat Warmer Module, Rear Seat Warmer Module, Rear
Curtain Unit
MDPS7.5AMDPS Unit3MODULE10ABCM, Sport Mode Switch, Stop Lamp Switch
STOP LAMP20AStop Signal Electronic Module
1MODULE7.5ANatural Vacuum Leak Detection, Active Air Flap, Driver/Passenger Smart Key Outside Handle,
Driver/Passenger Power Outside Mirror, Driver/Passenger Door Module
1SUN ROOF20APanorama Sunroof Motor
A/CON7.5AA/C Control Module, E/R Junction Block (RLY. 3 - Blower Relay), Electronic A/C Compressor
2MODULE10AAudio, A/V & Navigation Head Unit, TMU Unit, Digital Clock, BCM, AMP, Power Outside Mirror
Switch, Digital Clock, Smart Key Control Module, Overhead Console Lamp
A/BAG IND7.5AInstrument Cluster
6MODULE10A
Multipurpose Check Connector, TMU Unit, A/C Control Module, Vess Unit, Electro Chromic Mirror,
Rear Seat Warmer Module, A/T Shift Lever Ind., Front Air Ventilation Seat Module, Front Seat
Warmer Module, Auto Head Lamp Leveling Device Module, Head Lamp LH/RH, Crash Pad Switch,
A/V & Navigation Head Unit, Driver Ims Module
AMP25AAMP (JBL/MOBIS)
Page 674 of 708
I-2
A/V mode ........................................................................\
3-90
Air bag warning labels....................................................2-70
Air bags ........................................................................\
...2-47Additional safety precautions .....................................2-69
Air bag collision sensors ............................................2-63
Air bag inflation conditions .......................................2-65
Air bag non-inflation conditions ................................2-66
Air bag warning labels ...............................................2-70
Curtain air bags ..........................................................2-51
Do not install a child restraint on the front passenger seat..........................................................2-58
Driver’s front air bag..................................................2-49
How does the air bag system operate? .......................2-52
Occupant Classification System (OCS) .....................2-58
Passenger’s front air bag ............................................2-49
Side air bags ...............................................................2-50
SRS Care ....................................................................2-68\
SRS warning light .....................................................2-53
What to expect after an air bag inflates .....................2-57
Where are the air bags? ..............................................2-49
Why didn’t my air bag go off in a collision ..............2-63
Air cleaner.......................................................................7\
-35
Air ventilation seats ........................................................2-22 Airconditioning system
Automatic climate control system............................3-128
Manual climate control system ................................3-129
Refrigerant and Compressor ........................................8-5
Alarm system ..................................................................3-13
Antenna ........................................................................\
.....4-2
Anti-lock brake system (ABS) .......................................5-32
Appearance care..............................................................7-86 Exterior care ...............................................................7-86
Interior care ................................................................7-91
Armrest ........................................................................\
...2-14
Audio/Video/Navigation system (AVN) ...........................4-4
Auto door lock/unlock features ......................................3-12
Auto hold ........................................................................\
5-28
Auto light position ........................................................3-107
Automatic climate control system ................................3-127 Air conditioning .......................................................3-136
Automatic heating and air conditioning ...................3-128
Climate control air filter ...........................................3-139
Manual heating and air conditioning .......................3-129
Automatic transaxle ........................................................5-12 Sports mode ................................................................5-15
AUX, USB and iPod
®port ...............................................4-2
Index
A