2016 Hyundai Santa Fe Sport sound system
[x] Cancel search: sound systemPage 45 of 763
Safety features of your vehicle
24
3
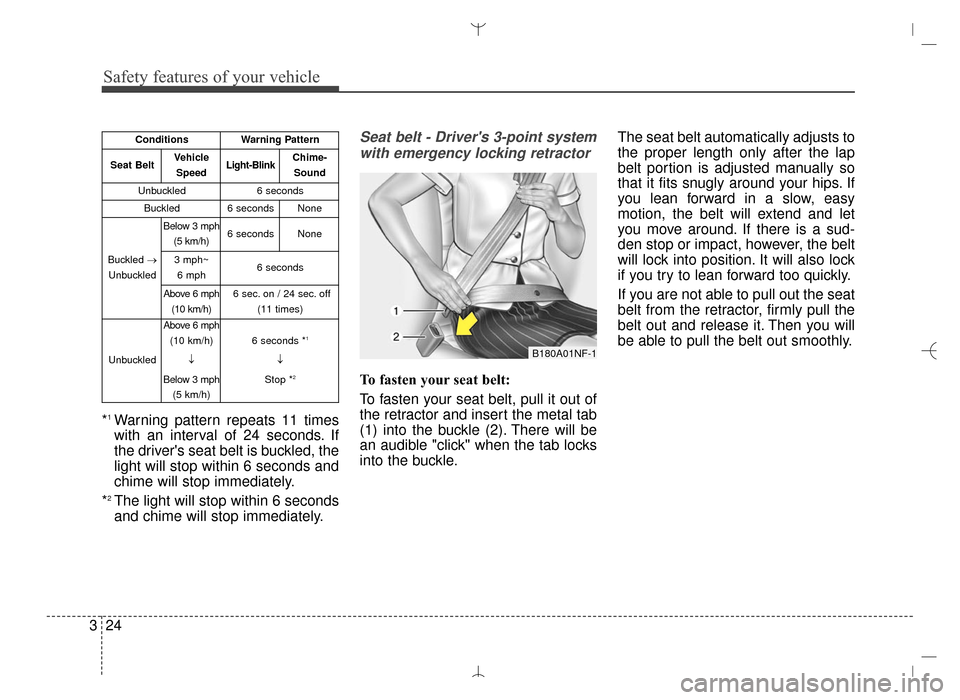
*1Warning pattern repeats 11 times
with an interval of 24 seconds. If
the driver's seat belt is buckled, the
light will stop within 6 seconds and
chime will stop immediately.
*
2The light will stop within 6 seconds
and chime will stop immediately.
Seat belt - Driver's 3-point system with emergency locking retractor
To fasten your seat belt:
To fasten your seat belt, pull it out of
the retractor and insert the metal tab
(1) into the buckle (2). There will be
an audible "click" when the tab locks
into the buckle. The seat belt automatically adjusts to
the proper length only after the lap
belt portion is adjusted manually so
that it fits snugly around your hips. If
you lean forward in a slow, easy
motion, the belt will extend and let
you move around. If there is a sud-
den stop or impact, however, the belt
will lock into position. It will also lock
if you try to lean forward too quickly.
If you are not able to pull out the seat
belt from the retractor, firmly pull the
belt out and release it. Then you will
be able to pull the belt out smoothly.
B180A01NF-1
ConditionsWarning Pattern
Seat BeltVehicle
SpeedLight-BlinkChime-Sound
Unbuckled6 seconds
Buckled6 secondsNone
Buckled →
Unbuckled
Below 3 mph (5 km/h)6 secondsNone
3 mph~6 mph6 seconds
Above 6 mph (10 km/h)6 sec. on / 24 sec. off (11 times)
Unbuckled
Above 6 mph(10 km/h)
↓
Below 3 mph (5 km/h)
6 seconds *1
↓
Stop *
2
AN HMA 3.QXP 3/5/2015 3:09 PM Page 24
Page 58 of 763
337
Safety features of your vehicle
Placing a passenger seat beltinto the automatic locking mode
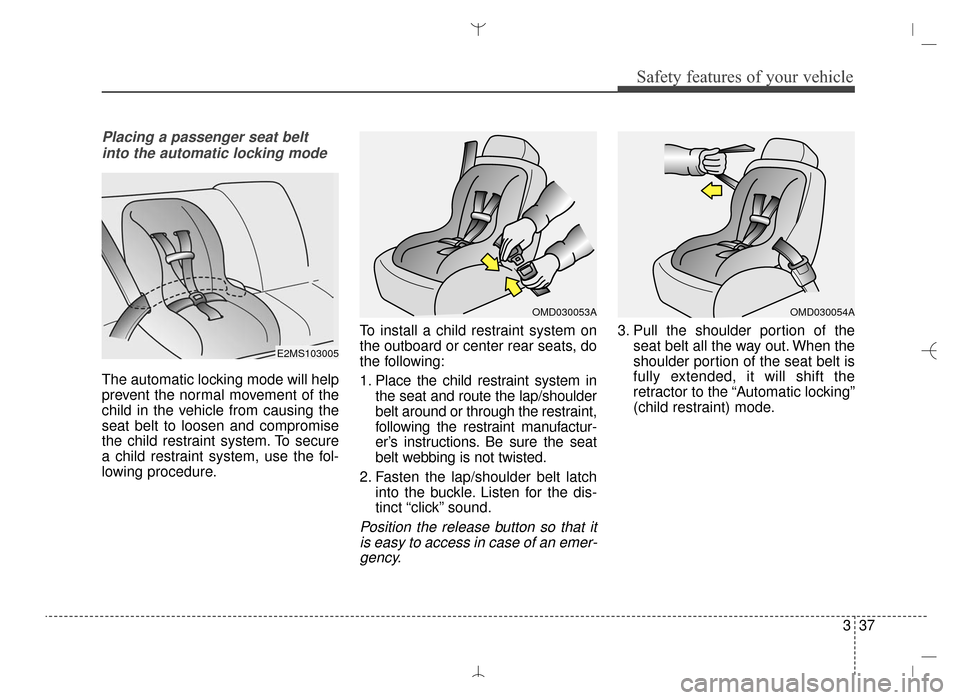
The automatic locking mode will help
prevent the normal movement of the
child in the vehicle from causing the
seat belt to loosen and compromise
the child restraint system. To secure
a child restraint system, use the fol-
lowing procedure. To install a child restraint system on
the outboard or center rear seats, do
the following:
1. Place the child restraint system in
the seat and route the lap/shoulder
belt around or through the restraint,
following the restraint manufactur-
er’s instructions. Be sure the seat
belt webbing is not twisted.
2. Fasten the lap/shoulder belt latch into the buckle. Listen for the dis-
tinct “click” sound.
Position the release button so that itis easy to access in case of an emer-gency.
3. Pull the shoulder portion of the seat belt all the way out. When the
shoulder portion of the seat belt is
fully extended, it will shift the
retractor to the “Automatic locking”
(child restraint) mode.
OMD030054AOMD030053A
E2MS103005
AN HMA 3.QXP 3/5/2015 3:09 PM Page 37
Page 59 of 763
Safety features of your vehicle
38
3
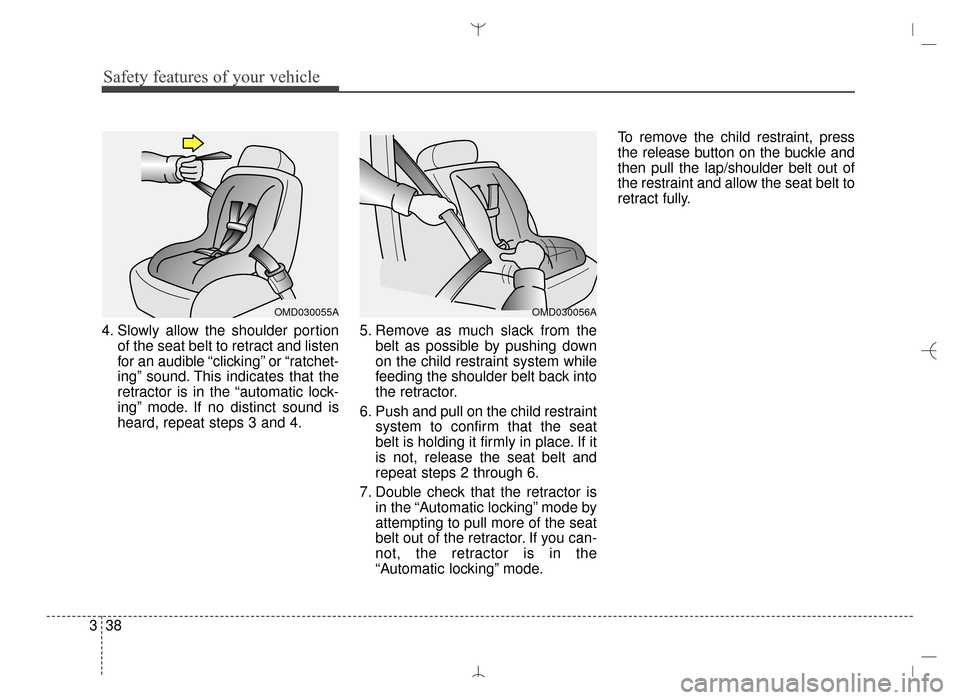
4. Slowly allow the shoulder portion
of the seat belt to retract and listen
for an audible “clicking” or “ratchet-
ing” sound. This indicates that the
retractor is in the “automatic lock-
ing” mode. If no distinct sound is
heard, repeat steps 3 and 4. 5. Remove as much slack from the
belt as possible by pushing down
on the child restraint system while
feeding the shoulder belt back into
the retractor.
6. Push and pull on the child restraint system to confirm that the seat
belt is holding it firmly in place. If it
is not, release the seat belt and
repeat steps 2 through 6.
7. Double check that the retractor is in the “Automatic locking” mode by
attempting to pull more of the seat
belt out of the retractor. If you can-
not, the retractor is in the
“Automatic locking” mode. To remove the child restraint, press
the release button on the buckle and
then pull the lap/shoulder belt out of
the restraint and allow the seat belt to
retract fully.
OMD030056AOMD030055A
AN HMA 3.QXP 3/5/2015 3:09 PM Page 38
Page 109 of 763
417
Features of your vehicle
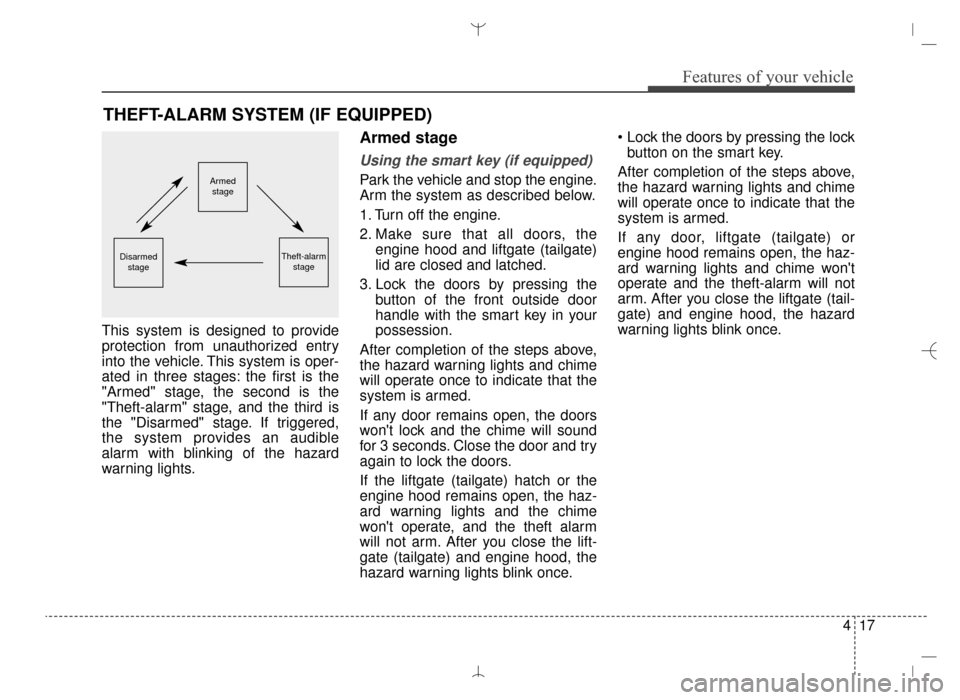
This system is designed to provide
protection from unauthorized entry
into the vehicle. This system is oper-
ated in three stages: the first is the
"Armed" stage, the second is the
"Theft-alarm" stage, and the third is
the "Disarmed" stage. If triggered,
the system provides an audible
alarm with blinking of the hazard
warning lights.
Armed stage
Using the smart key (if equipped)
Park the vehicle and stop the engine.
Arm the system as described below.
1. Turn off the engine.
2. Make sure that all doors, theengine hood and liftgate (tailgate)
lid are closed and latched.
3. Lock the doors by pressing the button of the front outside door
handle with the smart key in your
possession.
After completion of the steps above,
the hazard warning lights and chime
will operate once to indicate that the
system is armed.
If any door remains open, the doors
won't lock and the chime will sound
for 3 seconds. Close the door and try
again to lock the doors.
If the liftgate (tailgate) hatch or the
engine hood remains open, the haz-
ard warning lights and the chime
won't operate, and the theft alarm
will not arm. After you close the lift-
gate (tailgate) and engine hood, the
hazard warning lights blink once.
button on the smart key.
After completion of the steps above,
the hazard warning lights and chime
will operate once to indicate that the
system is armed.
If any door, liftgate (tailgate) or
engine hood remains open, the haz-
ard warning lights and chime won't
operate and the theft-alarm will not
arm. After you close the liftgate (tail-
gate) and engine hood, the hazard
warning lights blink once.
THEFT-ALARM SYSTEM (IF EQUIPPED)
Armed stage
Theft-alarm stageDisarmedstage
AN HMA 4A.QXP 3/5/2015 3:18 PM Page 17
Page 111 of 763
419
Features of your vehicle
Theft-alarm stage
The alarm will be activated if any of
the following occurs while the system
is armed.
transmitter, smart key or mechanical
key.
without using the transmitter or
smart key.
The horn will sound and the hazard
warning lights will blink continuously
for approximately 30 seconds. The
alarm will repeat once more unless
the system is disarmed. To turn off
the system, unlock the doors with the
mechanical key or transmitter or
smart key.
Disarmed stage
Using the smart key (if equipped)
The system will be disarmed when
the doors are unlocked by pressing
the unlock button on the smart key or
pressing the lock/unlock button of the
front outside door handle with the
smart key in your possession.
After unlocking the doors, the hazard
warning lights and chime will operate
twice to indicate that the system is
disarmed.
After unlocking the doors, if any door
is not opened within 30 seconds, the
system will be rearmed.
Using the transmitter (if equipped)
The system will be disarmed when
the doors are unlocked by pressing
the unlock button on the transmitter.
After unlocking the doors, the hazard
warning lights will blink twice to indi-
cate that the system is disarmed.
After unlocking the doors, if any door
is not opened within 30 seconds, the
system will be rearmed.
Using the mechanical key
The system will be disarmed when
the doors are unlocked with the
mechanical key.
✽ ✽ NOTICE
If you lock or unlock the doors by
using the mechanical key, the haz-
ard warning light and chime sound
won't operate.
AN HMA 4A.QXP 3/5/2015 3:18 PM Page 19
Page 122 of 763
Features of your vehicle
30
4
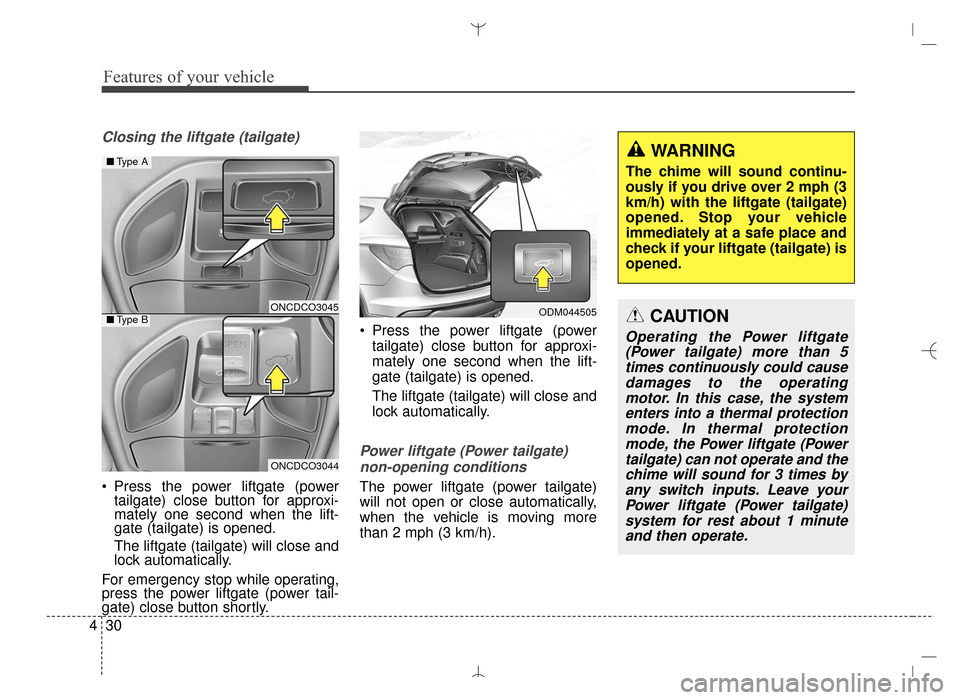
Closing the liftgate (tailgate)
Press the power liftgate (power
tailgate) close button for approxi-
mately one second when the lift-
gate (tailgate) is opened.
The liftgate (tailgate) will close and
lock automatically.
For emergency stop while operating,
press the power liftgate (power tail-
gate) close button shortly. Press the power liftgate (power
tailgate) close button for approxi-
mately one second when the lift-
gate (tailgate) is opened.
The liftgate (tailgate) will close and
lock automatically.
Power liftgate (Power tailgate)
non-opening conditions
The power liftgate (power tailgate)
will not open or close automatically,
when the vehicle is moving more
than 2 mph (3 km/h).
ONCDCO3045
ONCDCO3044
■ Type A
■Type BODM044505
WARNING
The chime will sound continu-
ously if you drive over 2 mph (3
km/h) with the liftgate (tailgate)
opened. Stop your vehicle
immediately at a safe place and
check if your liftgate (tailgate) is
opened.
CAUTION
Operating the Power liftgate
(Power tailgate) more than 5times continuously could causedamages to the operatingmotor. In this case, the systementers into a thermal protectionmode. In thermal protectionmode, the Power liftgate (Powertailgate) can not operate and thechime will sound for 3 times byany switch inputs. Leave yourPower liftgate (Power tailgate)system for rest about 1 minuteand then operate.
AN HMA 4A.QXP 3/5/2015 3:18 PM Page 30
Page 124 of 763
Features of your vehicle
32
4
How to reset the power liftgate
(power tailgate)
If the battery has been discharged or
disconnected, or if the related fuse
has been replaced or disconnected,
for the power liftgate (power tailgate)
to operate normally, reset the power
liftgate (power tailgate) as follow:
1. Put the shift lever in P (Park).
2. While pressing the liftgate (tail- gate) close button, press the lift-
gate (tailgate) handle switch for
more than 3 seconds. (the chime
will sound)
3. Close the liftgate (tailgate) manu- ally.
If the power liftgate (power tailgate)
does not work properly after the
above procedure, have the system
checked by an authorized HYUNDAI
dealer.
✽ ✽ NOTICE
If the power liftgate (power tailgate)
does not operate normally, check
again if the gear position is in right
position.
Power liftgate (Power tailgate)
opening height user setting
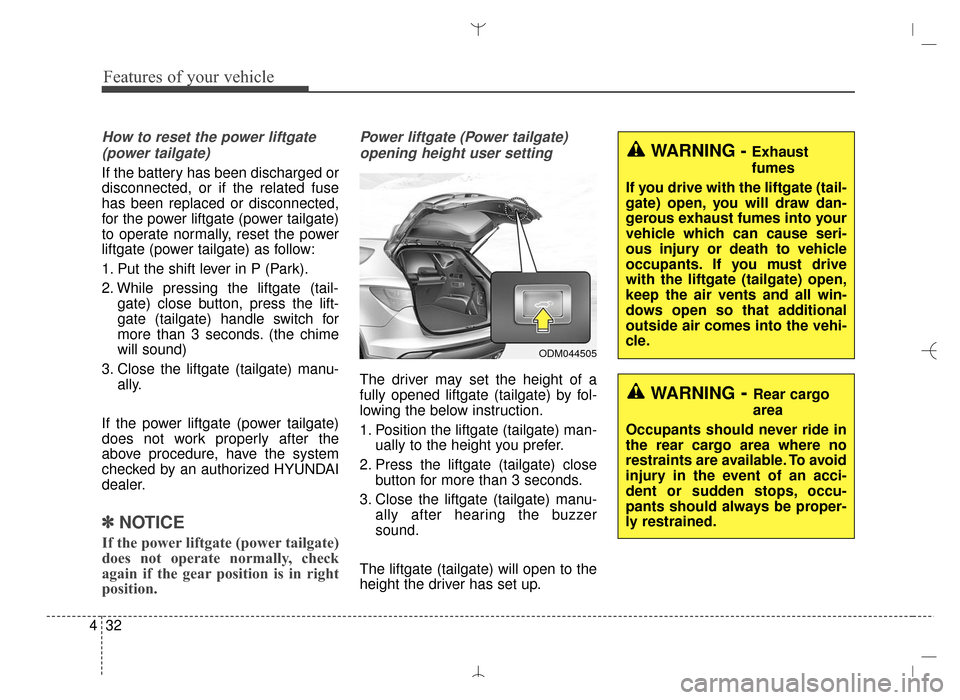
The driver may set the height of a
fully opened liftgate (tailgate) by fol-
lowing the below instruction.
1. Position the liftgate (tailgate) man- ually to the height you prefer.
2. Press the liftgate (tailgate) close button for more than 3 seconds.
3. Close the liftgate (tailgate) manu- ally after hearing the buzzer
sound.
The liftgate (tailgate) will open to the
height the driver has set up.
ODM044505
WARNING- Rear cargo
area
Occupants should never ride in
the rear cargo area where no
restraints are available. To avoid
injury in the event of an acci-
dent or sudden stops, occu-
pants should always be proper-
ly restrained.
WARNING - Exhaust
fumes
If you drive with the liftgate (tail-
gate) open, you will draw dan-
gerous exhaust fumes into your
vehicle which can cause seri-
ous injury or death to vehicle
occupants. If you must drive
with the liftgate (tailgate) open,
keep the air vents and all win-
dows open so that additional
outside air comes into the vehi-
cle.
AN HMA 4A.QXP 3/5/2015 3:18 PM Page 32
Page 148 of 763
Features of your vehicle
56
4
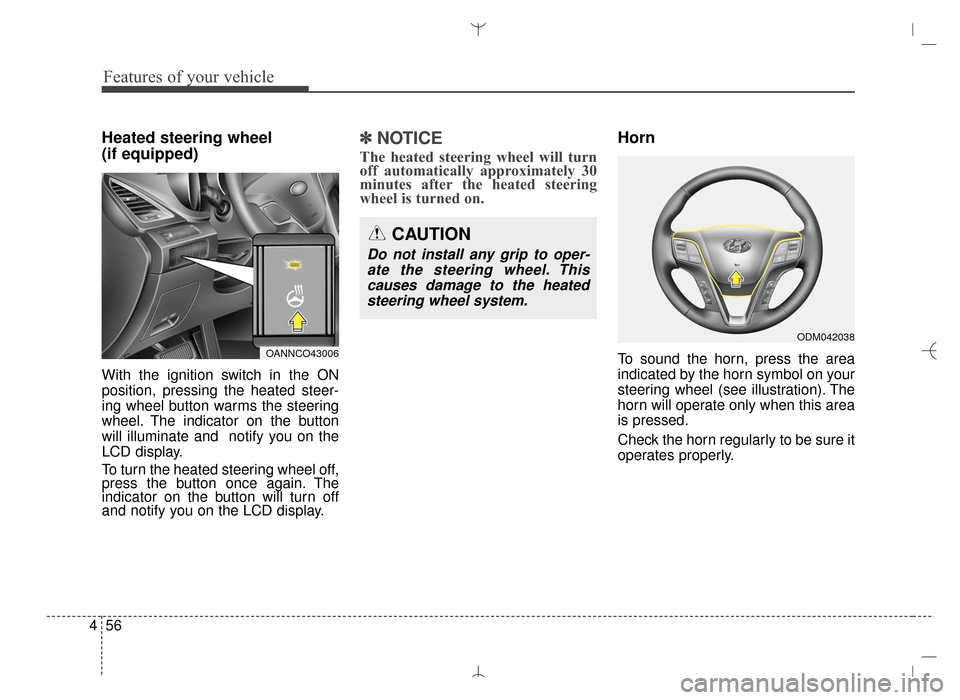
Heated steering wheel
(if equipped)
With the ignition switch in the ON
position, pressing the heated steer-
ing wheel button warms the steering
wheel. The indicator on the button
will illuminate and notify you on the
LCD display.
To turn the heated steering wheel off,
press the button once again. The
indicator on the button will turn off
and notify you on the LCD display.
✽ ✽
NOTICE
The heated steering wheel will turn
off automatically approximately 30
minutes after the heated steering
wheel is turned on.
Horn
To sound the horn, press the area
indicated by the horn symbol on your
steering wheel (see illustration). The
horn will operate only when this area
is pressed.
Check the horn regularly to be sure it
operates properly.
CAUTION
Do not install any grip to oper-
ate the steering wheel. Thiscauses damage to the heatedsteering wheel system.
OANNCO43006
ODM042038
AN HMA 4A.QXP 3/5/2015 3:18 PM Page 56