2016 Hyundai Santa Fe Sport bulb
[x] Cancel search: bulbPage 7 of 763
1
2
3
4
5
6
7
8I
IntroductionHow to use this manual / Fuel requirements / Vehicle break-in process / Vehicle handling instructions /Vehicle data collection and event data recorders
Your vehicle at a glance
Exterior overview / Interior overview / Instrument panel overview / Engi\
ne compartment
Safety features of your vehicle
Seats / Seat belts / Child restraint system / Air bag
Features of your vehicleKeys / Door locks / Liftgate (Tailgate) / Windows / Hood / Fuel filler lid / Panoramic sunroof / Steering wheel /
Mirrors / Instrument cluster / Lighting / Wipers & Washers / Climate control system / Multimedia system / Etc.
Driving your vehicleBefore driving / Engine start/stop button / Transaxle / All Wheel Drive (AWD) / Brake system /
Cruise control system / Active ECO system / Winter driving / Vehicle load limit / Etc.
What to do in an emergencyRoad warning / Emergency while driving / Emergency starting / Engine overheat / TPMS / Flat tire / Towing / Etc.
MaintenanceEngine compartment / Maintenance service / Engine oil / Engine coolant /\
Brake fluid / Washer fluid /
Parking brake / Air cleaner / Wiper blades / Battery / Tire and wheels / Fuses / Light bulbs / Etc.
Specifications, Consumer information and Reporting safety defects
Index
table of contents
AN HMA FOREWORD.QXP 2015-05-07 ¿ ¨˜ 4:12 Page 7
Page 216 of 763
Features of your vehicle
124
4
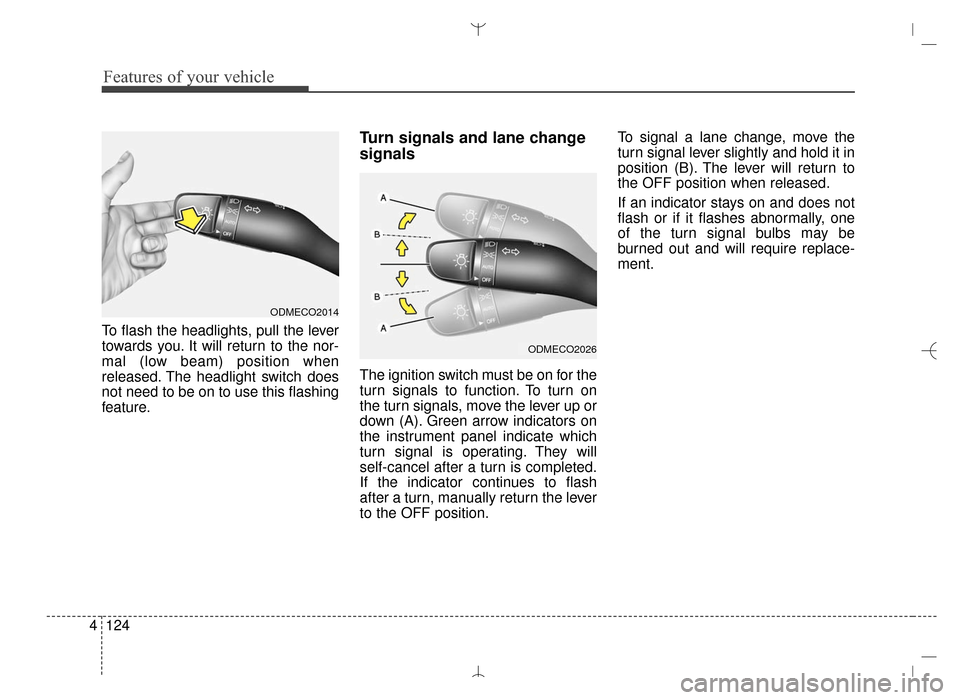
To flash the headlights, pull the lever
towards you. It will return to the nor-
mal (low beam) position when
released. The headlight switch does
not need to be on to use this flashing
feature.
Turn signals and lane change
signals
The ignition switch must be on for the
turn signals to function. To turn on
the turn signals, move the lever up or
down (A). Green arrow indicators on
the instrument panel indicate which
turn signal is operating. They will
self-cancel after a turn is completed.
If the indicator continues to flash
after a turn, manually return the lever
to the OFF position. To signal a lane change, move the
turn signal lever slightly and hold it in
position (B). The lever will return to
the OFF position when released.
If an indicator stays on and does not
flash or if it flashes abnormally, one
of the turn signal bulbs may be
burned out and will require replace-
ment.
ODMECO2026
ODMECO2014
AN HMA 4B.QXP 3/5/2015 3:22 PM Page 124
Page 217 of 763
4125
Features of your vehicle
One-touch triple turn signal (One Touch Turn Signal)
To activate the one-touch lane
change function, move the turn sig-
nal lever slightly and then release it.
The lane change signals will blink 3
(5 or 7, if equipped) times.
You can activate/deactivate the One
Touch Turn Signal function or choose
the number of blinking (3, 5, or 7)
from the User Settings Mode on the
LCD display (if equipped).
✽ ✽ NOTICE
If an indicator flash is abnormally
quick or slow, a bulb may be burned
out or have a poor electrical connec-
tion in the circuit.
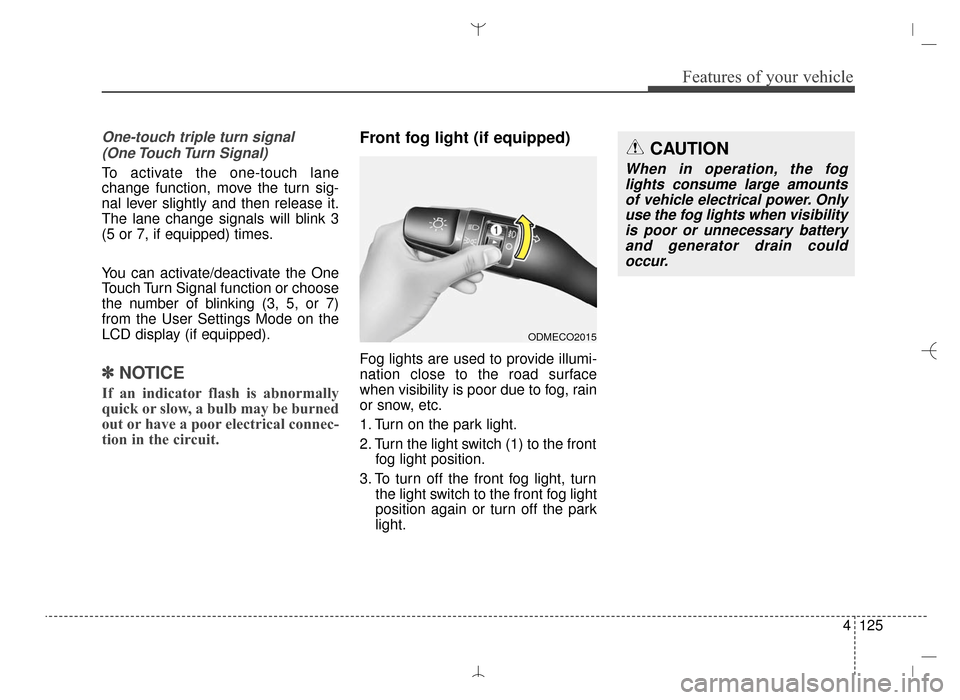
Front fog light (if equipped)
Fog lights are used to provide illumi-
nation close to the road surface
when visibility is poor due to fog, rain
or snow, etc.
1. Turn on the park light.
2. Turn the light switch (1) to the front
fog light position.
3. To turn off the front fog light, turn the light switch to the front fog light
position again or turn off the park
light.
ODMECO2015
CAUTION
When in operation, the foglights consume large amountsof vehicle electrical power. Onlyuse the fog lights when visibilityis poor or unnecessary batteryand generator drain couldoccur.
AN HMA 4B.QXP 3/5/2015 3:22 PM Page 125
Page 604 of 763

Driving your vehicle
74
5
Turn signals when towing a trailer
When you tow a trailer, your vehicle
has to have a different turn signal
flasher and extra wiring. The green
arrows on your instrument panel will
flash whenever you signal a turn or
lane change. Properly connected,
the trailer lights will also flash to alert
other drivers you’re about to turn,
change lanes, or stop.
When towing a trailer, the green
arrows on your instrument panel will
flash for turns even if the bulbs on the
trailer are burned out. Thus, you may
think drivers behind you are seeing
your signals when, in fact, they are
not. It’s important to check occasion-
ally to be sure the trailer bulbs are still
working. You must also check the
lights every time you disconnect and
then reconnect the wires.
Do not connect a trailer lighting sys-
tem directly to your vehicle’s lighting
system. Use only an approved trailer
wiring harness.
An authorized HYUNDAI dealer can
assist you in installing the wiring har-
ness.
Driving on grades
Reduce speed and shift to a lower
gear before you start down a long or
steep downgrade. If you don’t shift
down, you might have to use your
brakes so much that they would get
hot and no longer operate efficiently.
On a long uphill grade, shift down
and reduce your speed to around 45
mph (70 km/h) to reduce the possi-
bility of engine and transaxle over-
heating.
Operating your vehicle in D (Drive)
when towing a trailer will minimize
heat build up and extend the life of
your transaxle.WARNING
Failure to use an approved trail-
er wiring harness could result
in damage to the vehicle electri-
cal system and/or personal
injury.
AN HMA 5.QXP 2015-02-03 ¿ ¨˜ 1:21 Page 74
Page 649 of 763

Maintenance
Engine compartment . . . . . . . . . . . . . . . . . . . . . . . . 7-3
Maintenance services . . . . . . . . . . . . . . . . . . . . . . . . 7-4
• Owner’s responsibility . . . . . . . . . . . . . . . . . . . . . . . . . 7-4
• Owner maintenance precautions . . . . . . . . . . . . . . . . . 7-5
Owner maintenance . . . . . . . . . . . . . . . . . . . . . . . . . 7-6
• Owner maintenance schedule. . . . . . . . . . . . . . . . . . . . 7-6
Scheduled maintenance service. . . . . . . . . . . . . . . . 7-8
Explanation of scheduled maintenance items . . . 7-23
Engine oil. . . . . . . . . . . . . . . . . . . . . . . . . . . . . . . . . 7-26
• Checking the engine oil level . . . . . . . . . . . . . . . . . . . 7-26
• Changing the engine oil and filter . . . . . . . . . . . . . . . 7-27
Engine coolant . . . . . . . . . . . . . . . . . . . . . . . . . . . . 7-28
• Checking the coolant level . . . . . . . . . . . . . . . . . . . . . 7-28
• Changing the coolant . . . . . . . . . . . . . . . . . . . . . . . . . 7-30
Brake fluid . . . . . . . . . . . . . . . . . . . . . . . . . . . . . . . 7-31
• Checking the brake fluid level . . . . . . . . . . . . . . . . . . 7-31
Washer fluid . . . . . . . . . . . . . . . . . . . . . . . . . . . . . . 7-33
• Checking the washer fluid level . . . . . . . . . . . . . . . . . 7-33
Parking brake . . . . . . . . . . . . . . . . . . . . . . . . . . . . . 7-33
• Checking the parking brake. . . . . . . . . . . . . . . . . . . . 7-33
Air cleaner. . . . . . . . . . . . . . . . . . . . . . . . . . . . . . . . 7-34
• Filter replacement . . . . . . . . . . . . . . . . . . . . . . . . . . . . 7-34
Climate control air filter . . . . . . . . . . . . . . . . . . . . 7-36
• Filter inspection . . . . . . . . . . . . . . . . . . . . . . . . . . . . . . 7-36
• Filter replacement . . . . . . . . . . . . . . . . . . . . . . . . . . . . 7-36
Wiper blades . . . . . . . . . . . . . . . . . . . . . . . . . . . . . . 7-38
• Blade inspection . . . . . . . . . . . . . . . . . . . . . . . . . . . . . . 7-38
• Blade replacement . . . . . . . . . . . . . . . . . . . . . . . . . . . . 7-38
Battery . . . . . . . . . . . . . . . . . . . . . . . . . . . . . . . . . . . 7-\
41
• For best battery service . . . . . . . . . . . . . . . . . . . . . . . 7-41
• Battery recharging . . . . . . . . . . . . . . . . . . . . . . . . . . . 7-42
• Reset items . . . . . . . . . . . . . . . . . . . . . . . . . . . . . . . . . . 7-43\
Tires and wheels . . . . . . . . . . . . . . . . . . . . . . . . . . . 7-44
• Tire care . . . . . . . . . . . . . . . . . . . . . . . . . . . . . . . . . . . . \
7-44
• Recommended cold tire inflation pressures . . . . . . . 7-44
• Checking tire inflation pressure. . . . . . . . . . . . . . . . . 7-45
• Tire rotation . . . . . . . . . . . . . . . . . . . . . . . . . . . . . . . . . 7-46
• Wheel alignment and tire balance . . . . . . . . . . . . . . . 7-47
• Tire replacement . . . . . . . . . . . . . . . . . . . . . . . . . . . . . 7-48
• Wheel replacement . . . . . . . . . . . . . . . . . . . . . . . . . . . 7-49
• Tire traction . . . . . . . . . . . . . . . . . . . . . . . . . . . . . . . . . 7-49
• Tire maintenance . . . . . . . . . . . . . . . . . . . . . . . . . . . . . 7-50
• Tire sidewall labeling . . . . . . . . . . . . . . . . . . . . . . . . . 7-50
• Low aspect ratio tire . . . . . . . . . . . . . . . . . . . . . . . . . . 7-54
Fuses . . . . . . . . . . . . . . . . . . . . . . . . . . . . . . . . . . . . \
7-59
• Fuse/relay panel description. . . . . . . . . . . . . . . . . . . . 7-63
Light bulbs . . . . . . . . . . . . . . . . . . . . . . . . . . . . . . . 7-71
• Front light replacement . . . . . . . . . . . . . . . . . . . . . . . 7-72
• Side repeater light bulb replacement . . . . . . . . . . . . 7-75
• Rear combination light bulb replacement . . . . . . . . 7-76
7
AN HMA 7.QXP 3/5/2015 3:24 PM Page 1
Page 650 of 763

• High mounted stop light bulb replacement . . . . . . . 7-78
• License plate light bulb replacement. . . . . . . . . . . . . 7-79
• Interior light bulb replacement . . . . . . . . . . . . . . . . . 7-80
Appearance care . . . . . . . . . . . . . . . . . . . . . . . . . . . 7-81
• Exterior care . . . . . . . . . . . . . . . . . . . . . . . . . . . . . . . . 7-81
• Interior care . . . . . . . . . . . . . . . . . . . . . . . . . . . . . . . . . 7-86
Emission control system . . . . . . . . . . . . . . . . . . . . 7-88
California perchlorate notice . . . . . . . . . . . . . . . . 7-92
7
AN HMA 7.QXP 3/5/2015 3:24 PM Page 2
Page 719 of 763

771
Maintenance
LIGHT BULBS
Use only the bulbs of the specifiedwattage.
✽
✽ NOTICE
After heavy, driving rain or wash-
ing, headlamp and taillamp lenses
could appear frosty. This condition
is caused by the temperature differ-
ence between the lamp inside and
outside. This is similar to the con-
densation on your windows inside
your vehicle during the rain and
doesn’t indicate a problem with
your vehicle. If the water leaks into
the lamp bulb circuitry, have the
vehicle checked by an authorized
HYUNDAI dealer.WARNING - Working on
the lights
Prior to working on the light,
firmly apply the parking brake,
ensure that the ignition switch
is turned to the “LOCK” position
and turn off the lights to avoid
sudden movement of the vehi-
cle and burning your fingers or
receiving an electric shock.
CAUTION
Be sure to replace the burned-
out bulb with one of the samewattage rating. Otherwise, itmay cause damage to the fuseor electric wiring system.
CAUTION
If you don’t have necessarytools, the correct bulbs and theexpertise, consult an authorizedHYUNDAI dealer. In many cases,it is difficult to replace vehiclelight bulbs because other partsof the vehicle must be removedbefore you can get to the bulb.This is especially true if youhave to remove the headlightassembly to get to the bulb(s).Removing/installing the head-light assembly can result indamage to the vehicle.
AN HMA 7.QXP 3/5/2015 3:25 PM Page 71
Page 720 of 763

Maintenance
72
7
Headlamp, Front position
lamp, Front turn signal lamp,
Front fog lamp bulb replace-
ment
(1) Headlamp (High)
(2) Headlamp (Low) (3) Front position lamp
(4) Front turn signal lamp/Front side
marker
(5) Front fog lamp (if equipped)
Headlamp bulb
ODM072029
ODMEMC2017
■Type A
■ Type B
OHD076046
WARNING- Halogen bulbs
Halogen bulbs contain pres-
surized gas that will produce
flying pieces of glass if bro-
ken.
(Continued)
AN HMA 7.QXP 3/5/2015 3:25 PM Page 72