2016 Hyundai Santa Fe ECU
[x] Cancel search: ECUPage 68 of 759
Safety features of your vehicle
48
3
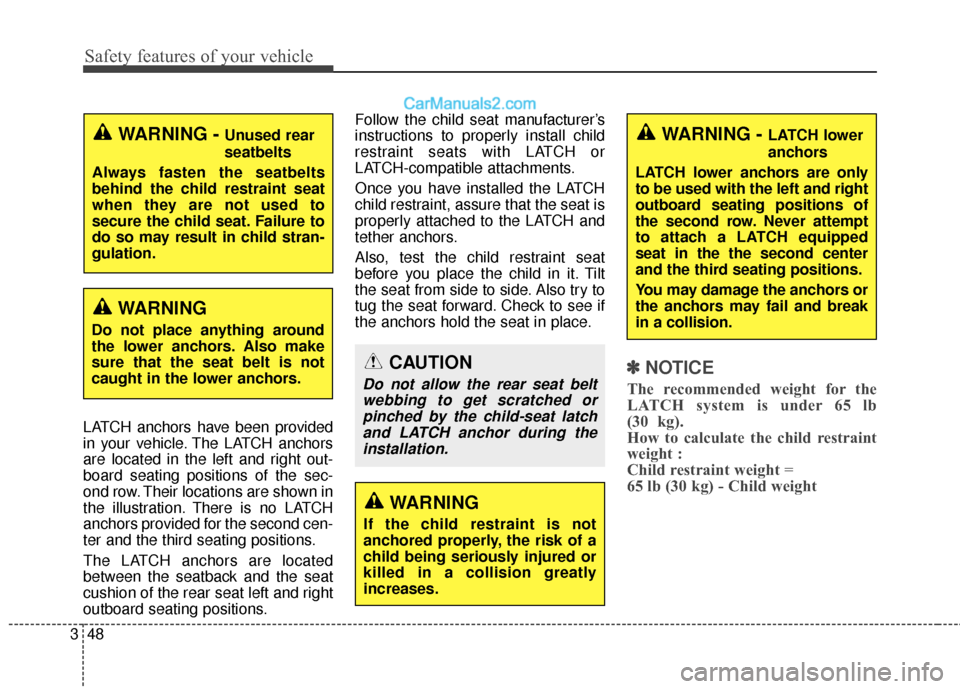
LATCH anchors have been provided
in your vehicle. The LATCH anchors
are located in the left and right out-
board seating positions of the sec-
ond row. Their locations are shown in
the illustration. There is no LATCH
anchors provided for the second cen-
ter and the third seating positions.
The LATCH anchors are located
between the seatback and the seat
cushion of the rear seat left and right
outboard seating positions. Follow the child seat manufacturer’s
instructions to properly install child
restraint seats with LATCH or
LATCH-compatible attachments.
Once you have installed the LATCH
child restraint, assure that the seat is
properly attached to the LATCH and
tether anchors.
Also, test the child restraint seat
before you place the child in it. Tilt
the seat from side to side. Also try to
tug the seat forward. Check to see if
the anchors hold the seat in place.
✽ ✽
NOTICE
The recommended weight for the
LATCH system is under 65 lb
(30 kg).
How to calculate the child restraint
weight :
Child restraint weight =
65 lb (30 kg) - Child weight
WARNING
If the child restraint is not
anchored properly, the risk of a
child being seriously injured or
killed in a collision greatly
increases.
WARNING - LATCH lower
anchors
LATCH lower anchors are only
to be used with the left and right
outboard seating positions of
the second row. Never attempt
to attach a LATCH equipped
seat in the the second center
and the third seating positions.
You may damage the anchors or
the anchors may fail and break
in a collision.
CAUTION
Do not allow the rear seat belt webbing to get scratched orpinched by the child-seat latchand LATCH anchor during theinstallation.
WARNING - Unused rear
seatbelts
Always fasten the seatbelts
behind the child restraint seat
when they are not used to
secure the child seat. Failure to
do so may result in child stran-
gulation.
WARNING
Do not place anything around
the lower anchors. Also make
sure that the seat belt is not
caught in the lower anchors.
Page 81 of 759
361
Safety features of your vehicle
WARNING
Even though your vehicle isequipped with the occupant
classification system, never
install a child restraint system
in the front passenger's seat.
A deploying air bag can force-
fully strike a child resulting in
serious injuries or death. Any
child age 12 and under should
ride in the rear seat. Children
too large for child restraints
should use the available
lap/shoulder belts. No matter
what type of crash, children of
all ages are safer when
restrained in the rear seat.
The occupant classification system may not work properly
if water, coffee or any other
liquid on the front passenger
seat. Keep the front seat dry
at all times.
(Continued)
(Continued)
If the PASSENGER AIR BAG"OFF" indicator is illuminated
when the front passenger's
seat is occupied by an adult
and he/she sits properly (sit-
ting upright with the seatback
in an upright position, cen-
tered on the seat cushion with
their seat belt on, legs com-
fortably extended and their
feet on the floor), have that
person sit in the rear seat.
Do not modify or replace the front passenger seat. Don't
place anything on or attach
anything such as a blanket or
seat heater to the front pas-
senger seat. This can adverse-
ly affect the occupant classifi-
cation system.
Do not sit on sharp objects such as tools when occupying
the front passenger seat. This
can adversely affect the occu-
pant classification system.
(Continued)(Continued)
Do not use accessory seatcovers on the front seats.
Accident statistics show that children are safer if they are
restrained in the rear, as
opposed to the front seat. It is
recommended that child
restraints be secured in a rear
seat, including an infant riding
in a rear-facing infant seat, a
child riding in a forward-fac-
ing child seat and an older
child riding in a booster seat.
Air bags can only be used once – have an authorized
HYUNDAI dealer replace the
air bag immediately after
deployment.
(Continued)
Page 89 of 759
369
Safety features of your vehicle
They are designed to help protect
occupants in certain side impacts
and to help prevent them from eject-
ing out of the vehicle as a result of a
rollover, especially when the seat-
belts are also in use.
to deploy during certain side
impact collisions, depending on the
crash severity, angle, speed and
point of impact.
The curtain air bags do not only deploy on the side of the impact
but also on the opposite side.
Also, the curtain air bags on both sides of the vehicle will deploy in
certain rollover situations.
The curtain air bags are not designed to deploy in all side
impact or rollover situations.(Continued)
Do not allow the passengersto lean their heads or bodies
onto doors, put their arms on
the doors, stretch their arms
out of the window, or place
objects between the doors
and passengers when they are
seated on seats equipped with
side and/or curtain air bags.
Never try to open or repair any components of the side cur-
tain air bag system. This
should only be done by an
authorized HYUNDAI dealer.
Failure to follow the above
instructions can result in injury
or death to the vehicle occu-
pants in an accident.WARNING
In order for side and curtain air bags to provide the best
protection, front seat occu-
pants and outboard rear occu-
pants should sit in an upright
position with the seat belts
properly fastened.
Importantly, children should
sit in a proper child restraint
system in the rear seat.
When children are seated in the rear outboard seats, they
must be seated in the proper
child restraint system. Make
sure to put the child restraint
system as far away from the
door side as possible, and
secure the child restraint sys-
tem in a locked position.
(Continued)
Page 118 of 759
421
Features of your vehicle
DOOR LOCKS
Operating door locks from
outside the vehicle
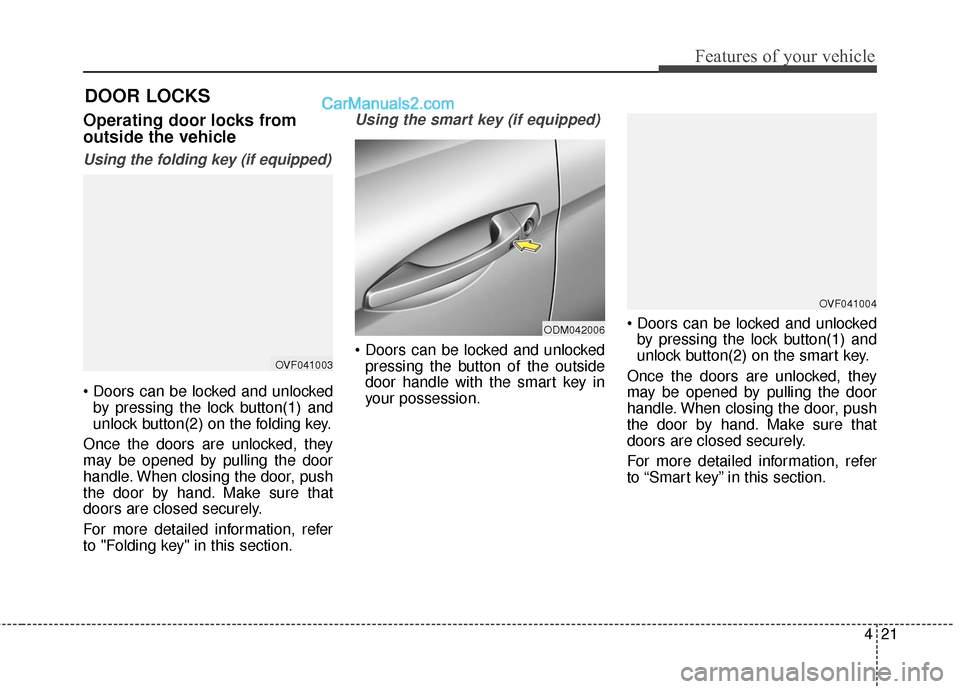
Using the folding key (if equipped)
by pressing the lock button(1) and
unlock button(2) on the folding key.
Once the doors are unlocked, they
may be opened by pulling the door
handle. When closing the door, push
the door by hand. Make sure that
doors are closed securely.
For more detailed information, refer
to "Folding key" in this section.
Using the smart key (if equipped)
pressing the button of the outside
door handle with the smart key in
your possession.
by pressing the lock button(1) and
unlock button(2) on the smart key.
Once the doors are unlocked, they
may be opened by pulling the door
handle. When closing the door, push
the door by hand. Make sure that
doors are closed securely.
For more detailed information, refer
to “Smart key” in this section.OVF041003
ODM042006
OVF041004
Page 119 of 759
Features of your vehicle
22
4
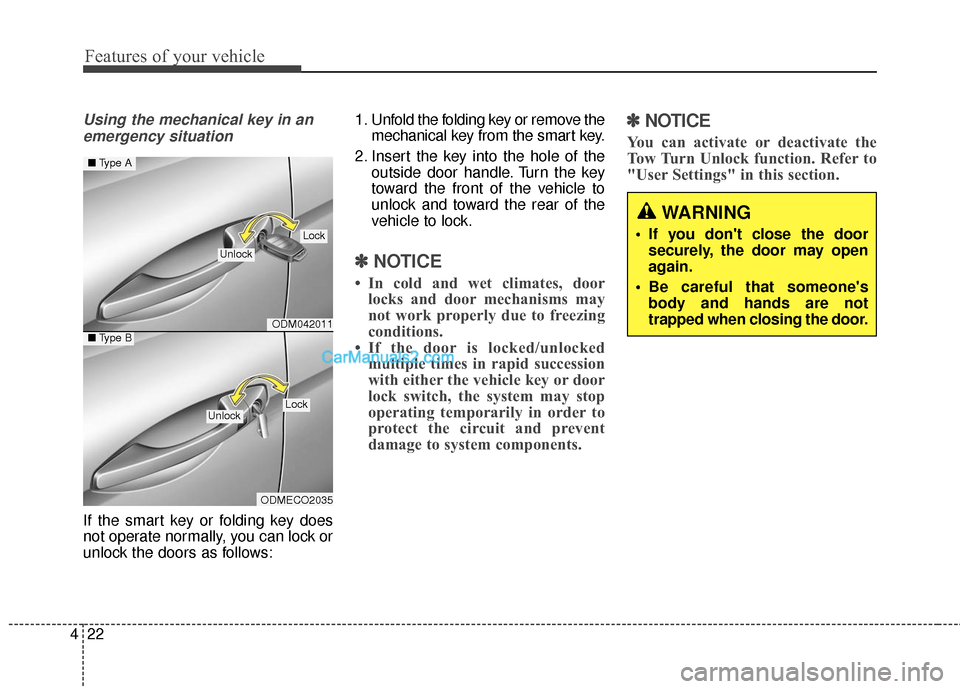
Using the mechanical key in an
emergency situation
If the smart key or folding key does
not operate normally, you can lock or
unlock the doors as follows: 1. Unfold the folding key or remove the
mechanical key from the smart key.
2. Insert the key into the hole of the outside door handle. Turn the key
toward the front of the vehicle to
unlock and toward the rear of the
vehicle to lock.
✽ ✽NOTICE
• In cold and wet climates, door
locks and door mechanisms may
not work properly due to freezing
conditions.
• If the door is locked/unlocked multiple times in rapid succession
with either the vehicle key or door
lock switch, the system may stop
operating temporarily in order to
protect the circuit and prevent
damage to system components.
✽ ✽ NOTICE
You can activate or deactivate the
Tow Turn Unlock function. Refer to
"User Settings" in this section.
WARNING
If you don't close the door
securely, the door may open
again.
Be careful that someone's body and hands are not
trapped when closing the door.
ODM042011
ODMECO2035
■ Type A
■Type B
Lock
Unlock
LockUnlock
Page 123 of 759
Features of your vehicle
26
4
Non-Powered liftgate (tailgate)
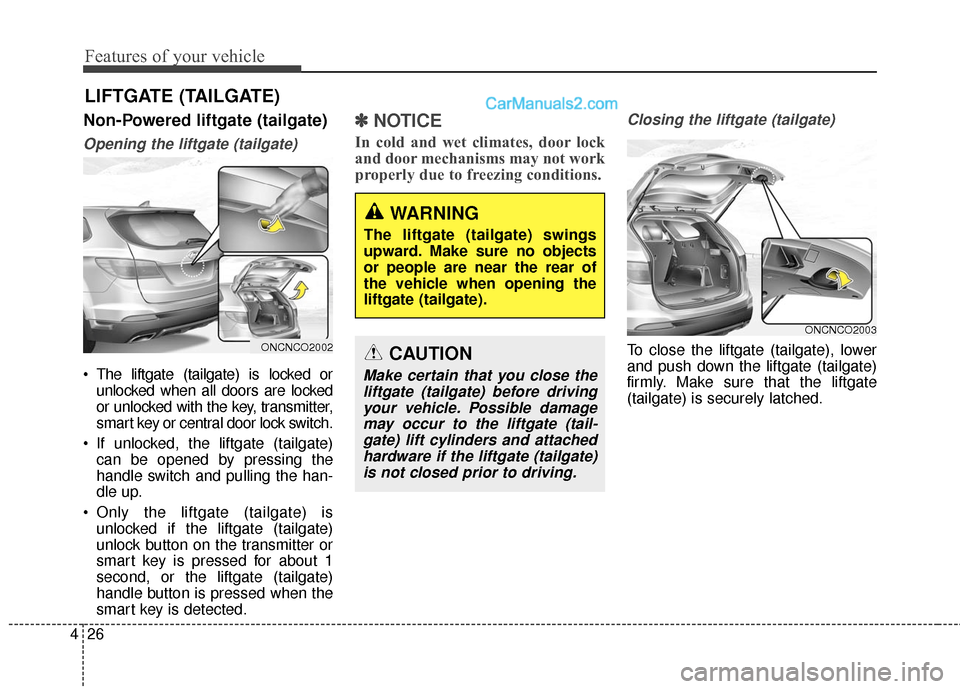
Opening the liftgate (tailgate)
The liftgate (tailgate) is locked or
unlocked when all doors are locked
or unlocked with the key, transmitter,
smart key or central door lock switch.
If unlocked, the liftgate (tailgate) can be opened by pressing the
handle switch and pulling the han-
dle up.
Only the liftgate (tailgate) is unlocked if the liftgate (tailgate)
unlock button on the transmitter or
smart key is pressed for about 1
second, or the liftgate (tailgate)
handle button is pressed when the
smart key is detected.
✽ ✽ NOTICE
In cold and wet climates, door lock
and door mechanisms may not work
properly due to freezing conditions.
Closing the liftgate (tailgate)
To close the liftgate (tailgate), lower
and push down the liftgate (tailgate)
firmly. Make sure that the liftgate
(tailgate) is securely latched.
LIFTGATE (TAILGATE)
ONCNCO2002
ONCNCO2003
WARNING
The liftgate (tailgate) swings
upward. Make sure no objects
or people are near the rear of
the vehicle when opening the
liftgate (tailgate).
CAUTION
Make certain that you close the
liftgate (tailgate) before drivingyour vehicle. Possible damagemay occur to the liftgate (tail-gate) lift cylinders and attachedhardware if the liftgate (tailgate)is not closed prior to driving.
Page 126 of 759
429
Features of your vehicle
Power liftgate (Power tailgate)non-opening conditions
The power liftgate (power tailgate)
will not open or close automatically,
when the vehicle is moving more
than 2 mph (3 km/h).
✽ ✽ NOTICE
• The power liftgate (power tailgate)
can be operated when the engine is
not running. However the power
liftgate (power tailgate) operation
consumes large amounts of vehicle
electric power. To prevent the bat-
tery from being discharged, do not
operate it excessively e.g.: more
than approximately 10 times
repeatedly.
• To prevent the battery from being discharged, do not leave the power
liftgate (power tailgate) in the
open position for a long lime.
• Do not modify or repair any part of the power liftgate (power tail-
gate) by yourself. This must be
done by an authorized HYUNDAI
dealer.
• When jacking up the vehicle to change a tire or repair the vehicle,
do not operate the power liftgate
(power tailgate). This could cause
the power liftgate (power tailgate)
to operate improperly.
• In cold and wet climates, the power liftgate (power tailgate) may
not work properly due to freezing
conditions.WARNING
The chime will sound and the
hazard warning flasher will
blink 10 times if you drive with
the liftgate (tailgate) closed but
not locked. Stop your vehicle
immediately at a safe place and
check if your liftgate (tailgate) is
securely locked.
WARNING
The chime will sound continu-
ously if you drive over 2 mph (3
km/h) with the liftgate (tailgate)
opened. Stop your vehicle
immediately at a safe place and
check if your liftgate (tailgate) is
opened.
CAUTION
Operating the power liftgate
(power tailgate) more than 5times continuously could causedamages to the operatingmotor. In this case, the systementers into a thermal protectionmode. In thermal protectionmode, the power liftgate (powertailgate) can not operate and thechime will sound for 3 times byany switch inputs. Leave yourpower liftgate (power tailgate)system for rest about 1 minuteand then operate.
Page 139 of 759
Features of your vehicle
42
4
Closing the hood
1. Before closing the hood, check the
following:
ment must be correctly installed.
bustible material must be removed
from the engine compartment.
2. Lower the hood halfway and push down to securely lock in place.WARNING
Before closing the hood,ensure that all obstructions
are removed from the hood
opening. Closing the hood
with an obstruction present in
the hood opening may result
in property damage or severe
personal injury.
Do not leave gloves, rags or any other combustible materi-
al in the engine compartment.
Doing so may cause a heat-
induced fire.
Always double check to be sure that the hood is firmly
latched before driving away. If
it is not latched, the hood
could open while the vehicle
is being driven, causing a
total loss of visibility, which
might result in an accident.
Do not move the vehicle with the hood in the raised posi-
tion, as vision is obstructed
and the hood could fall or be
damaged.