2016 Hyundai Santa Fe ECO mode
[x] Cancel search: ECO modePage 213 of 759
Features of your vehicle
116
4
To signal a lane change, move the
turn signal lever slightly and hold it in
position (B). The lever will return to
the OFF position when released.
If an indicator stays on and does not
flash or if it flashes abnormally, one of
the turn signal bulbs may be burned
out and will require replacement.
One-touch triple turn signal
(One Touch Turn Signal)
To activate the one-touch lane
change function, move the turn sig-
nal lever slightly and then release it.
The lane change signals will blink 3
(5 or 7, if equipped) times.
You can activate/deactivate the One
Touch Turn Signal function or choose
the number of blinking (3, 5, or 7)
from the User Settings Mode on the
LCD display (if equipped).
✽ ✽ NOTICE
If an indicator flash is abnormally
quick or slow, a bulb may be burned
out or have a poor electrical connec-
tion in the circuit.
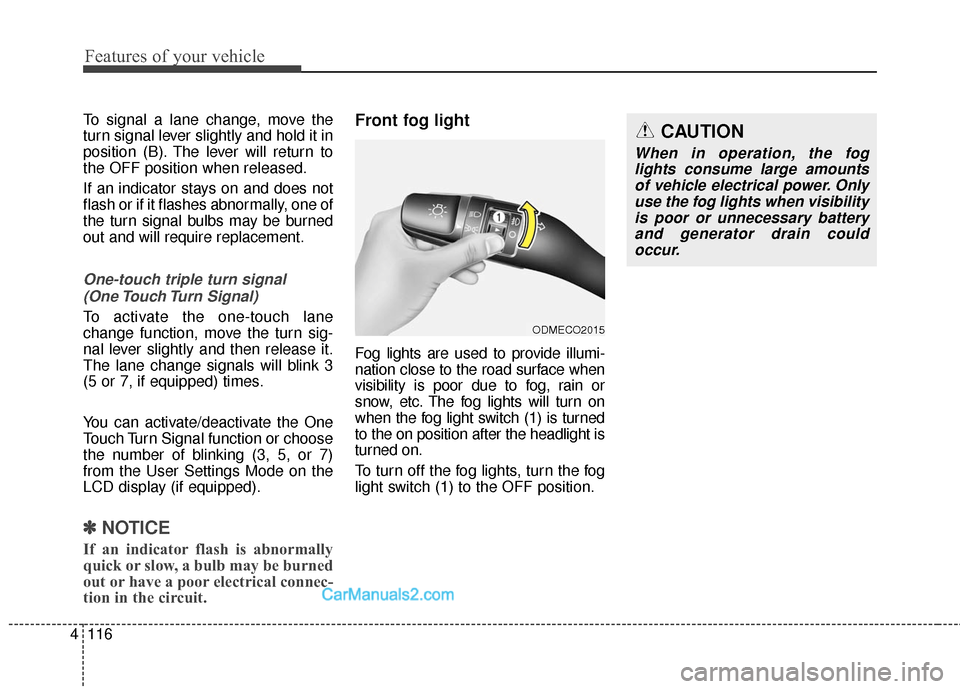
Front fog light
Fog lights are used to provide illumi-
nation close to the road surface when
visibility is poor due to fog, rain or
snow, etc. The fog lights will turn on
when the fog light switch (1) is turned
to the on position after the headlight is
turned on.
To turn off the fog lights, turn the fog
light switch (1) to the OFF position.
ODMECO2015
CAUTION
When in operation, the fog
lights consume large amountsof vehicle electrical power. Onlyuse the fog lights when visibilityis poor or unnecessary batteryand generator drain couldoccur.
Page 230 of 759
4133
Features of your vehicle
Air conditioning system operation tips
If the vehicle has been parked indirect sunlight during hot weather,
open the windows for a short time
to let the hot air inside the vehicle
escape.
To help reduce moisture inside of the windows on rainy or humid
days, decrease the humidity inside
the vehicle by operating the air
conditioning system.
During air conditioning system operation, you may occasionally
notice a slight change in engine
speed as the air conditioning com-
pressor cycles. This is a normal
system operation characteristic.
During the winter months, use the air conditioning system every
month for a few minutes to ensure
maximum system performance.
When using the air conditioning system, you may notice clear water
dripping (or even puddling) on the
ground under the passenger side
of the vehicle. This condensation is
a normal system operation charac-
teristic. Operating the air conditioning sys-
tem in the recirculated air position
provides maximum cooling, how-
ever, continual operation in this
mode may cause the air inside the
vehicle to become stale.
During cooling operation, you may occasionally notice a misty air flow
because of rapid cooling and
humid air intake. This is a normal
system operation characteristic.
If you operate air conditioner excessively, the difference
between the temperature of the
outside air and that of the wind-
shield could cause the outer sur-
face of the windshield to fog up,
causing loss of visibility. In this
case, set the mode selection knob
or button to the position and
fan speed control to the lower
speed.Climate control air filter
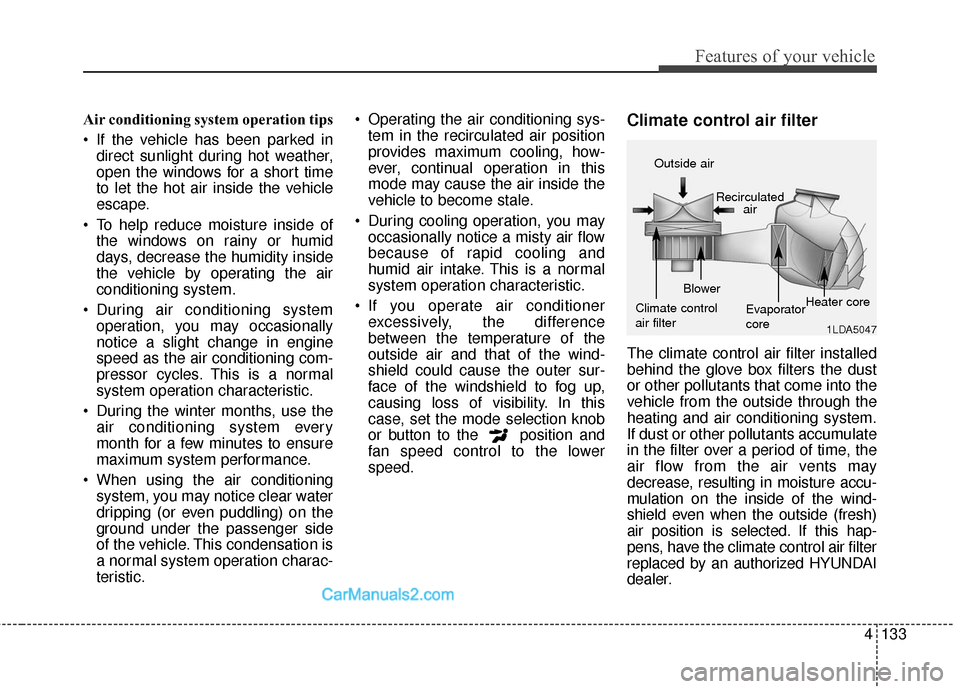
The climate control air filter installed
behind the glove box filters the dust
or other pollutants that come into the
vehicle from the outside through the
heating and air conditioning system.
If dust or other pollutants accumulate
in the filter over a period of time, the
air flow from the air vents may
decrease, resulting in moisture accu-
mulation on the inside of the wind-
shield even when the outside (fresh)
air position is selected. If this hap-
pens, have the climate control air filter
replaced by an authorized HYUNDAI
dealer.
1LDA5047
Outside air
Recirculatedair
Climate control
air filter Blower
Evaporator
coreHeater core
Page 259 of 759
Features of your vehicle
162
4
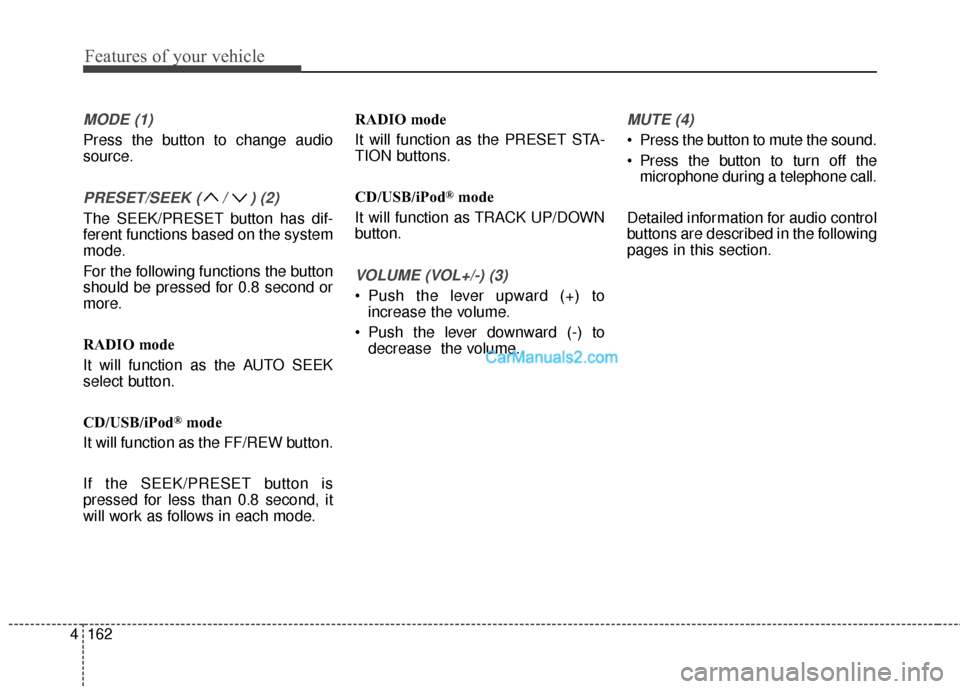
MODE (1)
Press the button to change audio
source.
PRESET/SEEK ( / ) (2)
The SEEK/PRESET button has dif-
ferent functions based on the system
mode.
For the following functions the button
should be pressed for 0.8 second or
more.
RADIO mode
It will function as the AUTO SEEK
select button.
CD/USB/iPod
®mode
It will function as the FF/REW button.
If the SEEK/PRESET button is
pressed for less than 0.8 second, it
will work as follows in each mode. RADIO mode
It will function as the PRESET STA-
TION buttons.
CD/USB/iPod
®mode
It will function as TRACK UP/DOWN
button.
VOLUME (VOL+/-) (3)
• Push the lever upward (+) to increase the volume.
Push the lever downward (-) to decrease the volume.
MUTE (4)
Press the button to mute the sound.
Press the button to turn off themicrophone during a telephone call.
Detailed information for audio control
buttons are described in the following
pages in this section.
Page 266 of 759
4169
Features of your vehicle
(Continued)
• If you disconnect the externalUSB device during playback in
USB mode, the external USB
device can be damaged or may
malfunction. Therefore, discon-
nect the external USB device
when the audio is turned off or
in another mode. (e.g, Radio,
CD)
• Depending on the type and capacity of the external USB
device or the type of the files
stored in the device, there is a
difference in the time taken for
recognition of the device.
• Do not use the USB device for purposes other than playing
music files.
• Playing videos through the USB is not supported.
• Use of USB accessories such as rechargers or heaters using USB
I/F may lower performance or
cause trouble. (Continued) (Continued)
• Some USB flash memory read-
ers (such as CF, SD, micro SD,
etc.) or external-HDD type
devices can be unrecognizable.
• Music files protected by DRM (DIGITAL RIGHTS MANAGE-
MENT) are not recognizable.
• The data in the USB memory may be lost while using this
audio. Always back up impor-
tant data on a personal storage
device.
• Please avoid using USB memory prod-
ucts which can be
used as key chains or
cellular phone acces-
sories as they could cause dam-
age to the USB jack. Please
make certain only to use plug
type connector products.(Continued)
• If you use devices such as a USBhub purchased separately, the
vehicle’s audio system may not
recognize the USB device. In that
case, connect the USB device
directly to the multimedia termi-
nal of the vehicle.
• If the USB device is divided by logical drives, only the music files
on the highest-priority drive are
recognized by car audio.
• Devices such as MP3 Player/ Cellular phone/Digital camera can
be unrecognizable by standard
USB I/F can be unrecognizable.
• Charging through the USB may not be supported in some mobile
devices.
• USB HDD or USB types liable to connection failures due to vehicle
vibrations are not supported.
(i-stick type)
• Some non-standard USB devices (METAL COVER TYPE USB)
can be unrecognizable. (Continued)
Page 269 of 759
Features of your vehicle
172
4
✽
✽
NOTICE -WHEN CON-
NECTING A
Bluetooth®
PHONE
• Before connecting the head unit
with the mobile phone, check to
see that the mobile phone supports
Bluetooth
®features.
• Even if the phone supports Bluetooth
®, the phone will not be
found during device searches if the
phone has been set to hidden state
or the Bluetooth
®power is turned
off. Disable the hidden state or
turn on the Bluetooth
®power
prior to searching/connecting with
the Head unit.
• After a Bluetooth phone has been successfully paired, the phone will
automatically connect when the
ignition is turned on.
• If you do not want automatic con- nection with your Bluetooth
®
device, turn off the Bluetooth®fea-
ture within your mobile phone.
• The Handsfree call volume and quality may differ depending on
the mobile phone. (Continued)(Continued)
• Park the vehicle when connecting
the head unit with the mobile
phone.
• Bluetooth
®connection may
become intermittently disconnect-
ed in some mobile phones. Follow
these steps to try again.
1. Within the mobile phone, turn the Bluetooth
®function off/on
and try again.
2. Turn the mobile phone power Off/On and try again.
3. Completely remove the mobile phone battery, reboot, and then
again.
4. Reboot the Audio System and try again.
5. Delete all paired devices, pair and try again.
• Handsfree call quality and volume may differ depending on the
model of your mobile phone.
Page 270 of 759
4173
Features of your vehicle
✽
✽NOTICE - USING THE
Voice Recognition
• When using the voice recognition
feature, only commands listed
within the user's manual are sup-
ported.
• Be aware that during the opera- tion of the voice recognition sys-
tem, pressing any key other than
the key terminate voice recog-
nition mode.
• For superior voice recognition performance, position the micro-
phone used for voice recognition
above the head of the driver’s seat
and maintain a proper position
when saying commands.
• Within the following situations, voice recognition may not function
properly due to background noises
which may be picked up by the
overhead microphone.
- When the windows and sunroofare open
- When the heating and air condi- tioning fan blower speed is high
- When entering and passing through tunnels (Continued)(Continued)
- When driving on rugged anduneven roads
- During severe rain (heavy rains, windstorms)
• Phone related voice commands can be used only when a
Bluetooth
®Wireless Technology
device is connected.
• When making calls by stating a name, the corresponding contact
must be downloaded and stored
within the audio system.
• After downloading the Bluetooth
®
Wireless Technology phone book,
it takes some times to convert the
phone book data into voice infor-
mation. During this time, voice
recognition may not properly
operate.
• Pronounce the voice commands naturally and clearly as if in a nor-
mal conversation.
Page 273 of 759
Features of your vehicle
176
4
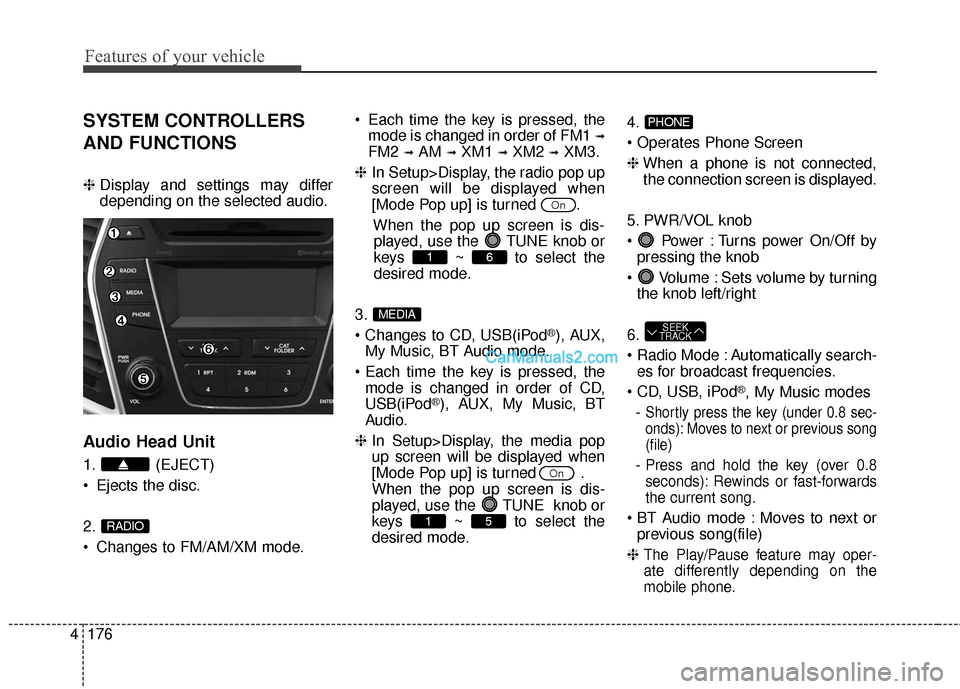
SYSTEM CONTROLLERS
AND FUNCTIONS
❈ Display and settings may differ
depending on the selected audio.
Audio Head Unit
1. (EJECT)
Ejects the disc.
2.
Changes to FM/AM/XM mode. Each time the key is pressed, the
mode is changed in order of FM1
➟
FM2 ➟AM ➟XM1 ➟XM2 ➟XM3.
❈ In Setup>Display, the radio pop up
screen will be displayed when
[Mode Pop up] is turned .
When the pop up screen is dis-played, use the TUNE knob or
keys ~ to select the
desired mode.
3.
®), AUX,
My Music, BT Audio mode.
mode is changed in order of CD,
USB(iPod
®), AUX, My Music, BT
Audio.
❈ In Setup>Display, the media pop
up screen will be displayed when
[Mode Pop up] is turned .
When the pop up screen is dis-
played, use the TUNE knob or
keys ~ to select the
desired mode. 4.
❈
When a phone is not connected,
the connection screen is displayed.
5. PWR/VOL knob
Power : Turns power On/Off by pressing the knob
Volume : Sets volume by turning the knob left/right
6.
Automatically search- es for broadcast frequencies.
®, My Music modes
-
Shortly press the key (under 0.8 sec-
onds): Moves to next or previous song
(file)
- Press and hold the key (over 0.8
seconds): Rewinds or fast-forwards
the current song.
Moves to next or previous song(file)
❈
The Play/Pause feature may oper-
ate differently depending on the
mobile phone.
SEEK
TRACK
PHONE
51
On
MEDIA
61
On
RADIO
Page 274 of 759
4177
Features of your vehicle
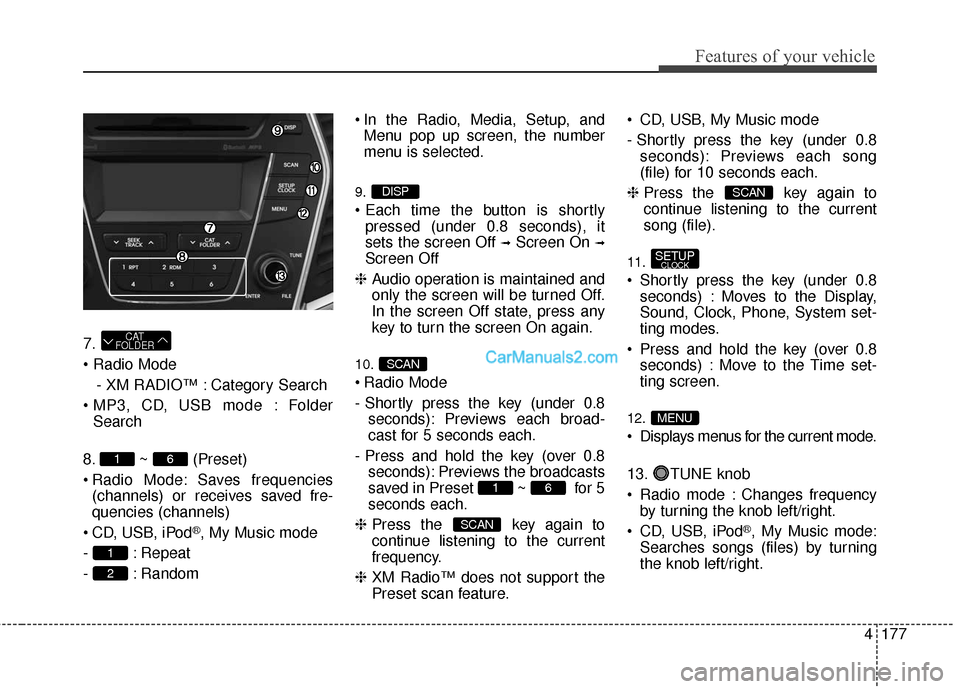
7.
- XM RADIO™ : Category Search
Folder Search
8. ~ (Preset)
Radio Mode: Saves frequencies (channels) or receives saved fre-
quencies (channels)
CD, USB, iPod
®, My Music mode
- : Repeat
- : Random In the Radio, Media, Setup, and
Menu pop up screen, the number
menu is selected.
9.
pressed (under 0.8 seconds), it
sets the screen Off
➟Screen On ➟
Screen Off
❈ Audio operation is maintained and
only the screen will be turned Off.
In the screen Off state, press any
key to turn the screen On again.
10.
Radio Mode
- Shortly press the key (under 0.8
seconds): Previews each broad-
cast for 5 seconds each.
- Press and hold the key (over 0.8 seconds): Previews the broadcasts
saved in Preset ~ for 5
seconds each.
❈ Press the key again to
continue listening to the current
frequency.
❈ XM Radio™ does not support the
Preset scan feature. CD, USB, My Music mode
- Shortly press the key (under 0.8
seconds): Previews each song
(file) for 10 seconds each.
❈ Press the key again to
continue listening to the current
song (file).
11.
Shortly press the key (under 0.8
seconds) : Moves to the Display,
Sound, Clock, Phone, System set-
ting modes.
Press and hold the key (over 0.8 seconds) : Move to the Time set-
ting screen.
12.
Displays menus for the current mode.
13. TUNE knob
Radio mode : Changes frequencyby turning the knob left/right.
CD, USB, iPod
®, My Music mode:
Searches songs (files) by turning
the knob left/right.
MENU
SETUPCLOCK
SCAN
SCAN
61
SCAN
DISP
2
1
61
CAT
FOLDER