2016 Hyundai Santa Fe remote control
[x] Cancel search: remote controlPage 18 of 699
Your vehicle at a glance
6 2
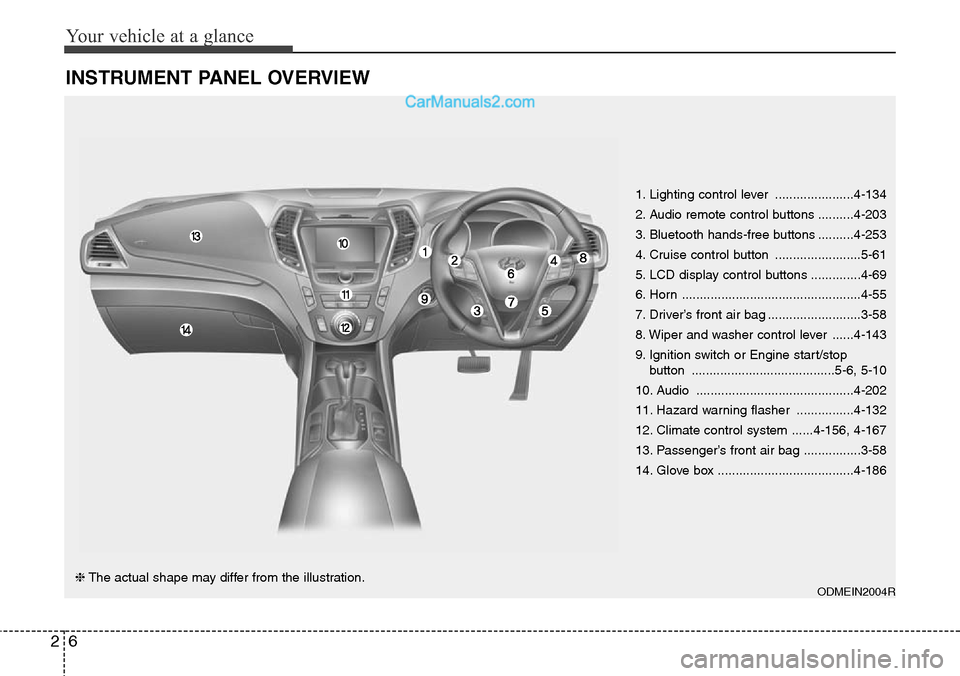
INSTRUMENT PANEL OVERVIEW
1. Lighting control lever ......................4-134
2. Audio remote control buttons ..........4-203
3. Bluetooth hands-free buttons ..........4-253
4. Cruise control button ........................5-61
5. LCD display control buttons ..............4-69
6. Horn ..................................................4-55
7. Driver’s front air bag ..........................3-58
8. Wiper and washer control lever ......4-143
9. Ignition switch or Engine start/stop
button ........................................5-6, 5-10
10. Audio ............................................4-202
11. Hazard warning flasher ................4-132
12. Climate control system ......4-156, 4-167
13. Passenger’s front air bag ................3-58
14. Glove box ......................................4-186
ODMEIN2004R❈The actual shape may differ from the illustration.
Page 102 of 699
• Cup holder . . . . . . . . . . . . . . . . . . . . . . . . . . . . . . . . . 4-191
• Bottle holder. . . . . . . . . . . . . . . . . . . . . . . . . . . . . . . . 4-192
• Sunvisor . . . . . . . . . . . . . . . . . . . . . . . . . . . . . . . . . . . 4-192
• Power outlet . . . . . . . . . . . . . . . . . . . . . . . . . . . . . . . . 4-193
• AC inverter . . . . . . . . . . . . . . . . . . . . . . . . . . . . . . . . . 4-194
• Aux, USB and iPod
®. . . . . . . . . . . . . . . . . . . . . . . . . . 4-196
• Clothes hanger . . . . . . . . . . . . . . . . . . . . . . . . . . . . . . 4-197
• Floor mat anchor(s). . . . . . . . . . . . . . . . . . . . . . . . . . 4-197
• Luggage net (holder) . . . . . . . . . . . . . . . . . . . . . . . . . 4-198
• Cargo security screen . . . . . . . . . . . . . . . . . . . . . . . . 4-198
• Side curtain . . . . . . . . . . . . . . . . . . . . . . . . . . . . . . . . 4-200
Exterior features. . . . . . . . . . . . . . . . . . . . . . . . . . 4-201
• Roof rack . . . . . . . . . . . . . . . . . . . . . . . . . . . . . . . . . . 4-201
Audio system . . . . . . . . . . . . . . . . . . . . . . . . . . . . . 4-202
• Antenna . . . . . . . . . . . . . . . . . . . . . . . . . . . . . . . . . . . 4-202
• Audio remote control. . . . . . . . . . . . . . . . . . . . . . . . . 4-203
4
Page 144 of 699
Features of your vehicle
46 4
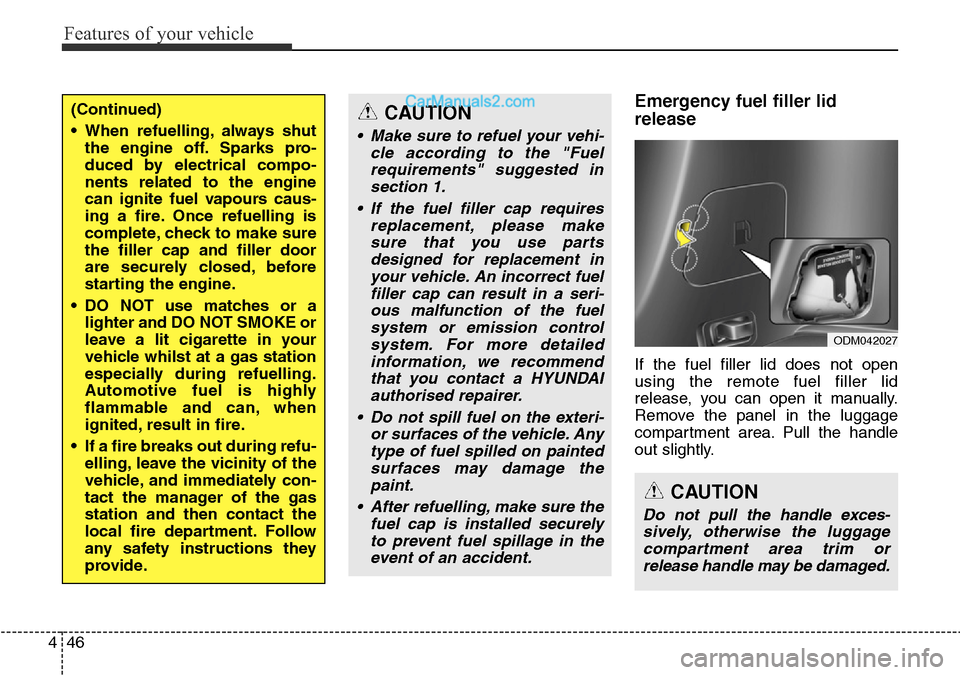
Emergency fuel filler lid
release
If the fuel filler lid does not open
using the remote fuel filler lid
release, you can open it manually.
Remove the panel in the luggage
compartment area. Pull the handle
out slightly.
(Continued)
• When refuelling, always shut
the engine off. Sparks pro-
duced by electrical compo-
nents related to the engine
can ignite fuel vapours caus-
ing a fire. Once refuelling is
complete, check to make sure
the filler cap and filler door
are securely closed, before
starting the engine.
• DO NOT use matches or a
lighter and DO NOT SMOKE or
leave a lit cigarette in your
vehicle whilst at a gas station
especially during refuelling.
Automotive fuel is highly
flammable and can, when
ignited, result in fire.
• If a fire breaks out during refu-
elling, leave the vicinity of the
vehicle, and immediately con-
tact the manager of the gas
station and then contact the
local fire department. Follow
any safety instructions they
provide.CAUTION
• Make sure to refuel your vehi-
cle according to the "Fuel
requirements" suggested in
section 1.
• If the fuel filler cap requires
replacement, please make
sure that you use parts
designed for replacement in
your vehicle. An incorrect fuel
filler cap can result in a seri-
ous malfunction of the fuel
system or emission control
system. For more detailed
information, we recommend
that you contact a HYUNDAI
authorised repairer.
• Do not spill fuel on the exteri-
or surfaces of the vehicle. Any
type of fuel spilled on painted
surfaces may damage the
paint.
• After refuelling, make sure the
fuel cap is installed securely
to prevent fuel spillage in the
event of an accident.
CAUTION
Do not pull the handle exces-
sively, otherwise the luggage
compartment area trim or
release handle may be damaged.
ODM042027
Page 160 of 699
Features of your vehicle
62 4
Outside rearview mirror
Be sure to adjust mirror angles
before driving.
Your vehicle is equipped with both
left-hand and right-hand outside
rearview mirrors. The mirrors can be
adjusted remotely with the remote
switch. The mirror heads can be fold-
ed back to prevent damage during an
automatic car wash or when passing
in a narrow street.
WARNING - Rearview
mirrors
• The outside rearview mirror is
convex. Objects seen in the
mirror are closer than they
appear.
• Use your interior rearview
mirror or direct observation to
determine the actual distance
of following vehicles when
changing lanes.
CAUTION
Do not scrape ice off the mirror
face; this may damage the sur-
face of the glass. If ice should
restrict movement of the mirror,
do not force the mirror for
adjustment. To remove ice, use
a deicer spray, or a sponge or
soft cloth with very warm water.
CAUTION
If the mirror is jammed with ice,
do not adjust the mirror by force.
Use an approved spray de-icer
(not radiator antifreeze) to
release the frozen mechanism or
move the vehicle to a warm
place and allow the ice to melt.
WARNING
Do not adjust or fold the outside
rearview mirrors whilst the vehi-
cle is moving. This could result in
loss of control, and an accident
which could cause death, seri-
ous injury or property damage.
Page 161 of 699
463
Features of your vehicle
Remote control
Electric type
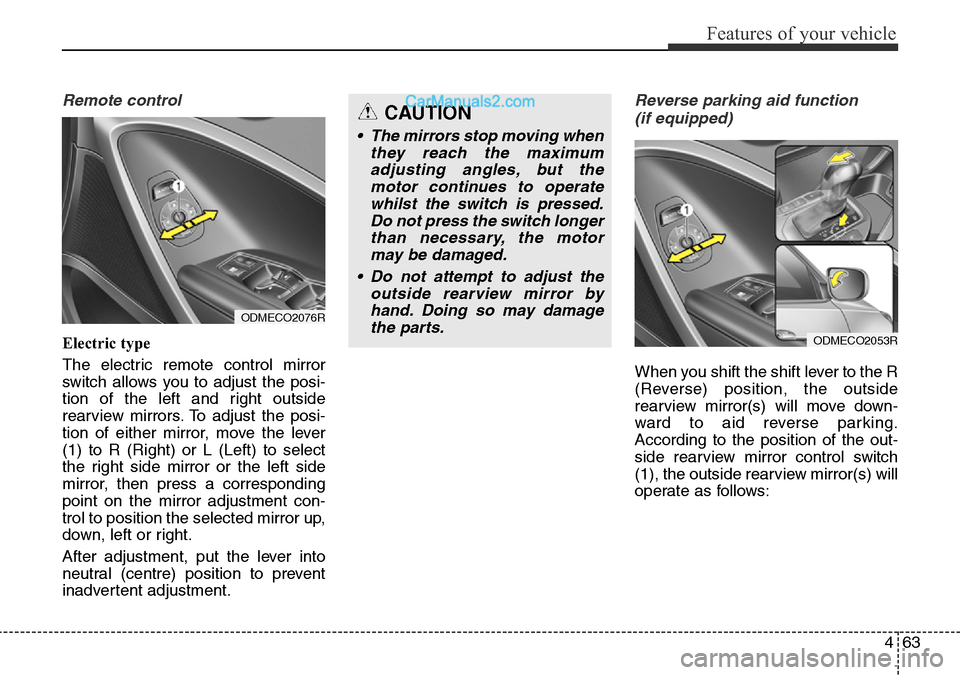
The electric remote control mirror
switch allows you to adjust the posi-
tion of the left and right outside
rearview mirrors. To adjust the posi-
tion of either mirror, move the lever
(1) to R (Right) or L (Left) to select
the right side mirror or the left side
mirror, then press a corresponding
point on the mirror adjustment con-
trol to position the selected mirror up,
down, left or right.
After adjustment, put the lever into
neutral (centre) position to prevent
inadvertent adjustment.
Reverse parking aid function
(if equipped)
When you shift the shift lever to the R
(Reverse) position, the outside
rearview mirror(s) will move down-
ward to aid reverse parking.
According to the position of the out-
side rearview mirror control switch
(1), the outside rearview mirror(s) will
operate as follows:
CAUTION
• The mirrors stop moving when
they reach the maximum
adjusting angles, but the
motor continues to operate
whilst the switch is pressed.
Do not press the switch longer
than necessary, the motor
may be damaged.
• Do not attempt to adjust the
outside rearview mirror by
hand. Doing so may damage
the parts.
ODMECO2053R
ODMECO2076R
Page 301 of 699
4203
Features of your vehicle
Audio remote control
(if equipped)
❈ The actual feature in the vehicle may differ
from the illustration.
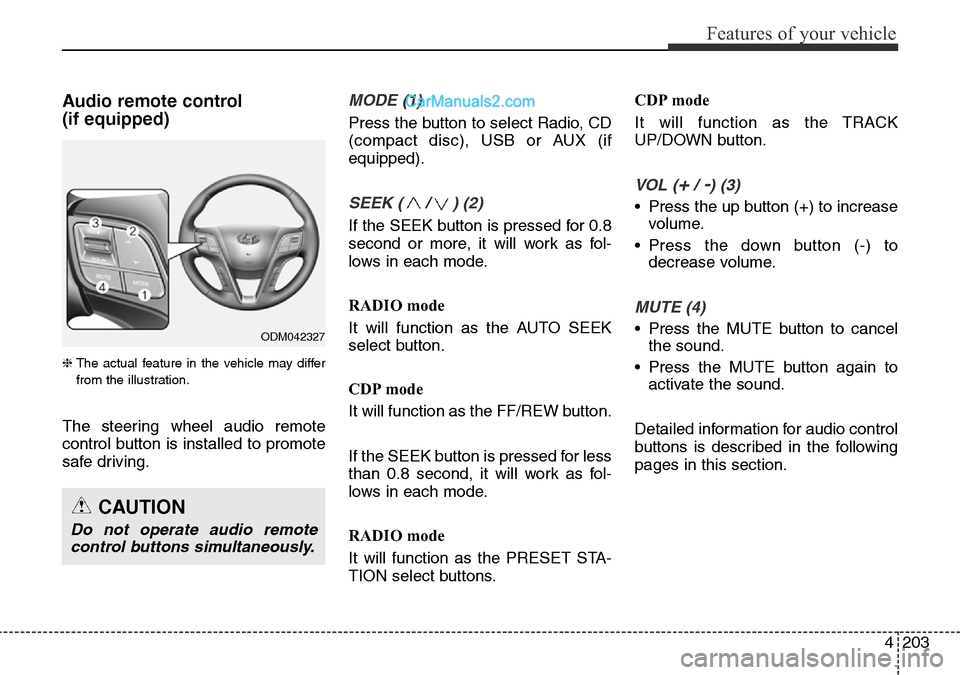
The steering wheel audio remote
control button is installed to promote
safe driving.
MODE (1)
Press the button to select Radio, CD
(compact disc), USB or AUX (if
equipped).
SEEK ( / ) (2)
If the SEEK button is pressed for 0.8
second or more, it will work as fol-
lows in each mode.
RADIO mode
It will function as the AUTO SEEK
select button.
CDP mode
It will function as the FF/REW button.
If the SEEK button is pressed for less
than 0.8 second, it will work as fol-
lows in each mode.
RADIO mode
It will function as the PRESET STA-
TION select buttons.CDP mode
It will function as the TRACK
UP/DOWN button.
VOL (+/ -) (3)
• Press the up button (+) to increase
volume.
• Press the down button (-) to
decrease volume.
MUTE (4)
• Press the MUTE button to cancel
the sound.
• Press the MUTE button again to
activate the sound.
Detailed information for audio control
buttons is described in the following
pages in this section.
CAUTION
Do not operate audio remote
control buttons simultaneously.
ODM042327
Page 350 of 699
Features of your vehicle
252 4
Bluetooth®Wireless
Technology AUDIO
(if equipped)
What is Bluetooth®Wireless
Technology?
Bluetooth®Wireless Technology is a
wireless technology that allows mul-
tiple devices to be connected in a
short range, low-powered devices
like hands-free, stereo headset, wire-
less remote controller, etc. For more
information, visit the
Bluetooth®
Wireless Technology website at
www.Bluetooth.com
Before using Bluetooth®Wireless
Technology audio features
•
Bluetooth®Wireless Technology
audio may not be supported
depending on the compatibility of
your
Bluetooth®Wireless Technology
mobile phone.
• In order to use
Bluetooth®Wireless
Technology audio, you must first
pair and connect the
Bluetooth®
Wireless Technology mobile phone.
•
Bluetooth®Wireless Technology
audio can be used only when the
[Audio Streaming] of Phone is
turned On.
❈ Setting
Bluetooth®Wireless
Technology Audio Streaming :
Press the key Select
[Phone] through the tune knob
Select [Audio Streaming] through
the TUNE knob Set /
Starting Bluetooth®Wireless
Technology Audio
• Press the key to change the
mode in order of CD ➟ USB ➟ AUX
➟ My Music ➟ BT Audio.
• If BT Audio is selected,
Bluetooth®
Wireless Technology audio will start
playing.
❈ Audio may not automatically start
playing in some mobile phones.
Using the
Bluetooth®Wireless
Technologyaudio features
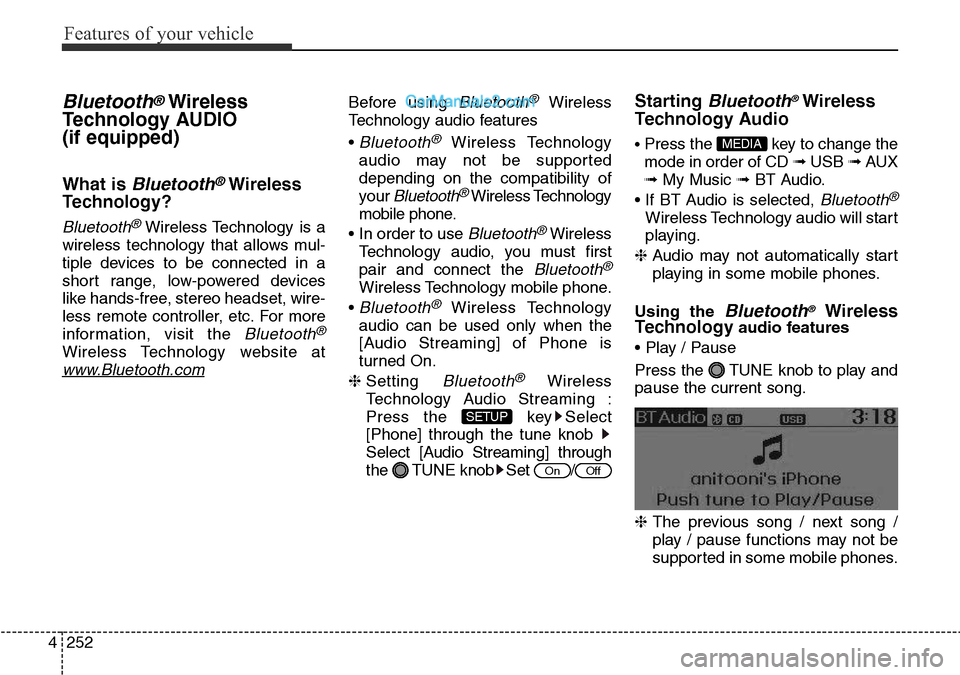
• Play / Pause
Press the TUNE knob to play and
pause the current song.
❈ The previous song / next song /
play / pause functions may not be
supported in some mobile phones.
MEDIA
OffOn
SETUP
Page 351 of 699
4253
Features of your vehicle
PHONE (if equipped)
Before using the Bluetooth®Wireless
Technology
phone features
• In order to use
Bluetooth®Wireless
Technology
phone, you must first
pair and connect the
Bluetooth®
Wireless Technologymobile phone.
• If the mobile phone is not paired or
connected, it is not possible to
enter Phone mode. Once a phone
is paired or connected, the guid-
ance screen will be displayed.
• If Priority is set upon vehicle igni-
tion (IGN/ACC ON), the
Bluetooth®
Wireless Technologyphone will be
automatically connected. Even if
you are outside, the
Bluetooth®
Wireless Technologyphone will be
automatically connected once you
are in the vicinity of the vehicle. If you
do not want automatic
Bluetooth®
Wireless Technologyphone connec-
tion, set the
Bluetooth®Wireless
Technology
power to OFF.
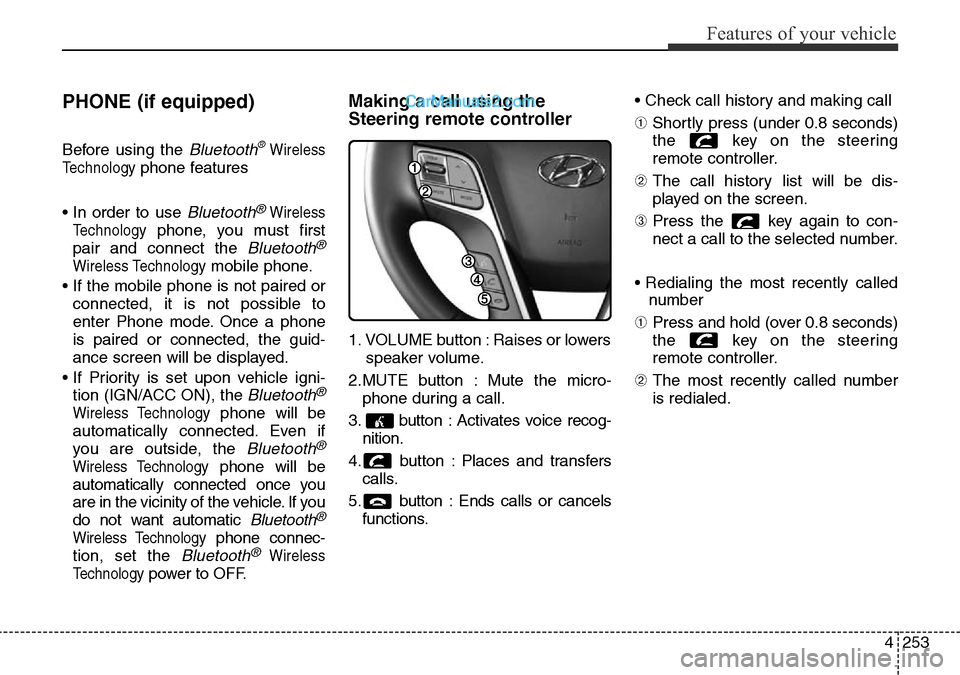
Making a call using the
Steering remote controller
1. VOLUME button : Raises or lowers
speaker volume.
2.MUTE button : Mute the micro-
phone during a call.
3. button : Activates voice recog-
nition.
4. button : Places and transfers
calls.
5. button : Ends calls or cancels
functions.• Check call history and making call
➀ Shortly press (under 0.8 seconds)
the key on the steering
remote controller.
➁ The call history list will be dis-
played on the screen.
➂ Press the key again to con-
nect a call to the selected number.
• Redialing the most recently called
number
➀ Press and hold (over 0.8 seconds)
the key on the steering
remote controller.
➁ The most recently called number
is redialed.