Page 555 of 699
597
Driving your vehicle
WARNING - Trailer
• Never load a trailer with more
weight in the rear than in the
front. The front should be
loaded with approximately
60% of the total trailer load;
the rear should be loaded with
approximately 40% of the total
trailer load.
• Never exceed the maximum
weight limits of the trailer or
trailer towing equipment.
Improper loading can result in
damage to your vehicle and/or
personal injury. Check
weights and loading at a com-
mercial scale or highway
patrol office equipped with
scales.
• An improperly loaded trailer
can cause loss of vehicle con-
trol.
Page 556 of 699

This section will guide you in the
proper loading of your vehicle and/or
trailer, to keep your loaded vehicle
weight within its design rating capa-
bility, with or without a trailer.
Properly loading your vehicle will
provide maximum return of the vehi-
cle design performance. Before load-
ing your vehicle, familiarize yourself
with the following terms for determin-
ing your vehicle's weight ratings, with
or without a trailer, from the vehicle's
specifications and the certification
label:
Base kerb weight
This is the weight of the vehicle
including a full tank of fuel and all
standard equipment. It does not
include passengers, cargo, or option-
al equipment.
Vehicle kerb weight
This is the weight of your new vehicle
when you picked it up from your deal-
er plus any aftermarket equipment.
Cargo weight
This figure includes all weight added
to the Base Kerb Weight, including
cargo and optional equipment.
GAW (Gross axle weight)
This is the total weight placed on
each axle (front and rear) - including
vehicle kerb weight and all payload.
GAWR (Gross axle weight rat-
ing)
This is the maximum allowable
weight that can be carried by a single
axle (front or rear). These numbers
are shown on the certification label.
The total load on each axle must
never exceed its GAWR.
GVW (Gross vehicle weight)
This is the Base Kerb Weight plus
actual Cargo Weight plus passen-
gers.
GVWR (Gross vehicle weight
rating)
This is the maximum allowable
weight of the fully loaded vehicle
(including all options, equipment,
passengers and cargo). The GVWR
is shown on the certification label.
Overloading
VEHICLE WEIGHT
WARNING - Vehicle
weight
The gross axle weight rating
(GAWR) and the gross vehicle
weight rating (GVWR) for your
vehicle are on the certification
label attached to the driver's (or
front passenger’s) door.
Exceeding these ratings can
cause an accident or vehicle
damage. You can calculate the
weight of your load by weighing
the items (and people) before
putting them in the vehicle. Be
careful not to overload your
vehicle.
598
Driving your vehicle
Page 584 of 699

What to do in an emergency
28 6
When using a compact spare tyre,
observe the following precautions:
• Under no circumstances should
you exceed 50 mph (80 km/h); a
higher speed could damage the
tyre.
• Ensure that you drive slowly
enough for the road conditions to
avoid all hazards. Any road hazard,
such as a pothole or debris, could
seriously damage the compact
spare.
• Any continuous road use of this
tyre could result in tyre failure, loss
of vehicle control, and possible
personal injury.
• Do not exceed the vehicle’s maxi-
mum load rating or the load-carry-
ing capacity shown on the sidewall
of the compact spare tyre.
• Avoid driving over obstacles. The
compact spare tyre diameter is
smaller than the diameter of a con-
ventional tyre and reduces the
ground clearance approximately
25 mm (1 inch), which could result
in damage to the vehicle.• Do not take this vehicle through an
automatic car wash whilst the com-
pact spare tyre is installed.
• Do not use tyre chains on the com-
pact spare tyre. Because of the
smaller size, a tyre chain will not fit
properly. This could damage the
vehicle and result in loss of the
chain.
• The compact spare tyre should not
be installed on the front axle if the
vehicle must be driven in snow or
on ice.
• Do not use the compact spare tyre
on any other vehicle because this
tyre has been designed especially
for your vehicle.
• The compact spare tyre’s tread life
is shorter than a regular tyre.
Inspect your compact spare tyre
regularly and replace worn com-
pact spare tyres with the same size
and design, mounted on the same
wheel.• The compact spare tyre should not
be used on any other wheels, nor
should standard tyres, snow tyres,
wheel covers or trim rings be used
with the compact spare wheel. If
such use is attempted, damage to
these items or other car compo-
nents may occur.
• Do not use more than one tempo-
rary spare tyre at a time.
• Do not tow a trailer whilst the tem-
porary spare tyre is installed.
Page 588 of 699

What to do in an emergency
32 6
It is possible that some tyres, espe-
cially with larger punctures or dam-
age to the sidewall, cannot be sealed
completely.
Air pressure loss in the tyre may
adversely affect tyre performance.
For this reason, you should avoid
abrupt steering or other driving
manoeuvres, especially if the vehicle
is heavily loaded or if a trailer is in
use.
The TMK is not designed or intended
as a permanent tyre repair method
and is to be used for one tyre only.
This instruction shows you step by
step how to temporarily seal the
puncture simply and reliably.
Read the section "Notes on the safe
use of the Tyre Mobility Kit".
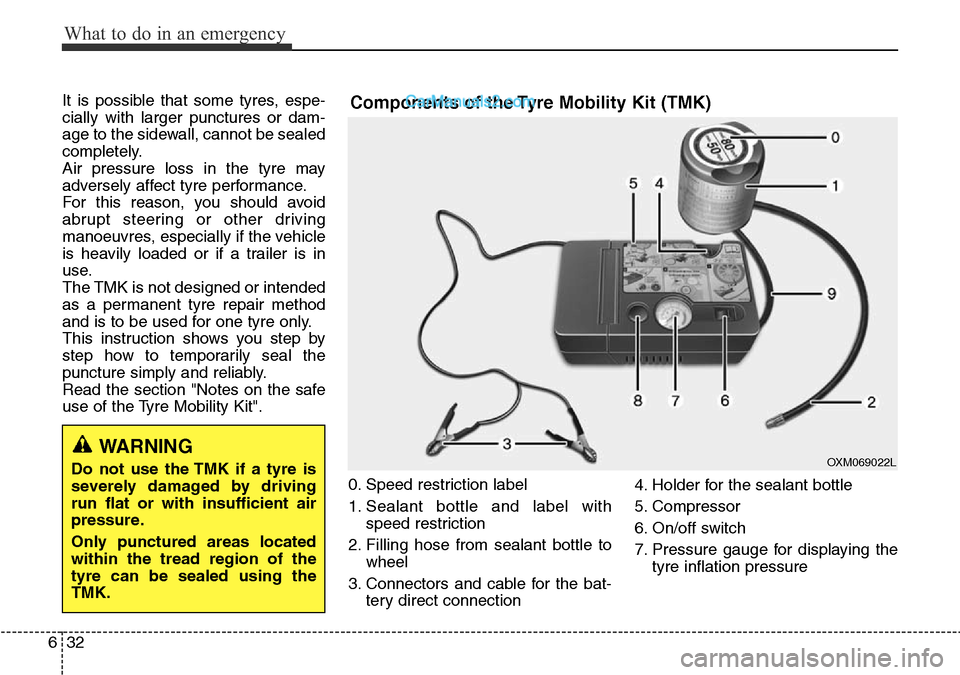
0. Speed restriction label
1. Sealant bottle and label with
speed restriction
2. Filling hose from sealant bottle to
wheel
3. Connectors and cable for the bat-
tery direct connection4. Holder for the sealant bottle
5. Compressor
6. On/off switch
7. Pressure gauge for displaying the
tyre inflation pressureComponents of the Tyre Mobility Kit (TMK)
OXM069022LWARNING
Do not use the TMK if a tyre is
severely damaged by driving
run flat or with insufficient air
pressure.
Only punctured areas located
within the tread region of the
tyre can be sealed using the
TMK.
Page 593 of 699

637
What to do in an emergency
TOWING
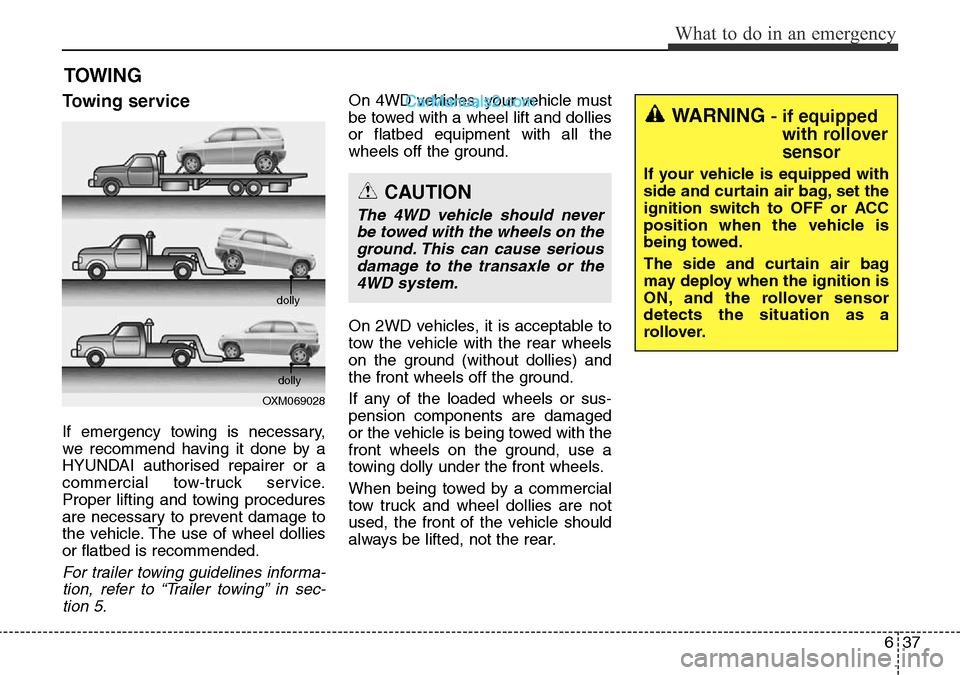
Towing service
If emergency towing is necessary,
we recommend having it done by a
HYUNDAI authorised repairer or a
commercial tow-truck service.
Proper lifting and towing procedures
are necessary to prevent damage to
the vehicle. The use of wheel dollies
or flatbed is recommended.
For trailer towing guidelines informa-
tion, refer to “Trailer towing” in sec-
tion 5.
On 4WD vehicles, your vehicle must
be towed with a wheel lift and dollies
or flatbed equipment with all the
wheels off the ground.
On 2WD vehicles, it is acceptable to
tow the vehicle with the rear wheels
on the ground (without dollies) and
the front wheels off the ground.
If any of the loaded wheels or sus-
pension components are damaged
or the vehicle is being towed with the
front wheels on the ground, use a
towing dolly under the front wheels.
When being towed by a commercial
tow truck and wheel dollies are not
used, the front of the vehicle should
always be lifted, not the rear.
OXM069028dolly
dolly
CAUTION
The 4WD vehicle should never
be towed with the wheels on the
ground. This can cause serious
damage to the transaxle or the
4WD system.
WARNING - if equipped
with rollover
sensor
If your vehicle is equipped with
side and curtain air bag, set the
ignition switch to OFF or ACC
position when the vehicle is
being towed.
The side and curtain air bag
may deploy when the ignition is
ON, and the rollover sensor
detects the situation as a
rollover.
Page 655 of 699
Maintenance
58 7
DescriptionSymbol Fuse ratingProtected Component
MULTI
FUSE
MDPS80AMDPS Unit
B+260ASmart Junction Box (IPS 1 (4CH), IPS 2 (1CH), IPS 5 (1CH), Fuse -
F31/F36/F41/F45)
BLOWER40ARLY. 4 (Blower Relay)
RR HTD40ARLY. 12 (Rear Defogger Relay)
ABS140AABS Control Module, ESC Control Module, Multipurpose Check Connector
ABS240AABS Control Module, ESC Control Module
C/FAN60AExcept Europe - RLY. 6 (Cooling Fan (LO) Relay), RLY. 10 (Cooling Fan (HI)
Relay)
B+360ASmart Junction Box (Fuse - F4/F5/F10/F21/F26, Leak Current Autocut Device)
FUSE
B+450ASmart Junction Box (IPS 3 (4CH), IPS 4 (2CH), IPS 6 (2CH), Fuse -
F35/F38/F40/F44)
EMS40AEMS Box
C/FAN50AExcept Europe - RLY. 6 (Cooling Fan (LO) Relay), RLY. 10 (Cooling Fan (HI)
Relay)
IG140AIgnition Switch (W/O Smart Key), RLY. 7/8 (ACC/IG1 Relay, With Smart Key)
IG240AIgnition Switch (W/O Smart Key), RLY. 2 (Start Relay)/RLY. 9 (IG2 Relay)
TRAILER30ATrailer Lamp & Power Outlet
Page 656 of 699
759
Maintenance
DescriptionSymbol Fuse ratingProtected Component
FUSE
B+150ASmart Junction Box (Fuse - F22/F27/F32/F37/F42)
AC INVERTER30AAC Inverter Module
HORN15ARLY. 13 (Horn Relay)
ACTIVE BONNET
LH30AActive Bonnet Lift Control Module
ACTIVE BONNET
RH30AActive Bonnet Lift Control Module
EPB115AElectric Parking Brake Module
EPB215AElectric Parking Brake Module
DEICER15ARLY. 3 (Front Deicer Relay)
H/LP WASHER20ARLY. 14 (Head Lamp Washer Relay)
P/OUTLET25ARLY. 1 (Power Outlet Relay)
4WD20A4WD ECM
AMS10ABattery Sensor
TRAILER 215ATrailer Lamp & Power Outlet
Page 657 of 699
Maintenance
60 7
DescriptionSymbol Fuse ratingProtected Component
FUSE
TRAILER 115ATrailer Lamp & Power Outlet
WIPER10ABCM, PCM/ECM
WIPER FRT25ARLY. 5 (Wiper (LO) Relay), Front Wiper Motor
B/UP LAMP10AM/T - Back-Up Lamp Switch, A/T - Rear Combination Lamp (IN) LH/RH,
Electro Chromic Mirror, Trailer Lamp & Power Outlet, Audio, A/V & Navigation
Head Unit
ABS37.5AABS Control Module, ESC Control Module
SENSOR57.5APCM/ECM, Mass Air Flow Sensor
TCU15ATCM (DSL), Transaxle Range Switch
F/PUMP15AFuel Pump Relay
ECU115AG4KE/G4KJ/G6DF : PCM
D4HA/D4HB (VGT Regular Engine Pack) : TCM (A/T)
ECU210AD4HA/D4HB : Electronic VGT Actuator
SENSOR310A
G4KE : Injector #1/#2/#3/#4
G6DF : PCM, Injector #1/#2/#3/#4/#5/#6, Fuel Pump Relay
D4HA/D4HB (VGT Regular Engine Pack) : Lambda Sensor, Stop Lamp Switch
D4HA (VGT Low Power Engine Pack) : Lambda Sensor
Page:
< prev 1-8 9-16 17-24