2016 Hyundai Santa Fe steering
[x] Cancel search: steeringPage 551 of 699
593
Driving your vehicle
Parking on hills
Generally, if you have a trailer
attached to your vehicle, you should
not park your vehicle on a hill. People
can be seriously or fatally injured,
and both your vehicle and the trailer
can be damaged if they unexpected-
ly roll down hill.
However, if you ever have to park
your trailer on a hill, here is how to do
it:
1.Pull the vehicle into the parking
space. Turn the steering wheel in
the direction of the kerb (left if
headed down hill, right if headed
up hill).2.If the vehicle has a manual
transaxle, place the car in neutral.
If the vehicle has an automatic
transaxle, place the car in P (Park).
3.Set the parking brake and shut off
the vehicle.
4.Place chocks under the trailer
wheels on the down hill side of the
wheels.
5.Start the vehicle, hold the brakes,
shift to neutral, release the parking
brake and slowly release the
brakes until the trailer chocks
absorb the load.
6.Reapply the brakes, reapply the
parking brake and shift the vehicle
to R (Reverse) for manual
transaxle or P (Park) for automatic
transaxle.
7.Shut off the vehicle and release the
vehicle brakes but leave the park-
ing brake set.CAUTION
• When towing a trailer on steep
grades (in excess of 6%) pay
close attention to the engine
coolant temperature gauge to
ensure the engine does not
overheat.
If the needle of the coolant
temperature gauge moves
across the dial towards “130/H
(HOT)”, pull over and stop as
soon as it is safe to do so, and
allow the engine to idle until it
cools down. You may proceed
once the engine has cooled
sufficiently.
• You must decide driving
speed depending on trailer
weight and uphill grade to
reduce the possibility of
engine and transaxle over-
heating.
WARNING- Parking on
a hill
Parking your vehicle on a hill
with a trailer attached could
cause serious injury or death,
should the trailer break loose or
the brake stops working.
Page 588 of 699
What to do in an emergency
32 6
It is possible that some tyres, espe-
cially with larger punctures or dam-
age to the sidewall, cannot be sealed
completely.
Air pressure loss in the tyre may
adversely affect tyre performance.
For this reason, you should avoid
abrupt steering or other driving
manoeuvres, especially if the vehicle
is heavily loaded or if a trailer is in
use.
The TMK is not designed or intended
as a permanent tyre repair method
and is to be used for one tyre only.
This instruction shows you step by
step how to temporarily seal the
puncture simply and reliably.
Read the section "Notes on the safe
use of the Tyre Mobility Kit".
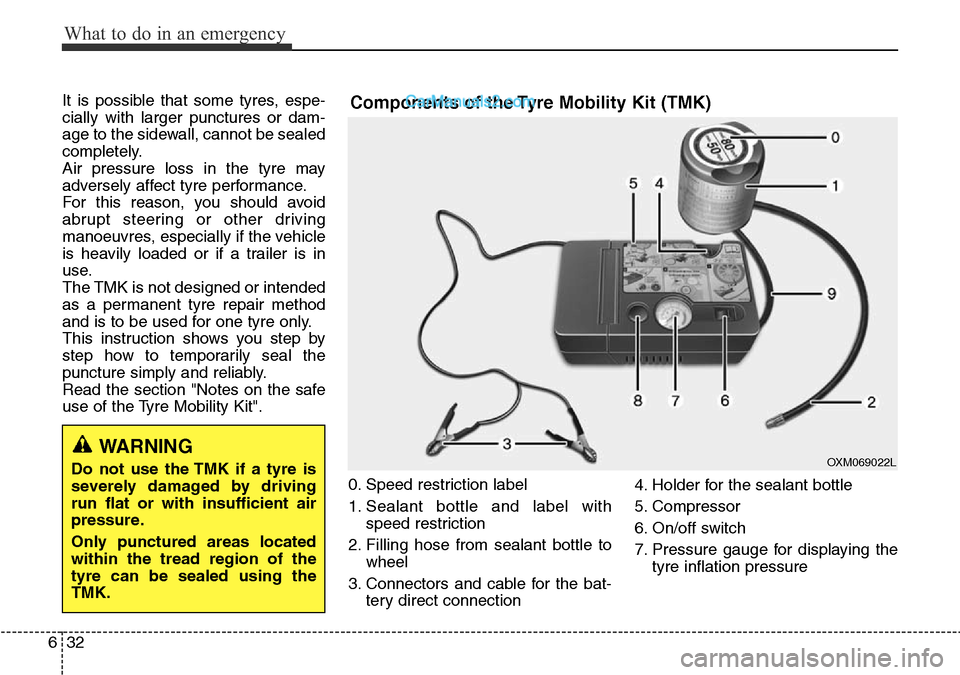
0. Speed restriction label
1. Sealant bottle and label with
speed restriction
2. Filling hose from sealant bottle to
wheel
3. Connectors and cable for the bat-
tery direct connection4. Holder for the sealant bottle
5. Compressor
6. On/off switch
7. Pressure gauge for displaying the
tyre inflation pressureComponents of the Tyre Mobility Kit (TMK)
OXM069022LWARNING
Do not use the TMK if a tyre is
severely damaged by driving
run flat or with insufficient air
pressure.
Only punctured areas located
within the tread region of the
tyre can be sealed using the
TMK.
Page 589 of 699
633
What to do in an emergency
8. Button for reducing tyre inflation
pressure
9. Hose to connect compressor and
sealant bottle or compressor and
wheel
Connectors, cable and connection
hose are stored in the compressor
housing.
Strictly follow the specified
sequence, otherwise the sealant
may escape under high pressure.Using the Tyre Mobility Kit
(TMK)
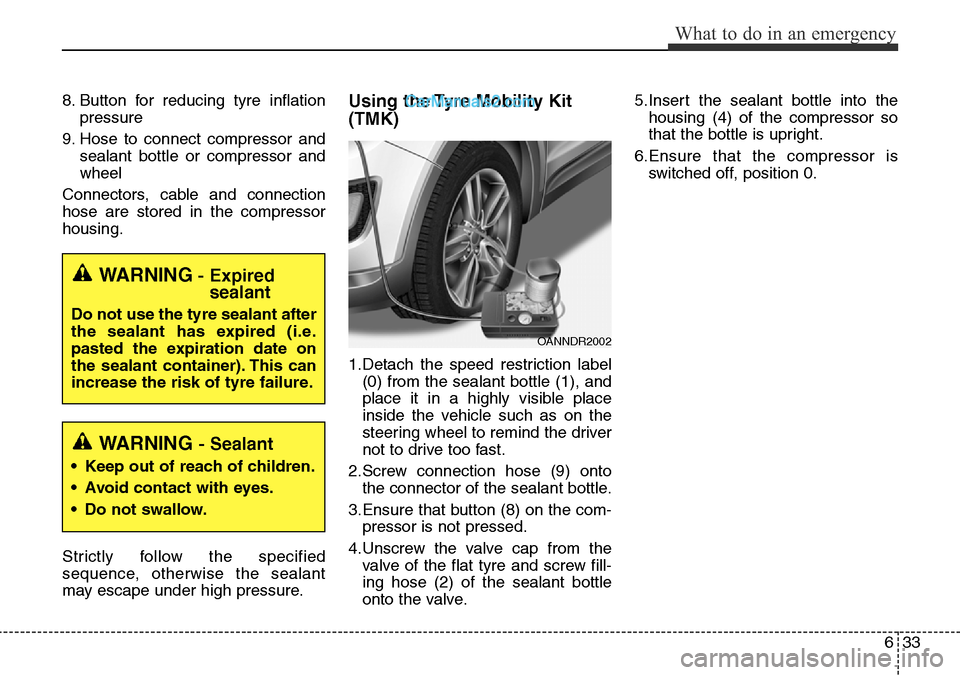
1.Detach the speed restriction label
(0) from the sealant bottle (1), and
place it in a highly visible place
inside the vehicle such as on the
steering wheel to remind the driver
not to drive too fast.
2.Screw connection hose (9) onto
the connector of the sealant bottle.
3.Ensure that button (8) on the com-
pressor is not pressed.
4.Unscrew the valve cap from the
valve of the flat tyre and screw fill-
ing hose (2) of the sealant bottle
onto the valve.5.Insert the sealant bottle into the
housing (4) of the compressor so
that the bottle is upright.
6.Ensure that the compressor is
switched off, position 0.
WARNING- Expired
sealant
Do not use the tyre sealant after
the sealant has expired (i.e.
pasted the expiration date on
the sealant container). This can
increase the risk of tyre failure.
WARNING - Sealant
• Keep out of reach of children.
• Avoid contact with eyes.
• Do not swallow.
OANNDR2002
Page 595 of 699
639
What to do in an emergency
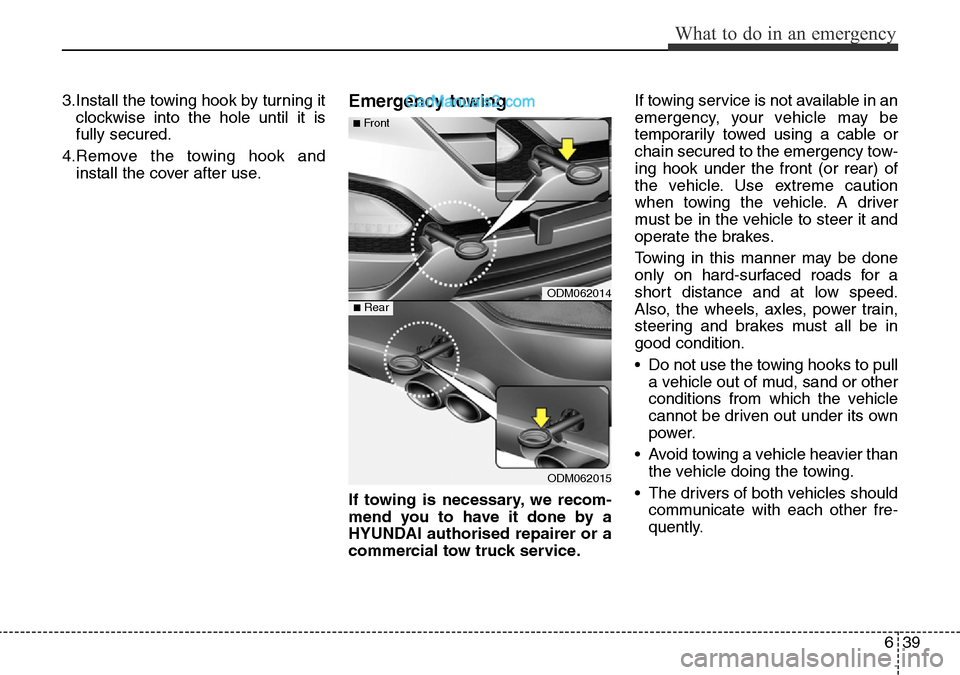
3.Install the towing hook by turning it
clockwise into the hole until it is
fully secured.
4.Remove the towing hook and
install the cover after use.Emergency towing
If towing is necessary, we recom-
mend you to have it done by a
HYUNDAI authorised repairer or a
commercial tow truck service.If towing service is not available in an
emergency, your vehicle may be
temporarily towed using a cable or
chain secured to the emergency tow-
ing hook under the front (or rear) of
the vehicle. Use extreme caution
when towing the vehicle. A driver
must be in the vehicle to steer it and
operate the brakes.
Towing in this manner may be done
only on hard-surfaced roads for a
short distance and at low speed.
Also, the wheels, axles, power train,
steering and brakes must all be in
good condition.
• Do not use the towing hooks to pull
a vehicle out of mud, sand or other
conditions from which the vehicle
cannot be driven out under its own
power.
• Avoid towing a vehicle heavier than
the vehicle doing the towing.
• The drivers of both vehicles should
communicate with each other fre-
quently.
ODM062014
ODM062015
■Front
■Rear
Page 597 of 699
641
What to do in an emergency
Emergency towing precautions
• Turn the ignition switch to ACC so
the steering wheel isn’t locked.
• Place the transaxle shift lever in N
(Neutral).
• Release the parking brake.
• Press the brake pedal with more
force than normal since you will
have reduced brake performance.
• More steering effort will be
required because the power steer-
ing system will be disabled.
• If you are driving down a long hill,
the brakes may overheat and brake
performance will be reduced. Stop
often and let the brakes cool off.CAUTION - Automatic
transaxle
• If the car is being towed with
all four wheels on the ground,
it can be towed only from the
front. Be sure that the
transaxle is in neutral. Be sure
the steering is unlocked by
placing the ignition switch in
the ACC position. A driver
must be in the towed vehicle
to operate the steering and
brakes.
• To avoid serious damage to
the automatic transaxle, limit
the vehicle speed to 10 mph
(15 km/h) and drive less than
1 mile (1.5 km) when towing.
• Before towing, check the auto-
matic transaxle for fluid leaks
under your vehicle. If the auto-
matic transaxle fluid is leak-
ing, flatbed equipment or a
towing dolly must be used.
Page 598 of 699
Maintenance
7
Engine compartment . . . . . . . . . . . . . . . . . . . . . . . . 7-3
Maintenance services . . . . . . . . . . . . . . . . . . . . . . . . 7-5
• Owner’s responsibility . . . . . . . . . . . . . . . . . . . . . . . . . 7-5
• Owner maintenance precautions . . . . . . . . . . . . . . . . . 7-5
• Engine compartment precautions (Diesel engine) . . . 7-7
Owner maintenance . . . . . . . . . . . . . . . . . . . . . . . . . 7-8
• Owner maintenance schedule. . . . . . . . . . . . . . . . . . . . 7-8
Scheduled maintenance service. . . . . . . . . . . . . . . 7-10
Explanation of scheduled maintenance items . . . 7-11
Engine oil. . . . . . . . . . . . . . . . . . . . . . . . . . . . . . . . . 7-15
• Checking the engine oil level . . . . . . . . . . . . . . . . . . . 7-15
• Changing the engine oil and filter . . . . . . . . . . . . . . . 7-16
Engine coolant . . . . . . . . . . . . . . . . . . . . . . . . . . . . 7-17
• Checking the coolant level . . . . . . . . . . . . . . . . . . . . . 7-17
• Changing the coolant . . . . . . . . . . . . . . . . . . . . . . . . . 7-19
Brake/clutch fluid . . . . . . . . . . . . . . . . . . . . . . . . . . 7-20
• Checking the brake/clutch fluid level . . . . . . . . . . . . 7-20
Power steering fluid . . . . . . . . . . . . . . . . . . . . . . . . 7-21
• Checking the power steering fluid level . . . . . . . . . 7-21
• Checking the power steering hose . . . . . . . . . . . . . . . 7-21
Washer fluid . . . . . . . . . . . . . . . . . . . . . . . . . . . . . . 7-22
• Checking the washer fluid level . . . . . . . . . . . . . . . . . 7-22
Parking brake . . . . . . . . . . . . . . . . . . . . . . . . . . . . . 7-23
• Checking the parking brake. . . . . . . . . . . . . . . . . . . . 7-23
Fuel filter (for Diesel) . . . . . . . . . . . . . . . . . . . . . . . 7-24
• Draining water from fuel filter . . . . . . . . . . . . . . . . . 7-24
Air cleaner. . . . . . . . . . . . . . . . . . . . . . . . . . . . . . . . 7-25
• Filter replacement . . . . . . . . . . . . . . . . . . . . . . . . . . . . 7-25
Climate control air filter . . . . . . . . . . . . . . . . . . . . 7-27
• Filter inspection . . . . . . . . . . . . . . . . . . . . . . . . . . . . . . 7-27
• Filter replacement . . . . . . . . . . . . . . . . . . . . . . . . . . . . 7-27
Wiper blades . . . . . . . . . . . . . . . . . . . . . . . . . . . . . . 7-29
• Blade inspection . . . . . . . . . . . . . . . . . . . . . . . . . . . . . . 7-29
• Blade replacement . . . . . . . . . . . . . . . . . . . . . . . . . . . . 7-29
Battery . . . . . . . . . . . . . . . . . . . . . . . . . . . . . . . . . . . 7-32
• For best battery service . . . . . . . . . . . . . . . . . . . . . . . 7-32
• Battery capacity label . . . . . . . . . . . . . . . . . . . . . . . . . 7-33
• Battery recharging . . . . . . . . . . . . . . . . . . . . . . . . . . . 7-34
• Reset items . . . . . . . . . . . . . . . . . . . . . . . . . . . . . . . . . . 7-34
Tyres and wheels . . . . . . . . . . . . . . . . . . . . . . . . . . 7-35
• Tyre care . . . . . . . . . . . . . . . . . . . . . . . . . . . . . . . . . . . . 7-35
• Recommended cold tyre inflation pressures . . . . . . . 7-35
• Checking tyre inflation pressure . . . . . . . . . . . . . . . . 7-37
• Tyre rotation . . . . . . . . . . . . . . . . . . . . . . . . . . . . . . . . 7-38
• Wheel alignment and tyre balance . . . . . . . . . . . . . . 7-39
• Tyre replacement . . . . . . . . . . . . . . . . . . . . . . . . . . . . . 7-39
• Wheel replacement . . . . . . . . . . . . . . . . . . . . . . . . . . . 7-41
• Tyre traction. . . . . . . . . . . . . . . . . . . . . . . . . . . . . . . . . 7-41
• Tyre maintenance . . . . . . . . . . . . . . . . . . . . . . . . . . . . 7-41
Page 605 of 699
Maintenance
8 7
OWNER MAINTENANCE
The following lists are vehicle checks
and inspections that should be per-
formed at the frequencies indicated
to help ensure safe, dependable
operation of your vehicle.
If you have any question, we recom-
mend that you consult a HYUNDAI
authorised repairer.
These Owner Maintenance Checks
are generally not covered by war-
ranties and you may be charged for
labour, parts and lubricants used.Owner maintenance schedule
When you stop for fuel:
• Check the engine oil level.
• Check coolant level in coolant
reservoir.
• Check the windscreen washer fluid
level.
• Look for low or under-inflated tyres.
Whilst operating your vehicle:
• Note any changes in the sound of
the exhaust or any smell of
exhaust fumes in the vehicle.
• Check for vibrations in the steering
wheel. Notice any increased steer-
ing effort or looseness in the steer-
ing wheel, or change in its straight-
ahead position.
• Notice if your vehicle constantly
turns slightly or “pulls” to one side
when travelling on smooth, level
road.
• When stopping, listen and check
for unusual sounds, pulling to one
side, increased brake pedal travel
or “hard-to-push” brake pedal.
• If any slipping or changes in the
operation of your transaxle occurs,
check the transaxle fluid level.
• Check manual transaxle operation,
including clutch operation.
• Check automatic transaxle P
(Park) function.
WARNING
Be careful when checking your
engine coolant level when the
engine is hot. Scalding hot
coolant and steam may blow
out under pressure. This could
cause burns or other serious
injury.
Page 606 of 699
79
Maintenance
• Check parking brake.
• Check for fluid leaks under your
vehicle (water dripping from the air
conditioning system during or after
use is normal).
At least monthly:
• Check coolant level in the engine
coolant reservoir.
• Check the operation of all exterior
lights, including the stoplights, turn
signals and hazard warning flash-
ers.
• Check the inflation pressures of all
tyres including the spare.
At least twice a year
(i.e., every Spring and Fall) :
• Check radiator, heater and air con-
ditioning hoses for leaks or dam-
age.
• Check windscreen washer spray
and wiper operation. Clean wiper
blades with clean cloth dampened
with washer fluid.
• Check headlight alignment.
• Check muffler, exhaust pipes,
shields and clamps.
• Check the lap/shoulder belts for
wear and function.
• Check for worn tyres and loose
wheel lug nuts.
At least once a year :
• Clean body and door drain holes.
• Lubricate door hinges and checks,
and bonnet hinges.
• Lubricate door and bonnet locks
and latches.
• Lubricate door rubber weather-
strips.
• Check the air conditioning system.
• Check the power steering fluid
level.
• Inspect and lubricate automatic
transaxle linkage and controls.
• Clean battery and terminals.
• Check the brake (and clutch) fluid
level.