Page 658 of 699
761
Maintenance
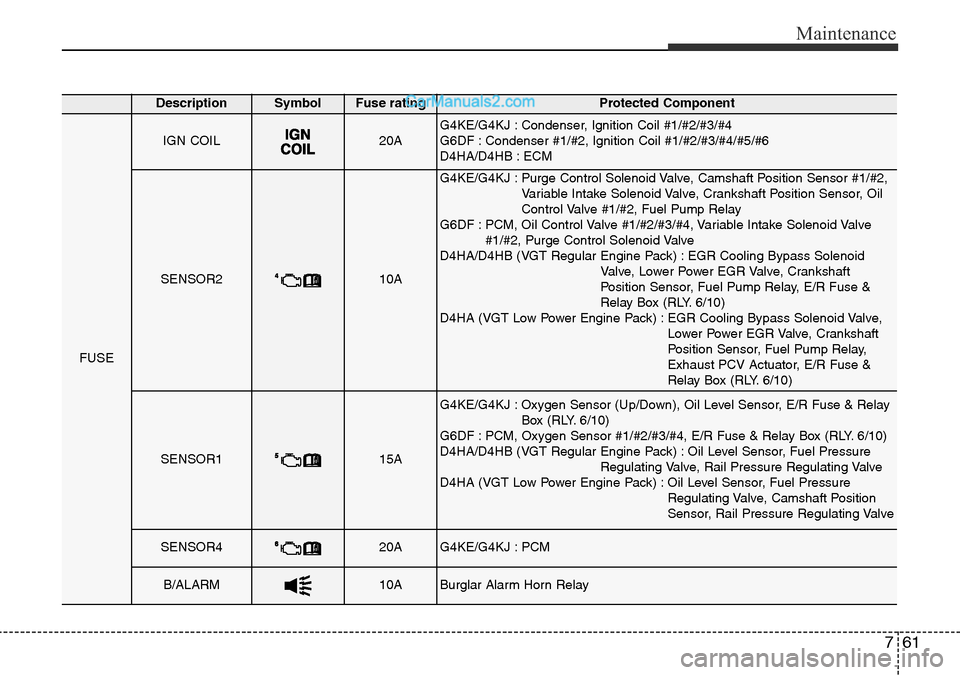
DescriptionSymbol Fuse ratingProtected Component
FUSE
IGN COIL20AG4KE/G4KJ : Condenser, Ignition Coil #1/#2/#3/#4
G6DF : Condenser #1/#2, Ignition Coil #1/#2/#3/#4/#5/#6
D4HA/D4HB : ECM
SENSOR210A
G4KE/G4KJ : Purge Control Solenoid Valve, Camshaft Position Sensor #1/#2,
Variable Intake Solenoid Valve, Crankshaft Position Sensor, Oil
Control Valve #1/#2, Fuel Pump Relay
G6DF : PCM, Oil Control Valve #1/#2/#3/#4, Variable Intake Solenoid Valve
#1/#2, Purge Control Solenoid Valve
D4HA/D4HB (VGT Regular Engine Pack) : EGR Cooling Bypass Solenoid
Valve, Lower Power EGR Valve, Crankshaft
Position Sensor, Fuel Pump Relay, E/R Fuse &
Relay Box (RLY. 6/10)
D4HA (VGT Low Power Engine Pack) : EGR Cooling Bypass Solenoid Valve,
Lower Power EGR Valve, Crankshaft
Position Sensor, Fuel Pump Relay,
Exhaust PCV Actuator, E/R Fuse &
Relay Box (RLY. 6/10)
SENSOR115A
G4KE/G4KJ : Oxygen Sensor (Up/Down), Oil Level Sensor, E/R Fuse & Relay
Box (RLY. 6/10)
G6DF : PCM, Oxygen Sensor #1/#2/#3/#4, E/R Fuse & Relay Box (RLY. 6/10)
D4HA/D4HB (VGT Regular Engine Pack) : Oil Level Sensor, Fuel Pressure
Regulating Valve, Rail Pressure Regulating Valve
D4HA (VGT Low Power Engine Pack) : Oil Level Sensor, Fuel Pressure
Regulating Valve, Camshaft Position
Sensor, Rail Pressure Regulating Valve
SENSOR420AG4KE/G4KJ : PCM
B/ALARM10ABurglar Alarm Horn Relay
Page 659 of 699
Maintenance
62 7
Engine compartment fuse panel
(Diesel engine only)
ODM072049
ODM074045
Page 660 of 699
763
Maintenance
Symbol Fuse ratingProtected Component
30ARLY. 1 (Fuel Filter Heater Relay)
150ARLY. 2 (PTC Heater Relay #1)
250ARLY. 3 (PTC Heater Relay #2)
350ARLY. 4 (PTC Heater Relay #3)
80AGlow Relay Unit
Circuit
Relay Type
Relay NO.SymbolRelay NameRelay Type
E44RLY. 1 (Fuel Filter Heater Relay)MICRO PLUG
E451RLY. 2 (PTC Heater Relay #1)MICRO PLUG
E462RLY. 3 (PTC Heater Relay #2)MICRO PLUG
E473RLY. 4 (PTC Heater Relay #3)MICRO PLUG
Page 661 of 699
Maintenance
64 7
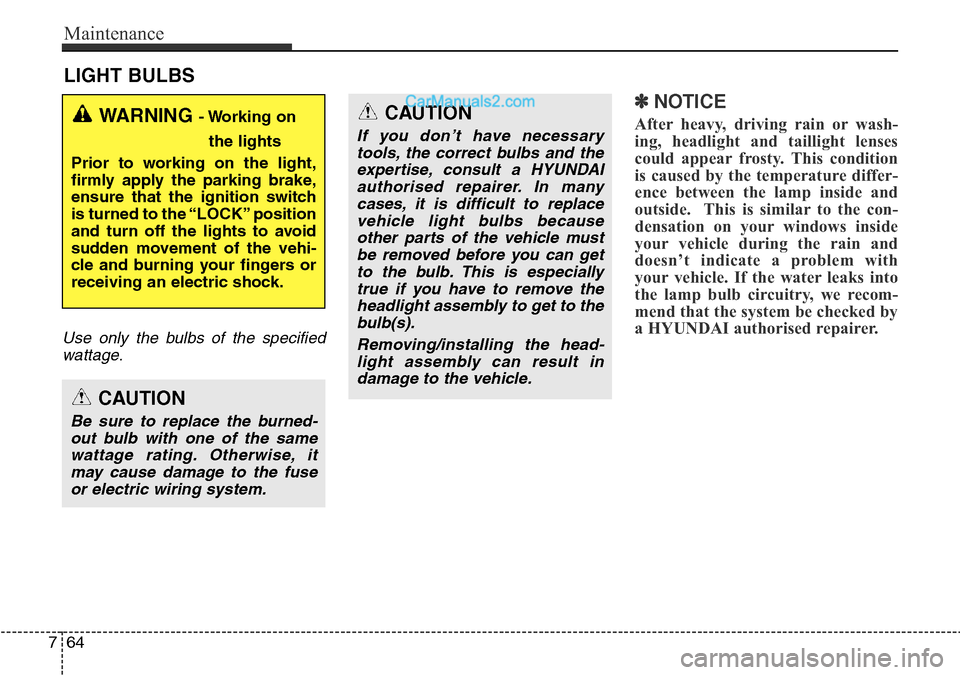
LIGHT BULBS
Use only the bulbs of the specified
wattage.
✽NOTICE
After heavy, driving rain or wash-
ing, headlight and taillight lenses
could appear frosty. This condition
is caused by the temperature differ-
ence between the lamp inside and
outside. This is similar to the con-
densation on your windows inside
your vehicle during the rain and
doesn’t indicate a problem with
your vehicle. If the water leaks into
the lamp bulb circuitry, we recom-
mend that the system be checked by
a HYUNDAI authorised repairer.WARNING - Working on
the lights
Prior to working on the light,
firmly apply the parking brake,
ensure that the ignition switch
is turned to the “LOCK” position
and turn off the lights to avoid
sudden movement of the vehi-
cle and burning your fingers or
receiving an electric shock.
CAUTION
Be sure to replace the burned-
out bulb with one of the same
wattage rating. Otherwise, it
may cause damage to the fuse
or electric wiring system.
CAUTION
If you don’t have necessary
tools, the correct bulbs and the
expertise, consult a HYUNDAI
authorised repairer. In many
cases, it is difficult to replace
vehicle light bulbs because
other parts of the vehicle must
be removed before you can get
to the bulb. This is especially
true if you have to remove the
headlight assembly to get to the
bulb(s).
Removing/installing the head-
light assembly can result in
damage to the vehicle.
Page 662 of 699
765
Maintenance
Headlamp, position lamp,
Front turn signal lamp, front
fog lamp bulb replacement(1) Headlamp (High)
(2) Headlamp (Low)
(3) Position lamp (LED/bulb)
(4) Front turn signal lamp
(5) Front fog lamp (if equipped)
(6) Cornering lamp (if equipped)
(7) Daytime running lamp
(if equipped)Headlamp bulb
OHD076046
WARNING- Halogen
bulbs
• Halogen bulbs contain pres-
surized gas that will produce
flying pieces of glass if bro-
ken.
• Always handle them carefully,
and avoid scratches and abra-
sions. If the bulbs are lit, avoid
contact with liquids.
(Continued)
ODMEMC2017
■Type A
■Type BODM072029
Page 663 of 699
Maintenance
66 7
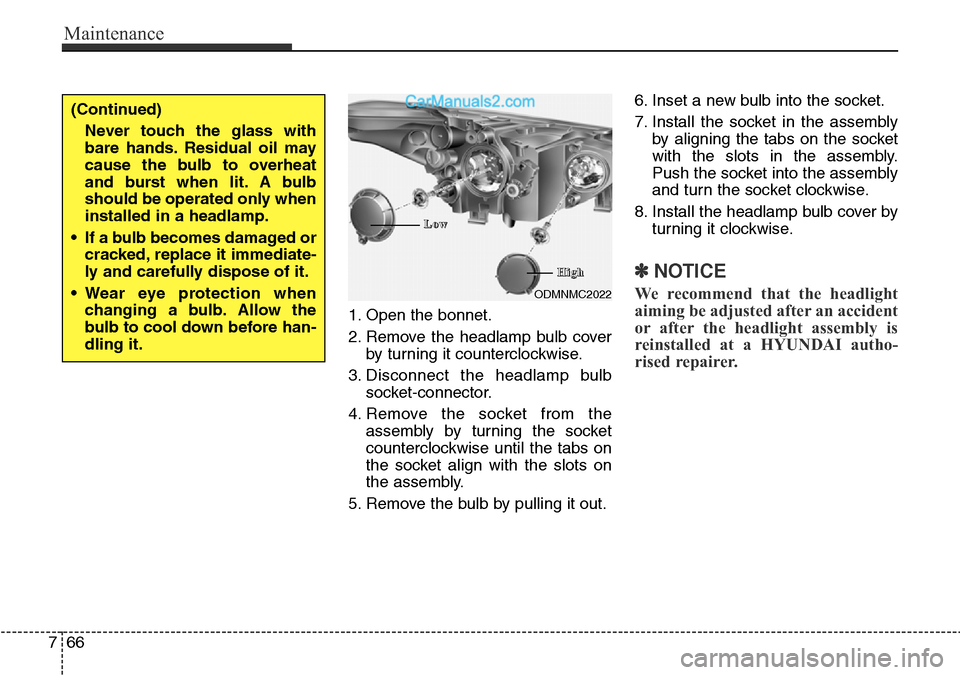
1. Open the bonnet.
2. Remove the headlamp bulb cover
by turning it counterclockwise.
3. Disconnect the headlamp bulb
socket-connector.
4. Remove the socket from the
assembly by turning the socket
counterclockwise until the tabs on
the socket align with the slots on
the assembly.
5. Remove the bulb by pulling it out.6. Inset a new bulb into the socket.
7. Install the socket in the assembly
by aligning the tabs on the socket
with the slots in the assembly.
Push the socket into the assembly
and turn the socket clockwise.
8. Install the headlamp bulb cover by
turning it clockwise.
✽NOTICE
We recommend that the headlight
aiming be adjusted after an accident
or after the headlight assembly is
reinstalled at a HYUNDAI autho-
rised repairer.ODMNMC2022
(Continued)
Never touch the glass with
bare hands. Residual oil may
cause the bulb to overheat
and burst when lit. A bulb
should be operated only when
installed in a headlamp.
• If a bulb becomes damaged or
cracked, replace it immediate-
ly and carefully dispose of it.
• Wear eye protection when
changing a bulb. Allow the
bulb to cool down before han-
dling it.
L L
o o
w w
H H
i i
g g
h h
Page 664 of 699
767
Maintenance
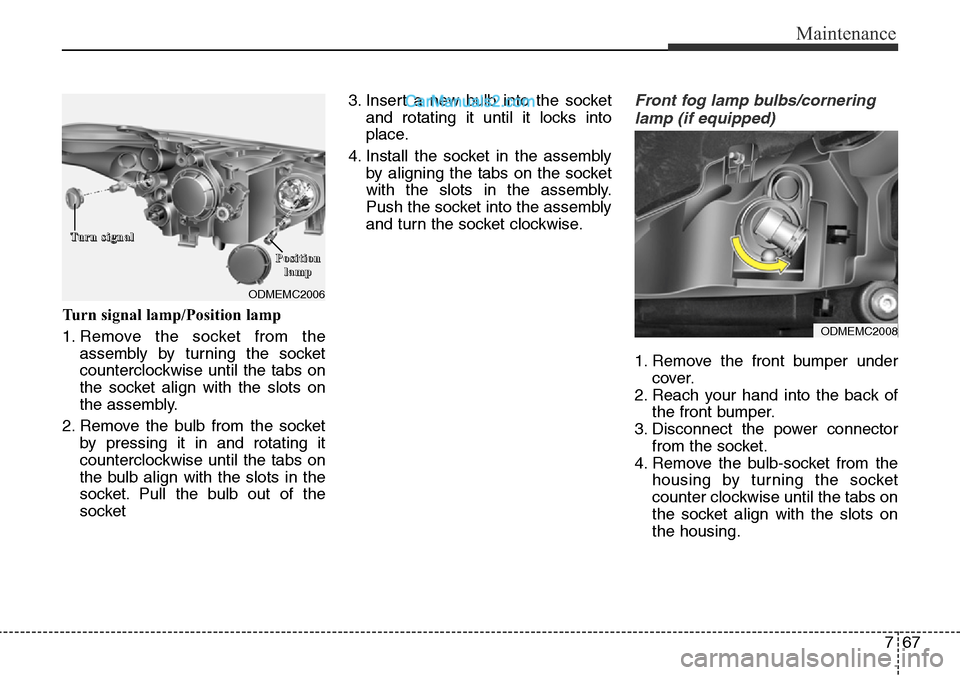
Turn signal lamp/Position lamp
1. Remove the socket from the
assembly by turning the socket
counterclockwise until the tabs on
the socket align with the slots on
the assembly.
2. Remove the bulb from the socket
by pressing it in and rotating it
counterclockwise until the tabs on
the bulb align with the slots in the
socket. Pull the bulb out of the
socket3. Insert a new bulb into the socket
and rotating it until it locks into
place.
4. Install the socket in the assembly
by aligning the tabs on the socket
with the slots in the assembly.
Push the socket into the assembly
and turn the socket clockwise.
Front fog lamp bulbs/cornering
lamp (if equipped)
1. Remove the front bumper under
cover.
2. Reach your hand into the back of
the front bumper.
3. Disconnect the power connector
from the socket.
4. Remove the bulb-socket from the
housing by turning the socket
counter clockwise until the tabs on
the socket align with the slots on
the housing.
ODMEMC2006
T T
u u
r r
n n
s s
i i
g g
n n
a a
l l
P P
o o
s s
i i
t t
i i
o o
n n
l l
a a
m m
p p
ODMEMC2008
Page 665 of 699
Maintenance
68 7
5. Install the new bulb-socket into the
housing by aligning the tabs on
the socket with the slots in the
housing. Push the socket into the
housing and turn the socket clock-
wise.
6. Connect the power connector to
the socket.
7. Reinstall the front bumper under
cover.Headlamp (HID type), position
(LED), turn signal, and front fog
lamp bulb, daytime running,
cornering lamp replacement
If the light bulb does not operate, we
recommend that the system be
checked by a HYUNDAI authorised
repairer.
✽NOTICE
HID lamps have superior perform-
ance vs. halogen bulbs. HID lamps
are estimated by the manufacturer
to last twice as long or longer than
halogen bulbs depending on their
frequency of use. They will probably
require replacement at some point
in the life of the vehicle. Cycling the
headlamps on and off more than
typical use will shorten HID lamps
life. HID lamps do not fail in the
same manner as halogen incandes-
cent lamps. If a headlamp goes out
after a period of operation but will
immediately relight when the head-
lamp switch is cycled it is likely the
HID lamp needs to be replaced. HID
lighting components are more com-
plex than conventional halogen
bulbs thus have higher replacement
cost.
WARNING - HID
Headlamp low beam
(if equipped)
Do not attempt to replace or
inspect the low beam (XENON
bulb) due to electric shock dan-
ger. If the low beam (XENON
bulb) is not working, if the light
bulb does not operate, we rec-
ommend that the system be
checked by a HYUNDAI autho-
rised repairer.