2016 HYUNDAI IX35 steering
[x] Cancel search: steeringPage 418 of 550
Driving your vehicle70
5Parking on hills Generally, if you have a trailer attached to
your vehicle, you should not park your
vehicle on a hill. People can be seriously
or fatally injured, and both your vehicle
and the trailer can be damaged if unex-
pectedly roll down hill. However, if you ever have to park your
trailer on a hill, here's how to do it:
1. Pull the vehicle into the parking space.
Turn the steering wheel in the direction
of the kerb (left if headed down hill,
right if headed up hill).
2. If the vehicle has a manual transaxle, place the car in neutral. If the vehicle
has an automatic transaxle, place the
car in P (Park).
3. Set the parking brake and shut off the vehicle.
4. Place chocks under the trailer wheels on the down hill side of the wheels.
5. Start the vehicle, hold the brakes, shift to neutral, release the parking brake
and slowly release the brakes until the
trailer chocks absorb the load.
6. Reapply the brakes, reapply the park- ing brake and shift the vehicle to R
(Reverse) for manual transaxle or P
(Park) for automatic transaxle.
7. Shut off the vehicle and release the vehicle brakes but leave the parking
brake set.
WARNING
- Parking on ahill
Parking your vehicle on a hill with a
trailer attached could cause seri-
ous injury or death, should the trail-
er break loose.
WARNING
- Parking brake
It can be dangerous to get out of
your vehicle if the parking brake is
not firmly set.
If you have left the engine running,
the vehicle can move suddenly. You
or others could be seriously or
fatally injured.
EL(FL) UK 5.QXP 12/16/2014 8:10 PM Page 70
Page 450 of 550
What to do in an emergency28
6It is possible that some tyres, espe-
cially with larger punctures or dam-
age to the sidewall, cannot be sealed
completely.Air pressure loss in the tyre may
adversely affect tyre performance.
For this reason, you should avoid
abrupt steering or other driving
manoeuvres, especially if the vehicle
is heavily loaded or if a trailer is in
use.
The TyreMobilityKit is not designed
or intended as a permanent tyre
repair method and is to be used for
one tyre only. This instruction shows
you step by step how to temporarily
seal the puncture simply and reliably.
Read the section "Notes on the safe
use of the TyreMobilityKit". Notes on the safe use of the
TyreMobilityKit
Park your car at the side of the
road so that you can work with the
TyreMobilityKit away from moving
traffic.
To be sure your vehicle won't move, even when you're on fairly
level ground, always set your park-
ing brake.
Only use the TyreMobilityKit for sealing/inflation passenger car
tyres. Only punctured areas locat-
ed within the tread region of the
tyre can be sealed using the tyre
mobility kit.
Do not use on motorcycles, bicy- cles or any other type of tyres.
When the tyre and wheel are dam- aged, do not use Tyre Mobility Kit
for your safety.
Use of the Tyre Mobility Kit may not be effective for tyre damage larger
than approximately 0.24 in (6 mm).
If the tyre cannot be made road-
worthy with the Tyre Mobility Kit,
we recommend that you contact a
HYUNDAI authorised repairer. Do not use the Tyre Mobility Kit if a
tyre is severely damaged by driving
run flat or with insufficient air pres-
sure.
Do not remove any foreign objects- such as nails or screws that have
penetrated the tyre.
Provided the car is outdoors, leave the engine running. Otherwise
operating the compressor may
eventually drain the car battery.
Never leave the TyreMobilityKit unattended whilst it is being used.
Do not leave the compressor run- ning for more than 10 min. at a time
or it may overheat.
Do not use the TyreMobilityKit if the ambient temperature is below
-30°C (-22°F).
WARNING
Do not use the TMK if a tyre is
severely damaged by driving
run flat or with insufficient air
pressure.
Only punctured areas located
within the tread region of the
tyre can be sealed using the
TMK.
EL(FL) UK 6.QXP 12/16/2014 8:13 PM Page 28
Page 452 of 550
What to do in an emergency30
6Using the TyreMobilityKit
1. Detach the speed restriction label
(0) from the sealant bottle (1), and
place it in a highly visible place
inside the vehicle such as on the
steering wheel to remind the driv-
er not to drive too fast.
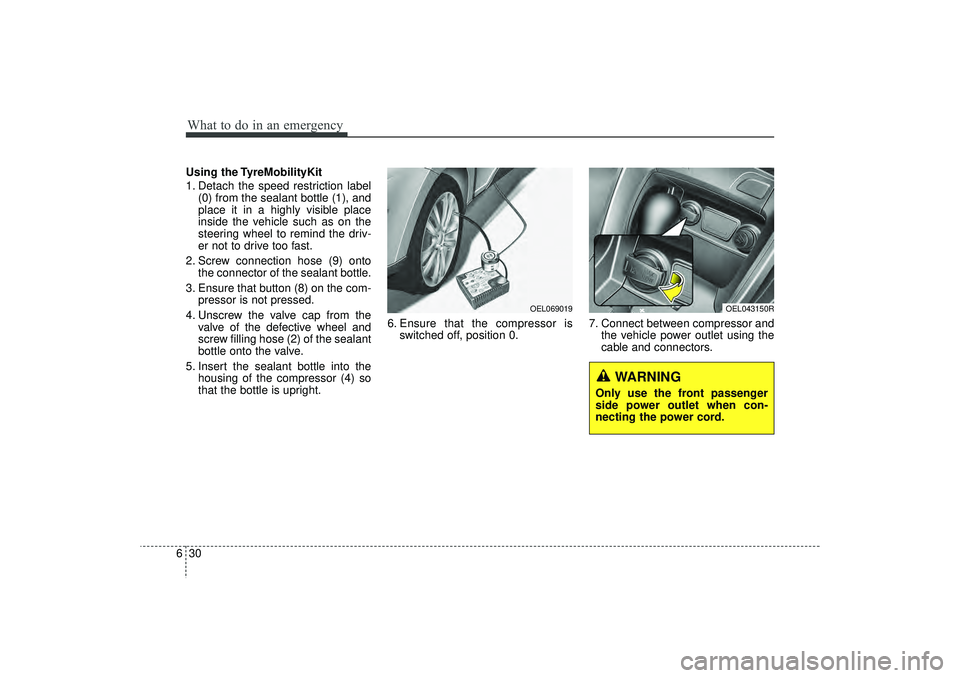
2. Screw connection hose (9) onto the connector of the sealant bottle.
3. Ensure that button (8) on the com- pressor is not pressed.
4. Unscrew the valve cap from the valve of the defective wheel and
screw filling hose (2) of the sealant
bottle onto the valve.
5. Insert the sealant bottle into the housing of the compressor (4) so
that the bottle is upright. 6. Ensure that the compressor is
switched off, position 0. 7. Connect between compressor and
the vehicle power outlet using the
cable and connectors.
OEL069019
OEL043150R
WARNING
Only use the front passenger
side power outlet when con-
necting the power cord.
EL(FL) UK 6.QXP 12/16/2014 8:13 PM Page 30
Page 458 of 550
What to do in an emergency36
6Emergency towingIf towing is necessary, we recommend
you to have it done by a HYUNDAI
authorised repairer or a commercial
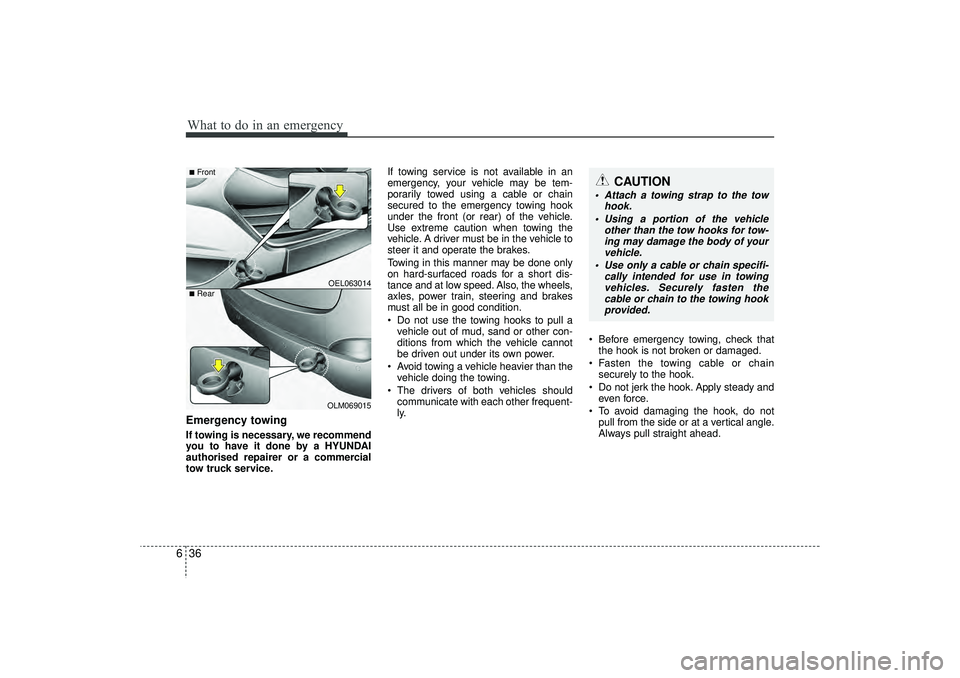
tow truck service. If towing service is not available in an
emergency, your vehicle may be tem-
porarily towed using a cable or chain
secured to the emergency towing hook
under the front (or rear) of the vehicle.
Use extreme caution when towing the
vehicle. A driver must be in the vehicle to
steer it and operate the brakes.
Towing in this manner may be done only
on hard-surfaced roads for a short dis-
tance and at low speed. Also, the wheels,
axles, power train, steering and brakes
must all be in good condition.
Do not use the towing hooks to pull a
vehicle out of mud, sand or other con-
ditions from which the vehicle cannot
be driven out under its own power.
Avoid towing a vehicle heavier than the vehicle doing the towing.
The drivers of both vehicles should communicate with each other frequent-
ly. Before emergency towing, check that
the hook is not broken or damaged.
Fasten the towing cable or chain securely to the hook.
Do not jerk the hook. Apply steady and even force.
To avoid damaging the hook, do not pull from the side or at a vertical angle.
Always pull straight ahead.
CAUTION
Attach a towing strap to the tow hook.
Using a portion of the vehicle other than the tow hooks for tow-ing may damage the body of yourvehicle.
Use only a cable or chain specifi- cally intended for use in towingvehicles. Securely fasten thecable or chain to the towing hook provided.
OEL063014OLM069015
■Front■Rear
EL(FL) UK 6.QXP 12/16/2014 8:13 PM Page 36
Page 459 of 550
637
What to do in an emergency
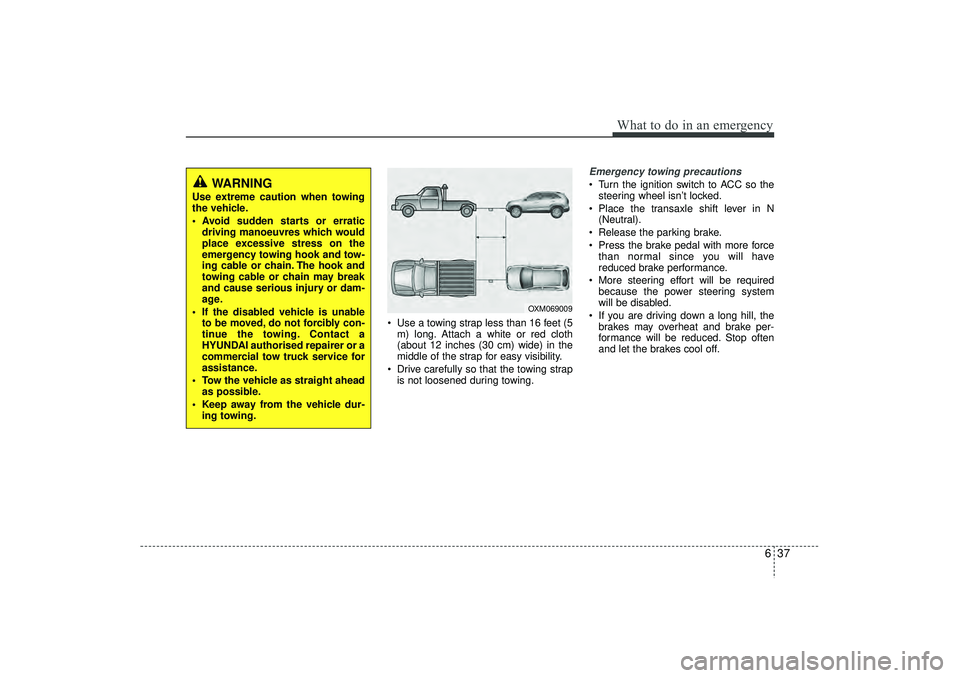
Use a towing strap less than 16 feet (5m) long. Attach a white or red cloth
(about 12 inches (30 cm) wide) in the
middle of the strap for easy visibility.
Drive carefully so that the towing strap is not loosened during towing.
Emergency towing precautions Turn the ignition switch to ACC so thesteering wheel isn’t locked.
Place the transaxle shift lever in N (Neutral).
Release the parking brake.
Press the brake pedal with more force than normal since you will have
reduced brake performance.
More steering effort will be required because the power steering system
will be disabled.
If you are driving down a long hill, the brakes may overheat and brake per-
formance will be reduced. Stop often
and let the brakes cool off.
WARNING
Use extreme caution when towing
the vehicle.
Avoid sudden starts or erratic driving manoeuvres which would
place excessive stress on the
emergency towing hook and tow-
ing cable or chain. The hook and
towing cable or chain may break
and cause serious injury or dam-
age.
If the disabled vehicle is unable to be moved, do not forcibly con-
tinue the towing. Contact a
HYUNDAI authorised repairer or a
commercial tow truck service for
assistance.
Tow the vehicle as straight ahead as possible.
Keep away from the vehicle dur- ing towing.
OXM069009
EL(FL) UK 6.QXP 12/16/2014 8:13 PM Page 37
Page 460 of 550
CAUTION - Automatictransaxle
If the car is being towed with all
four wheels on the ground, it canbe towed only from the front. Besure that the transaxle is in neu-tral. Be sure the steering is unlocked by placing the ignitionswitch in the ACC position. Adriver must be in the towed vehi- cle to operate the steering andbrakes.
To avoid serious damage to the automatic transaxle, limit thevehicle speed to 10 mph (15 km/h) and drive less than 1 mile (1.5km) when towing.
Before towing, check the auto- matic transaxle fluid leak underyour vehicle. If the automatic transaxle fluid is leaking, aflatbed equipment or towing dollymust be used.
638What to do in an emergency
EL(FL) UK 6.QXP 12/16/2014 8:13 PM Page 38
Page 470 of 550
Maintenance10
7Whilst operating your vehicle: Note any changes in the sound of the
exhaust or any smell of exhaust fumes
in the vehicle.
Check for vibrations in the steering wheel. Notice any increased steering
effort or looseness in the steering
wheel, or change in its straight-ahead
position.
Notice if your vehicle constantly turns slightly or “pulls” to one side when trav-
elling on smooth, level road.
When stopping, listen and check for unusual sounds, pulling to one side,
increased brake pedal travel or “hard-
to-push” brake pedal.
If any slipping or changes in the oper- ation of your transaxle occurs, check
the transaxle fluid level.
Check manual transaxle operation, including clutch operation.
Check automatic transaxle P (Park) function.
Check parking brake.
Check for fluid leaks under your vehicle (water dripping from the air condition-
ing system during or after use is nor-
mal).
At least monthly: Check coolant level in the enginecoolant reservoir.
Check the operation of all exterior lights, including the stoplights, turn sig-
nals and hazard warning flashers.
Check the inflation pressures of all tyres including the spare.At least twice a year (i.e., every Spring and Fall) : Check radiator, heater and air condi- tioning hoses for leaks or damage.
Check windscreen washer spray and wiper operation. Clean wiper blades
with clean cloth dampened with wash-
er fluid.
Check headlight alignment.
Check muffler, exhaust pipes, shields and clamps.
Check the lap/shoulder belts for wear and function.
Check for worn tyres and loose wheel lug nuts.
At least once a year : Clean body and door drain holes.
Lubricate door hinges and checks, andbonnet hinges.
Lubricate door and bonnet locks and latches.
Lubricate door rubber weatherstrips.
Check the air conditioning system.
Check the power steering fluid level.
Inspect and lubricate automatic transaxle linkage and controls.
Clean battery and terminals.
Check the brake (and clutch) fluid level.
EL(FL) UK 7.QXP 3/4/2015 9:04 PM Page 10
Page 474 of 550
Maintenance14
7Brake hoses and linesVisually check for proper installation,
chafing, cracks, deterioration and any
leakage. Replace any deteriorated or
damaged parts immediately.Brake fluidCheck brake fluid level in the brake fluid
reservoir. The level should be between
“MIN” and “MAX” marks on the side of
the reservoir. Use only hydraulic brake
fluid conforming to DOT 3 or DOT 4
specification.
Parking brakeInspect the parking brake system includ-
ing the parking brake lever and cables.Brake pads, calipers and rotorsCheck the pads for excessive wear, discs
for run out and wear, and calipers for fluid
leakage.
For more information on checking the
pads or lining wear limit, refer to the
Hyundai web site.
(http://brakeman
ual.hmc.co.kr
)
Suspension mounting boltsCheck the suspension connections for
looseness or damage. Retighten to the
specified torque.
Steering gear box, linkage &
boots/lower arm ball jointWith the vehicle stopped and engine off,
check for excessive free-play in the
steering wheel.
Check the linkage for bends or damage.
Check the dust boots and ball joints for
deterioration, cracks, or damage.
Replace any damaged parts.Drive shafts and bootsCheck the drive shafts, boots and clamps
for cracks, deterioration, or damage.
Replace any damaged parts and, if nec-
essary, repack the grease.Air conditioning refrigerant/
compressor (if equipped)Check the air conditioning lines and con-
nections for leakage and damage.
CAUTION
The use of a non-specified fluid
could result in transaxle malfunc- tion and failure.
Use only specified automatictransaxle fluid. (Refer to“Recommended lubricants andcapacities” in section 8.)
EL(FL) UK 7.QXP 3/4/2015 9:04 PM Page 14