2016 HYUNDAI IX35 tyre pressure
[x] Cancel search: tyre pressurePage 495 of 550
735
Maintenance
Checking tyre inflation pressure
Check your tyres once a month or
more.
Also, check the tyre pressure of the
spare tyre.How to checkUse a good quality gauge to check
tyre pressure. You can not tell if your
tyres are properly inflated simply by
looking at them. Radial tyres may
look properly inflated even when
they're underinflated.
Check the tyre's inflation pressure
when the tyres are cold. - "Cold"
means your vehicle has been sitting
for at least three hours or driven no
more than 1 mile (1.6 km).Remove the valve cap from the tyre
valve stem. Press the tyre gauge
firmly onto the valve to get a pres-
sure measurement. If the cold tyre
inflation pressure matches the rec-
ommended pressure on the tyre and
loading information label, no further
adjustment is necessary. If the pres-
sure is low, add air until you reach
the recommended amount.
If you overfill the tyre, release air by
pushing on the metal stem in the
centre of the tyre valve. Recheck the
tyre pressure with the tyre gauge. Be
sure to put the valve caps back on
the valve stems. They help prevent
leaks by keeping out dirt and mois-
ture.
WARNING
Inspect your tyres frequently
for proper inflation as well as
wear and damage. Always use
a tyre pressure gauge.
Tyres with too much or too lit- tle pressure wear unevenly
causing poor handling, loss of
vehicle control, and sudden
tyre failure leading to acci-
dents, injuries, and even death.
The recommended cold tyre
pressure for your vehicle can
be found in this manual and on
the tyre label located on the
driver's side centre pillar.
Worn tyres can cause acci- dents. Replace tyres that are
worn, show uneven wear, or
are damaged.
Remember to check the pres- sure of your spare tyre.
HYUNDAI recommends that
you check the spare every
time you check the pressure
of the other tyres on your
vehicle.
EL(FL) UK 7.QXP 3/4/2015 9:05 PM Page 35
Page 496 of 550
Maintenance36
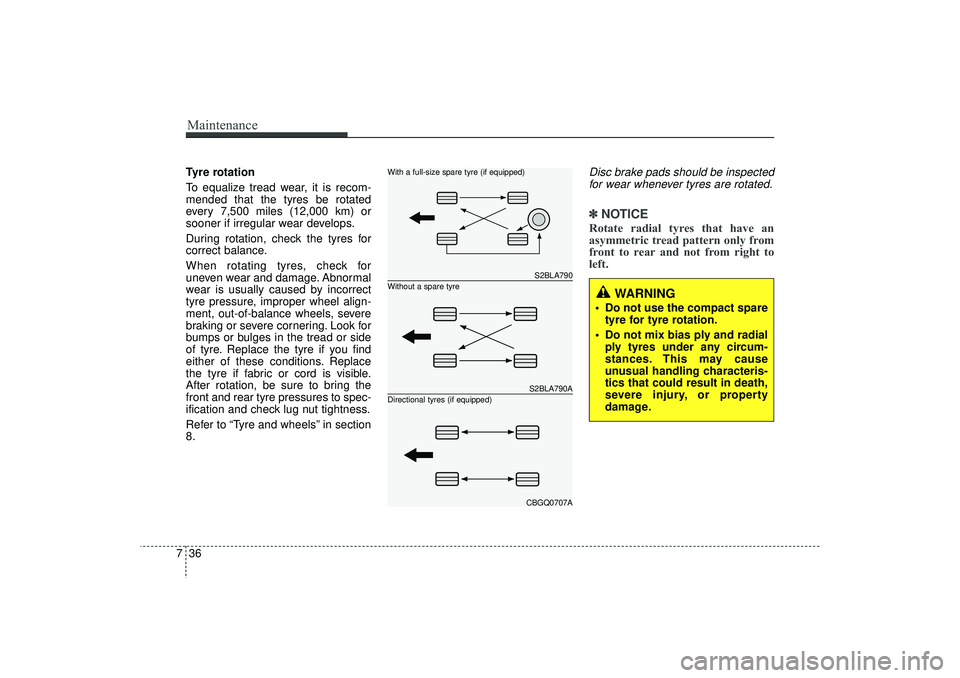
7Tyre rotation
To equalize tread wear, it is recom-
mended that the tyres be rotated
every 7,500 miles (12,000 km) or
sooner if irregular wear develops.
During rotation, check the tyres for
correct balance.
When rotating tyres, check for
uneven wear and damage. Abnormal
wear is usually caused by incorrect
tyre pressure, improper wheel align-
ment, out-of-balance wheels, severe
braking or severe cornering. Look for
bumps or bulges in the tread or side
of tyre. Replace the tyre if you find
either of these conditions. Replace
the tyre if fabric or cord is visible.
After rotation, be sure to bring the
front and rear tyre pressures to spec-
ification and check lug nut tightness.
Refer to “Tyre and wheels” in section
8.
Disc brake pads should be inspected
for wear whenever tyres are rotated.✽ ✽ NOTICERotate radial tyres that have an
asymmetric tread pattern only from
front to rear and not from right to
left.
WARNING
Do not use the compact spare
tyre for tyre rotation.
Do not mix bias ply and radial ply tyres under any circum-
stances. This may cause
unusual handling characteris-
tics that could result in death,
severe injury, or property
damage.
S2BLA790S2BLA790ACBGQ0707A
Without a spare tyre With a full-size spare tyre (if equipped)
Directional tyres (if equipped)
EL(FL) UK 7.QXP 3/4/2015 9:05 PM Page 36
Page 501 of 550

741
Maintenance
3. Checking tyre life (TIN : Tyre Identification Number) Any tyres that are over 6 years,
based on the manufacturing date,
tyre strength and performance,
decline with age naturally (even
unused spare tyres). Therefore, the
tyres (including the spare tyre)
should be replaced by new ones. You
can find the manufacturing date on
the tyre sidewall (possibly on the
inside of the wheel), displaying the
DOT Code. The DOT Code is a
series of numbers on a tyre consist-
ing of numbers and English letters.
The manufacturing date is designat-
ed by the last four digits (characters)
of the DOT code.DOT : XXXX XXXX OOOOThe front part of the DOT means a
plant code number, tyre size and
tread pattern and the last four num-
bers indicate week and year manu-
factured.
For example:
DOT XXXX XXXX 1615 represents
that the tyre was produced in the
16th week of 2015.
4. Tyre ply composition and materialThe number of layers or plies of rub-
ber-coated fabric are in the tyre. Tyre
manufacturers also must indicate the
materials in the tyre, which include
steel, nylon, polyester, and others.
The letter "R" means radial ply con-
struction; the letter "D" means diago-
nal or bias ply construction; and the
letter "B" means belted-bias ply con-
struction.
5. Maximum permissible inflationpressureThis number is the greatest amount
of air pressure that should be put in
the tyre. Do not exceed the maximum
permissible inflation pressure. Refer
to the Tyre and Loading Information
label for recommended inflation
pressure.6. Maximum load ratingThis number indicates the maximum
load in kilograms and pounds that
can be carried by the tyre. When
replacing the tyres on the vehicle,
always use a tyre that has the same
load rating as the factory installed
tyre.7. Uniform tyre quality grading Quality grades can be found where
applicable on the tyre sidewall
between tread shoulder and maxi-
mum section width.
For example:
TREADWEAR 200
TRACTION AA
TEMPERATURE A
WARNING - Tyre age
Tyres degrade over time, even
when they are not being used.
Regardless of the remaining
tread, it is recommended that
tyres generally be replaced
after six (6) years of normal
service. Heat caused by hot cli-
mates or frequent high loading
conditions can accelerate the
aging process. Failure to follow
this Warning can result in sud-
den tyre failure, which could
lead to a loss of control and an
accident involving serious
injury or death.
EL(FL) UK 7.QXP 3/4/2015 9:05 PM Page 41
Page 503 of 550
743
Maintenance
Low aspect ratio tyre (if equipped)
Low aspect ratio tyres, whose aspect
ratio is lower than 50, are provided
for sporty looks.
Because the low aspect ratio tyres
are optimized for handling and brak-
ing, it may be more uncomfortable to
ride in and there is more noise com-
pare with normal tyres.
CAUTION
Because the sidewall of the lowaspect ratio tyre is shorter thanthe normal, the wheel and tyreof the low aspect ratio tyre iseasier to be damaged. So, followthe instructions below.
- When driving on a rough road or off road, drive cautiouslybecause tyres and wheels maybe damaged. And after driving,inspect tyres and wheels.
- When passing over a pothole, speed bump, manhole, or kerbstone, drive slowly so that thetyres and wheels are not dam-aged.
- If the tyre is impacted, we rec- ommend that you inspect thetyre condition or contact aHYUNDAI authorised repairer.
- To prevent damage to the tyre, inspect the tyre condition andpressure every 1,800 miles(3,000 km).
CAUTION
It is not easy to recognize the tyre damage with your owneyes. But if there is the slight-est hint of tyre damage, eventhough you cannot see thetyre damage with your owneyes, have the tyre checked orreplaced because the tyredamage may cause air leak-age from the tyre.
If the tyre is damaged by driv- ing on a rough road, off road,pothole, manhole, or kerbstone, it will not be covered bythe warranty.
You can find out the tyre infor- mation on the tyre sidewall.
EL(FL) UK 7.QXP 3/4/2015 9:05 PM Page 43
Page 511 of 550
751
Maintenance
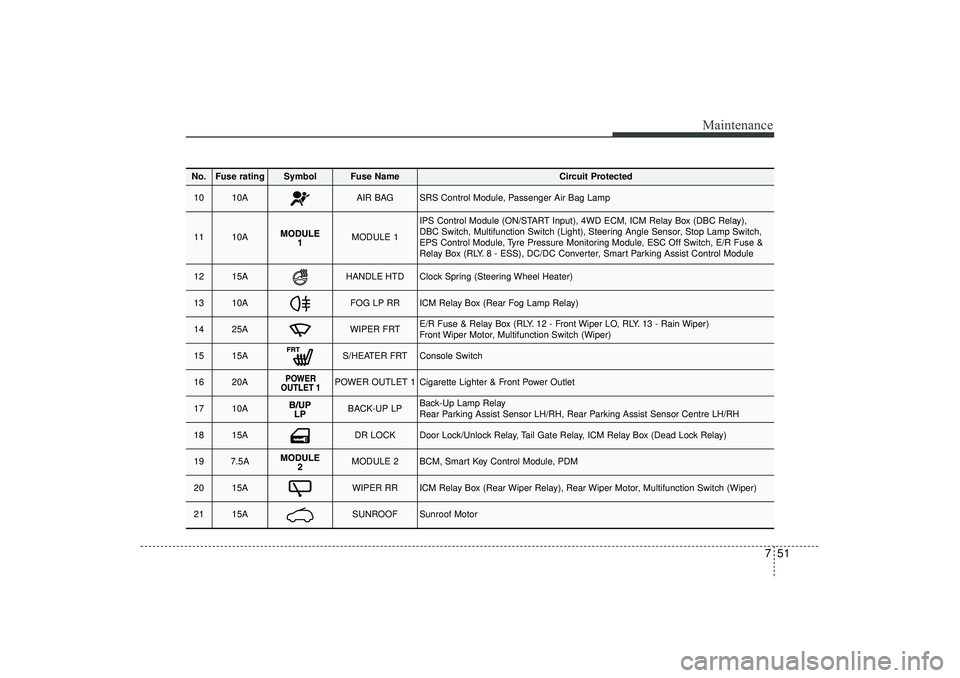
No.
Fuse rating
Symbol
Fuse Name
Circuit Protected
10
10A
AIR BAG
SRS Control Module, Passenger Air Bag Lamp
11
10A
MODULE 1
IPS Control Module (ON/START Input), 4WD ECM, ICM Relay Box (DBC Relay),
DBC Switch, Multifunction Switch (Light), Steering Angle Sensor, Stop Lamp Switch,
EPS Control Module, Tyre Pressure Monitoring Module, ESC Off Switch, E/R Fuse &
Relay Box (RLY. 8 - ESS), DC/DC Converter, Smart Parking Assist Control Module
12
15A
HANDLE HTD
Clock Spring (Steering Wheel Heater)
13
10A
FOG LP RR
ICM Relay Box (Rear Fog Lamp Relay)
14
25A
WIPER FRT
E/R Fuse & Relay Box (RLY. 12 - Front Wiper LO, RLY. 13 - Rain Wiper)
Front Wiper Motor, Multifunction Switch (Wiper)
15
15A
S/HEATER FRT
Console Switch
16
20A
POWER OUTLET 1
Cigarette Lighter & Front Power Outlet
17
10A
BACK-UP LP
Back-Up Lamp Relay
Rear Parking Assist Sensor LH/RH, Rear Parking Assist Sensor Centre LH/RH
18
15A
DR LOCK
Door Lock/Unlock Relay, Tail Gate Relay, ICM Relay Box (Dead Lock Relay)
19
7.5A
MODULE 2
BCM, Smart Key Control Module, PDM
20
15A
WIPER RR
ICM Relay Box (Rear Wiper Relay), Rear Wiper Motor, Multifunction Switch (Wiper)
21
15A
SUNROOF
Sunroof Motor
EL(FL) UK 7.QXP 3/4/2015 9:07 PM Page 51
Page 512 of 550
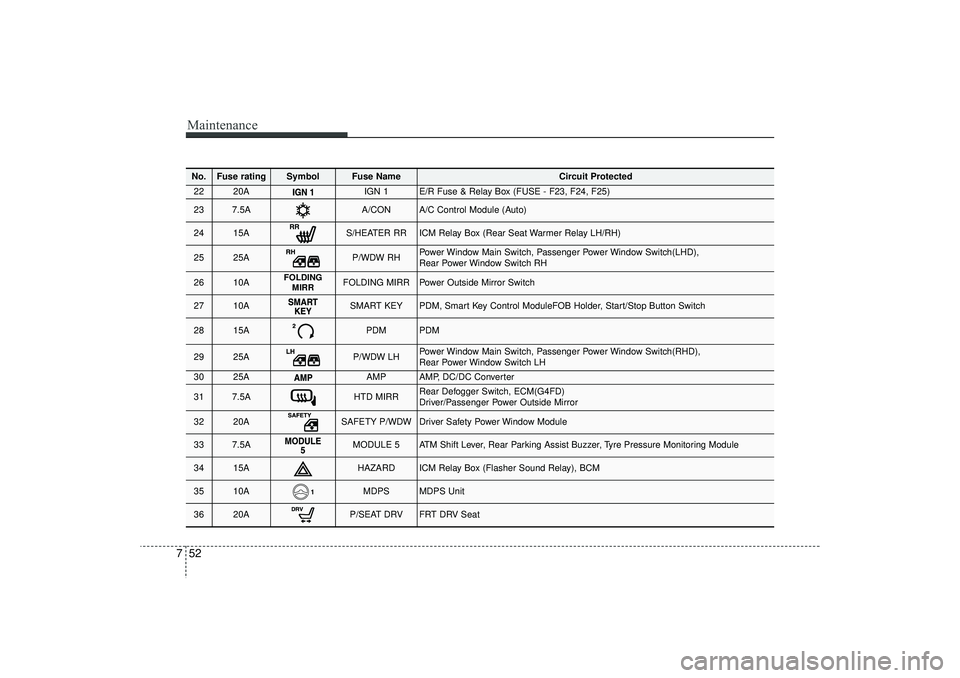
Maintenance52
7No.
Fuse rating
Symbol
Fuse Name
Circuit Protected
22
20A
IGN 1
E/R Fuse & Relay Box (FUSE - F23, F24, F25)
23
7.5A
A/CON
A/C Control Module (Auto)
24
15A
S/HEATER RR
ICM Relay Box (Rear Seat Warmer Relay LH/RH)
25
25A
P/WDW RH
Power Window Main Switch, Passenger Power Window Switch(LHD),
Rear Power Window Switch RH
26
10A
FOLDING
MIRR
FOLDING MIRR
Power Outside Mirror Switch
27
10A
SMART KEY
PDM, Smart Key Control ModuleFOB Holder, Start/Stop Button Switch
28
15A
PDM
PDM
29
25A
P/WDW LH
Power Window Main Switch, Passenger Power Window Switch(RHD),
Rear Power Window Switch LH
30
25A
AMP
AMP, DC/DC Converter
31
7.5A
HTD MIRR
Rear Defogger Switch, ECM(G4FD)
Driver/Passenger Power Outside Mirror
32
20A
SAFETY P/WDW
Driver Safety Power Window Module
33
7.5A
MODULE 5
ATM Shift Lever, Rear Parking Assist Buzzer, Tyre Pressure Monitoring Module
34
15A
HAZARD
ICM Relay Box (Flasher Sound Relay), BCM
35
10A
MDPS
MDPS Unit
36
20A
P/SEAT DRV
FRT DRV Seat
EL(FL) UK 7.QXP 3/4/2015 9:07 PM Page 52
Page 540 of 550
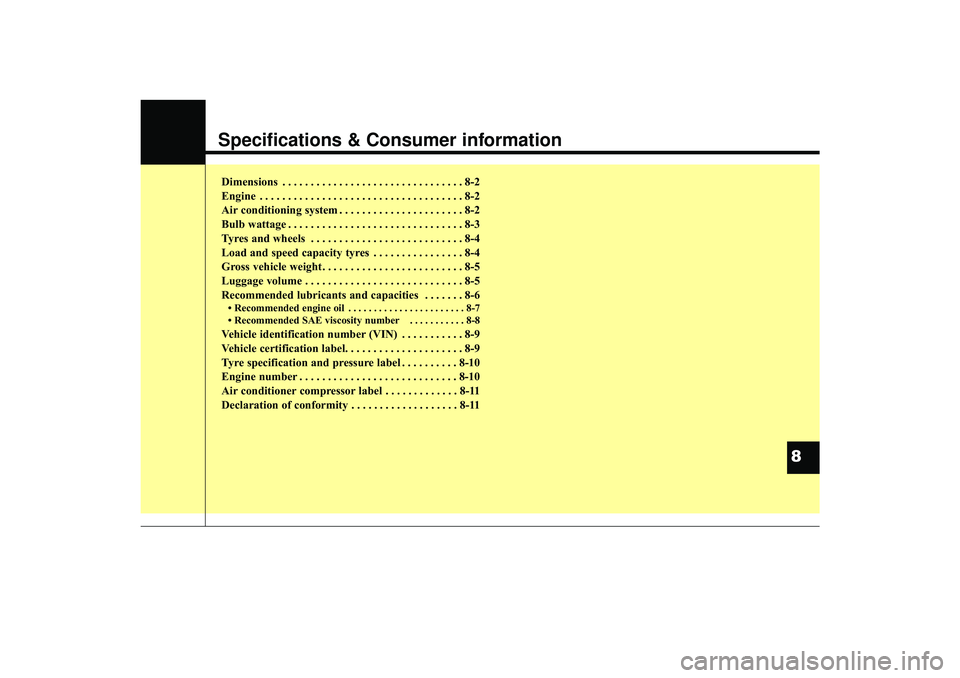
Specifications & Consumer informationDimensions . . . . . . . . . . . . . . . . . . . . . . . . . . . . . . . . 8-2
Engine . . . . . . . . . . . . . . . . . . . . . . . . . . . . . . . . . . . . \
8-2
Air conditioning system . . . . . . . . . . . . . . . . . . . . . . 8-2
Bulb wattage . . . . . . . . . . . . . . . . . . . . . . . . . . . . . . . 8-3
Tyres and wheels . . . . . . . . . . . . . . . . . . . . . . . . . . . 8-4
Load and speed capacity tyres . . . . . . . . . . . . . . . . 8-4
Gross vehicle weight. . . . . . . . . . . . . . . . . . . . . . . . . 8-5
Luggage volume . . . . . . . . . . . . . . . . . . . . . . . . . . . . 8-5
Recommended lubricants and capacities . . . . . . . 8-6• Recommended engine oil . . . . . . . . . . . . . . . . . . . . . . . 8-7
• Recommended SAE viscosity number . . . . . . . . . . . 8-8Vehicle identification number (VIN) . . . . . . . . . . . 8-9
Vehicle certification label. . . . . . . . . . . . . . . . . . . . . 8-9
Tyre specification and pressure label . . . . . . . . . . 8-10
Engine number . . . . . . . . . . . . . . . . . . . . . . . . . . . . 8-10
Air conditioner compressor label . . . . . . . . . . . . . 8-11
Declaration of conformity . . . . . . . . . . . . . . . . . . . 8-11
8
EL(FL) UK 8.QXP 3/13/2015 5:44 PM Page 1
Page 543 of 550
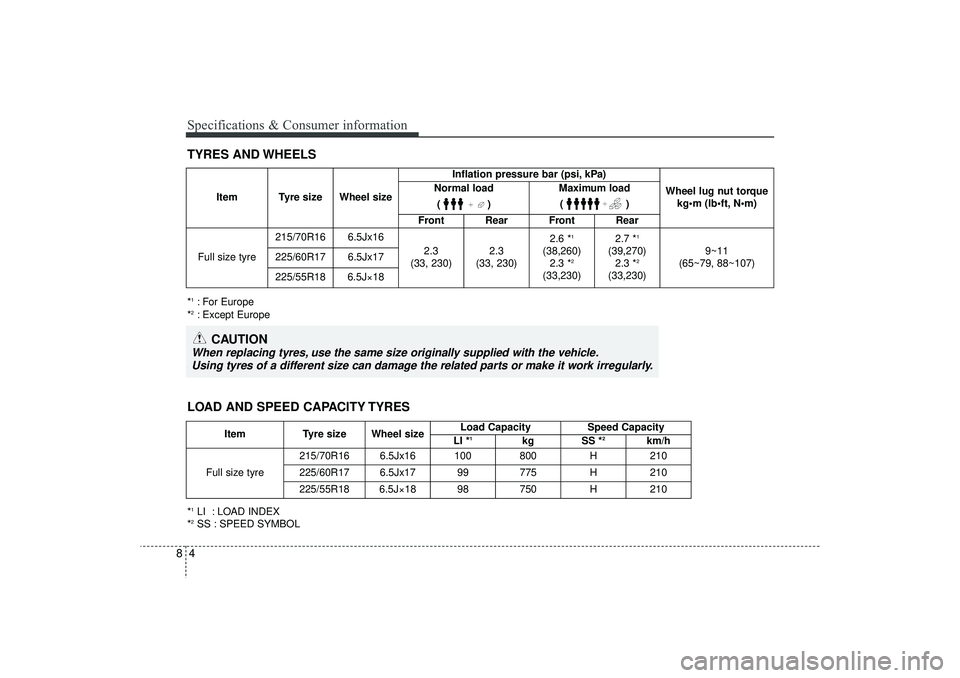
Specifications & Consumer information48TYRES AND WHEELS
CAUTION
When replacing tyres, use the same size originally supplied with the vehicle.Using tyres of a different size can damage the related parts or make it work irregularly.*1LI : LOAD INDEX
*2SS : SPEED SYMBOL Item Tyre size Wheel size
Load Capacity Speed Capacity
LI *
1
kg SS *
2
km/h
Full size tyre 215/70R16 6.5Jx16 100 800
H210
225/60R17 6.5Jx17 99 775 H210
225/55R18
6.5J×18
98
750
H
210
LOAD AND SPEED CAPACITY TYRES*1: For Europe
*2: Except Europe Item Tyre size Wheel size
Inflation pressure bar (psi, kPa)
Wheel lug nut torquekg•m (lbft, Nm)
Normal load
()
Maximum load()
Front Rear Front Rear
Full size tyre 215/70R16 6.5Jx16
2.3
(33, 230) 2.3
(33, 230) 2.6 *
1
(38,260)
2.3 *
2
(33,230) 2.7 *
1
(39,270)
2.3 *
2
(33,230) 9~11
(65~79, 88~107)
225/60R17 6.5Jx17
225/55R18 6.5J×18
EL(FL) UK 8.QXP 3/13/2015 5:44 PM Page 4