2016 HYUNDAI IX35 instrument panel
[x] Cancel search: instrument panelPage 68 of 550
349
Safety features of your vehicle
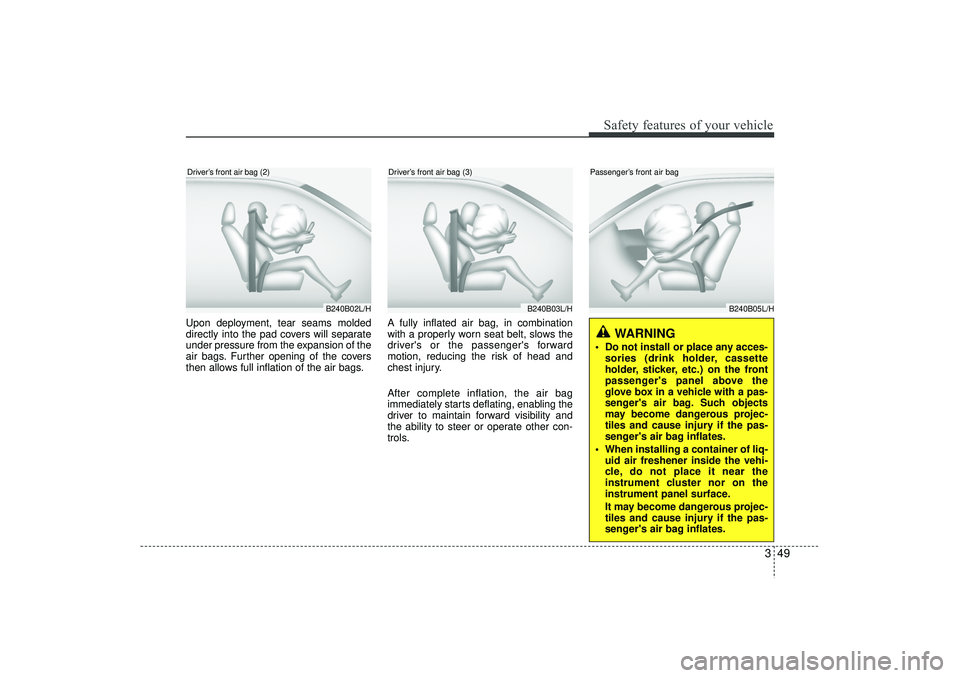
Upon deployment, tear seams molded
directly into the pad covers will separate
under pressure from the expansion of the
air bags. Further opening of the covers
then allows full inflation of the air bags.A fully inflated air bag, in combination
with a properly worn seat belt, slows the
driver's or the passenger's forward
motion, reducing the risk of head and
chest injury.
After complete inflation, the air bag
immediately starts deflating, enabling the
driver to maintain forward visibility and
the ability to steer or operate other con-
trols.
B240B02L/H
B240B03L/H
Driver’s front air bag (2)
Driver’s front air bag (3)
B240B05L/H
Passenger’s front air bag
WARNING
Do not install or place any acces-
sories (drink holder, cassette
holder, sticker, etc.) on the front
passenger's panel above the
glove box in a vehicle with a pas-
senger's air bag. Such objects
may become dangerous projec-
tiles and cause injury if the pas-
senger's air bag inflates.
When installing a container of liq- uid air freshener inside the vehi-
cle, do not place it near the
instrument cluster nor on the
instrument panel surface.
It may become dangerous projec-
tiles and cause injury if the pas-
senger's air bag inflates.
EL(FL) UK 3.QXP 12/16/2014 8:56 PM Page 49
Page 70 of 550
351
Safety features of your vehicle
The indications of the system's presence
are the letters "AIR BAG" embossed on
the air bag pad cover on the steering
wheel and the passenger's side front
panel pad above the glove box.
The SRS consists of air bags installed
under the pad covers in the centre of the
steering wheel and the passenger's side
in the front panel above the glove box.
The purpose of the SRS is to provide the
vehicle's driver and/or the front passen-
ger with additional protection than that
offered by the seat belt system alone in
case of a frontal impact of sufficient
severity.
WARNING
Always use seat belts and child
restraints – every trip, every time,
everyone! Air bags inflate with
considerable force and in the blink
of an eye. Seat belts help keep
occupants in proper position to
obtain maximum benefit from the
air bag. Even with air bags, improp-
erly and unbelted occupants can be
severely injured when the air bag
inflates. Always follow the precau-
tions about seat belts, air bags and
occupant safety contained in this
manual.
To reduce the chance of serious or
fatal injuries and receive the maxi-
mum safety benefit from your
restraint system:
Never place a child in any child orbooster seat in the front seat. NB
See section - Passenger's front
air bag ON/OFF switch (if
equipped).
ABC – Always Buckle Children in the back seat. It is the safest
place for children of any age to
ride.
(Continued)
(Continued)
Front and side air bags can injureoccupants improperly positioned
in the front seats.
Move your seat as far back as practical from the front air bags,
whilst still maintaining control of
the vehicle.
You and your passengers should never sit or lean unnecessarily
close to the air bags. Improperly
positioned drivers and passen-
gers can be severely injured by
inflating air bags.
Never lean against the door or centre console – always sit in an
upright position.
No objects should be placed over or near the air bag modules on
the steering wheel, instrument
panel, and the front passenger's
panel above the glove box,
because any such object could
cause harm if the vehicle is in a
crash severe enough to cause
the air bags to deploy.
(Continued)
EL(FL) UK 3.QXP 12/16/2014 8:56 PM Page 51
Page 73 of 550
Safety features of your vehicle54
3✽
✽
NOTICE• When the passenger’s front air bag
ON/OFF switch is set to the ON position,
the passenger’s front air bag is activated
and child or infant seat should not be
installed on the front passenger seat.
• When the passenger’s front air bag ON/OFF switch is set to the OFF posi-
tion, the passenger’s front air bag is
deactivated.
CAUTION
If the passenger’s front air bag
ON/OFF switch is not workingproperly, the air bag warning light()
on the instrument panel will
illuminate.
And, the passenger's front air bagOFF indicator
()
will not illumi-
nate (The passenger's front air bag ON indicator comes on andgoes off after approximately 60seconds), the SRS Control Module reactivate the passen-ger’s front air bag and the pas- senger’s front air bag will inflatein frontal impact crashes even ifthe passenger’s front air bag ON/OFF switch is set to the OFFposition.
If this occurs, we recommend thatthe system be inspected by aHYUNDAI authorised repairer.
(Continued)
(Continued) If the SRS air bag warning light does not illuminate when the igni-tion switch is turned to the ONposition, or if it illuminates whilst the vehicle is being driven, werecommend that the system be inspected by a HYUNDAI autho-rised repairer.
WARNING
On some models, the front air bag
ON/OFF switch could turn by using
a similar small rigid device. Always
check the status of the front air bag
ON/OFF switch and passenger's
front air bag ON/OFF indicator.
EL(FL) UK 3.QXP 12/16/2014 8:56 PM Page 54
Page 83 of 550
Safety features of your vehicle64
3SRS CareThe SRS is virtually maintenance-free
and so there are no parts you can safely
service by yourself. If the SRS air bag
warning light does not illuminate, or con-
tinuously remains on, we recommend
that the system be inspected by a
HYUNDAI authorised repairer.
WARNING
Modification to SRS components
or wiring, including the addition
of any kind of badges to the pad
covers or modifications to the
body structure, can adversely
affect SRS performance and lead
to possible injury.
For cleaning the air bag pad cov- ers, use only a soft, dry cloth or
one which has been moistened
with plain water. Solvents or
cleaners could adversely affect
the air bag covers and proper
deployment of the system.
No objects should be placed over or near the air bag modules on
the steering wheel, instrument
panel, and the front passenger's
panel above the glove box,
because any such object could
cause harm if the vehicle is in a
crash severe enough to cause
the air bags to inflate.
If the air bags inflate, we recom- mend that the system be
replaced by a HYUNDAI autho-
rised repairer.
(Continued)
(Continued)
Do not tamper with or disconnectSRS wiring, or other components
of the SRS system. Doing so
could result in injury, due to acci-
dental inflation of the air bags or
by rendering the SRS inopera-
tive.
If components of the air bag sys- tem must be discarded, or if the
vehicle must be scrapped, certain
safety precautions must be
observed. We recommend that
you contact a HYUNDAI autho-
rised repairer for these precau-
tions and necessary information.
Failure to follow these precau-
tions and procedures could
increase the risk of personal
injury.
If your car was flooded and has soaked carpeting or water on
flooring, you shouldn't try to start
the engine; we recommend that
you contact a HYUNDAI autho-
rised repairer.
EL(FL) UK 3.QXP 12/16/2014 8:57 PM Page 64
Page 86 of 550

Features of your vehicleKeys . . . . . . . . . . . . . . . . . . . . . . . . . . . . . . . . . . . . \
. . 4-4• Record your key number . . . . . . . . . . . . . . . . . . . . . . . 4-4
• Key operations . . . . . . . . . . . . . . . . . . . . . . . . . . . . . . . . 4-4
• Immobiliser system . . . . . . . . . . . . . . . . . . . . . . . . . . . . 4-5Remote keyless entry . . . . . . . . . . . . . . . . . . . . . . . 4-7• Remote keyless entry system operations . . . . . . . . . . . 4-7
• Transmitter precautions . . . . . . . . . . . . . . . . . . . . . . . . 4-8
• Battery replacement . . . . . . . . . . . . . . . . . . . . . . . . . . . 4-9Smart key . . . . . . . . . . . . . . . . . . . . . . . . . . . . . . . . 4-10• Smart key functions . . . . . . . . . . . . . . . . . . . . . . . . . . 4-10
• Smart key precautions . . . . . . . . . . . . . . . . . . . . . . . . 4-12
• Door lock/unlock in an emergency situation . . . . . . 4-12Theft-alarm system . . . . . . . . . . . . . . . . . . . . . . . . 4-13• Theft-alarm stage . . . . . . . . . . . . . . . . . . . . . . . . . . . . 4-14
• Disarmed stage. . . . . . . . . . . . . . . . . . . . . . . . . . . . . . . 4-14Door locks . . . . . . . . . . . . . . . . . . . . . . . . . . . . . . . 4-15• Operating door locks from outside the vehicle . . . . 4-15
• Operating door locks from inside the vehicle . . . . . . 4-16
• Deadlocks . . . . . . . . . . . . . . . . . . . . . . . . . . . . . . . . . . 4-17\
• Speed sensing door lock system . . . . . . . . . . . . . . . . 4-18
• Child-protector rear door lock. . . . . . . . . . . . . . . . . . 4-18Tailgate . . . . . . . . . . . . . . . . . . . . . . . . . . . . . . . . . . 4-19\
• Opening the tailgate . . . . . . . . . . . . . . . . . . . . . . . . . . 4-19
• Closing the tailgate . . . . . . . . . . . . . . . . . . . . . . . . . . . 4-19
Windows . . . . . . . . . . . . . . . . . . . . . . . . . . . . . . . . . 4-21• Power windows . . . . . . . . . . . . . . . . . . . . . . . . . . . . . . 4-22Bonnet . . . . . . . . . . . . . . . . . . . . . . . . . . . . . . . . . . . 4-\
25• Opening the bonnet . . . . . . . . . . . . . . . . . . . . . . . . . . 4-25
• Closing the bonnet . . . . . . . . . . . . . . . . . . . . . . . . . . . . 4-26Fuel filler lid . . . . . . . . . . . . . . . . . . . . . . . . . . . . . 4-27• Opening the fuel filler lid . . . . . . . . . . . . . . . . . . . . . . 4-27
• Closing the fuel filler lid . . . . . . . . . . . . . . . . . . . . . . . 4-27Panorama sunroof . . . . . . . . . . . . . . . . . . . . . . . . . 4-30• Sunroof open warning . . . . . . . . . . . . . . . . . . . . . . . . 4-30
• Tilting the sunroof . . . . . . . . . . . . . . . . . . . . . . . . . . . 4-32
• Resetting the sunroof . . . . . . . . . . . . . . . . . . . . . . . . . 4-33Steering wheel . . . . . . . . . . . . . . . . . . . . . . . . . . . . . 4-34• Electric power steering . . . . . . . . . . . . . . . . . . . . . . . 4-34
• Heated steering wheel . . . . . . . . . . . . . . . . . . . . . . . . 4-35
• Horn . . . . . . . . . . . . . . . . . . . . . . . . . . . . . . . . . . . . \
. . . 4-36
• Flex steering wheel . . . . . . . . . . . . . . . . . . . . . . . . . . . 4-37Mirrors . . . . . . . . . . . . . . . . . . . . . . . . . . . . . . . . . . 4-39\
• Inside rearview mirror . . . . . . . . . . . . . . . . . . . . . . . . 4-39
• Outside rearview mirror . . . . . . . . . . . . . . . . . . . . . . 4-43Instrument cluster . . . . . . . . . . . . . . . . . . . . . . . . . 4-46• Instrument panel illumination . . . . . . . . . . . . . . . . . 4-47
• LCD Display Control . . . . . . . . . . . . . . . . . . . . . . . . . 4-47
• Gauges . . . . . . . . . . . . . . . . . . . . . . . . . . . . . . . . . . . . \
. 4-48
• Transaxle Shift Indicator . . . . . . . . . . . . . . . . . . . . . . 4-52
4
EL(FL) UK 4A.QXP 2/9/2015 9:02 PM Page 1
Page 132 of 550
447
Features of your vehicle
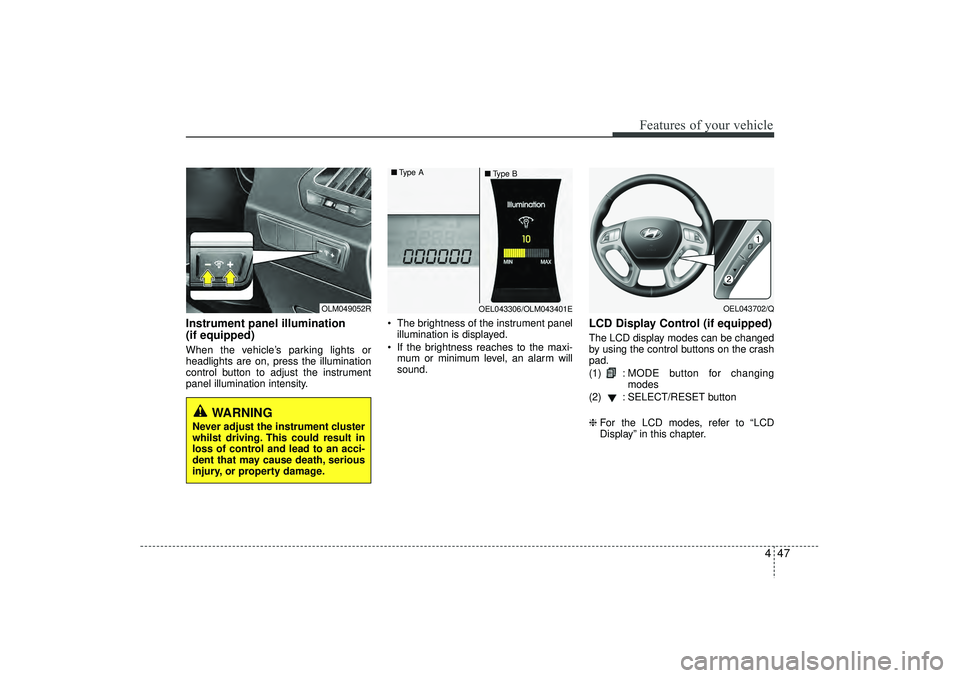
Instrument panel illumination
(if equipped)When the vehicle’s parking lights or
headlights are on, press the illumination
control button to adjust the instrument
panel illumination intensity. The brightness of the instrument panel
illumination is displayed.
If the brightness reaches to the maxi- mum or minimum level, an alarm will
sound.
LCD Display Control (if equipped)The LCD display modes can be changed
by using the control buttons on the crash
pad.
(1) : MODE button for changing
modes
(2) : SELECT/RESET button
❈ For the LCD modes, refer to “LCD
Display” in this chapter.
OLM049052R
OEL043306/OLM043401E
■
Type A
■Type B
OEL043702/Q
WARNING
Never adjust the instrument cluster
whilst driving. This could result in
loss of control and lead to an acci-
dent that may cause death, serious
injury, or property damage.
EL(FL) UK 4A.QXP 2/9/2015 9:04 PM Page 47
Page 185 of 550
Features of your vehicle100
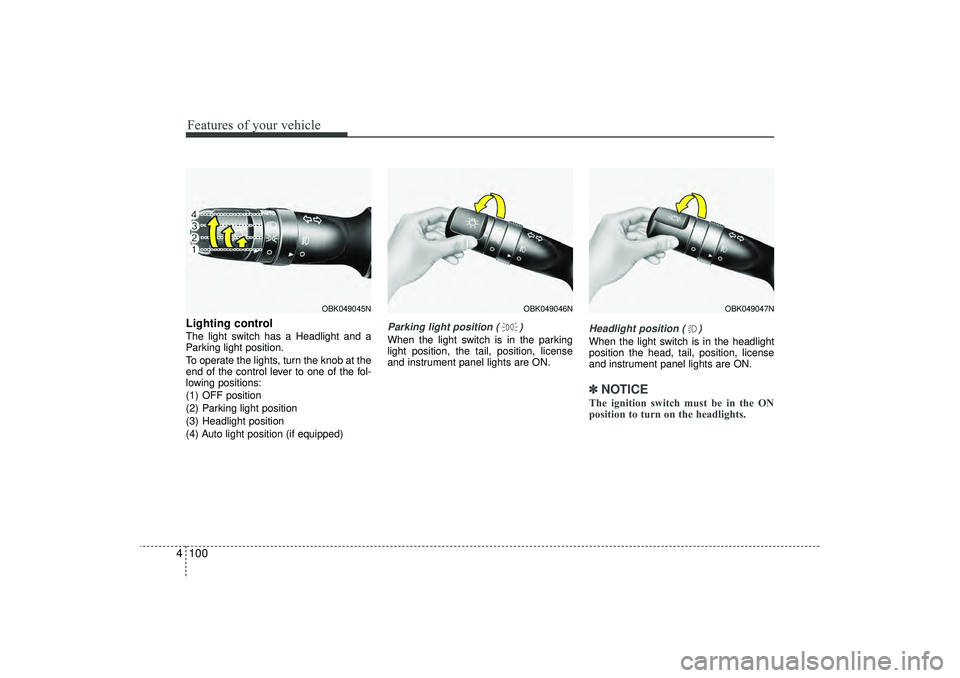
4Lighting controlThe light switch has a Headlight and a
Parking light position.
To operate the lights, turn the knob at the
end of the control lever to one of the fol-
lowing positions:
(1) OFF position
(2) Parking light position
(3) Headlight position
(4) Auto light position (if equipped)
Parking light position ( )When the light switch is in the parking
light position, the tail, position, license
and instrument panel lights are ON.
Headlight position ( )When the light switch is in the headlight
position the head, tail, position, license
and instrument panel lights are ON.✽ ✽
NOTICEThe ignition switch must be in the ON
position to turn on the headlights.
OBK049047N
OBK049046N
OBK049045N
EL(FL) UK 4A.QXP 2/9/2015 9:06 PM Page 100
Page 198 of 550
4 113
Features of your vehicle
✽
✽NOTICEIf you want to defrost and defog on the
front windscreen, refer to “Windscreen
Defrosting and Defogging” in this sec-
tion.
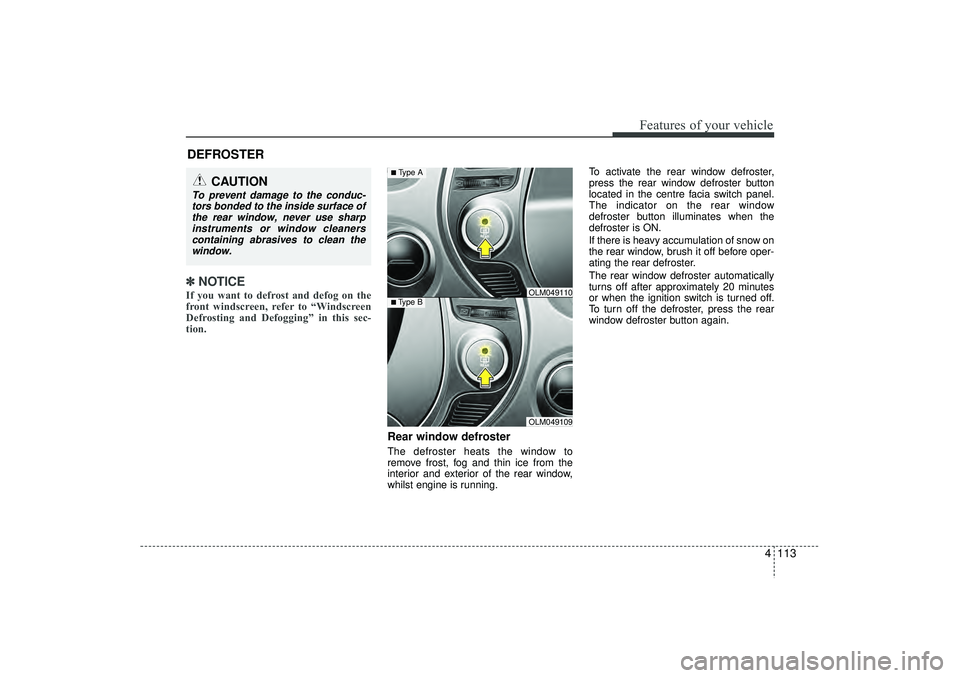
Rear window defrosterThe defroster heats the window to
remove frost, fog and thin ice from the
interior and exterior of the rear window,
whilst engine is running. To activate the rear window defroster,
press the rear window defroster button
located in the centre facia switch panel.
The indicator on the rear window
defroster button illuminates when the
defroster is ON.
If there is heavy accumulation of snow on
the rear window, brush it off before oper-
ating the rear defroster.
The rear window defroster automatically
turns off after approximately 20 minutes
or when the ignition switch is turned off.
To turn off the defroster, press the rear
window defroster button again.
DEFROSTER
CAUTION
To prevent damage to the conduc-
tors bonded to the inside surface of the rear window, never use sharpinstruments or window cleanerscontaining abrasives to clean the window.
OLM049109
■Type B
OLM049110
■Type A
EL(FL) UK 4A.QXP 2/9/2015 9:07 PM Page 113