2016 HYUNDAI IX35 inflation pressure
[x] Cancel search: inflation pressurePage 436 of 550
What to do in an emergency14
6Always check the TPMS malfunction
telltale after replacing one or more
tyres or wheels on your vehicle to
ensure that the replacement or alter-
nate tyres and wheels allow the
TPMS to continue to function proper-
ly.✽ ✽
NOTICEIf the TPMS, Low Tyre Pressure and
Position indicators do not illuminate
for 3 seconds when the ignition
switch is turned to the ON position
or engine is running, or if they
remain illuminated after coming on
for approximately 3 seconds, we rec-
ommend that the system be checked
by a HYUNDAI authorised repairer.
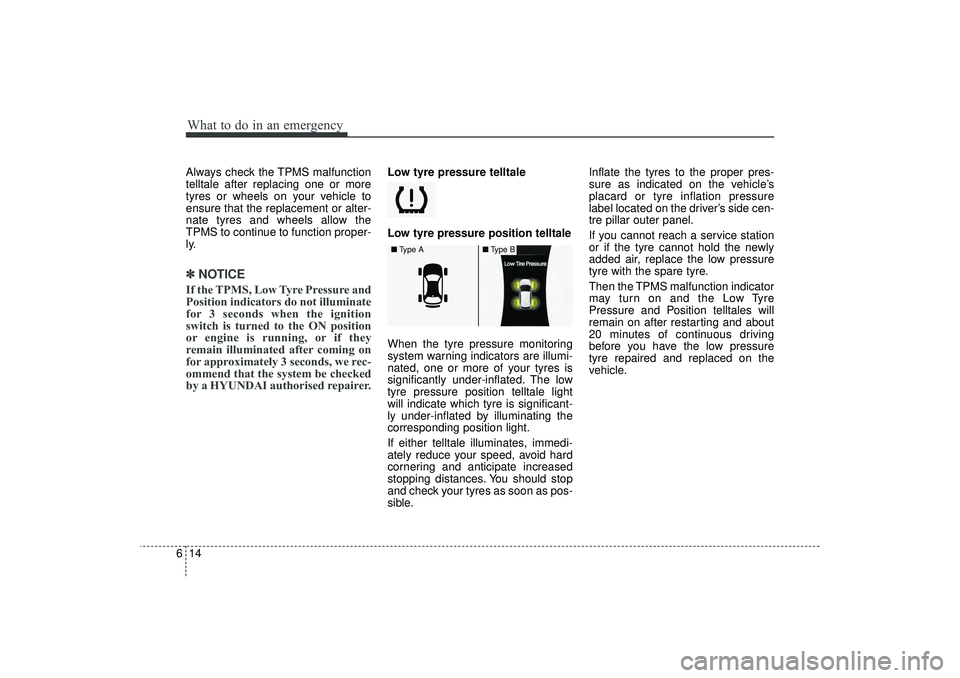
Low tyre pressure telltale
Low tyre pressure position telltale
When the tyre pressure monitoring
system warning indicators are illumi-
nated, one or more of your tyres is
significantly under-inflated. The low
tyre pressure position telltale light
will indicate which tyre is significant-
ly under-inflated by illuminating the
corresponding position light.
If either telltale illuminates, immedi-
ately reduce your speed, avoid hard
cornering and anticipate increased
stopping distances. You should stop
and check your tyres as soon as pos-
sible. Inflate the tyres to the proper pres-
sure as indicated on the vehicle’s
placard or tyre inflation pressure
label located on the driver’s side cen-
tre pillar outer panel.
If you cannot reach a service station
or if the tyre cannot hold the newly
added air, replace the low pressure
tyre with the spare tyre.
Then the TPMS malfunction indicator
may turn on and the Low Tyre
Pressure and Position telltales will
remain on after restarting and about
20 minutes of continuous driving
before you have the low pressure
tyre repaired and replaced on the
vehicle.■
Type A
■Type B
EL(FL) UK 6.QXP 12/16/2014 8:12 PM Page 14
Page 437 of 550
615
What to do in an emergency
TPMS (Tyre Pressure
Monitoring System)
malfunction indicator
The low tyre pressure telltale will illu-
minate after it blinks for approximate-
ly one minute when there is a prob-
lem with the Tyre Pressure
Monitoring System. If the system is
able to correctly detect an under infla-
tion warning at the same time as sys-
tem failure then it will illuminate both
the TPMS malfunction and low tyre
pressure position telltales e.g. if Front
Left sensor fails, the TPMS malfunc-
tion indicator illuminates, but if the
Front Right, Rear Left, or Rear Right
tyre is under-inflated, the low tyre
pressure position telltales may illumi-
nate together with the TPMS mal-
function indicator.
We recommend that the system be
checked by a HYUNDAI authorised
repairer.
WARNING
- Low pressuredamage
Significantly low tyre pressure
makes the vehicle unstable and
can contribute to loss of vehicle
control and increased braking
distances.
Continued driving on low pres-
sure tyres can cause the tyres
to overheat and fail.
CAUTION
In winter or cold weather, the low tyre pressure telltale may beilluminated if the tyre pressurewas adjusted to the recom-mended tyre inflation pressurein warm weather. It does notmean your TPMS is malfunction-ing because the decreased tem-perature leads to a proportionallowering of tyre pressure.
When you drive your vehiclefrom a warm area to a cold areaor from a cold area to a warmarea, or the outside temperatureis greatly higher or lower, youshould check the tyre inflationpressure and adjust the tyres tothe recommended tyre inflationpressure.
EL(FL) UK 6.QXP 12/16/2014 8:12 PM Page 15
Page 439 of 550

617
What to do in an emergency
You may not be able identify a low
tyre by simply looking at it. Always
use a good quality tyre pressure
gauge to measure the tyre's inflation
pressure. Please note that a tyre that
is hot (from being driven) will have a
higher pressure measurement than a
tyre that is cold (from sitting station-
ary for at least 3 hours and driven
less than 1 mile (1.6 km) during that
3 hour period).
Allow the tyre to cool before measur-
ing the inflation pressure. Always be
sure the tyre is cold before inflating
to the recommended pressure.
A cold tyre means the vehicle has
been sitting for 3 hours and driven for
less than 1 mile (1.6 km) in that 3
hour period.
CAUTION
If original mounted tyre isreplaced with the spare tyre, theTPMS sensor on the replacedspare wheel should be initiatedand we recommend that theTPMS sensor on the originalmounted wheel be deactivatedby a HYUNDAI dealer. If theTPMS sensor on the originalmounted wheel located in thespare tyre carrier still activates,the tyre pressure monitoringsystem may not operate proper-ly. We recommend that the sys-tem be serviced by a HYUNDAIauthorised repairer.
CAUTION
We recommend that you do notuse any tyre sealant except theTyre Mobility Kit approved byHYUNDAI if your vehicle isequipped with a Tyre PressureMonitoring System. The liquidsealant can damage the tyrepressure sensors.
WARNING
- TPMS
The TPMS cannot alert you to severe and sudden tyre dam-
age caused by external fac-
tors such as nails or road
debris.
If you feel any vehicle instabil- ity, immediately take your foot
off the accelerator, apply the
brakes gradually and with
light force, and slowly move to
a safe position off the road.
EL(FL) UK 6.QXP 12/16/2014 8:12 PM Page 17
Page 446 of 550
What to do in an emergency24
6If you have a tyre gauge, remove the
valve cap and check the air pressure.
If the pressure is lower than recom-
mended, drive slowly to the nearest
service station and inflate to the cor-
rect pressure. If it is too high, adjust
it until it is correct. Always reinstall
the valve cap after checking or
adjusting tyre pressure. If the cap is
not replaced, air may leak from the
tyre. If you lose a valve cap, buy
another and install it as soon as pos-
sible.
After you have changed wheels,
always secure the flat tyre in its place
and return the jack and tools to their
proper storage locations. To prevent the jack, jack handle,
wheel lug nut wrench and spare tyre
from rattling whilst the vehicle is in
motion, store them properly.
CAUTION
Your vehicle has metric threads
on the wheel studs and nuts.Make certain during wheelremoval that the same nuts thatwere removed are reinstalled -or, if replaced, that nuts withmetric threads and the samechamfer configuration are used.Installation of a non-metricthread nut on a metric stud orvice-versa will not secure thewheel to the hub properly andwill damage the stud so that itmust be replaced.
Note that most lug nuts do nothave metric threads. Be sure touse extreme care in checkingfor thread style before installingaftermarket lug nuts or wheels.If in doubt, we recommend thatyou consult a HYUNDAI autho-rised repairer.
WARNING
- Wheel studs
If the studs are damaged, they
may lose their ability to retain
the wheel. This could lead to the
loss of the wheel and a collision
resulting in serious injuries.
WARNING -
Inadequate
spare tyre pressure
Check the inflation pressures as
soon as possible after installing
the spare tyre. Adjust it to the
specified pressure, if necessary.
Refer to “Tyres and wheels” in
section 8.
EL(FL) UK 6.QXP 12/16/2014 8:12 PM Page 24
Page 450 of 550
What to do in an emergency28
6It is possible that some tyres, espe-
cially with larger punctures or dam-
age to the sidewall, cannot be sealed
completely.Air pressure loss in the tyre may
adversely affect tyre performance.
For this reason, you should avoid
abrupt steering or other driving
manoeuvres, especially if the vehicle
is heavily loaded or if a trailer is in
use.
The TyreMobilityKit is not designed
or intended as a permanent tyre
repair method and is to be used for
one tyre only. This instruction shows
you step by step how to temporarily
seal the puncture simply and reliably.
Read the section "Notes on the safe
use of the TyreMobilityKit". Notes on the safe use of the
TyreMobilityKit
Park your car at the side of the
road so that you can work with the
TyreMobilityKit away from moving
traffic.
To be sure your vehicle won't move, even when you're on fairly
level ground, always set your park-
ing brake.
Only use the TyreMobilityKit for sealing/inflation passenger car
tyres. Only punctured areas locat-
ed within the tread region of the
tyre can be sealed using the tyre
mobility kit.
Do not use on motorcycles, bicy- cles or any other type of tyres.
When the tyre and wheel are dam- aged, do not use Tyre Mobility Kit
for your safety.
Use of the Tyre Mobility Kit may not be effective for tyre damage larger
than approximately 0.24 in (6 mm).
If the tyre cannot be made road-
worthy with the Tyre Mobility Kit,
we recommend that you contact a
HYUNDAI authorised repairer. Do not use the Tyre Mobility Kit if a
tyre is severely damaged by driving
run flat or with insufficient air pres-
sure.
Do not remove any foreign objects- such as nails or screws that have
penetrated the tyre.
Provided the car is outdoors, leave the engine running. Otherwise
operating the compressor may
eventually drain the car battery.
Never leave the TyreMobilityKit unattended whilst it is being used.
Do not leave the compressor run- ning for more than 10 min. at a time
or it may overheat.
Do not use the TyreMobilityKit if the ambient temperature is below
-30°C (-22°F).
WARNING
Do not use the TMK if a tyre is
severely damaged by driving
run flat or with insufficient air
pressure.
Only punctured areas located
within the tread region of the
tyre can be sealed using the
TMK.
EL(FL) UK 6.QXP 12/16/2014 8:13 PM Page 28
Page 451 of 550
629
What to do in an emergency
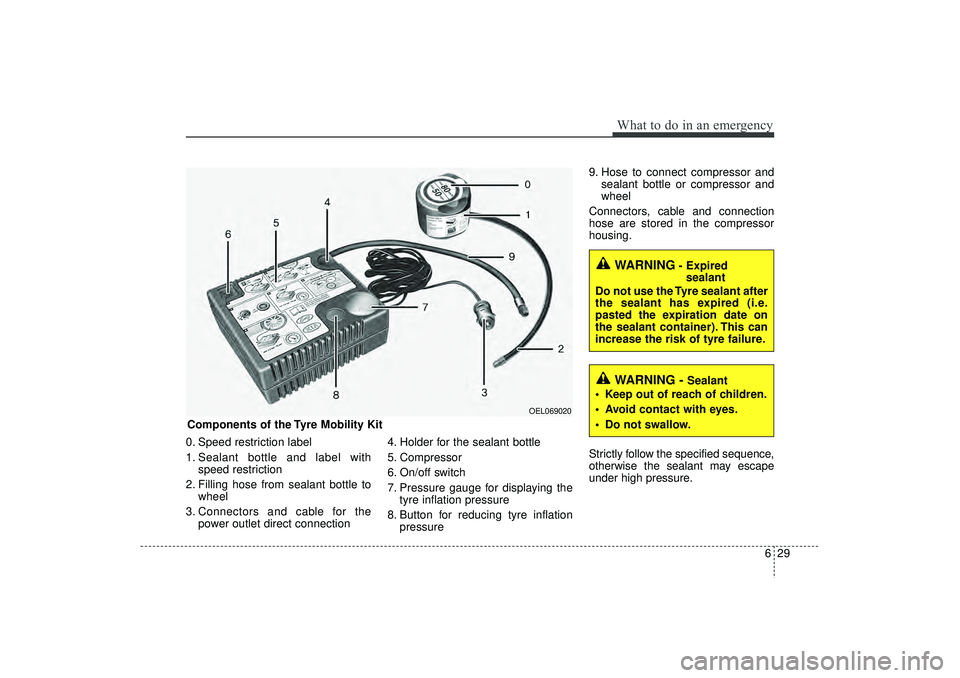
0. Speed restriction label
1. Sealant bottle and label withspeed restriction
2. Filling hose from sealant bottle to wheel
3. Connectors and cable for the power outlet direct connection 4. Holder for the sealant bottle
5. Compressor
6. On/off switch
7. Pressure gauge for displaying the
tyre inflation pressure
8. Button for reducing tyre inflation pressure 9. Hose to connect compressor and
sealant bottle or compressor and
wheel
Connectors, cable and connection
hose are stored in the compressor
housing.
Strictly follow the specified sequence,
otherwise the sealant may escape
under high pressure.
WARNING
- Expired sealant
Do not use the Tyre sealant after
the sealant has expired (i.e.
pasted the expiration date on
the sealant container). This can
increase the risk of tyre failure.
WARNING -
Sealant
Keep out of reach of children.
Avoid contact with eyes.
Do not swallow.
Components of the Tyre Mobility Kit
OEL069020
EL(FL) UK 6.QXP 12/16/2014 8:13 PM Page 29
Page 454 of 550
What to do in an emergency32
6
CAUTION
- Tyre pressure
sensor
The sealant on the tyre pressuresensor and wheel should beremoved when you replace thetyre with a new one and inspectthe tyre pressure sensors inauthorised dealer.
Checking the tyre inflation pres-
sure
1. After driving approximately 4~6 miles (7~10 km or about 10 min),
stop at a safety location.
2. Connect connection hose (9) of the compressor directly to the tyre
valve.
3. Plug the compressor power cord into the vehicle power outlet.
4. Adjust the tyre inflation pressure to the recomended tyre inflation.
With the ignition switched on, pro-
ceed as follows.
- To increase the inflation pres- sure: Switch on the compressor,
position I. To check the current
inflation pressure setting, briefly
switch off the compressor.
✽ ✽ NOTICEThe pressure gauge may show high-
er than actual reading when the
compressor is running. To get an
accurate tyre reading, the compres-
sor needs to be turned off.- To reduce the inflation pres-
sure: Press the button 8 on the
compressor.
WARNING
Do not let the compressor run
for more than 10 minutes, other-
wise the device will overheat
and may be damaged.
CAUTION
If the inflation pressure is not maintained, drive the vehicle asecond time, refer toDistributing the sealant. Thenrepeat steps 1 to 4.
Use of the TMK may be ineffec-tual for tyre damage larger thanapproximately 4 mm (0.16 in).
We recommend that you contacta HYUNDAI authorised repairerif the tyre cannot be made road-worthy with the Tyre MobilityKit.
WARNING
The tyre inflation pressure must
be at least 220 kPa (32 psi). If it
is not, do not continue driving.
Call for road side service or
towing.
EL(FL) UK 6.QXP 12/16/2014 8:13 PM Page 32
Page 461 of 550

Maintenance
7
Engine compartment . . . . . . . . . . . . . . . . . . . . . . . . 7-3
Maintenance services . . . . . . . . . . . . . . . . . . . . . . . . 7-7• Owner’s responsibility . . . . . . . . . . . . . . . . . . . . . . . . 7-7
• Owner maintenance precautions . . . . . . . . . . . . . . . . 7-7
• Engine compartment precautions (Diesel engine) . . . 7-8Owner maintenance . . . . . . . . . . . . . . . . . . . . . . . . . 7-9• Owner maintenance schedule. . . . . . . . . . . . . . . . . . . . 7-9Scheduled maintenance service . . . . . . . . . . . . . . . 7-11
Explanation of scheduled maintenance items . . . 7-12
Engine oil. . . . . . . . . . . . . . . . . . . . . . . . . . . . . . . . . 7-15• Checking the engine oil level . . . . . . . . . . . . . . . . . . . 7-15
• Changing the engine oil and filter . . . . . . . . . . . . . . . 7-16Engine coolant . . . . . . . . . . . . . . . . . . . . . . . . . . . . 7-16• Checking the coolant level . . . . . . . . . . . . . . . . . . . . . 7-17
• Changing the coolant . . . . . . . . . . . . . . . . . . . . . . . . . 7-18Brake/clutch fluid . . . . . . . . . . . . . . . . . . . . . . . . . . 7-19• Checking the brake/clutch fluid level . . . . . . . . . . . 7-19Washer fluid . . . . . . . . . . . . . . . . . . . . . . . . . . . . . . 7-20• Checking the washer fluid level . . . . . . . . . . . . . . . . 7-20Parking brake . . . . . . . . . . . . . . . . . . . . . . . . . . . . . 7-20• Check the parking brake . . . . . . . . . . . . . . . . . . . . . . 7-20Fuel Filter (For Diesel). . . . . . . . . . . . . . . . . . . . . . 7-21• Draining water from fuel filter . . . . . . . . . . . . . . . . . 7-21
• Extracting air from the fuel filter . . . . . . . . . . . . . . . 7-21
• Fuel filter cartridge replacement . . . . . . . . . . . . . . . . 7-22
Air cleaner. . . . . . . . . . . . . . . . . . . . . . . . . . . . . . . . 7-23• Filter replacement . . . . . . . . . . . . . . . . . . . . . . . . . . . 7-23Climate control air filter . . . . . . . . . . . . . . . . . . . . 7-25• Filter inspection . . . . . . . . . . . . . . . . . . . . . . . . . . . . . . 7-25
• Filter replacement . . . . . . . . . . . . . . . . . . . . . . . . . . . . 7-25Wiper blades . . . . . . . . . . . . . . . . . . . . . . . . . . . . . . 7-27• Blade inspection . . . . . . . . . . . . . . . . . . . . . . . . . . . . . . 7-27
• Blade replacement . . . . . . . . . . . . . . . . . . . . . . . . . . . 7-27Battery . . . . . . . . . . . . . . . . . . . . . . . . . . . . . . . . . . . 7-\
30• For best battery service . . . . . . . . . . . . . . . . . . . . . . . 7-30
• Battery capacity label . . . . . . . . . . . . . . . . . . . . . . . . 7-31
• Battery recharging . . . . . . . . . . . . . . . . . . . . . . . . . . 7-32
• Reset items . . . . . . . . . . . . . . . . . . . . . . . . . . . . . . . . . . 7-32\
Tyres and wheels . . . . . . . . . . . . . . . . . . . . . . . . . . 7-33• Tyre care . . . . . . . . . . . . . . . . . . . . . . . . . . . . . . . . . . . 7-\
33
• Recommended cold tyre inflation pressures . . . . . . 7-33
• Checking tyre inflation pressure . . . . . . . . . . . . . . . . 7-35
• Tyre rotation . . . . . . . . . . . . . . . . . . . . . . . . . . . . . . . . 7-36
• Wheel alignment and tyre balance . . . . . . . . . . . . . 7-37
• Tyre replacement . . . . . . . . . . . . . . . . . . . . . . . . . . . . . 7-37
• Wheel replacement . . . . . . . . . . . . . . . . . . . . . . . . . . . 7-39
• Tyre traction. . . . . . . . . . . . . . . . . . . . . . . . . . . . . . . . \
. 7-39
• Tyre maintenance . . . . . . . . . . . . . . . . . . . . . . . . . . . . 7-39
• Tyre sidewall labeling . . . . . . . . . . . . . . . . . . . . . . . . . 7-39
• Low aspect ratio tyre . . . . . . . . . . . . . . . . . . . . . . . . . 7-43
EL(FL) UK 7.QXP 3/4/2015 9:04 PM Page 1