2016 HYUNDAI IX35 brake
[x] Cancel search: brakePage 434 of 550

What to do in an emergency12
6You may not be able to identify a low
tyre by simply looking at it. Always
use a good quality tyre pressure
gauge to measure the tyre's inflation
pressure. Please note that a tyre that
is hot (from being driven) will have a
higher pressure measurement than a
tyre that is cold.
A cold tyre means the vehicle has
been sitting for 3 hours and driven for
less than 1 mile (1.6 km) in that 3
hour period.
Allow the tyre to cool before measur-
ing the inflation pressure. Always be
sure the tyre is cold before inflating
to the recommended pressure.
CAUTION
We recommend that you use the
tyre sealant approved byHYUNDAI if your vehicle isequipped with a Tyre PressureMonitoring System. The liquidsealant can damage the tyrepressure sensors.
WARNING
- Protecting TPMS
Tampering with, modifying, or
disabling the Tyre Pressure
Monitoring System (TPMS) com-
ponents may interfere with the
system's ability to warn the driv-
er of low tyre pressure condi-
tions and/or TPMS malfunctions.
Tampering with, modifying, or
disabling the Tyre Pressure
Monitoring System (TPMS) com-
ponents may void the warranty
for that portion of the vehicle.
WARNING
- TPMS
The TPMS cannot alert you to severe and sudden tyre dam-
age caused by external fac-
tors such as nails or road
debris.
If you feel any vehicle instabil- ity, immediately take your foot
off the accelerator, apply the
brakes gradually and with
light force, and slowly move to
a safe position off the road.
WARNING
- For EUROPE
Do not modify the vehicle, it may interfere with the TPMS
function.
The wheels on the market do not have a TPMS sensor.
For your safety, we recom-
mend that you use parts for
replacement from a HYUNDAI
authorised repairer.
If you use the wheels on the market, use a TPMS sensor
approved by a HYUNDAI deal-
er. If your vehicle is not
equipped with a TPMS sensor
or TPMS does not work prop-
erly, you may fail the periodic
vehicle inspection conducted
in your country.
❈ ❈ All vehicles sold in the
EUROPE market during below
period must be equipped with
TPMS.
- New model vehicle : Nov. 1,
2012 ~
- Current model vehicle : Nov. 1, 2014~ (Based on vehicle
registrations)
EL(FL) UK 6.QXP 12/16/2014 8:12 PM Page 12
Page 439 of 550

617
What to do in an emergency
You may not be able identify a low
tyre by simply looking at it. Always
use a good quality tyre pressure
gauge to measure the tyre's inflation
pressure. Please note that a tyre that
is hot (from being driven) will have a
higher pressure measurement than a
tyre that is cold (from sitting station-
ary for at least 3 hours and driven
less than 1 mile (1.6 km) during that
3 hour period).
Allow the tyre to cool before measur-
ing the inflation pressure. Always be
sure the tyre is cold before inflating
to the recommended pressure.
A cold tyre means the vehicle has
been sitting for 3 hours and driven for
less than 1 mile (1.6 km) in that 3
hour period.
CAUTION
If original mounted tyre isreplaced with the spare tyre, theTPMS sensor on the replacedspare wheel should be initiatedand we recommend that theTPMS sensor on the originalmounted wheel be deactivatedby a HYUNDAI dealer. If theTPMS sensor on the originalmounted wheel located in thespare tyre carrier still activates,the tyre pressure monitoringsystem may not operate proper-ly. We recommend that the sys-tem be serviced by a HYUNDAIauthorised repairer.
CAUTION
We recommend that you do notuse any tyre sealant except theTyre Mobility Kit approved byHYUNDAI if your vehicle isequipped with a Tyre PressureMonitoring System. The liquidsealant can damage the tyrepressure sensors.
WARNING
- TPMS
The TPMS cannot alert you to severe and sudden tyre dam-
age caused by external fac-
tors such as nails or road
debris.
If you feel any vehicle instabil- ity, immediately take your foot
off the accelerator, apply the
brakes gradually and with
light force, and slowly move to
a safe position off the road.
EL(FL) UK 6.QXP 12/16/2014 8:12 PM Page 17
Page 442 of 550
What to do in an emergency20
6
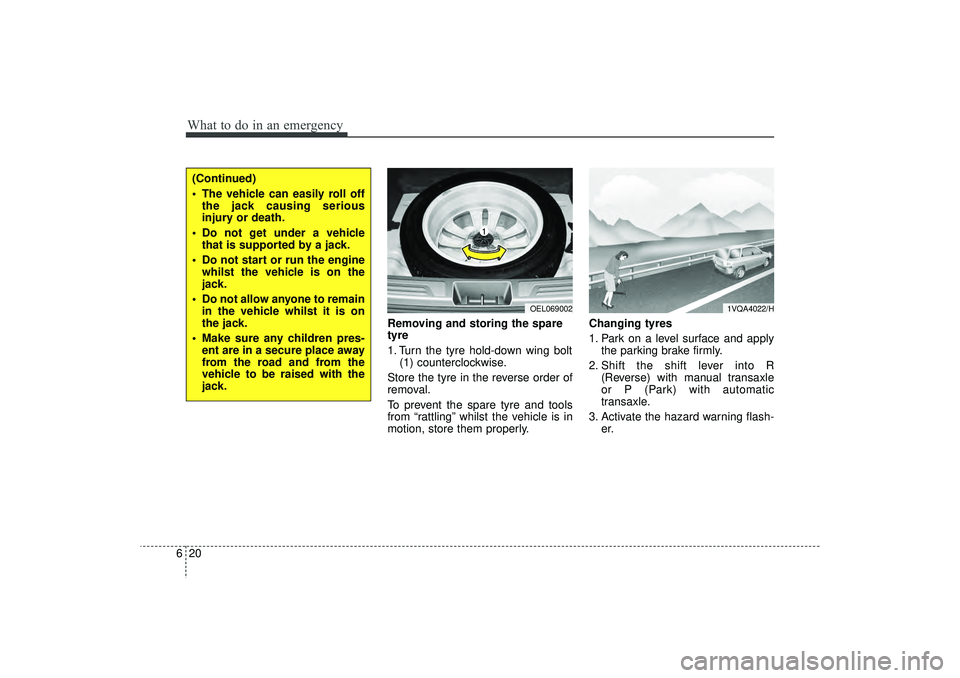
Removing and storing the spare
tyre
1. Turn the tyre hold-down wing bolt
(1) counterclockwise.
Store the tyre in the reverse order of
removal.
To prevent the spare tyre and tools
from “rattling” whilst the vehicle is in
motion, store them properly. Changing tyres
1. Park on a level surface and apply
the parking brake firmly.
2. Shift the shift lever into R (Reverse) with manual transaxle
or P (Park) with automatic
transaxle.
3. Activate the hazard warning flash- er.
OEL069002
(Continued)
The vehicle can easily roll offthe jack causing serious
injury or death.
Do not get under a vehicle that is supported by a jack.
Do not start or run the engine whilst the vehicle is on the
jack.
Do not allow anyone to remain in the vehicle whilst it is on
the jack.
Make sure any children pres- ent are in a secure place away
from the road and from the
vehicle to be raised with the
jack.
1VQA4022/H
EL(FL) UK 6.QXP 12/16/2014 8:12 PM Page 20
Page 443 of 550
621
What to do in an emergency
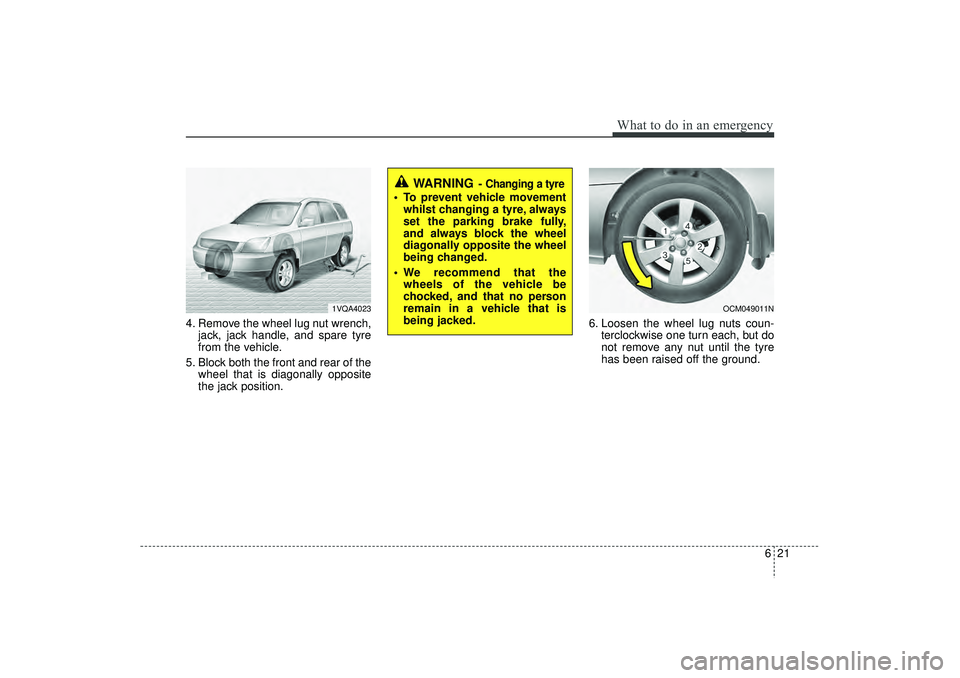
4. Remove the wheel lug nut wrench,jack, jack handle, and spare tyre
from the vehicle.
5. Block both the front and rear of the wheel that is diagonally opposite
the jack position. 6. Loosen the wheel lug nuts coun-
terclockwise one turn each, but do
not remove any nut until the tyre
has been raised off the ground.
WARNING
- Changing a tyre
To prevent vehicle movementwhilst changing a tyre, always
set the parking brake fully,
and always block the wheel
diagonally opposite the wheel
being changed.
We recommend that the wheels of the vehicle be
chocked, and that no person
remain in a vehicle that is
being jacked.
1VQA4023
OCM049011N
EL(FL) UK 6.QXP 12/16/2014 8:12 PM Page 21
Page 447 of 550
625
What to do in an emergency
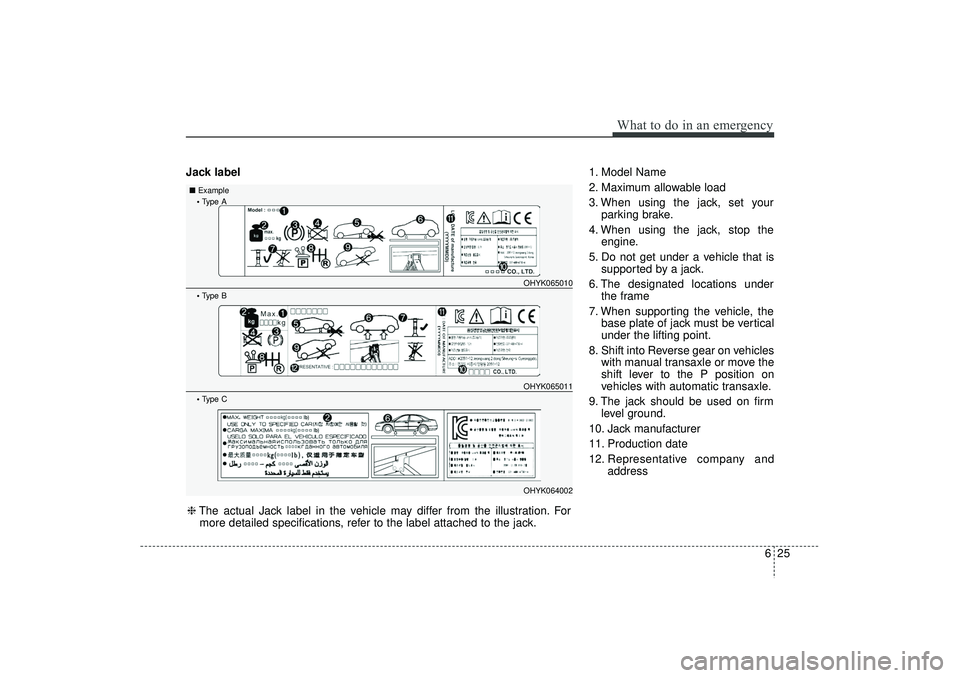
Jack label1. Model Name
2. Maximum allowable load
3. When using the jack, set your
parking brake.
4. When using the jack, stop the engine.
5. Do not get under a vehicle that is supported by a jack.
6. The designated locations under the frame
7. When supporting the vehicle, the base plate of jack must be vertical
under the lifting point.
8. Shift into Reverse gear on vehicles with manual transaxle or move the
shift lever to the P position on
vehicles with automatic transaxle.
9. The jack should be used on firm level ground.
10. Jack manufacturer
11. Production date
12. Representative company and address❈The actual Jack label in the vehicle may differ from the illustration. For
more detailed specifications, refer to the label attached to the jack.• Type A ■ Example Type B Type C
OHYK065010OHYK065011OHYK064002
EL(FL) UK 6.QXP 2/9/2015 9:11 PM Page 25
Page 450 of 550
What to do in an emergency28
6It is possible that some tyres, espe-
cially with larger punctures or dam-
age to the sidewall, cannot be sealed
completely.Air pressure loss in the tyre may
adversely affect tyre performance.
For this reason, you should avoid
abrupt steering or other driving
manoeuvres, especially if the vehicle
is heavily loaded or if a trailer is in
use.
The TyreMobilityKit is not designed
or intended as a permanent tyre
repair method and is to be used for
one tyre only. This instruction shows
you step by step how to temporarily
seal the puncture simply and reliably.
Read the section "Notes on the safe
use of the TyreMobilityKit". Notes on the safe use of the
TyreMobilityKit
Park your car at the side of the
road so that you can work with the
TyreMobilityKit away from moving
traffic.
To be sure your vehicle won't move, even when you're on fairly
level ground, always set your park-
ing brake.
Only use the TyreMobilityKit for sealing/inflation passenger car
tyres. Only punctured areas locat-
ed within the tread region of the
tyre can be sealed using the tyre
mobility kit.
Do not use on motorcycles, bicy- cles or any other type of tyres.
When the tyre and wheel are dam- aged, do not use Tyre Mobility Kit
for your safety.
Use of the Tyre Mobility Kit may not be effective for tyre damage larger
than approximately 0.24 in (6 mm).
If the tyre cannot be made road-
worthy with the Tyre Mobility Kit,
we recommend that you contact a
HYUNDAI authorised repairer. Do not use the Tyre Mobility Kit if a
tyre is severely damaged by driving
run flat or with insufficient air pres-
sure.
Do not remove any foreign objects- such as nails or screws that have
penetrated the tyre.
Provided the car is outdoors, leave the engine running. Otherwise
operating the compressor may
eventually drain the car battery.
Never leave the TyreMobilityKit unattended whilst it is being used.
Do not leave the compressor run- ning for more than 10 min. at a time
or it may overheat.
Do not use the TyreMobilityKit if the ambient temperature is below
-30°C (-22°F).
WARNING
Do not use the TMK if a tyre is
severely damaged by driving
run flat or with insufficient air
pressure.
Only punctured areas located
within the tread region of the
tyre can be sealed using the
TMK.
EL(FL) UK 6.QXP 12/16/2014 8:13 PM Page 28
Page 455 of 550
633
What to do in an emergency
Notes on the safe use of the
Tyre Mobility Kit Park your car at the side of theroad so that you can work with the
TMK away from moving traffic.
Place your warning triangle in a
prominent place to make passing
vehicles aware of your location.
To be sure your vehicle will not move, even when you're on fairly
level ground, always set your park-
ing brake.
Only use the TMK for sealing/infla- tion passenger car tyres. Do not
use on motorcycles, bicycles or
any other type of tyres.
Do not remove any foreign objects- such as nails or screws -that have
penetrated the tyre.
Before using the TMK, read the precautionary advice printed on
the sealant bottle!
Provided the car is outdoors, leave the engine running. Otherwise
operating the compressor may
eventually drain the car battery. Never leave the TMK unattended
whilst it is being used.
Do not leave the compressor run- ning for more than 10 min. at a time
or it may overheat.
Do not use the TMK if the ambient temperature is below -30°C (-
22°F).
When both the tyre and wheel are damaged, do not use Tyre Mobility
Kit for your safety. Technical Data
System voltage: DC 12 V
Working voltage: DC 10 - 15 V
Amperage rating: max. 15 A
Suitable for use at temperatures:
-30 ~ +70°C (-22 ~ +158°F)
Max. working pressure: 87 psi (6 bar)
Size
Compressor: 6.6 x 5.9 x 2.7 in. (168 x 150 x 68 mm)
Sealant bottle: 4.1 x ø 3.3 in. (104 x ø 85 mm)
Compressor weight: 2.31 lbs (1.05 kg)
Sealant volume: 18.3 cu. in. (300 ml)
❈ Sealant and spare parts can be
obtained and replaced at an
authorized vehicle or tyre dealer.
Empty sealant bottles may be dis-
posed of at home. Liquid residue
from the sealant should be dis-
posed of by your vehicle or tyre
dealer or in accordance with local
waste disposal regulations.
EL(FL) UK 6.QXP 12/16/2014 8:13 PM Page 33
Page 457 of 550
635
What to do in an emergency
When towing your vehicle in an emer-
gency without wheel dollies :
1. Set the ignition switch in the ACC posi-tion.
2. Place the transaxle shift lever in N (Neutral).
3. Release the parking brake.
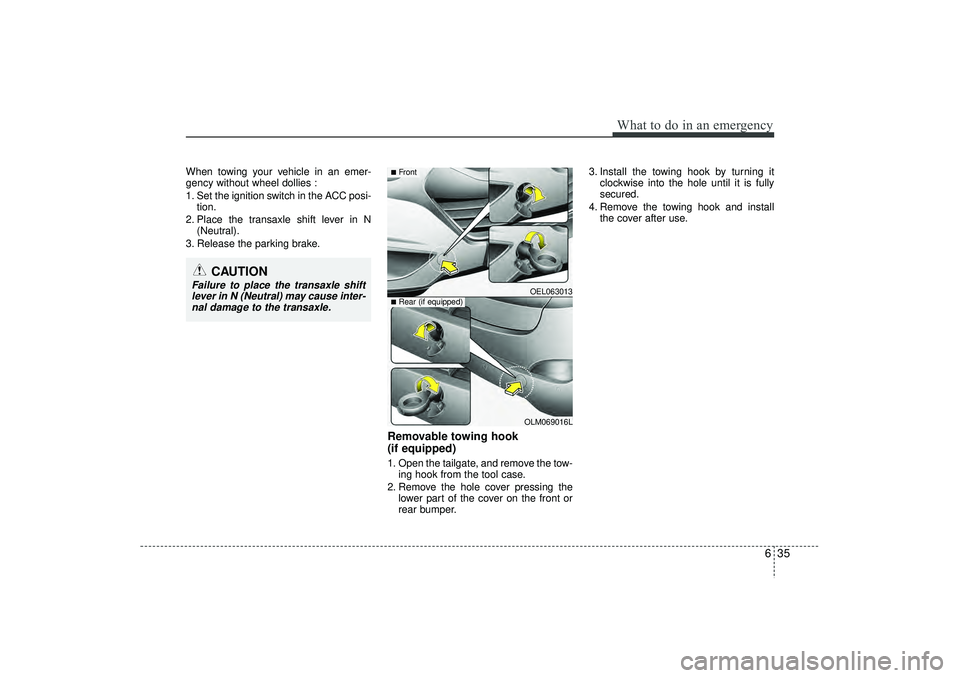
Removable towing hook
(if equipped)1. Open the tailgate, and remove the tow- ing hook from the tool case.
2. Remove the hole cover pressing the lower part of the cover on the front or
rear bumper. 3. Install the towing hook by turning it
clockwise into the hole until it is fully
secured.
4. Remove the towing hook and install the cover after use.
CAUTION
Failure to place the transaxle shiftlever in N (Neutral) may cause inter- nal damage to the transaxle.
OEL063013OLM069016L
■Front■Rear (if equipped)
EL(FL) UK 6.QXP 12/16/2014 8:13 PM Page 35