2016 Hyundai H350 spare tire
[x] Cancel search: spare tirePage 407 of 473

7-44
Maintenance
Remove the valve cap from the tire
valve stem. Press the tire gage firm-
ly onto the valve to get a pressure
measurement. If the cold tire inflationpressure matches the recommendedpressure on the tire and loading
information label, no further adjust-
ment is necessary. If the pressure is
low, add air until you reach the rec-ommended amount.
If you overfill the tire, release air by pushing on the metal stem in the
center of the tire valve. Recheck the
tire pressure with the tire gage. Be
sure to put the valve caps back on
the valve stems. They help prevent
leaks by keeping out dirt and mois-
ture.Tire rotation
To equalize tread wear, it is recom- mended that the tires be rotated
every 12,000 km (7,500 miles) or
sooner if irregular wear develops.
During rotation, check the tires for
correct balance.
When rotating tires, check for uneven
wear and damage. Abnormal wear is
usually caused by incorrect tire pres-
sure, improper wheel alignment, out-
of-balance wheels, severe braking or
severe cornering. Look for bumps or
bulges in the tread or side of tire.
Replace the tire if you find either of
these conditions. Replace the tire if
fabric or cord is visible. After rotation,
be sure to bring the front and rear tire
pressures to specification and check
lug nut tightness.
Refer to “Tire and wheels” in section 8.
Inspect your tires frequently
for proper inflation as well as
wear and damage. Always use
a tire pressure gauge.
Tires with too much or too lit-
tle pressure wear unevenly
causing poor handling, loss of
vehicle control, and suddentire failure leading to acci-
dents, injuries, and even
death. The recommended cold
tire pressure for your vehicle
can be found in this manualand on the tire label locatedon the driver's side center pil-
lar.
Worn tires can cause acci-
dents. Replace tires that are
worn, show uneven wear, or
are damaged.
Remember to check the pres-
sure of your spare tire.
HYUNDAI recommends that
you check the spare every
time you check the pressure
of the other tires on your vehi-
cle.
WARNING
Page 408 of 473

7-45
7
Maintenance
Disc brake pads should be inspectedfor wear whenever tires are rotated.
Rotate radial tires that have an
asymmetric tread pattern only
from front to rear and not fromright to left.
Wheel alignment and tire bal- ance
The wheels on your vehicle were aligned and balanced carefully at the
factory to give you the longest tire life
and best overall performance.
In most cases, you will not need to
have your wheels aligned again.
However, if you notice unusual tire
wear or your vehicle pulling one way
or the other, the alignment may needto be reset.
If you notice your vehicle vibrating
when driving on a smooth road, your
wheels may need to be rebalanced.NOTICE
Do not use the compact spare
tire for tire rotation.
Do not mix bias ply and radial
ply tires under any circum-
stances. This may cause
unusual handling characteris-tics that could result in death,
severe injury, or property
damage.
WARNING
Improper wheel weights can
damage your vehicle's alu-
minum wheels. Use only
approved wheel weights.
CAUTION
S2BLA790
S2BLA790A
CBGQ0707A
Without a spare tire
With a full-size spare tire (if equipped) Directional tires (if equipped)
Page 412 of 473

7-49
7
Maintenance
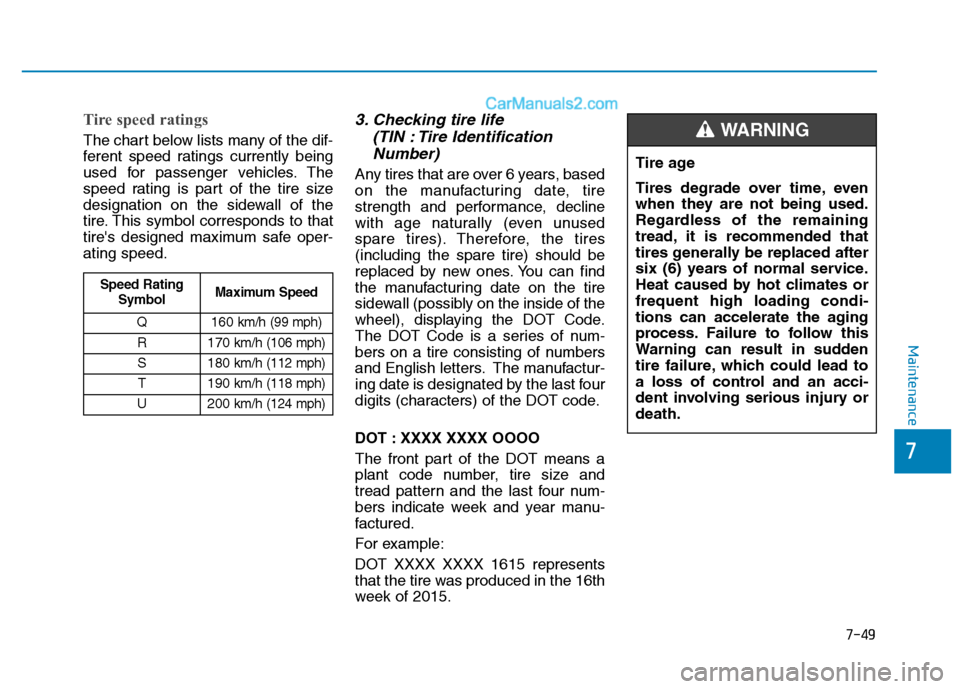
Tire speed ratings
The chart below lists many of the dif-
ferent speed ratings currently being
used for passenger vehicles. The
speed rating is part of the tire size
designation on the sidewall of the
tire. This symbol corresponds to that
tire's designed maximum safe oper-ating speed.
3. Checking tire life (TIN : Tire Identification
Number)
Any tires that are over 6 years, based
on the manufacturing date, tire
strength and performance, decline
with age naturally (even unused
spare tires). Therefore, the tires(including the spare tire) should be
replaced by new ones. You can find
the manufacturing date on the tire
sidewall (possibly on the inside of the
wheel), displaying the DOT Code.
The DOT Code is a series of num-
bers on a tire consisting of numbers
and English letters. The manufactur-
ing date is designated by the last four
digits (characters) of the DOT code.
DOT : XXXX XXXX OOOO
The front part of the DOT means a
plant code number, tire size and
tread pattern and the last four num-
bers indicate week and year manu-
factured.
For example:
DOT XXXX XXXX 1615 represents
that the tire was produced in the 16th
week of 2015. Tire age
Tires degrade over time, even
when they are not being used.
Regardless of the remaining
tread, it is recommended that
tires generally be replaced after
six (6) years of normal service.
Heat caused by hot climates orfrequent high loading condi-
tions can accelerate the aging
process. Failure to follow this
Warning can result in sudden
tire failure, which could lead to
a loss of control and an acci-
dent involving serious injury ordeath.
WARNING
Speed Rating
SymbolMaximum Speed
Q160km/h (99 mph)
R170km/h (106 mph)
S180km/h (112 mph)
T190km/h (118 mph)
U200km/h (124 mph)
Page 433 of 473

7-70
Maintenance
Turn signal light/Position light
Turn signal light
1.Turn off the engine and open thehood.
2.Remove the socket from the assembly by turning the socket
counterclockwise until the tabs on
the socket align with the slots on
the assembly.
3.Remove the bulb from the socket by pressing it in and rotating it
counterclockwise until the tabs on
the bulb align with the slots in the
socket. Pull the bulb out of the
socket
4.Insert a new bulb by inserting it into the socket and rotating it until it
locks into place.
5.Install the socket in the assembly by aligning the tabs on the socket
with the slots in the assembly.
Push the socket into the assembly
and turn the socket clockwise.
Position light
If the light bulb does not operate, we recommend that the system be
checked by an authorized HYUNDAI
dealer.
Front fog light bulbs
(if equipped)
1.Remove the front bumper under cover.
2.Reach your hand into the back of the front bumper.
3.Disconnect the power connector from the socket.
4.Remove the bulb-socket from the housing by turning the socket
counter clockwise until the tabs on
the socket align with the slots onthe housing.
5.Install the new bulb-socket into the housing by aligning the tabs on the
socket with the slots in the hous-
ing. Push the socket into the hous-
ing and turn the socket clockwise.
6.Connect the power connector to the socket.
7.Reinstall the front bumper under cover.
Headlight and front fog light
aiming (for Europe)
Headlight aiming
1.Inflate the tires to the specified
pressure and remove any loads
from the vehicle except the driver,
spare tire, and tools.
OEU074061
OEU074049■■Projection type
■■MFR type
Page 471 of 473

I-6Multi-display.................................................................3-50
AV information ..........................................................3-53
Drive info. mode ........................................................3-53
Function description ..................................................3-51
Information Mode ......................................................3-54
Main display ..............................................................3-50
Trip computer ............................................................3-53
Turn by turn navigation .............................................3-54
User Settings Mode ...................................................3-55
Warning Messages .....................................................3-57
Multimedia system .........................................................4-2
Owner maintenance ........................................................7-8
Parking assist system ....................................................3-88
Front/rear parking assist system type ........................3-92
Rear parking assist system type.................................3-89
Parking brake ................................................................7-30
Power steering fluid......................................................7-28 Checking the power steering fluid level ....................2-28
Checking the power steering hose .............................2-29
PTO switch ...................................................................5-41 RADIO 1 (RADIO,AUX) ...........................................4-45
RADIO 2 (RADIO,USB,AUX) (Except RDS Model)
..4-49
RADIO 2 (RADIO,USB,AUX) (For RDS Model) ......4-48
Rear door ......................................................................3-22 Child-protector rear door lock ...................................3-25
Closing the rear doors from the outside ....................3-25
Opening the left-hand rear door ................................3-24
Opening the rear doors to an angle of 180° or 270° ..3-24
Opening/closing from the inside ...............................3-23
Opening/closing from the outside .............................3-23
Rearview camera ..........................................................3-94
Recommended lubricants and capacities........................8-7
Remote keyless entry......................................................3-6
Battery replacement .....................................................3-8
Remote keyless entry system operations .....................3-6
Transmitter precautions ...............................................3-7
Removing and storing the spare tire...............................6-9
Jacking instructions .....................................................6-9
A type ...........................................................................6-9
B type .........................................................................6-11
Changing tires ............................................................6-14
Index
R
P
O