2016 Hyundai H350 tire type
[x] Cancel search: tire typePage 352 of 473

6-17
What to do in an emergency
6
10. Changing wheels
Loosen the wheel nuts and remove
them with your fingers. Slide the
wheel off the studs and lay it flat so it
cannot roll away. To put the wheel on
the hub, pick up the spare tire, lineup the holes with the studs and slide
the wheel onto them. If this is diffi-cult, tip the wheel slightly and get thetop hole in the wheel lined up with
the top stud. Then jiggle the wheel
back and forth until the wheel can be
slid over the other studs.
On a double-tire vehicle, first
remove the outside tire, then
remove the inner tire.
NOTICE
Use only the jack included
with the vehicle and use it
only for changing a wheel.
Position the jack on a hard
level surface.
If the release valve is loos-
ened by turning it 2 or more
times in the counterclockwise
direction, the jack cannot beused.
This jack is hydraulic, and the
ram is a two-stage type. Whenboth rams are raised and thestop mark of the upper ram
becomes visible, stop jacking
immediately.
Further extension of the ram
may damage the jack.
When jacking up the vehicle,
do so only until the tires are
slightly lifted from the ground.
It is dangerous to jack up the
vehicle more than that much.(Continued)
CAUTION(Continued)
It is very dangerous if the jack
somehow slips, so never
leave the vehicle in the
jacked-up position, and never
shake the vehicle while it israised.
Do not get under the vehicle
when it is supported by the
jack! This is very dangerous as
the vehicle could fall and cause
serious injury or death. No one
should stay in the vehicle while
the jack is being used.
WARNING
Page 409 of 473

7-46
Maintenance
Tire replacement
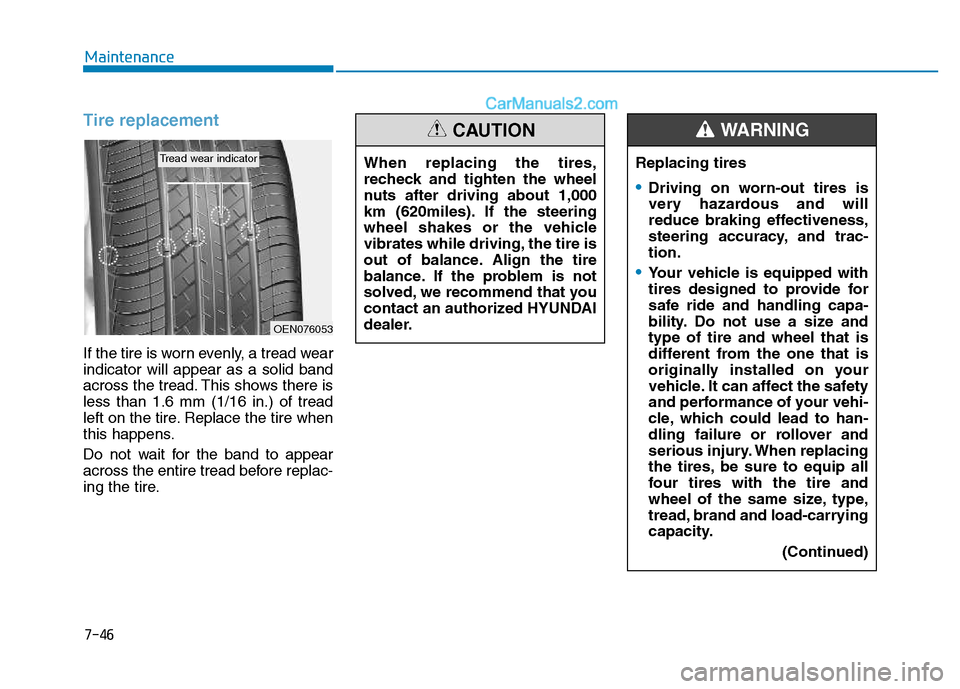
If the tire is worn evenly, a tread wear indicator will appear as a solid band
across the tread. This shows there isless than 1.6 mm (1/16 in.) of tread
left on the tire. Replace the tire when
this happens.
Do not wait for the band to appear
across the entire tread before replac-
ing the tire.When replacing the tires,
recheck and tighten the wheel
nuts after driving about 1,000
km (620miles). If the steering
wheel shakes or the vehicle
vibrates while driving, the tire is
out of balance. Align the tire
balance. If the problem is not
solved, we recommend that you
contact an authorized HYUNDAI
dealer.
CAUTION
Replacing tires
Driving on worn-out tires is
very hazardous and will
reduce braking effectiveness,
steering accuracy, and trac-tion.
Your vehicle is equipped with
tires designed to provide for
safe ride and handling capa-
bility. Do not use a size andtype of tire and wheel that is
different from the one that is
originally installed on your
vehicle. It can affect the safety
and performance of your vehi-
cle, which could lead to han-
dling failure or rollover and
serious injury. When replacing
the tires, be sure to equip all
four tires with the tire and
wheel of the same size, type,
tread, brand and load-carrying
capacity.
(Continued)
WARNING
OEN076053
Tread wear indicator
Page 410 of 473

7-47
7
Maintenance
Wheel replacement
When replacing the metal wheels for
any reason, make sure the new
wheels are equivalent to the original
factory units in diameter, rim widthand offset.
Tire traction
Tire traction can be reduced if you
drive on worn tires, tires that are
improperly inflated or on slippery
road surfaces. Tires should be
replaced when tread wear indicators
appear. To reduce the possibility of
losing control, slow down whenever
there is rain, snow or ice on the road.
Tire maintenance
In addition to proper inflation, correct wheel alignment helps to decrease
tire wear. If you find a tire is worn
unevenly, have your dealer or otherrepair shops that use qualified tech-
nicians check the wheel alignment.
When you have new tires installed,
make sure they are balanced. This
will increase vehicle ride comfort and
tire life. Additionally, a tire should
always be rebalanced if it is removedfrom the wheel.
A wheel that is not the correct
size may adversely affect wheel
and bearing life, braking and
stopping abilities, handling
characteristics, ground clear-
ance, body-to-tire clearance,
snow chain clearance,speedometer and odometer cal-
ibration, headlight aim and
bumper height.
WARNING
(Continued)
The use of any other tire size
or type may seriously affect
ride, handling, ground clear-
ance, stopping distance, body
to tire clearance, snow tire
clearance, and speedometer
reliability.
It is best to replace all four
tires at the same time. If that
is not possible, or necessary,
then replace the two front or
two rear tires as a pair.Replacing just one tire can
seriously affect your vehicle’shandling.
The ABS works by comparing
the speed of the wheels. Tire
size can affect wheel speed.
When replacing tires, all 4
tires must use the same size
originally supplied with the
vehicle. Using tires of a differ-
ent size can cause the ABS
(Anti-lock Brake System) and
ESP (Electronic Stability
Program) (if equipped) to
work irregularly.
Page 433 of 473

7-70
Maintenance
Turn signal light/Position light
Turn signal light
1.Turn off the engine and open thehood.
2.Remove the socket from the assembly by turning the socket
counterclockwise until the tabs on
the socket align with the slots on
the assembly.
3.Remove the bulb from the socket by pressing it in and rotating it
counterclockwise until the tabs on
the bulb align with the slots in the
socket. Pull the bulb out of the
socket
4.Insert a new bulb by inserting it into the socket and rotating it until it
locks into place.
5.Install the socket in the assembly by aligning the tabs on the socket
with the slots in the assembly.
Push the socket into the assembly
and turn the socket clockwise.
Position light
If the light bulb does not operate, we recommend that the system be
checked by an authorized HYUNDAI
dealer.
Front fog light bulbs
(if equipped)
1.Remove the front bumper under cover.
2.Reach your hand into the back of the front bumper.
3.Disconnect the power connector from the socket.
4.Remove the bulb-socket from the housing by turning the socket
counter clockwise until the tabs on
the socket align with the slots onthe housing.
5.Install the new bulb-socket into the housing by aligning the tabs on the
socket with the slots in the hous-
ing. Push the socket into the hous-
ing and turn the socket clockwise.
6.Connect the power connector to the socket.
7.Reinstall the front bumper under cover.
Headlight and front fog light
aiming (for Europe)
Headlight aiming
1.Inflate the tires to the specified
pressure and remove any loads
from the vehicle except the driver,
spare tire, and tools.
OEU074061
OEU074049■■Projection type
■■MFR type
Page 464 of 473

8-11
8
Specifications & Consumer information
The tires supplied on your new vehi-
cle are chosen to provide the best
performance for normal driving.
The tire label located on the driver's
side center pillar gives the tire pres-
sures recommended for your vehicle.The engine number is stamped on
the engine block as shown in the
drawing.
A compressor label informs you the
type of compressor your vehicle isequipped with such as model, suppli-
er part number, production number,
refrigerant (1) and refrigerant oil (2).
TT
IIRR EE SS PP EECCIIFF IICC AA TTIIOO NN AA NN DD
P
P RR EESSSSUU RREE LL AA BBEELL E
E
NN GGIINN EE NN UU MM BBEERR
OEU084004
OEU084005
OHC081001
AA IIRR CC OO NNDDIITT IIOO NNEERR
C
C OO MM PPRR EESSSSOO RR LL AA BBEELL
Page 471 of 473

I-6Multi-display.................................................................3-50
AV information ..........................................................3-53
Drive info. mode ........................................................3-53
Function description ..................................................3-51
Information Mode ......................................................3-54
Main display ..............................................................3-50
Trip computer ............................................................3-53
Turn by turn navigation .............................................3-54
User Settings Mode ...................................................3-55
Warning Messages .....................................................3-57
Multimedia system .........................................................4-2
Owner maintenance ........................................................7-8
Parking assist system ....................................................3-88
Front/rear parking assist system type ........................3-92
Rear parking assist system type.................................3-89
Parking brake ................................................................7-30
Power steering fluid......................................................7-28 Checking the power steering fluid level ....................2-28
Checking the power steering hose .............................2-29
PTO switch ...................................................................5-41 RADIO 1 (RADIO,AUX) ...........................................4-45
RADIO 2 (RADIO,USB,AUX) (Except RDS Model)
..4-49
RADIO 2 (RADIO,USB,AUX) (For RDS Model) ......4-48
Rear door ......................................................................3-22 Child-protector rear door lock ...................................3-25
Closing the rear doors from the outside ....................3-25
Opening the left-hand rear door ................................3-24
Opening the rear doors to an angle of 180° or 270° ..3-24
Opening/closing from the inside ...............................3-23
Opening/closing from the outside .............................3-23
Rearview camera ..........................................................3-94
Recommended lubricants and capacities........................8-7
Remote keyless entry......................................................3-6
Battery replacement .....................................................3-8
Remote keyless entry system operations .....................3-6
Transmitter precautions ...............................................3-7
Removing and storing the spare tire...............................6-9
Jacking instructions .....................................................6-9
A type ...........................................................................6-9
B type .........................................................................6-11
Changing tires ............................................................6-14
Index
R
P
O