Page 117 of 332

449
Features of your vehicle
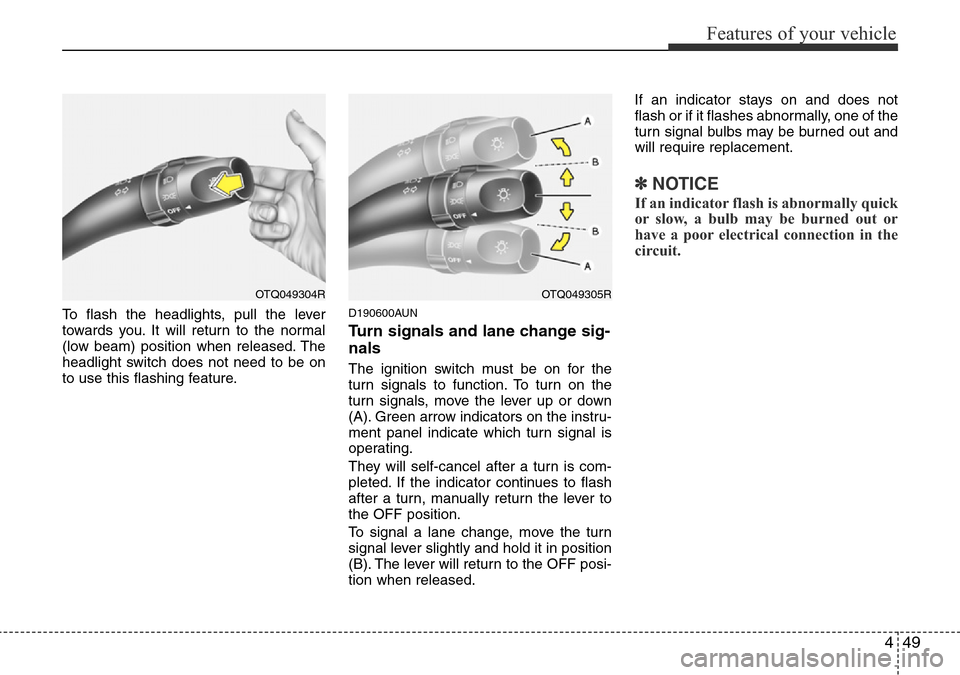
To flash the headlights, pull the lever
towards you. It will return to the normal
(low beam) position when released. The
headlight switch does not need to be on
to use this flashing feature.D190600AUN
Turn signals and lane change sig-
nals
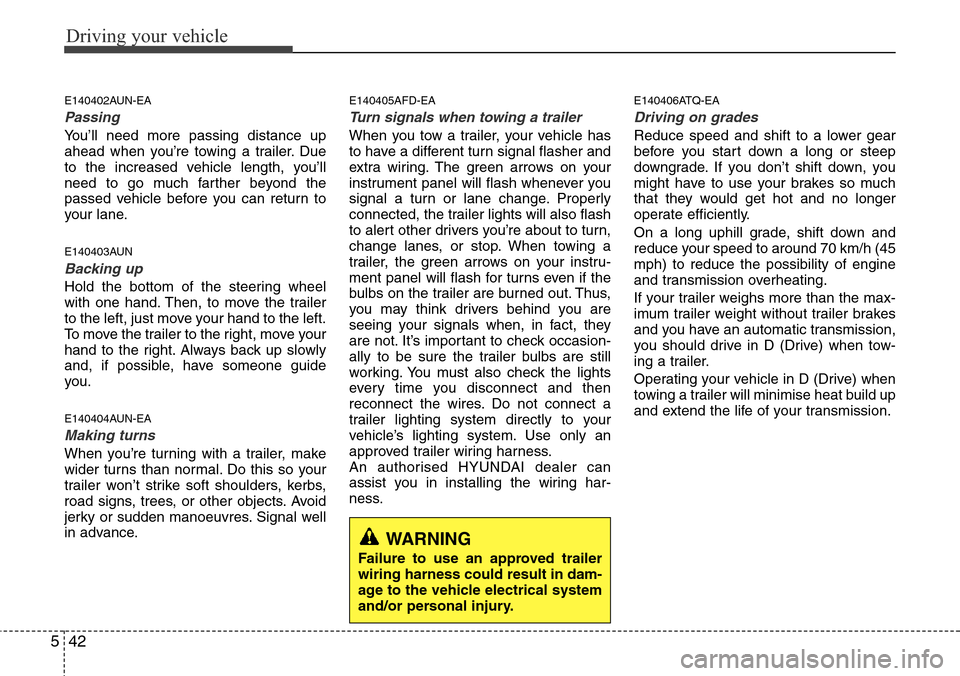
The ignition switch must be on for the
turn signals to function. To turn on the
turn signals, move the lever up or down
(A). Green arrow indicators on the instru-
ment panel indicate which turn signal is
operating.
They will self-cancel after a turn is com-
pleted. If the indicator continues to flash
after a turn, manually return the lever to
the OFF position.
To signal a lane change, move the turn
signal lever slightly and hold it in position
(B). The lever will return to the OFF posi-
tion when released.If an indicator stays on and does not
flash or if it flashes abnormally, one of the
turn signal bulbs may be burned out and
will require replacement.
✽NOTICE
If an indicator flash is abnormally quick
or slow, a bulb may be burned out or
have a poor electrical connection in the
circuit.
OTQ049304ROTQ049305R
Page 227 of 332

Driving your vehicle
42 5
E140402AUN-EA
Passing
You’ll need more passing distance up
ahead when you’re towing a trailer. Due
to the increased vehicle length, you’ll
need to go much farther beyond the
passed vehicle before you can return to
your lane.
E140403AUN
Backing up
Hold the bottom of the steering wheel
with one hand. Then, to move the trailer
to the left, just move your hand to the left.
To move the trailer to the right, move your
hand to the right. Always back up slowly
and, if possible, have someone guide
you.
E140404AUN-EA
Making turns
When you’re turning with a trailer, make
wider turns than normal. Do this so your
trailer won’t strike soft shoulders, kerbs,
road signs, trees, or other objects. Avoid
jerky or sudden manoeuvres. Signal well
in advance.
E140405AFD-EA
Turn signals when towing a trailer
When you tow a trailer, your vehicle has
to have a different turn signal flasher and
extra wiring. The green arrows on your
instrument panel will flash whenever you
signal a turn or lane change. Properly
connected, the trailer lights will also flash
to alert other drivers you’re about to turn,
change lanes, or stop. When towing a
trailer, the green arrows on your instru-
ment panel will flash for turns even if the
bulbs on the trailer are burned out. Thus,
you may think drivers behind you are
seeing your signals when, in fact, they
are not. It’s important to check occasion-
ally to be sure the trailer bulbs are still
working. You must also check the lights
every time you disconnect and then
reconnect the wires. Do not connect a
trailer lighting system directly to your
vehicle’s lighting system. Use only an
approved trailer wiring harness.
An authorised HYUNDAI dealer can
assist you in installing the wiring har-
ness.
E140406ATQ-EA
Driving on grades
Reduce speed and shift to a lower gear
before you start down a long or steep
downgrade. If you don’t shift down, you
might have to use your brakes so much
that they would get hot and no longer
operate efficiently.
On a long uphill grade, shift down and
reduce your speed to around 70 km/h (45
mph) to reduce the possibility of engine
and transmission overheating.
If your trailer weighs more than the max-
imum trailer weight without trailer brakes
and you have an automatic transmission,
you should drive in D (Drive) when tow-
ing a trailer.
Operating your vehicle in D (Drive) when
towing a trailer will minimise heat build up
and extend the life of your transmission.
WARNING
Failure to use an approved trailer
wiring harness could result in dam-
age to the vehicle electrical system
and/or personal injury.
Page 307 of 332

Maintenance
56 7
LIGHT BULBS
G220000AEN-EA
Use only the bulbs of the specified
wattage.
All bulbs are available from your
HYUNDAI dealers Parts Department.
✽NOTICE
After washing or driving through heavy
rain, condensation may form in the head
and tail lamp lenses. This condition is
caused by the temperature difference
between the lamp inside and outside.
This is similar to the condensation on
your windows inside your vehicle during
the rain and doesn’t indicate a problem
with your vehicle. If the water leaks into
the lamp bulb circuitry, have the vehicle
checked by an authorised HYUNDAI
dealer.
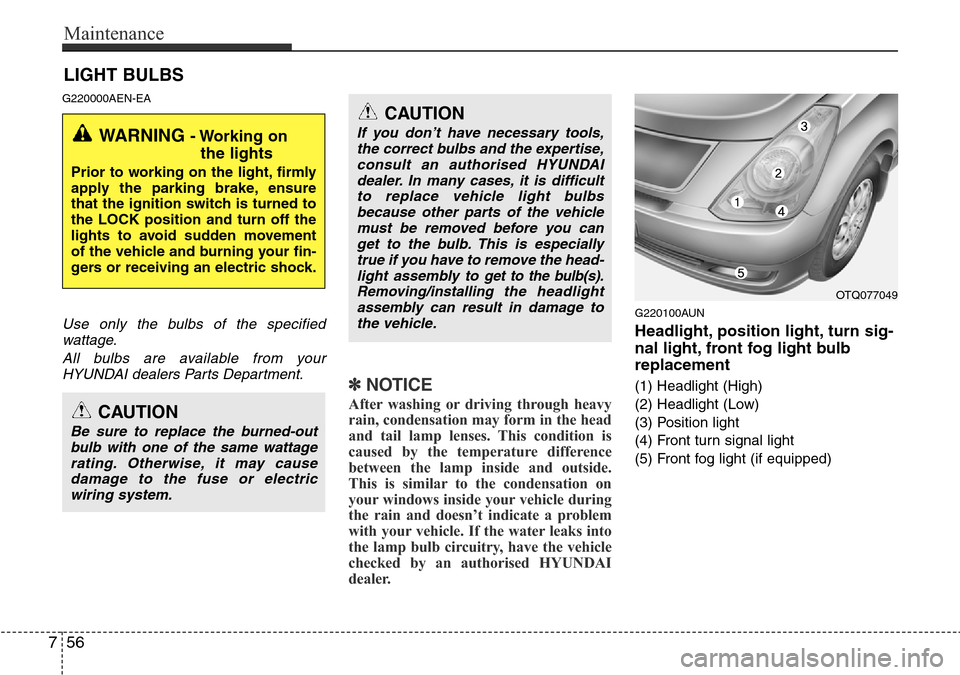
G220100AUN
Headlight, position light, turn sig-
nal light, front fog light bulb
replacement
(1) Headlight (High)
(2) Headlight (Low)
(3) Position light
(4) Front turn signal light
(5) Front fog light (if equipped)
WARNING - Working on
the lights
Prior to working on the light, firmly
apply the parking brake, ensure
that the ignition switch is turned to
the LOCK position and turn off the
lights to avoid sudden movement
of the vehicle and burning your fin-
gers or receiving an electric shock.
CAUTION
Be sure to replace the burned-out
bulb with one of the same wattage
rating. Otherwise, it may cause
damage to the fuse or electric
wiring system.
CAUTION
If you don’t have necessary tools,
the correct bulbs and the expertise,
consult an authorised HYUNDAI
dealer. In many cases, it is difficult
to replace vehicle light bulbs
because other parts of the vehicle
must be removed before you can
get to the bulb. This is especially
true if you have to remove the head-
light assembly to
get to the bulb(s).
Removing/installingthe headlight
assembly can result in damage to
the vehicle.OTQ077049
Page 309 of 332

Maintenance
58 7
G220102ATQ-EA
Turn signal light/position light, fog
light bulb (if equipped)
Turn signal light
1. If necessary, remove the headlight
assembly by loosening the headlight
installation bolts. When you remove
the headlight assembly, you may need
to remove the bumper according to the
vehicle.
2. Replace the malfunctioned light bulb.
3. Install the headlight assembly.
Fog light bulb (if equipped)
1. Remove the fog light under cover by
loosening the screw.
2. Replace the malfunctioned light bulb.
3. Install the fog light under cover.Position light
1. Open the bonnet.
2. Remove the socket by turning it coun-
terclockwise.
3. Remove the bulb by pulling it straight
out.
4. Insert a new bulb in the socket.
5. Install the position light socket.
G220200AUN
Side repeater light bulb replace-
ment (if equipped)
1. Remove the light assembly from the
vehicle by prying the lens and pulling
the assembly out.
2. Disconnect the bulb electrical connec-
tor.
3. Separate the socket and the lens parts
by turning the socket counterclockwise
until the tabs on the socket align with
the slots on the lens part.
4. Remove the bulb by pulling it straight
out.
5. Insert a new bulb in the socket.
6. Reassemble the socket and the lens
part.
7. Connect the bulb electrical connector.
8. Reinstall the light assembly to the
body of the vehicle.
OTQ077056OTQ077050
Page 310 of 332
759
Maintenance
G220300ATQ
Rear combination light bulb
replacement
- Without rear fog light
(1) Tail light
(2) Back-up light
(3) Rear turn signal light
(4) Stop light
- With rear fog light
(1) Tail and stop light
(2) Back-up light
(3) Rear turn signal light
(4) Rear fog light
1. Open the tailgate.
2. Loosen the light assembly retaining
screws with a philips head screwdriver.
3. Remove the rear combination light
assembly from the body of the vehicle.
OTQ077052
OTQ077053
OTQ077051
OTQ077051G
Type B
Type A
Page 328 of 332
Specifications
2 9
Item mm (in)
Overall length 5125 (201.8)
Overall width 1920 (75.6)
Overall height 1925 (75.8)
Front tread 1685 (66.3)
Rear tread 1660 (65.4)
Wheelbase 3200 (126.0)
DIMENSIONS
Light Bulb Wattage
Headlights (Low) 55
Headlights (High) 55
Front turn signal lights 21
Position lights 5
Side repeater lights* 5
Front fog lights* 27
Rear fog light* 21
Stop and tail lights 21/5
Rear turn signal lights 21
Back-up lights 16
High mounted stop light* 5
License plate lights 5
Room lamps 10
Luggage lamp* 10
Step lamp* 5
BULB WATTAGE
* : If equipped
The above dimensions are based on 8-seater vehicle.
I010000ATQ-EA I030000ATQ