2016 Hyundai H-1 (Grand Starex) length
[x] Cancel search: lengthPage 33 of 332

315
Safety features of your vehicle
D150302AEN-EA
Seat belt warning (if equipped)
As a reminder to the driver, the seat belt
warning light will blink for approximately
6 seconds each time you turn the ignition
switch ON regardless of belt fastening.
If the driver’s seat belt is unfastened after
the ignition switch is ON, the seat belt
warning light blinks again for approxi-
mately 6 seconds.
Seat belt warning chime (if equipped)
If the driver's seat belt is not fastened
when the ignition switch is turned ON or
if it is unfastened after the ignition switch
is ON, the seat belt warning chime will
sound for approximately 6 seconds.
Once the seat belt is fastened the chime
will stop.
C020102AEN
Lap/shoulder belt
To fasten your seat belt:
To fasten your seat belt, pull it out of the
retractor and insert the metal tab (1) into
the buckle (2). There will be an audible
"click" when the tab locks into the buckle.
The seat belt automatically adjusts to the
proper length only after the lap belt por-
tion is adjusted manually so that it fits
snugly around your hips. If you lean for-
ward in a slow, easy motion, the belt will
extend and let you move around. If there
is a sudden stop or impact, however, the
belt will lock into position. It will also lock
if you try to lean forward too quickly.
1GQA2083B180A01NF-E
WARNING
• No modifications or additions
should be made by the user
which will either prevent the seat
belt adjusting devices from oper-
ating to remove slack, or prevent
the seat belt assembly from being
adjusted to remove slack.
• When you fasten the seat belt, be
careful not to latch the seat belt in
buckles of other seat. It's very dan-
gerous and you may not be pro-
tected by the seat belt properly.
• Do not unfasten the seat belt and
do not fasten and unfasten the
seat belt repeatedly whilst driv-
ing. This could result in loss of
control, and an accident causing
death, serious injury, or property
damage.
• When fastening the seat belt,
make sure that the seat belt does
not pass over objects that are
hard or can break easily.
• Make sure there is nothing in the
buckle. The seat belt may not be
fastened securely.
Page 36 of 332

Safety features of your vehicle
18 3
With a 2-point static type seat belt, the
length must be adjusted manually so it
fits snugly around your body. Fasten the
belt and pull on the loose end to tighten.
The belt should be placed as low as pos-
sible on your hips, not on your waist. If
the belt is too high, it could increase the
possibility of your being injured in an
accident.When using the rear centre seat belt, the
buckle with the “CENTER” mark must be
used.To release the seat belt:
When you want to release the seat belt,
press the button (1) in the locking buckle.
OTQ037020
OHM039105N
B220B01NF
Too high
ShortenCorrect
B210A02NF-1
WARNING
The centre lap belt latching mecha-
nism is different from those for the
rear seat shoulder belts. When fas-
tening the rear seat shoulder belts
or the centre lap belt, make sure
they are inserted into the correct
buckles to obtain maximum protec-
tion from the seat belt system and
assure proper operation.
Page 47 of 332

329
Safety features of your vehicle
2. Fasten the lap/shoulder belt latch into
the buckle. Listen for the distinct “click”
sound.
Position the release button so that it is
easy to access in case of an emergency.
3. Buckle the seat belt and allow the seat
belt to take up any slack. After installa-
tion of the child restraint system, try to
move it in all directions to be sure the
child restraint system is securely
installed.
If you need to tighten the belt, pull more
webbing toward the retractor. When you
unbuckle the seat belt and allow it to
retract, the retractor will automatically
revert back to its normal seated passen-
ger emergency locking usage condition.
If the child seat moves, readjust the
length of the seat belt. In Australia/NZ the
child restraint manufacturer's instructions
must be followed when fitting the unit to
the vehicle.C030101AUN-EA
Installing a child restraint system by
lap belt (on the centre rear seat) (if
equipped)
To install a child restraint system on the
centre rear seats, do the following:
1. Place the child restraint system on the
centre rear seat.
2. Extend the latch plate tongue of the
lap belt.
3. Route the lap belt through the restraint
according to the seat manufacturer’s
instructions.
4. Buckle the seat belt and adjust the lap
belt for a snug hold on the child
restraint by pulling on the loose end of
the belt. After installation of the child
restraint system, try to move it in all
directions to be sure the child restraint
system is securely installed.
OEN036101OEN0361041GHA2260
Page 227 of 332
Driving your vehicle
42 5
E140402AUN-EA
Passing
You’ll need more passing distance up
ahead when you’re towing a trailer. Due
to the increased vehicle length, you’ll
need to go much farther beyond the
passed vehicle before you can return to
your lane.
E140403AUN
Backing up
Hold the bottom of the steering wheel
with one hand. Then, to move the trailer
to the left, just move your hand to the left.
To move the trailer to the right, move your
hand to the right. Always back up slowly
and, if possible, have someone guide
you.
E140404AUN-EA
Making turns
When you’re turning with a trailer, make
wider turns than normal. Do this so your
trailer won’t strike soft shoulders, kerbs,
road signs, trees, or other objects. Avoid
jerky or sudden manoeuvres. Signal well
in advance.
E140405AFD-EA
Turn signals when towing a trailer
When you tow a trailer, your vehicle has
to have a different turn signal flasher and
extra wiring. The green arrows on your
instrument panel will flash whenever you
signal a turn or lane change. Properly
connected, the trailer lights will also flash
to alert other drivers you’re about to turn,
change lanes, or stop. When towing a
trailer, the green arrows on your instru-
ment panel will flash for turns even if the
bulbs on the trailer are burned out. Thus,
you may think drivers behind you are
seeing your signals when, in fact, they
are not. It’s important to check occasion-
ally to be sure the trailer bulbs are still
working. You must also check the lights
every time you disconnect and then
reconnect the wires. Do not connect a
trailer lighting system directly to your
vehicle’s lighting system. Use only an
approved trailer wiring harness.
An authorised HYUNDAI dealer can
assist you in installing the wiring har-
ness.
E140406ATQ-EA
Driving on grades
Reduce speed and shift to a lower gear
before you start down a long or steep
downgrade. If you don’t shift down, you
might have to use your brakes so much
that they would get hot and no longer
operate efficiently.
On a long uphill grade, shift down and
reduce your speed to around 70 km/h (45
mph) to reduce the possibility of engine
and transmission overheating.
If your trailer weighs more than the max-
imum trailer weight without trailer brakes
and you have an automatic transmission,
you should drive in D (Drive) when tow-
ing a trailer.
Operating your vehicle in D (Drive) when
towing a trailer will minimise heat build up
and extend the life of your transmission.
WARNING
Failure to use an approved trailer
wiring harness could result in dam-
age to the vehicle electrical system
and/or personal injury.
Page 328 of 332
Specifications
2 9
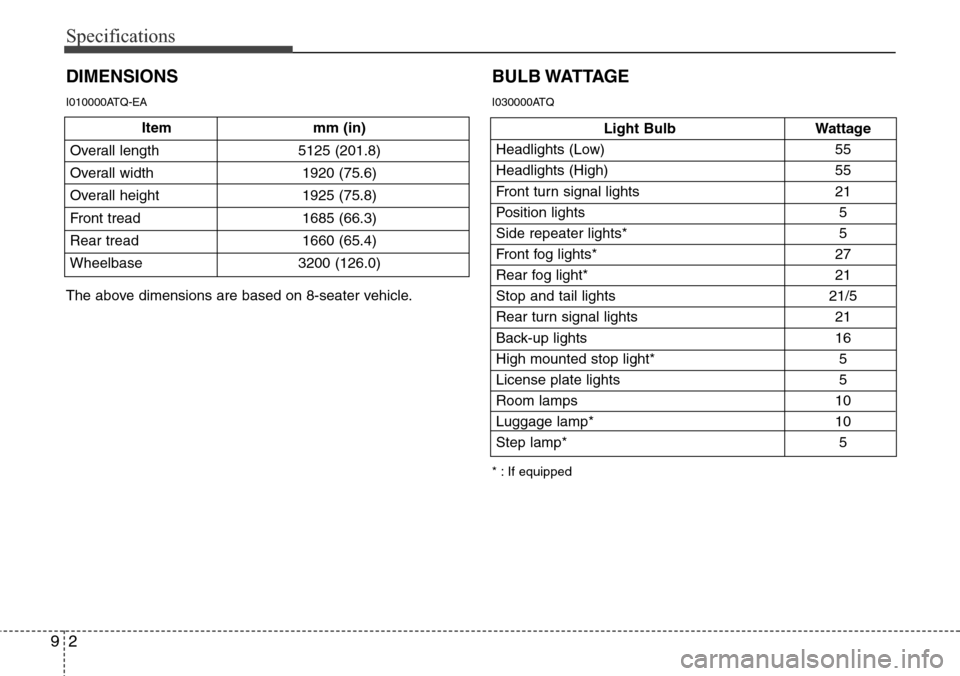
Item mm (in)
Overall length 5125 (201.8)
Overall width 1920 (75.6)
Overall height 1925 (75.8)
Front tread 1685 (66.3)
Rear tread 1660 (65.4)
Wheelbase 3200 (126.0)
DIMENSIONS
Light Bulb Wattage
Headlights (Low) 55
Headlights (High) 55
Front turn signal lights 21
Position lights 5
Side repeater lights* 5
Front fog lights* 27
Rear fog light* 21
Stop and tail lights 21/5
Rear turn signal lights 21
Back-up lights 16
High mounted stop light* 5
License plate lights 5
Room lamps 10
Luggage lamp* 10
Step lamp* 5
BULB WATTAGE
* : If equipped
The above dimensions are based on 8-seater vehicle.
I010000ATQ-EA I030000ATQ