2016 Hyundai H-1 (Grand Starex) battery
[x] Cancel search: batteryPage 143 of 332

475
Features of your vehicle
D280400BTQ
Sunvisor
Use the sunvisor to shield direct light
through the front or side windows.
To use a sunvisor, pull it downward.
To use a sunvisor for a side window, pull
it downward, unsnap it from the bracket
(1) and swing it to the side (2).
To use the vanity mirror (if equipped), pull
down the visor and slide the mirror cover
(3).
Adjust the sunvisor forward or backward
(4, if equipped).
The ticket holder (5) is provided for hold-
ing a tollgate ticket. (if equipped)
* : if equipped
D280500AEN
Power outlet (if equipped)
The power outlet is designed to provide
power for mobile telephones or other
devices designed to operate with vehicle
electrical systems. The devices should
draw less than 10 amps with the engine
running.
OTQ047115ROTQ047116R
CAUTION- Vanity mirror
lamp (if equipped)
Close the vanity mirror cover
securely and return the sunvisor to
its original position after use. If the
vanity mirror is not closed securely,
the lamp will stay on and could
result in battery discharge and pos-
sible sunvisor damage.
WARNING
Do not put a finger or a foreign ele-
ment (pin, etc.) into a power outlet
and do not touch with a wet hand.
You may get an electric shock.
WARNING
For your safety, do not obstruct your
vision when using the sunvisor.
Page 144 of 332

Features of your vehicle
76 4
D280600AEN
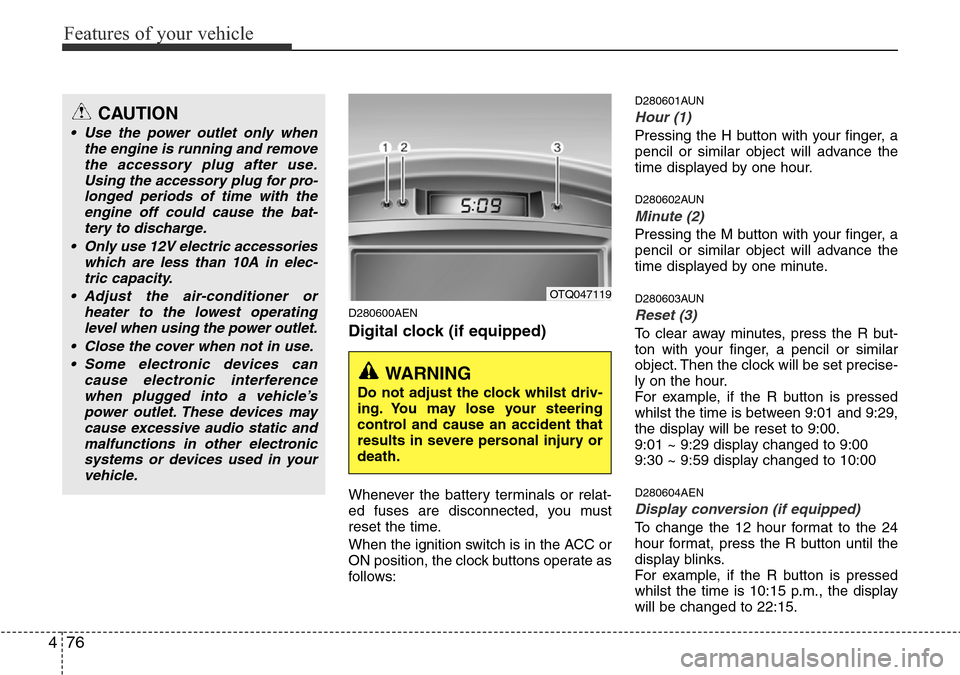
Digital clock (if equipped)
Whenever the battery terminals or relat-
ed fuses are disconnected, you must
reset the time.
When the ignition switch is in the ACC or
ON position, the clock buttons operate as
follows:
D280601AUN
Hour (1)
Pressing the H button with your finger, a
pencil or similar object will advance the
time displayed by one hour.
D280602AUN
Minute (2)
Pressing the M button with your finger, a
pencil or similar object will advance the
time displayed by one minute.
D280603AUN
Reset (3)
To clear away minutes, press the R but-
ton with your finger, a pencil or similar
object. Then the clock will be set precise-
ly on the hour.
For example, if the R button is pressed
whilst the time is between 9:01 and 9:29,
the display will be reset to 9:00.
9:01 ~ 9:29 display changed to 9:00
9:30 ~ 9:59 display changed to 10:00
D280604AEN
Display conversion (if equipped)
To change the 12 hour format to the 24
hour format, press the R button until the
display blinks.
For example, if the R button is pressed
whilst the time is 10:15 p.m., the display
will be changed to 22:15.
OTQ047119
WARNING
Do not adjust the clock whilst driv-
ing. You may lose your steering
control and cause an accident that
results in severe personal injury or
death.
CAUTION
• Use the power outlet only when
the engine is running and remove
the accessory plug after use.
Using the accessory plug for pro-
longed periods of time with the
engine off could cause the bat-
tery to discharge.
• Only use 12V electric accessories
which are less than 10A in elec-
tric capacity.
• Adjust the air-conditioner or
heater to the lowest operating
level when using the power outlet.
• Close the cover when not in use.
• Some electronic devices can
cause electronic interference
when plugged into a vehicle’s
power outlet. These devices may
cause excessive audio static and
malfunctions in other electronic
systems or devices used in your
vehicle.
Page 162 of 332

Features of your vehicle
94 4
✽NOTICE
• When using a portable audio device
connected to power outlet, noise may
occur during playback.
If this happens, use the original power
source of the portable audio device
(e.g., batteries).
• To assure proper operation of the unit,
keep the vehicle interior temperature
within a normal range by using the
vehicle’s air conditioning or heating
system.
• When replacing the fuse, replace it
with a fuse having the correct capaci-
ty.
• All stored bookmarks are all erased
when the car battery is disconnected
or power to the vehicle is lost. If this
occurs, the bookmarks will have to be
reset.
• Do not add any oil to the rotating
parts. Keep magnets, screwdrivers
and other metallic objects away from
the tape mechanism and head.CAUTION
• Do not insert warped or poor
quality discs into the CD player
as damage to the unit may occur.
• Do not insert anything like coins
into the player slot as damage to
the unit may occur.
• Do not place beverages close to
the audio system. The playback
mechanism may be damaged if
you spill them.
• Do not strike or allow anything to
impact the audio system, damage
to the system mechanisms could
occur.
• Off-road or rough surface driving
may cause the compact disc to
skip. Do not use the compact disc
when driving in such conditions
as damage to the compact disc
face could occur.
• Do not attempt to grab or pull the
compact disc out whilst the disc
is being pulled into the audio unit
by the self-loading mechanism.
Damage to the audio unit and
compact disc could occur.
• This equipment is designed to be
used only in a 12 volt DC battery
system with negative ground.
• This unit is made of precision
parts. Do not attempt to disas-
semble or adjust any parts.
• When driving your vehicle, be
sure to keep the volume of the
unit set low enough to allow you
to hear sounds coming from the
outside.
• Do not expose this equipment
(including the speakers and tape)
to water or excessive moisture.
• Avoid using recorded compact
discs in your audio unit. Original
compact discs are recommended.
• The unit is not sure of playing CD-
RW (Rewritable).
• When using the EQ function, turn
off the EQ function of the device
on the AUX input.
• When no device is connected to
the AUX cable, please pull out the
cable from the JACK on the car.
(AUX MODE is operational and
noise may heard in the AUX
MODE.)
Page 164 of 332

Features of your vehicle
96 4
Using RADIO, SETUP, VOLUME
and AUDIO CONTROL
1. Power ON/OFF Button & Volume
Control Button
Turns on/off the set when the IGNITION
SWITCH is on ACC or ON. If the button
is turned to the right, it increases the vol-
ume and left,decreases the volume.
• Press this button to turn the audio sys-
tem ON or OFF. (EUROPE MODEL
ONLY)
• Depending on the model if the ignition
switch is not on ACC or ON position.
The “Battery Discharge” warning
appears on LCD after 10 seconds of
power-up, and automatically turns off
after 1 hours of operation.
• Adjusts the volume of the car audio
system. Rotate clockwise to increase
the volume or counterclockwise to
decrease.
2. FM Button
Turns to FM mode and toggles FM1and
FM2 when the button is pressed each
time.
3. AM Button
Pressing the [AM] button selects the AM
band. AM Mode is displayed on the LCD.
4. SEEK Button
• When the [SEEK ] button is
pressed, it increases the band fre-
quency to automatically select a chan-
nel. Stops at the previous frequency if
no channel is found.
• When the [TRACK ] button is press-
ed, it reduces the band frequency to
automatically select a channel. Stops
at the previous frequency if no channel
is found.
5. Preset Button
Push [1]~[6] buttons less than 0.8 sec-
ond to play the channel saved in each
button. Push Preset button for 0.8 sec-
ond or longer to save current channel to
the respective button with a beep.
6. AST(AUTO STORE) Button
When the button is pressed, it automati-
cally selects and saves channels with
high reception rate to PRESET buttons
[1]~[6] and plays the channel saved in
PRESET1. If no channel is saved after
AST, it will play the previous channel.
7. TUNE & Audio Control Button
Manual Channel Selection knob
Turn this control whilst listening to a radio
channel to manually adjust frequency.
Turn clockwise to increase frequency
and counterclockwise to reduce frequen-
cy.
SETUP Button
• GENERAL MODEL
Press this button to turn to the SCROLL
adjustment mode. If no action is taken for
5 seconds after pressing the button, it will
return to the play mode. (After entering
SETUP mode, PUSH functions of the
[TUNE] button to adjust SCROLL.)
Page 176 of 332

✽NOTICE FOR USING THE
iPod®DEVICE
• Some iPod models might not support
the communication protocol and the
files will not be played.
Supported iPod models:
- iPod Mini
- iPod 4th (Photo) ~ 6th (Classic) gen-
eration
- iPod Nano 1st~4th generation
- iPod Touch 1st~2nd generation
• The order of search or playback of
songs in the iPod can be different
from the order searched in the audio
system.
• If the iPod crashes due to its own mal-
function, reset the iPod. (Reset: Refer
to iPod manual)
• An iPod may not operate normally on
low battery.
• Some iPod devices, such as the
iPhone, can be connected through the
Bluetooth
®Wireless Technology inter-
face. The device must have audio
Bluetooth
®Wireless Technology capa-
bility (such as for stereo headphone
Bluetooth
®Wireless Technology). The
device can play, but it will not be con-
trolled by the audio system.
(Continued)
• Deactivate (turn off) the equalizer
function of an iPod when adjust-
ing the audio system’s volume,
and turn off the equalizer of the
audio system when using the
equalizer of an iPod.
• When the iPod cable is connect-
ed, the system can be switched to
the AUX mode even without the
iPod device and may cause noise.
Disconnect the iPod cable when
you are not using the iPod device.
• When not using iPod with car
audio, detach the iPod cable from
iPod. Otherwise, the iPod may
remain in accessory mode, and
may not work properly.CAUTION IN USING THE
iPod®DEVICE
• The HYUNDAI iPod Power Cable
is needed in order to operate iPod
with the audio buttons on the
audio system. The USB cable pro-
vided by Apple may cause mal-
function and should not be used
for HYUNDAI vehicles.
❋The HYUNDAI iPod Power Cable
may be purchased through your
HYUNDAI Dealership.
Page 185 of 332

4117
Features of your vehicle
✽NOTICE FOR USING THE
iPod DEVICE
• Some iPod models might not support
the communication protocol and the
files will not be played.
Supported iPod models:
- iPod Mini
- iPod 4th(Photo) ~ 6th(Classic)
generation
- iPod Nano 1st~4th generation
- iPod Touch 1st~2nd generation
• The order of search or playback of
songs in the iPod can be different
from the order searched in the audio
system.
• If the iPod disabled due to its own
malfunction, reset the iPod. (Reset:
Refer to iPod manual)
• An iPod may not operate normally on
low battery.
• Some iPod devices, such as the
iPhone, can be connected through the
Bluetooth
®Wireless Technolog inter-
face. The device must have audio
Bluetooth
®Wireless Technology capa-
bility (such as for stereo headphone
Bluetooth
®Wireless Technology). The
device can play, but it will not be con-
trolled by the audio system.
CAUTION IN USING THE
iPod DEVICE
• The HYUNDAI iPod Power Cable
is needed in order to operate iPod
with the audio buttons on the
audio system. The USB cable pro-
vided by Apple may cause mal-
function and should not be used
for HYUNDAI vehicles.
❋The HYUNDAI iPod Power
Cable may be purchased
through your HYUNDAI
Dealership.
Page 190 of 332

55
Driving your vehicle
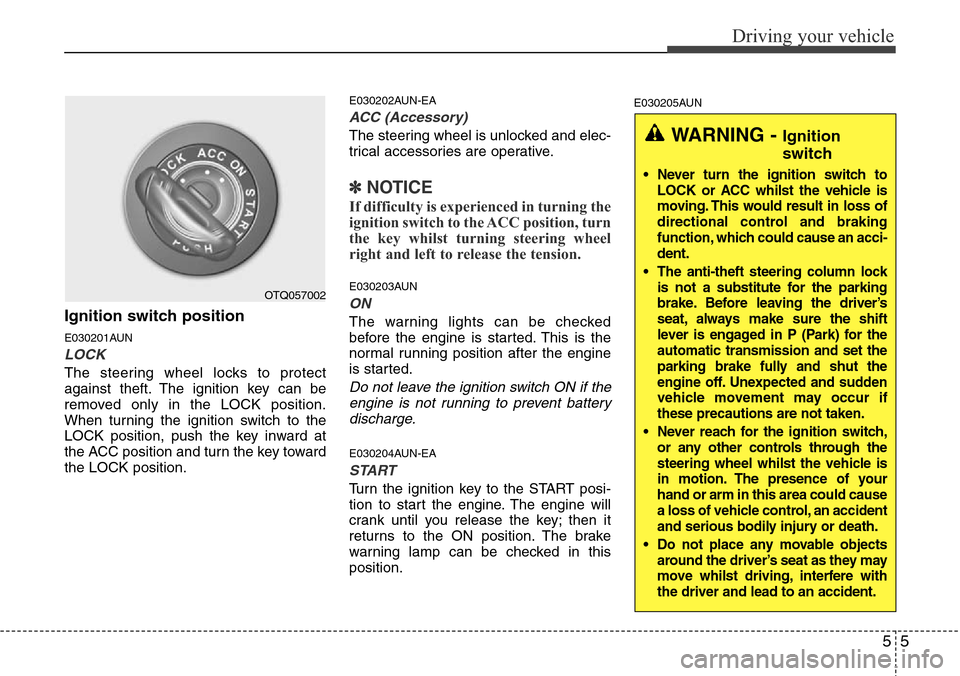
Ignition switch position
E030201AUN
LOCK
The steering wheel locks to protect
against theft. The ignition key can be
removed only in the LOCK position.
When turning the ignition switch to the
LOCK position, push the key inward at
the ACC position and turn the key toward
the LOCK position.
E030202AUN-EA
ACC (Accessory)
The steering wheel is unlocked and elec-
trical accessories are operative.
✽NOTICE
If difficulty is experienced in turning the
ignition switch to the ACC position, turn
the key whilst turning steering wheel
right and left to release the tension.
E030203AUN
ON
The warning lights can be checked
before the engine is started. This is the
normal running position after the engine
is started.
Do not leave the ignition switch ON if the
engine is not running to prevent battery
discharge.
E030204AUN-EA
START
Turn the ignition key to the START posi-
tion to start the engine. The engine will
crank until you release the key; then it
returns to the ON position. The brake
warning lamp can be checked in this
position.
E030205AUN
WARNING - Ignition
switch
• Never turn the ignition switch to
LOCK or ACC whilst the vehicle is
moving. This would result in loss of
directional control and braking
function, which could cause an acci-
dent.
• The anti-theft steering column lock
is not a substitute for the parking
brake. Before leaving the driver’s
seat, always make sure the shift
lever is engaged in P (Park) for the
automatic transmission and set the
parking brake fully and shut the
engine off. Unexpected and sudden
vehicle movement may occur if
these precautions are not taken.
• Never reach for the ignition switch,
or any other controls through the
steering wheel whilst the vehicle is
in motion. The presence of your
hand or arm in this area could cause
a loss of vehicle control, an accident
and serious bodily injury or death.
• Do not place any movable objects
around the driver’s seat as they may
move whilst driving, interfere with
the driver and lead to an accident
.
OTQ057002
Page 197 of 332

Driving your vehicle
12 5
E060100BTQ-EA
Automatic transmission operation
The automatic transmission has 5 (or 4)
forward speeds and one reverse speed.
The individual speeds are selected auto-
matically, depending on the position of
the shift lever.
✽NOTICE
The first few shifts on a new vehicle, or
if the battery has been disconnected,
may be somewhat abrupt. This is a nor-
mal condition, and the shifting sequence
will adjust after shifts are cycled a few
times by the TCM (Transmission
Control Module) or PCM (Powertrain
Control Module).
For smooth operation, depress the brake
pedal when shifting from N (Neutral) to a
forward or reverse gear.
WARNING- Automatic
transmission
• Always check the surrounding
areas near your vehicle for peo-
ple, especially children, before
shifting a car into D (Drive) or R
(Reverse).
• Before leaving the driver’s seat,
always make sure the shift lever
is in the P (Park) position; then
set the parking brake fully and
shut the engine off. Unexpected
and sudden vehicle movement
can occur if these precautions
are not followed in the order iden-
tified.
• Do not use the engine brake
(shifting from a high gear to
lower gear) rapidly on slippery
roads. The vehicle may slip caus-
ing an accident.
CAUTION
• To avoid damage to your trans-
mission, do not accelerate the
engine in R (Reverse) or any for-
ward gear position with the
brakes on.
• When stopped on an incline, do
not hold the vehicle stationary
with engine power. Use the serv-
ice brake or the parking brake.
• Do not shift from N (Neutral) or P
(Park) into D (Drive), or R
(Reverse) when the engine is
above idle speed.