Page 16 of 717
Your vehicle at a glance
4 2
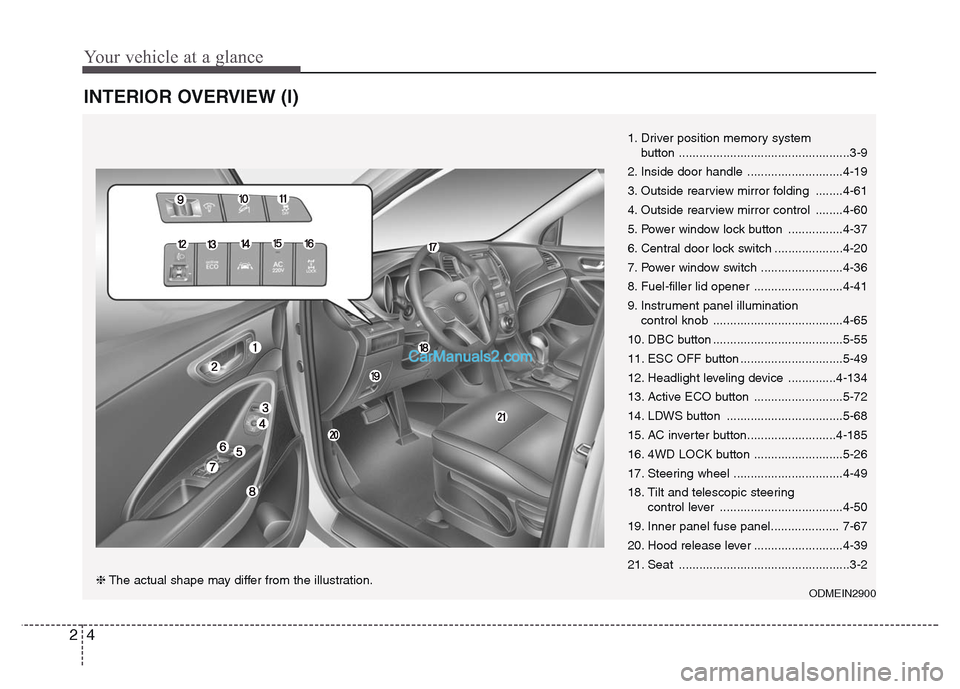
INTERIOR OVERVIEW (I)
1. Driver position memory system
button ..................................................3-9
2. Inside door handle ............................4-19
3. Outside rearview mirror folding ........4-61
4. Outside rearview mirror control ........4-60
5. Power window lock button ................4-37
6. Central door lock switch ....................4-20
7. Power window switch ........................4-36
8. Fuel-filler lid opener ..........................4-41
9. Instrument panel illumination
control knob ......................................4-65
10. DBC button ......................................5-55
11. ESC OFF button ..............................5-49
12. Headlight leveling device ..............4-134
13. Active ECO button ..........................5-72
14. LDWS button ..................................5-68
15. AC inverter button..........................4-185
16. 4WD LOCK button ..........................5-26
17. Steering wheel ................................4-49
18. Tilt and telescopic steering
control lever ....................................4-50
19. Inner panel fuse panel.................... 7-67
20. Hood release lever ..........................4-39
21. Seat ..................................................3-2
ODMEIN2900❈The actual shape may differ from the illustration.
Page 19 of 717
27
Your vehicle at a glance
ENGINE COMPARTMENT
1. Engine coolant reservoir....................7-35
2. Engine oil filler cap ............................7-33
3. Brake fluid reservoir ..........................7-37
4. Air cleaner ........................................7-41
5. Fuse box ............................................7-65
6. Negative battery terminal ..................7-48
7. Positive battery terminal ....................7-48
8. Radiator cap ......................................7-36
9. Engine oil dipstick..............................7-32
10. Windshield washer fluid reservoir....7-38
11. Fuel filter..........................................7-40
ONCEMC3212/ODM012005
■Diesel Engine (R2.2)
❈The actual engine room in the vehicle may differ from the illustration.
■■Gasoline Engine (Lambda II 3.3L) - MPI
Page 81 of 717

Safety features of your vehicle
62 3
Driver's and passenger's front
air bag (if equipped)
Your vehicle is equipped with a
Supplemental Restraint (Air Bag)
System and lap/shoulder belts at
both the driver and passenger seat-
ing positions.The indications of the system's pres-
ence are the letters "AIR BAG"
embossed on the air bag pad cover
in the steering wheel and/or on the
cover of the driver’s side knee bolster
located below the steering wheel and
the passenger's side front panel pad
above the glove box.
The SRS consists of air bags
installed under the pad covers in the
center of the steering wheel, in the
knee bolster below the steering
wheel column and the passenger's
side front panel above the glove box.
(Continued)
• The SRS can function only
when the ignition key is in the
"ON" position. If the SRS air
bag warning light blinks or
does not illuminate, or contin-
uously remains on after illu-
minating for about 6 seconds
when the ignition key is
turned to the ON position, or
after the engine is started,
comes on while driving, the
SRS is not working properly.
If this occurs, we recommend
that the system be inspected
by an authorized HYUNDAI
dealer.
• Before you replace a fuse or
disconnect a battery terminal,
turn the ignition switch to the
LOCK position and remove
the ignition key. Never remove
or replace the air bag related
fuse(s) when the ignition
switch is in the ON position.
Failure to heed this warning
will cause the SRS air bag
warning light to illuminate.
ODM032040
ODM032041
■Driver’s front air bag
■Driver’s knee air bag
Page 126 of 717
429
Features of your vehicle
How to reset the power tailgate
If the battery has been discharged or
disconnected, or if the related fuse has
been replaced or disconnected, for the
power tailgate to operate normally,
reset the power tailgate as follow:
1. Put the shift lever in P (Park).
2. While pressing the tailgate close
button, press the tailgate handle
switch for more than 3 seconds.
(the chime will sound)
3. Close the tailgate manually.
If the power tailgate does not work
properly after the above procedure,
we recommend that the system be
checked by an authorized HYUNDAI
dealer.
✽NOTICE
If the power tailgate does not oper-
ate normally, first check the follow-
ing condition before using the power
tailgate.
Check if the shift lever is in P (Park)
for automatic transaxle vehicles.
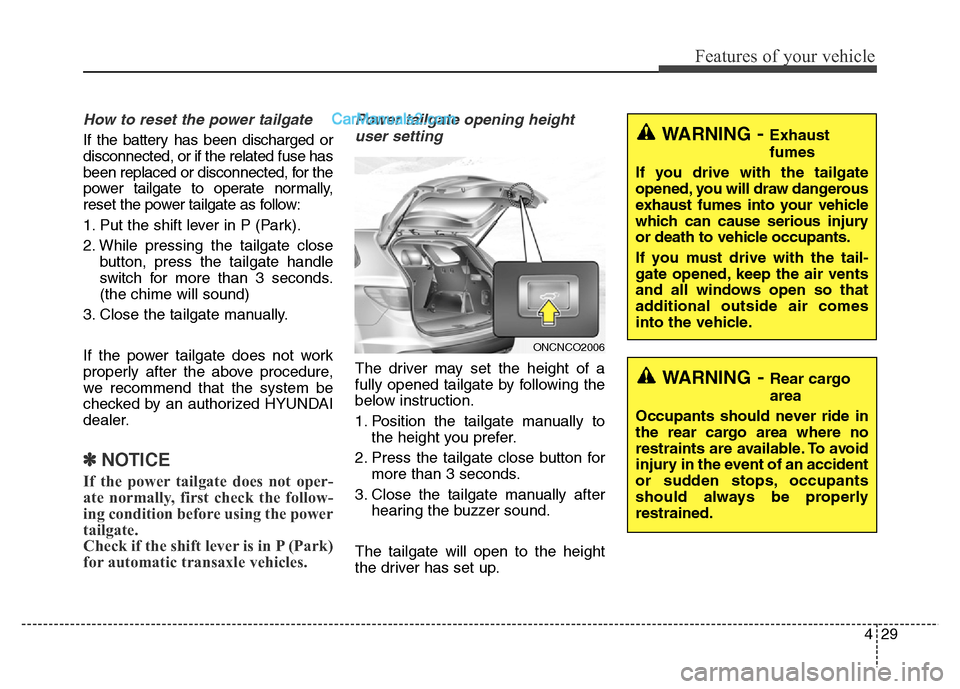
Power tailgate opening height
user setting
The driver may set the height of a
fully opened tailgate by following the
below instruction.
1. Position the tailgate manually to
the height you prefer.
2. Press the tailgate close button for
more than 3 seconds.
3. Close the tailgate manually after
hearing the buzzer sound.
The tailgate will open to the height
the driver has set up.
ONCNCO2006
WARNING- Exhaust
fumes
If you drive with the tailgate
opened, you will draw dangerous
exhaust fumes into your vehicle
which can cause serious injury
or death to vehicle occupants.
If you must drive with the tail-
gate opened, keep the air vents
and all windows open so that
additional outside air comes
into the vehicle.
WARNING- Rear cargo
area
Occupants should never ride in
the rear cargo area where no
restraints are available. To avoid
injury in the event of an accident
or sudden stops, occupants
should always be properly
restrained.
Page 135 of 717
Features of your vehicle
38 4
WARNING - Windows
• NEVER leave the keys in your
vehicle with unsupervised
children, when the engine is
running.
• NEVER leave any child unat-
tended in the vehicle. Even
very young children may inad-
vertently cause the vehicle to
move, entangle themselves in
the windows, or otherwise
injure themselves or others.
• Always double check to make
sure all arms, hands, head
and other obstructions are
safely out of the way before
closing a window.
• Do not allow children to play
with the power windows. Keep
the driver’s door power win-
dow lock switch in the LOCK
position (pressed). Serious
injury can result from uninten-
tional window operation by
the child.
• Do not extend face or arms
outside the window while
driving.CAUTION
• To prevent possible damage
to the power window system,
do not open or close two win-
dows or more at the same
time. This will also ensure the
longevity of the fuse.
• Never try to operate the main
switch on the driver's door
and the individual door win-
dow switch in opposing direc-
tions at the same time. If this
is done, the window will stop
and cannot be opened or
closed.
Page 145 of 717
Features of your vehicle
48 4
Resetting the sunroof
Sunroof needs to be reset if (in the
followings)
- Battery is discharged or disconnect-
ed or the related fuse has been
replaced or disconnected.
- The one-touch sliding function of the
sunroof does not normally operate.
1.Turn the ignition switch to the ON
position.
2.Close the sunshade and sunroof
completely if opened.
3.Release the sunroof control lever.
4.Push the sunroof control lever for-
ward in the direction of close
(about 10 seconds) until the sun-
roof moves a little. Then, release
the lever.5.Push the sunroof control lever for-
ward in the direction of close, until
the sunroof operates as follows
again:
The sunshade and sunroof glass
slide open →The sunroof glass
slide close →The sunshade close
Then, release the lever.
When this is complete, the sunroof
system has been reset.
✽NOTICE
If you do not reset the sunroof, it
may not work properly.
CAUTION
• Periodically remove any dirt
that may accumulate on the
guide rail.
• If you try to open the sunroof
when the temperature is
below freezing or when the
sunroof is covered with snow
or ice, the glass or the motor
could be damaged.
Page 171 of 717
Features of your vehicle
74 4
Service in OFF
If the service interval is not set,
“Service in OFF” message is dis-
played on the LCD display.
✽NOTICE
If any of the following conditions
occurs, the mileage and days may be
incorrect.
- The battery cable is disconnected.
- The fuse switch is turned off.
- The battery is discharged.
User Settings Mode
Description
On this mode, you can change set-
ting of the doors, lamps, and so on.
Door
Auto Door Lock (if equipped)
• Off:
The auto door lock operation will
be deactivated.
• Speed:
All doors will be automatically
locked when the vehicle speed
exceeds 15km/h (9.3mph).
• Shift Lever:
All doors will be automatically
locked if the automatic transaxle
shift lever is shifted from the P
(Park) position to the R (Reverse),
N (Neutral), or D (Drive) position.
ODMEDI2068/ODMEDI2072 ■Type A
■Type B
ODMEDI2025/ODMEDI2054 ■Type A
■Type B
Page 178 of 717
481
Features of your vehicle
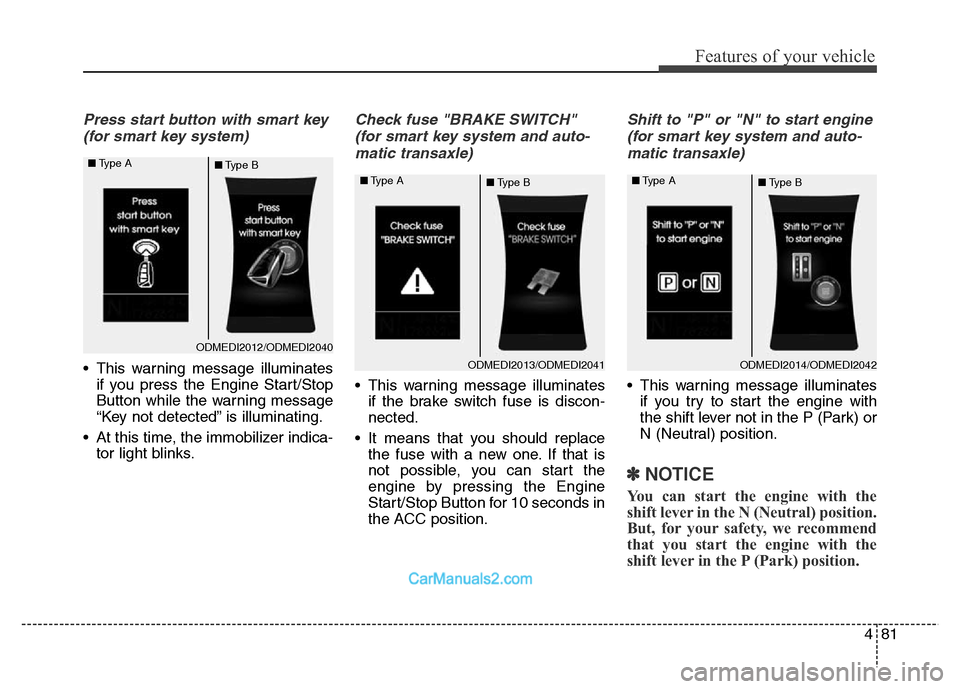
Press start button with smart key
(for smart key system)
• This warning message illuminates
if you press the Engine Start/Stop
Button while the warning message
“Key not detected” is illuminating.
• At this time, the immobilizer indica-
tor light blinks.
Check fuse "BRAKE SWITCH"
(for smart key system and auto-
matic transaxle)
• This warning message illuminates
if the brake switch fuse is discon-
nected.
• It means that you should replace
the fuse with a new one. If that is
not possible, you can start the
engine by pressing the Engine
Start/Stop Button for 10 seconds in
the ACC position.
Shift to "P" or "N" to start engine
(for smart key system and auto-
matic transaxle)
• This warning message illuminates
if you try to start the engine with
the shift lever not in the P (Park) or
N (Neutral) position.
✽NOTICE
You can start the engine with the
shift lever in the N (Neutral) position.
But, for your safety, we recommend
that you start the engine with the
shift lever in the P (Park) position.
ODMEDI2012/ODMEDI2040 ■Type A
■Type B
ODMEDI2013/ODMEDI2041 ■Type A
■Type BODMEDI2014/ODMEDI2042 ■Type A
■Type B