Page 235 of 717
Features of your vehicle
138 4
Windshield washers
(if equipped)
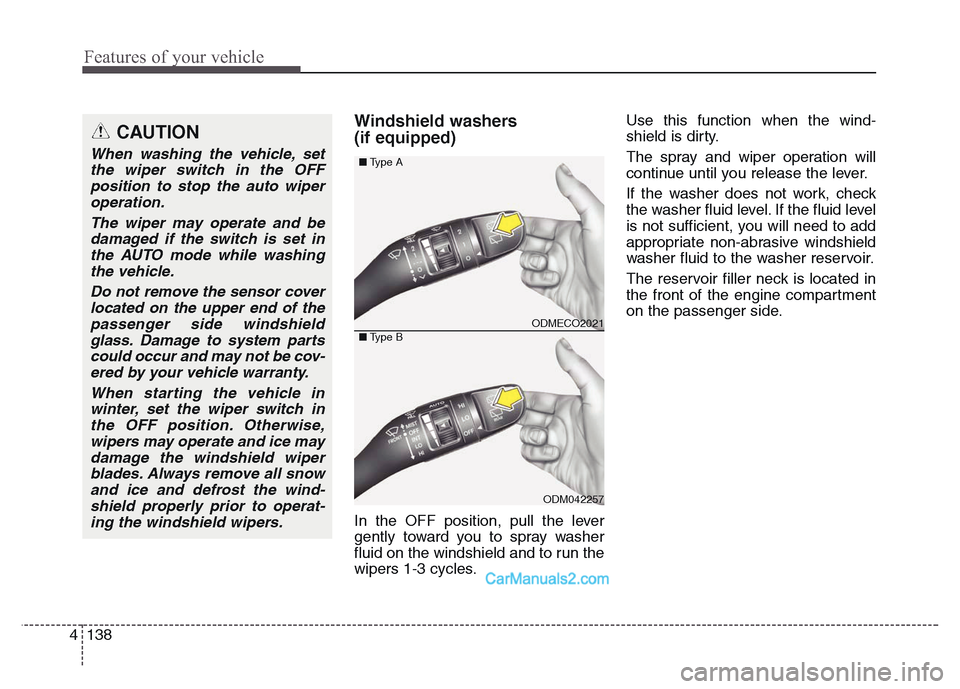
In the OFF position, pull the lever
gently toward you to spray washer
fluid on the windshield and to run the
wipers 1-3 cycles.Use this function when the wind-
shield is dirty.
The spray and wiper operation will
continue until you release the lever.
If the washer does not work, check
the washer fluid level. If the fluid level
is not sufficient, you will need to add
appropriate non-abrasive windshield
washer fluid to the washer reservoir.
The reservoir filler neck is located in
the front of the engine compartment
on the passenger side.
CAUTION
When washing the vehicle, set
the wiper switch in the OFF
position to stop the auto wiper
operation.
The wiper may operate and be
damaged if the switch is set in
the AUTO mode while washing
the vehicle.
Do not remove the sensor cover
located on the upper end of the
passenger side windshield
glass. Damage to system parts
could occur and may not be cov-
ered by your vehicle warranty.
When starting the vehicle in
winter, set the wiper switch in
the OFF position. Otherwise,
wipers may operate and ice may
damage the windshield wiper
blades. Always remove all snow
and ice and defrost the wind-
shield properly prior to operat-
ing the windshield wipers.
ODMECO2021
ODM042257 ■Type A
■Type B
Page 236 of 717
4 139
Features of your vehicle
Headlight washer (if equipped)
If your vehicle is equipped with the
headlight washer it will operate at the
same time when you operate the
windshield washer. It will operate
when the headlight low beam is
turned on and the ignition switch or
engine start/stop button is in the ON
position.
The washer fluid will be sprayed on
to the headlights.
✽NOTICE
• Check the headlight washers peri-
odically to confirm that the wash-
er fluid is being sprayed properly
onto the headlight lenses.
• The headlight washer can be oper-
ated 15 minutes after being oper-
ated last time.
CAUTION
• To prevent possible damage
to the wipers or windshield,
do not operate the wipers
when the windshield is dry.
• To prevent damage to the wiper
blades, do not use gasoline,
kerosene, paint thinner, or
other solvents on or near them.
• To prevent damage to the
wiper arms and other compo-
nents, do not attempt to move
the wipers manually.
CAUTION
To prevent possible damage to
the washer pump, do not oper-
ate the washer when the fluid
reservoir is empty.
WARNING
Do not use the washer in freez-
ing temperatures without first
warming the windshield with
the defrosters; the washer solu-
tion could freeze on the wind-
shield and obscure your vision.
Page 238 of 717
4 141
Features of your vehicle
Interior lamp AUTO cut
• When all entrances are closed, if
you lock the vehicle by using the
transmitter or the smart key, all
interior lamp will be off within 5
seconds.
• If you do not operate anything in
the vehicle after turning off the
engine, the lights will turn off after
20 minutes.
Map lamp
INTERIOR LIGHT
CAUTION
Do not use the interior lights for
extended periods when the
engine is not running.
It may cause battery discharge.
WARNING
Do not use the interior lights
when driving in the dark.
Accidents could happen
because the view may be
obscured by interior lights.ODM042258
ODM042259
■Type A
■Type B
ONCDCO3048
■Type C
Page 243 of 717
Features of your vehicle
146 4
DEFROSTER
✽NOTICE
If you want to defrost and defog the
front windshield, refer to
“Windshield Defrosting and
Defogging” in this section.
Rear window defroster
The defroster heats the window to
remove frost, fog and thin ice from
the interior and exterior of the rear
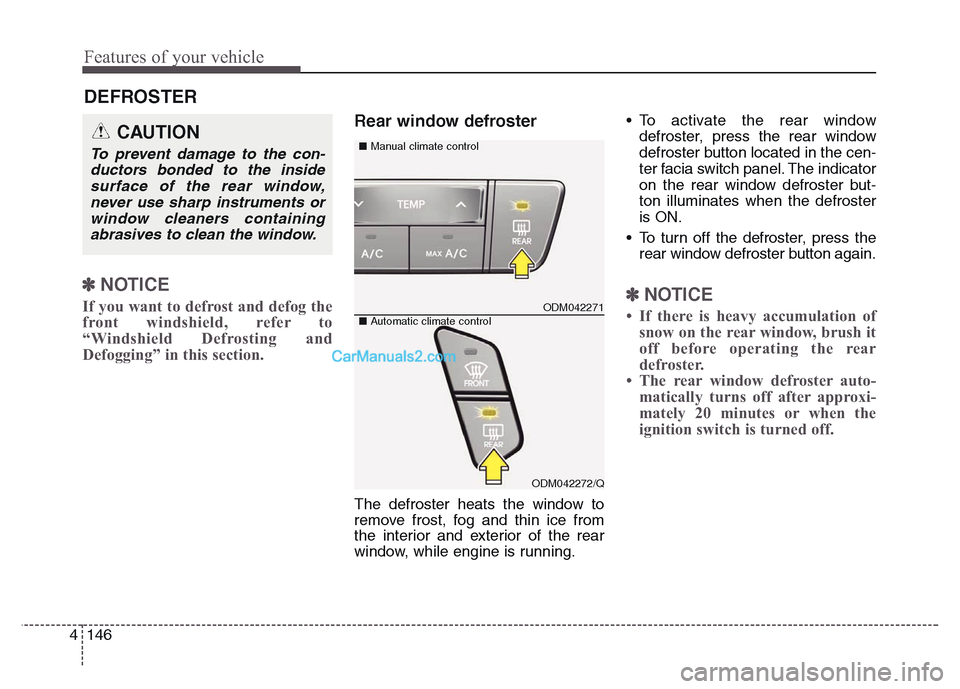
window, while engine is running.• To activate the rear window
defroster, press the rear window
defroster button located in the cen-
ter facia switch panel. The indicator
on the rear window defroster but-
ton illuminates when the defroster
is ON.
• To turn off the defroster, press the
rear window defroster button again.
✽NOTICE
• If there is heavy accumulation of
snow on the rear window, brush it
off before operating the rear
defroster.
• The rear window defroster auto-
matically turns off after approxi-
mately 20 minutes or when the
ignition switch is turned off.
CAUTION
To prevent damage to the con-
ductors bonded to the inside
surface of the rear window,
never use sharp instruments or
window cleaners containing
abrasives to clean the window.
ODM042271
■Manual climate control
ODM042272/Q ■Automatic climate control
Page 246 of 717
4 149
Features of your vehicle
Heating and air conditioning
1.Start the engine.
2.Set the mode to the desired posi-
tion.
For improving the effectiveness of
heating and cooling;
- Heating:
- Cooling:
3.Set the temperature control to the
desired position.
4.Set the air intake control to the out-
side (fresh) air position.
5.Set the fan speed control to the
desired speed.
6.If air conditioning is desired, turn
the air conditioning system (if
equipped) on.
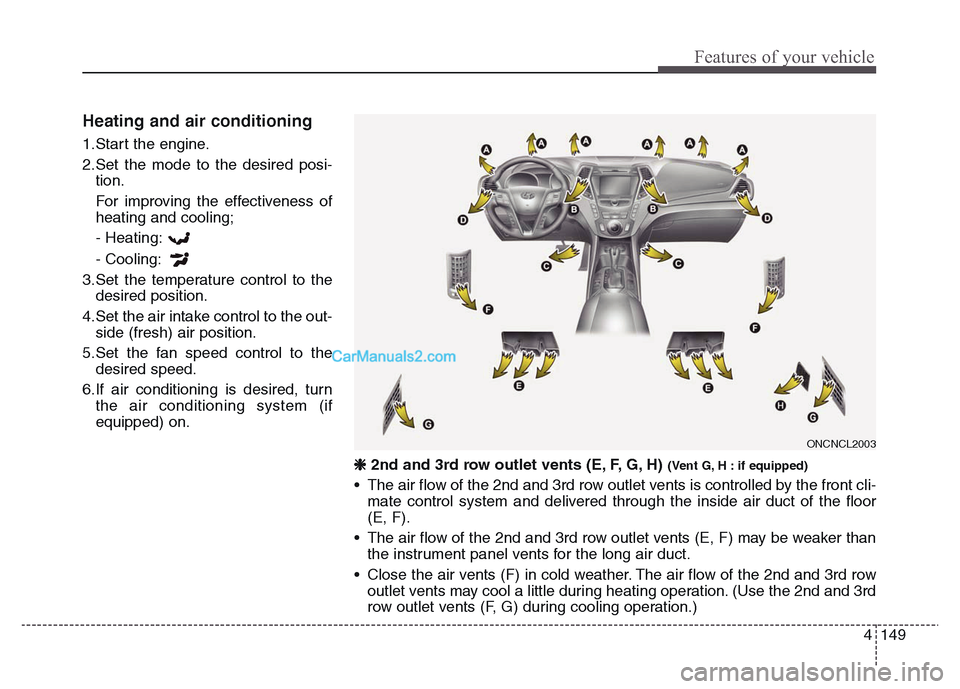
ONCNCL2003
❈ 2nd and 3rd row outlet vents (E, F, G, H) (Vent G, H : if equipped)
• The air flow of the 2nd and 3rd row outlet vents is controlled by the front cli-
mate control system and delivered through the inside air duct of the floor
(E, F).
• The air flow of the 2nd and 3rd row outlet vents (E, F) may be weaker than
the instrument panel vents for the long air duct.
• Close the air vents (F) in cold weather. The air flow of the 2nd and 3rd row
outlet vents may cool a little during heating operation. (Use the 2nd and 3rd
row outlet vents (F, G) during cooling operation.)
Page 253 of 717
Features of your vehicle
156 4
Air conditioning (if equipped)
HYUNDAI Air Conditioning Systems
are filled with environmentally friend-
ly refrigerant*.
1. Start the engine. Push the air con-
ditioning button.
2. Set the mode to the position.
3. Set the air intake control to the out-
side air or recirculated air position.
4. Adjust the fan speed control and
temperature control to maintain
maximum comfort.
*: Your vehicle is filled with R-134a or
R-1234yf according to the regula-
tion in your country at the time of
producing. You can find out which
air conditioning refrigerant is
applied your vehicle at the label
inside of the engine room. Refer to
section 8 for more detail location of
air conditioning refrigerant label.
✽NOTICE
• When using the air conditioning
system, monitor the temperature
gauge closely while driving up
hills or in heavy traffic when out-
side temperatures are high. Air
conditioning system operation
may cause engine overheating.
Continue to use the blower fan but
turn the air conditioning system
off if the temperature gauge indi-
cates engine overheating.
• When opening the windows in
humid weather air conditioning
may create water droplets inside
the vehicle. Since excessive water
droplets may cause damage to
electrical equipment, air condi-
tioning should only be used with
the windows closed.CAUTION
• The refrigerant system should
only be serviced by trained and
certified technicians to insure
proper and safe operation.
• The refrigerant system should
be serviced in a well-ventilat-
ed place.
• The air conditioning evaporator
(cooling coil) shall never be
repaired or replaced with one
removed from a used or sal-
vaged vehicle and new replace-
ment MAC evaporators shall be
certified (and labeled) as meet-
ing SAE Standard J2842.
Page 254 of 717
4 157
Features of your vehicle
Air conditioning system operation tips
• If the vehicle has been parked in
direct sunlight during hot weather,
open the windows for a short time
to let the hot air inside the vehicle
escape.
• Use air conditioning to reduce
humidity and moisture inside the
vehicle on rainy or humid days.
• During air conditioning system
operation, you may occasionally
notice a slight change in engine
speed as the air conditioning com-
pressor cycles. This is a normal
system operation characteristic.
• Use the air conditioning system
every month only for a few minutes
to ensure maximum system per-
formance.• When using the air conditioning
system, you may notice clear water
dripping (or even puddling) on the
ground under the passenger side
of the vehicle. This is a normal sys-
tem operation characteristic.
• Operating the air conditioning sys-
tem in the recirculated air position
provides maximum cooling, how-
ever, continual operation in this
mode may cause the air inside the
vehicle to become stale.
• During cooling operation, you may
occasionally notice a misty air flow
because of rapid cooling and
humid air intake. This is a normal
system operation characteristic.Climate control air filter
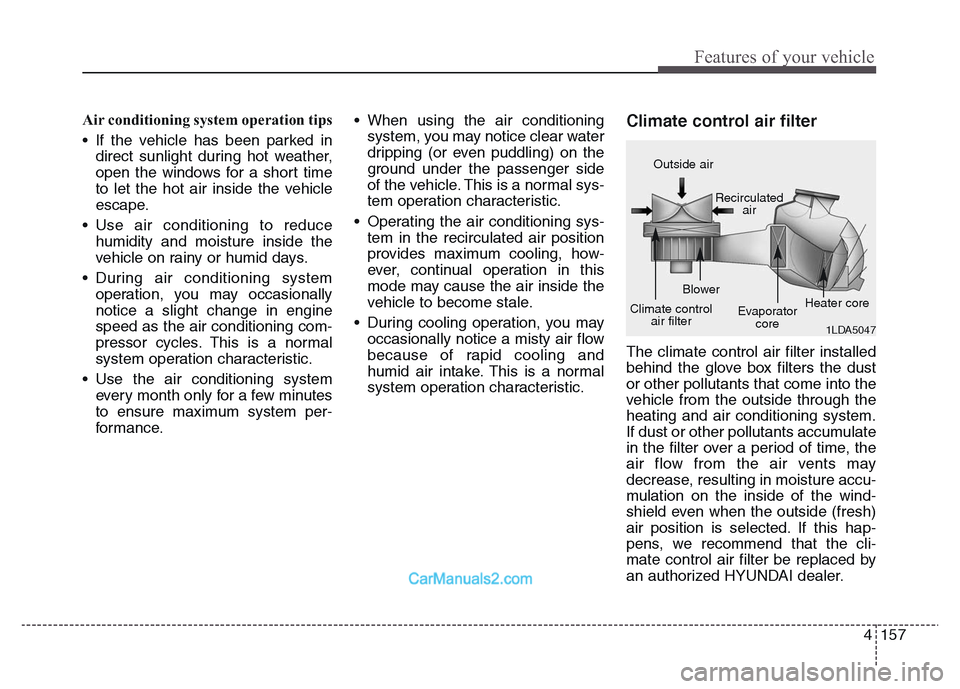
The climate control air filter installed
behind the glove box filters the dust
or other pollutants that come into the
vehicle from the outside through the
heating and air conditioning system.
If dust or other pollutants accumulate
in the filter over a period of time, the
air flow from the air vents may
decrease, resulting in moisture accu-
mulation on the inside of the wind-
shield even when the outside (fresh)
air position is selected. If this hap-
pens, we recommend that the cli-
mate control air filter be replaced by
an authorized HYUNDAI dealer.
1LDA5047
Outside air
Recirculated
air
Climate control
air filterBlower
Evaporator
coreHeater core
Page 259 of 717
Features of your vehicle
162 4
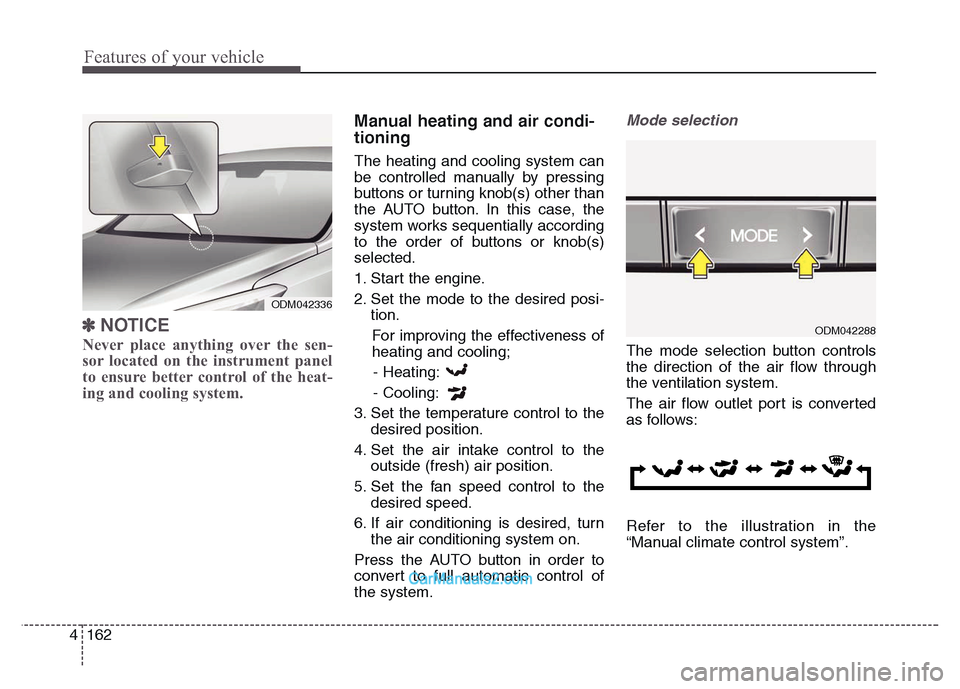
✽NOTICE
Never place anything over the sen-
sor located on the instrument panel
to ensure better control of the heat-
ing and cooling system.
Manual heating and air condi-
tioning
The heating and cooling system can
be controlled manually by pressing
buttons or turning knob(s) other than
the AUTO button. In this case, the
system works sequentially according
to the order of buttons or knob(s)
selected.
1. Start the engine.
2. Set the mode to the desired posi-
tion.
For improving the effectiveness of
heating and cooling;
- Heating:
- Cooling:
3. Set the temperature control to the
desired position.
4. Set the air intake control to the
outside (fresh) air position.
5. Set the fan speed control to the
desired speed.
6. If air conditioning is desired, turn
the air conditioning system on.
Press the AUTO button in order to
convert to full automatic control of
the system.
Mode selection
The mode selection button controls
the direction of the air flow through
the ventilation system.
The air flow outlet port is converted
as follows:
Refer to the illustration in the
“Manual climate control system”.
ODM042336
ODM042288