Page 10 of 22

INSTRUMENT CLUSTER
Quick Reference Guide I 17
16 I Quick Reference Guide
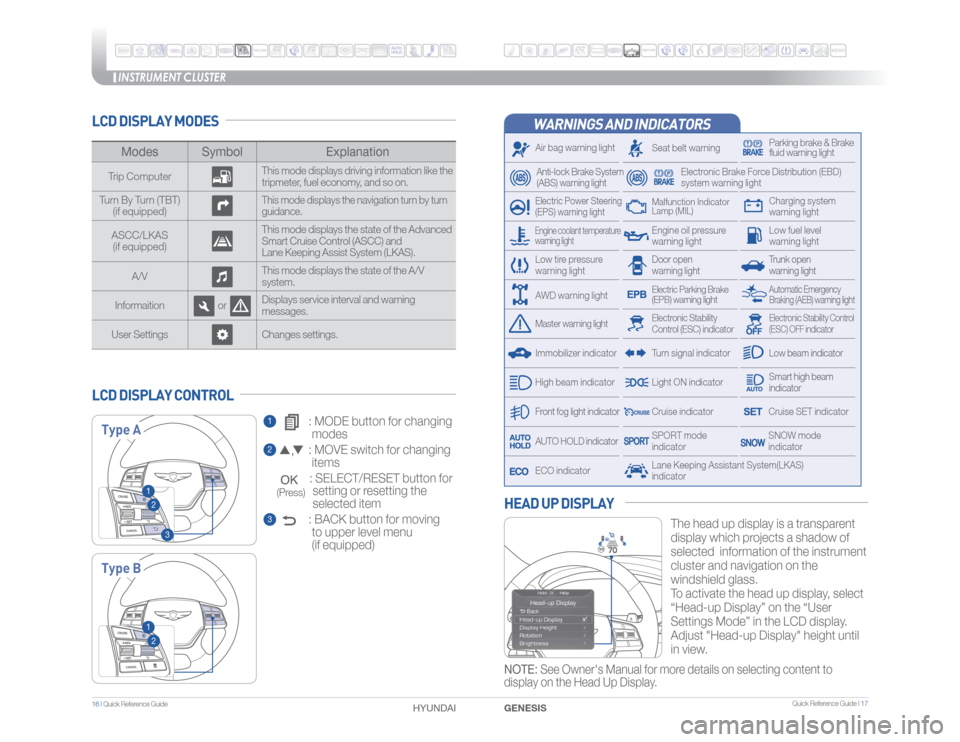
WARNINGS AND INDICATORSAir bag warning lightElectric Power Steering
(EPS) warning light
Seat belt warning
Parking brake & Brake
fluid warning light
Electronic Brake Force Distribution (EBD)
system warning light
Low tire pressure
warning light
Trunk open
warning lightLow fuel level
warning light
Front fog light indicator
Low beam indicatorSmart high beam
indicatorSNOW mode
indicator
Light ON indicator
ECO indicator
SPORT mode
indicator
Anti-lock Brake System
(ABS) warning lightHigh beam indicator
Door open
warning lightElectronic Stability
Control (ESC) indicator
Master warning light
Automatic Emergency
Braking (AEB) warning light
Electric Parking Brake
(EPB) warning lightEngine oil pressure
warning light
Charging system
warning light
Immobilizer indicator
Malfunction Indicator
Lamp (MIL)
Electronic Stability Control
(ESC) OFF indicator
Cruise indicatorLane Keeping Assistant System(LKAS)
indicator
Cruise SET indicator
AUTO HOLD indicator
Turn signal indicator
LCD DISPLAY MODES
The head up display is a transparent
display which projects a shadow of
selected information of the instrument
cluster and navigation on the
windshield glass.
To activate the head up display, select
“Head-up Display” on the “User
Settings Mode” in the LCD display.
Adjust "Head-up Display" height until
in view.
HEAD UP DISPLAY
1 : MODE button for changing
modes2 : MOVE switch for changing
items
: SELECT/RESET button for
setting or resetting the
selected item3 : BACK button for moving
to upper level menu
(if equipped)
LCD DISPLAY CONTROL
Modes Symbol Explanation
Trip ComputerThis mode displays driving information like the
tripmeter, fuel economy, and so on.
Turn By Turn (TBT)
(if equipped)
This mode displays the navigation turn by turn
guidance.
ASCC/LKAS
(if equipped)This mode displays the state of the Advanced
Smart Cruise Control (ASCC) and
Lane Keeping Assist System (LKAS).
A/VThis mode displays the state of the A/V
system.
Informaition orDisplays service interval and warning
messages.
User Settings Changes settings.Type AType B
12
3
12
Engine coolant temperature
warning lightAWD warning light
GENESIS HYUNDAI NOTE: See Owner's Manual for more details on selecting content to
display on the Head Up Display.
(Press)
Page 15 of 22

MULTIMEDIA
26 I Quick Reference Guide
HYUNDAI
Quick Reference Guide I 27
GENESISAUX, USB AND iPod PORT
Use the input jack to connect an
external audio device and listen to it
through the audio system in your
vehicle.
NOTE: To operate your iPod
® through the vehicle's audio system,
connect your Apple supplied USB cable to the USB port
iPod
®
is a trademark of Apple Inc.
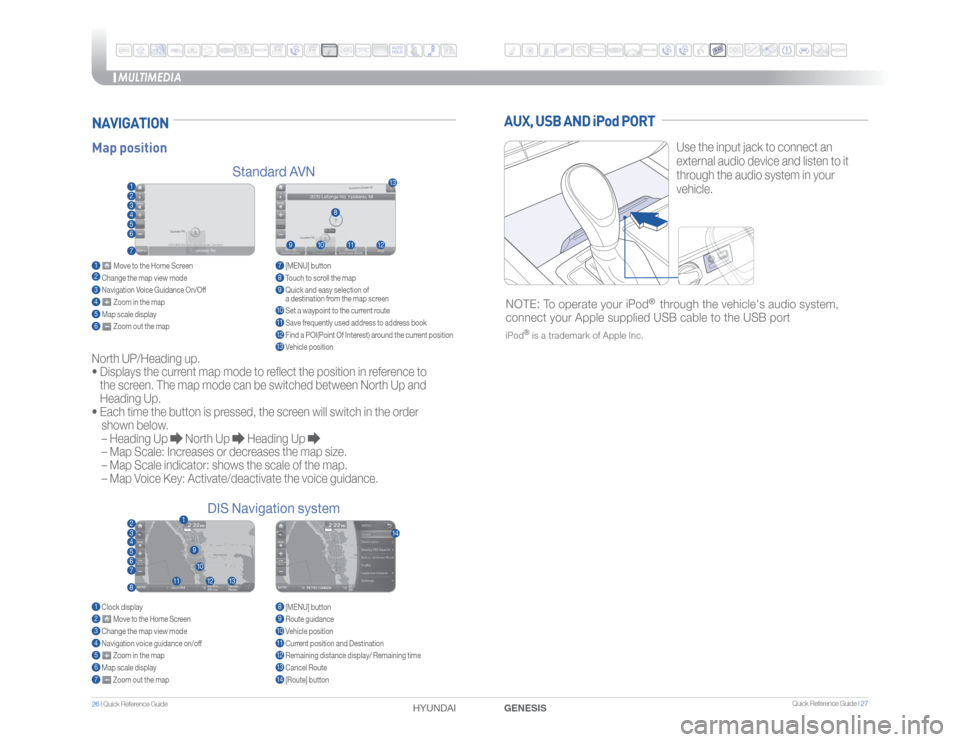
Map position
Standard AVN
DIS Navigation systemNAVIGATIONNorth UP/Heading up.
�t
Displays the current map mode to reflect the position in reference to
the screen. The map mode can be switched between North Up and
Heading Up.
�t
Each time the button is pressed, the screen will switch in the order
shown below.
– Heading Up
North Up
Heading Up
– Map Scale: Increases or decreases the map size.
– Map Scale indicator: shows the scale of the map.
– Map Voice Key: Activate/deactivate the voice guidance.
1 Move to the Home Screen2 Change the map view mode3 Navigation Voice Guidance On/Off4 Zoom in the map5 Map scale display6 Zoom out the map1 Clock display2 Move to the Home Screen3 Change the map view mode4 Navigation voice guidance on/off5
Zoom in the map
6 Map scale display7
Zoom out the map
7 [MENU] button 8 Touch to scroll the map9 Quick and easy selection of
a destination from the map screen10 Set a waypoint to the current route11 Save frequently used address to address book12 Find a POI(Point Of Interest) around the current position13 Vehicle position8 [MENU] button9 Route guidance10 Vehicle position11 Current position and Destination12 Remaining distance display/ Remaining time13 Cancel Route14 [Route] button
12
1
345678
11
12
9
13
10
14
8
9
10
11
1213
234567
Page 16 of 22

Quick Reference Guide I 29
FEATURES AND CONTROLS
28 I Quick Reference Guide
GENESIS HYUNDAI
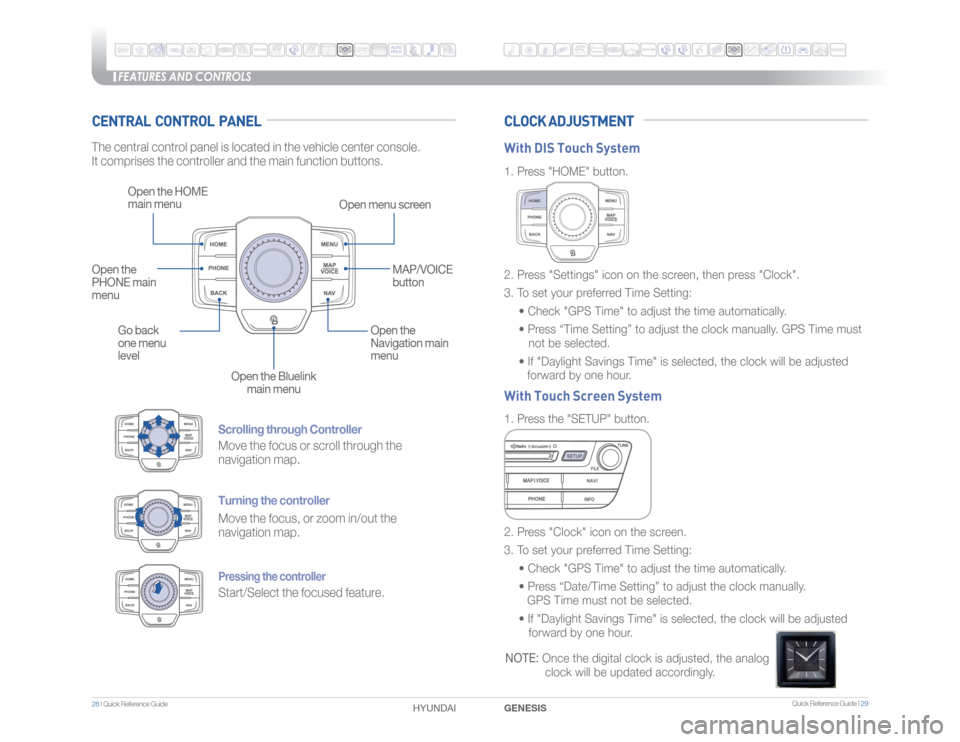
Scrolling through ControllerMove the focus or scroll through the
navigation map.Turning the controllerMove the focus, or zoom in/out the
navigation map.Pressing the controllerStart/Select the focused feature.
CENTRAL CONTROL PANEL CLOCK ADJUSTMENTThe central control panel is located in the vehicle center console.
It comprises the controller and the main function buttons.
Open the HOME
main menu
Open menu screen
Go back
one menu
levelOpen the
Navigation main
menu
Open the Bluelink
main menu Open the
PHONE main
menuMAP/VOICE
button
1. Press "HOME" button.
1. Press the "SETUP" button. 2. Press "Settings" icon on the screen, then press "Clock".
3. To set your preferred Time Setting:
�� �t���$�I�F�D�L�����(�1�4���5�J�N�F�����U�P���B�E�K�V�T�U���U�I�F���U�J�N�F���B�V�U�P�N�B�U�J�D�B�M�M�Z��
�� �t���1�S�F�T�T���i�5�J�N�F���4�F�U�U�J�O�H�w���U�P���B�E�K�V�T�U���U�I�F���D�M�P�D�L���N�B�O�V�B�M�M�Z�����(�1�4���5�J�N�F���N�V�T�U��
not be selected.
�� �t���*�G�����%�B�Z�M�J�H�I�U���4�B�W�J�O�H�T���5�J�N�F�����J�T���T�F�M�F�D�U�F�E�
���U�I�F���D�M�P�D�L���X�J�M�M���C�F���B�E�K�V�T�U�F�E��������
forward by one hour.
2. Press "Clock" icon on the screen.
3. To set your preferred Time Setting:
�� �t���$�I�F�D�L�����(�1�4���5�J�N�F�����U�P���B�E�K�V�T�U���U�I�F���U�J�N�F���B�V�U�P�N�B�U�J�D�B�M�M�Z��
�� �t���1�S�F�T�T���i�%�B�U�F���5�J�N�F���4�F�U�U�J�O�H�w���U�P���B�E�K�V�T�U���U�I�F���D�M�P�D�L���N�B�O�V�B�M�M�Z������
GPS Time must not be selected.
�� �t���*�G�����%�B�Z�M�J�H�I�U���4�B�W�J�O�H�T���5�J�N�F�����J�T���T�F�M�F�D�U�F�E�
���U�I�F���D�M�P�D�L���X�J�M�M���C�F���B�E�K�V�T�U�F�E����
forward by one hour. With DIS Touch System
With Touch Screen SystemNOTE:
Once the digital clock is adjusted, the analog
clock will be updated accordingly.