2016 Hyundai Genesis ESP
[x] Cancel search: ESPPage 444 of 502

7-38
Maintenance
Tyre speed ratings
The chart below lists many of the dif-
ferent speed ratings currently being
used for passenger car tyres. The
speed rating is part of the tyre size
designation on the sidewall of the
tyre. This symbol corresponds to that
tyre's designed maximum safe oper-
ating speed.
3. Checking tyre life
(TIN : Tyre Identification
Number)
Any tyres that are over 6 years old,
based on the manufacturing date,
tyre strength and performance,
decline with age naturally (even
unused spare tyres). Therefore, the
tyres (including the spare tyre)
should be replaced by new ones. You
can find the manufacturing date on
the tyre sidewall (possibly on the
inside of the wheel), displaying the
DOT Code. The DOT Code is a
series of numbers on a tyre consist-
ing of numbers and English letters.
The manufacturing date is designat-
ed by the last four digits (characters)
of the DOT code.
DOT : XXXX XXXX OOOO
The front part of the DOT means a
plant code number, tyre size and
tread pattern and the last four num-
bers indicate week and year manu-
factured.
For example:
DOT XXXX XXXX 1615 represents
that the tyre was produced in the
16th week of 2015.Tyre age
Tyres degrade over time, even
when they are not being used.
Regardless of the remaining
tread, it is recommended that
tyres generally be replaced
after six (6) years of normal
service. Heat caused by hot cli-
mates or frequent high loading
conditions can accelerate the
aging process. Failure to follow
this Warning can result in sud-
den tyre failure, which could
lead to a loss of control and an
accident involving serious injury
or death.
WARNING
Speed
Rating
SymbolMaximum Speed
S 112 mph (180 km/h)
T 118 mph (190 km/h)
H 130 mph (210 km/h)
V 149 mph (240 km/h)
Z Above 149 mph (240 km/h)
Page 445 of 502

7-39
7
Maintenance
4. Tyre ply composition and
material
The number of layers or plies of rub-
ber-coated fabric are in the tyre. Tyre
manufacturers also must indicate the
materials in the tyre, which include
steel, nylon, polyester, and others.
The letter "R" means radial ply con-
struction; the letter "D" means diago-
nal or bias ply construction; and the
letter "B" means belted-bias ply con-
struction.
5. Maximum permissible infla-
tion pressure
This number is the greatest amount
of air pressure that should be put in
the tyre. Do not exceed the maximum
permissible inflation pressure. Refer
to the Tyre and Loading Information
label for recommended inflation
pressure.
6. Maximum load rating
This number indicates the maximum
load in kilograms and pounds that
can be carried by the tyre. When
replacing the tyres on the vehicle,
always use a tyre that has the same
load rating as the factory installed
tyre.
7. Uniform tyre quality grading
Quality grades can be found where
applicable on the tyre sidewall
between tread shoulder and maxi-
mum section width.
For example:
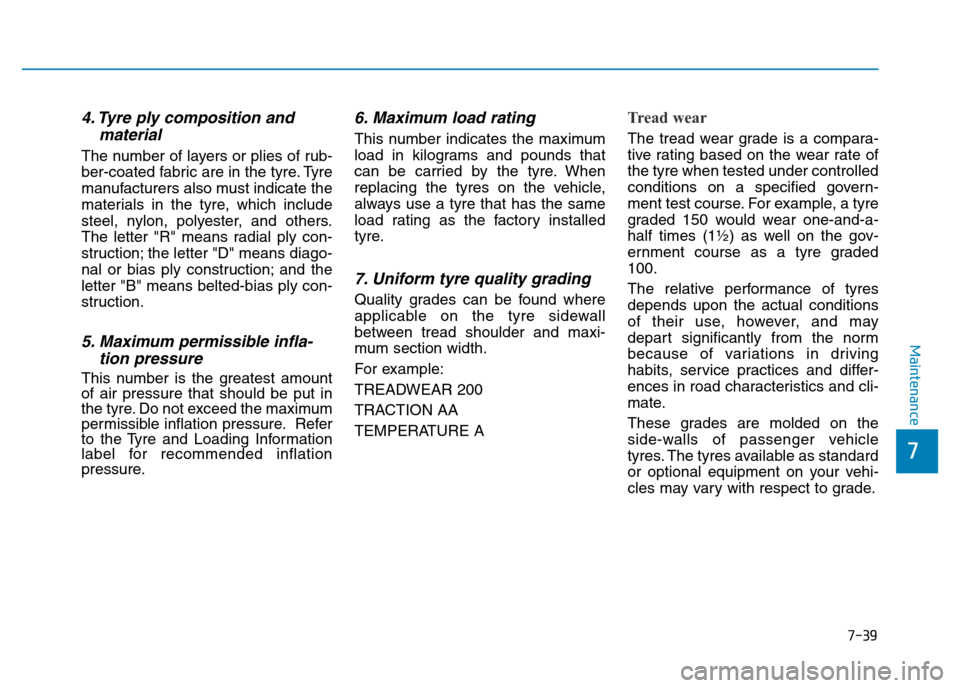
TREADWEAR 200
TRACTION AA
TEMPERATURE A
Tread wear
The tread wear grade is a compara-
tive rating based on the wear rate of
the tyre when tested under controlled
conditions on a specified govern-
ment test course. For example, a tyre
graded 150 would wear one-and-a-
half times (1½) as well on the gov-
ernment course as a tyre graded
100.
The relative performance of tyres
depends upon the actual conditions
of their use, however, and may
depart significantly from the norm
because of variations in driving
habits, service practices and differ-
ences in road characteristics and cli-
mate.
These grades are molded on the
side-walls of passenger vehicle
tyres. The tyres available as standard
or optional equipment on your vehi-
cles may vary with respect to grade.
Page 460 of 502

7-54
Maintenance
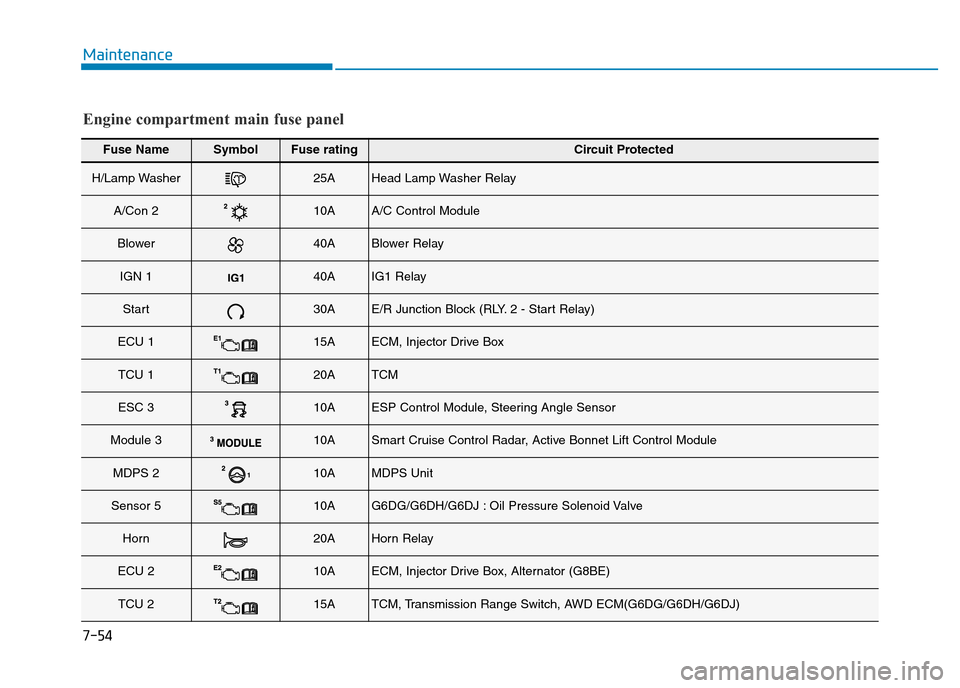
Fuse NameSymbolFuse ratingCircuit Protected
H/Lamp Washer25AHead Lamp Washer Relay
A/Con 210AA/C Control Module
Blower40ABlower Relay
IGN 140AIG1 Relay
Start30AE/R Junction Block (RLY. 2 - Start Relay)
ECU 115AECM, Injector Drive Box
TCU 120ATCM
ESC 310AESP Control Module, Steering Angle Sensor
Module 310ASmart Cruise Control Radar, Active Bonnet Lift Control Module
MDPS 210AMDPS Unit
Sensor 510AG6DG/G6DH/G6DJ : Oil Pressure Solenoid Valve
Horn20AHorn Relay
ECU 210AECM, Injector Drive Box, Alternator (G8BE)
TCU 215ATCM, Transmission Range Switch, AWD ECM(G6DG/G6DH/G6DJ)
Engine compartment main fuse panel
Page 461 of 502

7-55
7
Maintenance
Engine compartment main fuse panel
Fuse NameSymbolFuse ratingCircuit Protected
EPB 215AElectric Parking Brake Module
EPB 115AElectric Parking Brake Module
ACC40AACC Relay
Back-Up Lamp10ATCM, Transmission Range Switch, Rear Combination Lamp (IN) LH/RH, Electro Chromic
Mirror, A/V & Navigation Head Unit
Rear
Power Seat30ARear Power Seat Relay Box
ESC140AESP Control Module, Multipurpose Check Connector
ESC240AESP Control Module, Multipurpose Check Connector
Lumbar Seat10ADriver/Passenger Power Seat Relay Box, Driver/Passenger Lumbar Support Unit
Driver P/Seat 225ADriver IMS Control Module, Driver Power Seat Switch, Driver Power Seat Relay Box
Active Bonnet LH30AActive Bonnet Lift Control Module
Active Bonnet RH30AActive Bonnet Lift Control Module
Wiper130AWiper Motor
Driver Seat
Warmer25ADriver CCS Module, Driver Seat Warmer Control Module
H/Lamp Hi
Solenoid10AMetal Core Block (PCB #2 - Head Lamp High Solenoid Relay)
Page 470 of 502

7-64
Maintenance
LIGHT BULBS
Use only the bulbs of the specified
wattage.
✽NOTICE
After heavy driving, rain or wash-
ing, headlamp and tail lamp lenses
could appear frosty. This condition
is caused by the temperature differ-
ence between the lamp inside and
outside. This is similar to the con-
densation on your windows inside
your vehicle during rain and doesn’t
indicate a problem with your vehi-
cle. If the water leaks into the lamp
bulb circuitry, we recommend that
the system be checked by a
HYUNDAI authorised repairer.
❈Traffic Change (For Europe)
The low beam light distribution is
asymmetric. If you go abroad to a
country with opposite traffic direc-
tion, this asymmetric part will dazzle
oncoming car driver. To prevent daz-
zle, ECE regulation demand several
technical solutions (ex. automatic
change system, adhesive sheet,
down aiming). These headlamps are
designed not to dazzle opposite driv-
ers. So, you need not change your
headlamps in a country with oppo-
site traffic direction. Be sure to replace the burned-
out bulb with one of the same
wattage rating. Otherwise, it
may cause damage to the fuse
or electric wiring system.
CAUTION
If you don’t have the necessary
tools, the correct bulbs and the
expertise, consult a HYUNDAI
authorised repairer. In many
cases, it is difficult to replace
vehicle light bulbs because
other parts of the vehicle must
be removed before you can get
to the bulb. This is especially
true if you have to remove the
headlamp assembly to get to
the bulb(s).
Removing/installing the head-
lamp assembly can result in
damage to the vehicle.
CAUTION
Working on the lights
Prior to working on the light, firm-
ly apply the parking brake,
ensure that the Engine Start/Stop
button is turned to the OFF posi-
tion and turn off the lights to
avoid sudden movement of the
vehicle and burning your fingers
or receiving an electric shock.
WARNING
Page 474 of 502

7-68
Maintenance
Headlamp and front fog lamp
aiming - For Europe
Headlamp aiming
1. Inflate the tyres to the specified
pressure and remove any loads
from the vehicle except the driver,
spare tyre, and tools.
2. The vehicle should be placed on a
flat floor.
3. Draw vertical lines (Vertical lines
passing through respective head
lamp centres) and a horizontal line
(Horizontal line passing through
centre of head lamps) on the
screen.4. With the headlamp and battery in
normal condition, aim the head-
lamps so the brightest portion falls
on the horizontal and vertical
lines.
5. To aim the low beam left or right,
turn the driver clockwise or coun-
terclockwise. To aim the low beam
up or down, turn the driver clock-
wise or counterclockwise.
To aim the high beam up or down,
turn the driver clockwise or coun-
terclockwise.
Front fog lamp aiming
The front fog lamp can be aimed as
the same manner of the headlamps
aiming.
With the front fog lamps and battery
in normal condition, aim the front fog
lamps.
To aim the front fog lamp up or down,
turn the driver clockwise or counter-
clockwise.
ODH073059L
ODH073060L
Page 481 of 502

7-75
7
Maintenance
APPEARANCE CARE
Exterior care
Exterior general caution
It is very important to follow the label
directions when using any chemical
cleaner or polish. Read all warning
and caution statements that appear
on the label.
Finish maintenance
Washing
To help protect your vehicle’s finish
from rust and deterioration, wash it
thoroughly and frequently at least
once a month with lukewarm or cold
water.
If you use your vehicle for off-road
driving, you should wash it after each
off-road trip. Pay special attention to
the removal of any accumulation of
salt, dirt, mud, and other foreign
materials. Make sure the drain holes
in the lower edges of the doors and
rocker panels are kept clear and
clean.
Insects, tar, tree sap, bird droppings,
industrial pollution and similar
deposits can damage your vehicle’s
finish if not removed immediately.
Even prompt washing with plain
water may not completely remove all
these deposits.
A mild soap, safe for use on painted
surfaces, may be used.
After washing, rinse the vehicle thor-
oughly with lukewarm or cold water.
Do not allow soap to dry on the fin-
ish.•Do not use strong soap,
chemical detergents or hot
water, and do not wash the
vehicle in direct sunlight or
when the body of the vehicle
is warm.
•Be careful when washing the
side windows of your vehicle.
Especially, with high-pressure
water, water may leak through
the windows and wet the inte-
rior.
•To prevent damage to the
plastic parts and lamps, do
not clean with chemical sol-
vents or strong detergents.
CAUTION
Page 499 of 502

8-8
Specifications & Consumer information
Recommended SAE viscosity
number Engine oil viscosity (thickness) has
an effect on fuel economy and cold
weather operating (engine start and
engine oil flow ability). Lower viscos-
ity engine oils can provide better fuel
economy and cold weather perform-
ance; however, higher viscosity
engine oils are required for satisfac-
tory lubrication in hot weather. Using oils of any viscosity other than
those recommended could result in
engine damage. When choosing an
oil, consider the range of tempera-
ture your vehicle will be operated in
before the next oil change. Proceed
to select the recommended oil vis-
cosity from the chart.
Always be sure to clean the area
around any filler plug, drain
plug, or dipstick before check-
ing or draining any lubricant.
This is especially important in
dusty or sandy areas and when
the vehicle is used on unpaved
roads. Cleaning the plug and
dipstick areas will prevent dirt
and grit from entering the
engine and other mechanisms
that could be damaged.
CAUTION
Temperature Range for SAE Viscosity Numbers
Temperature
Petrol
Engine Oil *
1
°C
(°F)-30 -20 -10 0 10 20 30 40 50
-10 0 20 40 60 80 100 120
20W-50
10W-30
15W-40
5W-30, 5W-40 (For 5.0L)
*1: For better fuel economy, it is recommended to use the engine oil of a viscosity
grade SAE 5W-30 (API SM/ILSAC GF-4 (For 3.0L, 3.3L, 3.8L)/ACEA A5).
However, if the engine oil is not available in your country, select the proper engine
oil using the engine oil viscosity chart.