Page 119 of 502

3-28
Convenient features of your vehicle
Auto up/down window
Pressing or pulling up the power win-
dow switch momentarily to the sec-
ond detent position (6) completely
lowers or lifts the window even when
the switch is released. To stop the
window at the desired position whilst
the window is in operation, pull up or
press down and release the switch.
To reset the power windows
If the power windows do not operate
normally, the automatic power win-
dow system must be reset as follows:
1. Place the Engine Start/Stop button
to the ON position.
2. Close the window and continue
pulling up on the power window
switch for at least one second.
If the power windows do not operate
properly after resetting, it is recom-
mended that the system be checked
by a HYUNDAI authorised repairer.
Automatic reversal
If a window senses any obstacle
whilst it is closing automatically, it will
stop and lower approximately 30 cm
(12 inches) to allow the object to be
cleared.
If the window detects the resistance
whilst the power window switch is
pulled up continuously, the window
will stop upward movement then
lower approximately 2.5 cm (1 inch).
If the power window switch is pulled
up continuously again within 5 sec-
onds after the window is lowered by
the automatic window reversal fea-
ture, the automatic window reversal
will not operate.
ODH044136R
Page 121 of 502

3-30
Convenient features of your vehicle
If your vehicle is equipped with a
sunroof, you can slide or tilt your
sunroof with the sunroof control lever
located on the overhead console.
The Engine Start/Stop button must
be in the ON position before you can
open or close the sunroof.
✽NOTICE
• In cold and wet climates, the sun-
roof may not work properly due to
freezing conditions.
• After washing the car or after
there is rain, be sure to wipe off
any water that is on the sunroof
before operating it.
Sunshade
• To open the sunshade, press the
sunshade control switch (1).
• To close the sunshade, press the
sunshade control switch (2). If you
press the switch when the sunroof
glass is opened, the sunroof glass
will close then the sunshade will
close.
To stop the sliding at any point, press
the sunshade control switch momen-
tarily.
PANORAMA SUNROOF (IF EQUIPPED)
ODH043034Do not continue to move the
sunroof control lever after the
sunroof is fully opened, closed,
or tilted. Damage to the motor or
system components could occur.
CAUTION
Never adjust the sunroof or sun-
shade whilst driving. This could
result in loss of control and an
accident that may cause death,
serious injury, or property dam-
age.
WARNING
ODH043035
Page 129 of 502

3-38
Convenient features of your vehicle
To close:
Do one of the following:
- Press the Power Boot Main Control
button (1) until the Power Boot is
closed securely.
- Press the Close button (3) on the
boot.
- Press the Lock button (4) on the
boot whilst carrying the Smart Key
with all the vehicle’s doors closed.
All doors will lock and arm the theft
alarm system.
If you push a button or switch whilst
the boot is opening or closing, it
could stop moving. Press any button
to operate the Power Boot again.
✽NOTICE
The Power Boot Lock button will
not work if you press the button
when:
- Any door is open.
- The Engine Start/Stop button is
not in the OFF position.
- The Smart Key is in the vehicle.
Never leave children or animals
unattended in your vehicle.
Children or animals might oper-
ate the power boot that could
result in injury to themselves or
others, or damage to the vehicle.
WARNING
Always keep the boot lid com-
pletely closed whilst the vehicle
is in motion. If it is left open or
ajar, poisonous exhaust gases
containing carbon monoxide
(CO) may enter the vehicle and
serious illness or death may
result.
WARNING
Make sure there are no people
or objects around the boot
before opening or closing the
Power Boot. Wait until the boot
is open fully and stopped
before loading or unloading
cargo from the vehicle.
WARNING
Page 139 of 502

3-48
Convenient features of your vehicle
(Continued)
•Do not use mobile phones
whilst refuelling. Electric cur-
rent and/or electronic interfer-
ence from mobile phones can
potentially ignite fuel vapours
and cause a fire.
•Do not get back into a vehicle
once you have begun refu-
elling. You can generate a
build-up of static electricity by
touching, rubbing or sliding
against any item or fabric capa-
ble of producing static electric-
ity. Static electricity discharge
can ignite fuel vapours causing
a fire. If you must re-enter the
vehicle, you should once again
eliminate potentially danger-
ous static electricity discharge
by touching a metal part of the
vehicle, away from the fuel filler
neck, nozzle or other petrol
source, with your bare hand.
(Continued)
(Continued)
•When using an approved
portable fuel container, be
sure to place the container on
the ground prior to refuelling.
Static electricity discharge
from the container can ignite
fuel vapours causing a fire.
Once refuelling has begun,
contact between your bare
hand and the vehicle should
be maintained until the filling
is complete.
•Use only approved portable
plastic fuel containers designed
to carry and store petrol.
(Continued)
(Continued)
•When refuelling, always move
the shift lever to the P (Park)
position, set the parking
brake, and place the Engine
Start/Stop button to the OFF
position. Sparks produced by
electrical components related
to the engine can ignite fuel
vapours causing a fire.
•Do not use matches or a
lighter and do not smoke or
leave a lit cigarette in your
vehicle whilst at a petrol sta-
tion, especially during refu-
elling.
•Do not over-fill or top-off your
vehicle tank, which can cause
petrol spillage.
(Continued)
Page 142 of 502
3-51
Convenient features of your vehicle
3
Instrument Cluster Control
Instrument panel illumination
When the Engine Start/Stop button is
in the ON position, press the illumina-
tion control button to adjust the instru-
ment panel illumination intensity and
AVN monitor illumination intensity.
When the vehicle’s parking lights or
headlights are on, the interior switch
illumination intensity is adjusted
additionally by pressing the control
button.• The brightness of the instrument
panel illumination is displayed.
• If the brightness reaches the maxi-
mum or minimum level, an alarm
will sound.
ODH044053R
Never adjust the instrument
cluster whilst driving. This could
result in loss of control and lead
to an accident that may cause
death, serious injury, or property
damage.
WARNING
ODH043228L
Page 144 of 502

3-53
Convenient features of your vehicle
3
Tachometer
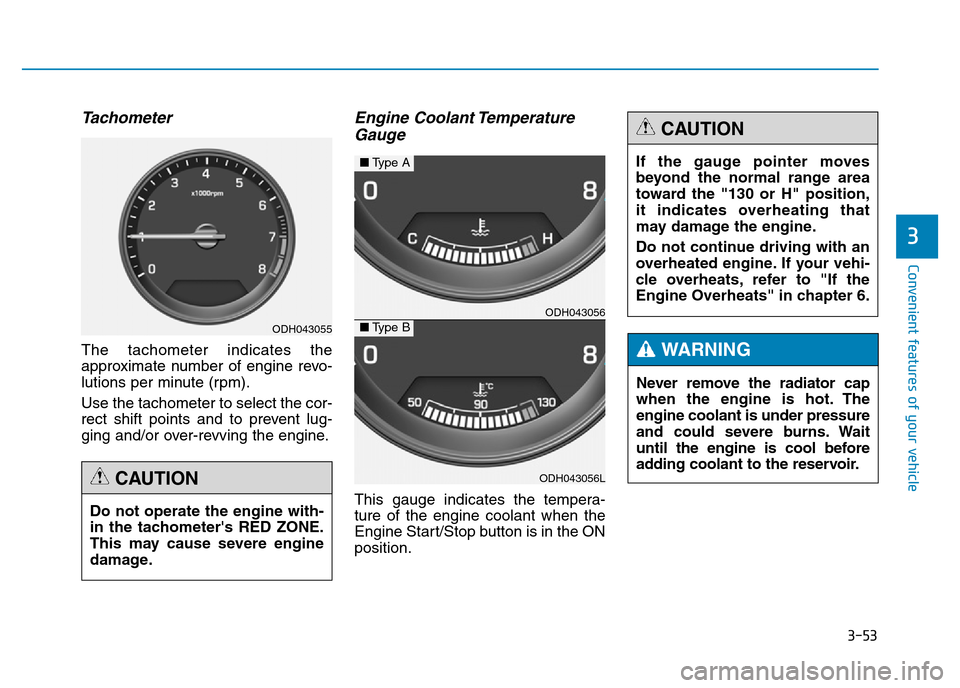
The tachometer indicates the
approximate number of engine revo-
lutions per minute (rpm).
Use the tachometer to select the cor-
rect shift points and to prevent lug-
ging and/or over-revving the engine.
Engine Coolant Temperature
Gauge
This gauge indicates the tempera-
ture of the engine coolant when the
Engine Start/Stop button is in the ON
position. Do not operate the engine with-
in the tachometer's RED ZONE.
This may cause severe engine
damage.
CAUTION
ODH043055
ODH043056
ODH043056L
■Type A
■Type B
Never remove the radiator cap
when the engine is hot. The
engine coolant is under pressure
and could severe burns. Wait
until the engine is cool before
adding coolant to the reservoir.
WARNING
If the gauge pointer moves
beyond the normal range area
toward the "130 or H" position,
it indicates overheating that
may damage the engine.
Do not continue driving with an
overheated engine. If your vehi-
cle overheats, refer to "If the
Engine Overheats" in chapter 6.
CAUTION
Page 146 of 502

3-55
Convenient features of your vehicle
3
Outside Temperature Gauge
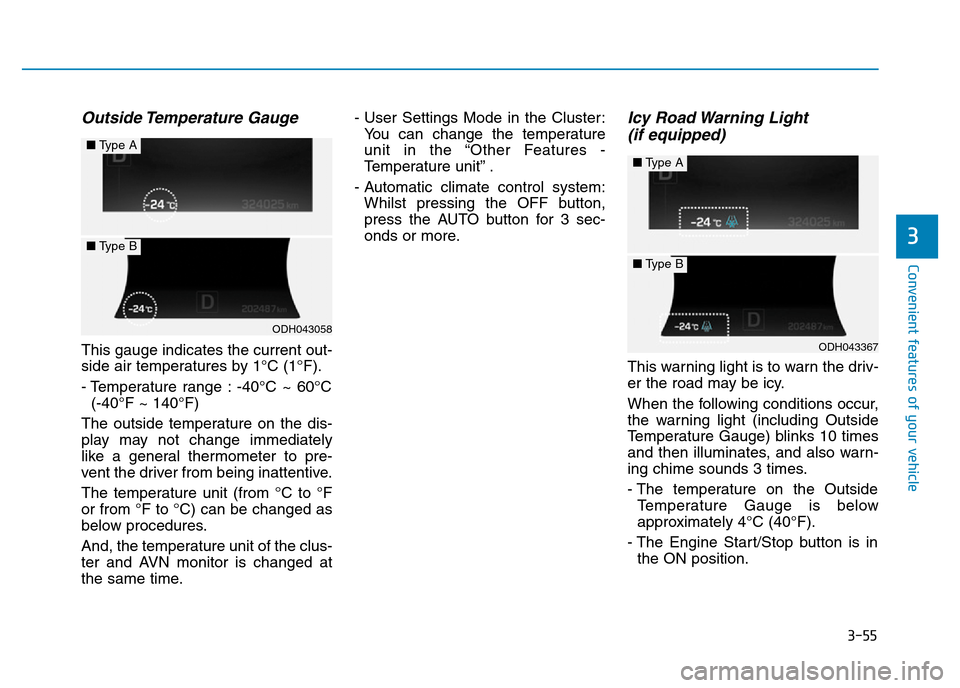
This gauge indicates the current out-
side air temperatures by 1°C (1°F).
- Temperature range : -40°C ~ 60°C
(-40°F ~ 140°F)
The outside temperature on the dis-
play may not change immediately
like a general thermometer to pre-
vent the driver from being inattentive.
The temperature unit (from °C to °F
or from °F to °C) can be changed as
below procedures.
And, the temperature unit of the clus-
ter and AVN monitor is changed at
the same time.- User Settings Mode in the Cluster:
You can change the temperature
unit in the “Other Features -
Temperature unit” .
- Automatic climate control system:
Whilst pressing the OFF button,
press the AUTO button for 3 sec-
onds or more.
Icy Road Warning Light
(if equipped)
This warning light is to warn the driv-
er the road may be icy.
When the following conditions occur,
the warning light (including Outside
Temperature Gauge) blinks 10 times
and then illuminates, and also warn-
ing chime sounds 3 times.
- The temperature on the Outside
Temperature Gauge is below
approximately 4°C (40°F).
- The Engine Start/Stop button is in
the ON position.
ODH043058
■Type A
■Type B
ODH043367
■Type A
■Type B
Page 151 of 502
3-60
Convenient features of your vehicle
Information Mode
Tyre pressure information
This mode informs of tyre pressure
information, service interval (mileage
or days) and warning messages
related to the advanced smart cruise
control system, pre-safe seat belt,
and so on.
Service Interval
Service in
It calculates and displays when you
need a scheduled maintenance
service (mileage or days).
If the remaining mileage or time
reaches 900 miles (1,500 km) or 30
days, "Service in" message is dis-
played for several seconds each time
you set the Engine Start/Stop button
to the ON position.
For the setting of the service interval,
refer to "User Settings Mode" of the
LCD display.
Service required
If you do not have your vehicle serv-
iced according to the already inputted
service interval, "Service required"
message is displayed for several sec-
onds each time you set the Engine
Start/Stop button to the ON position.
ODH063029LODH043277N
ODH043406N