Page 109 of 521
429
Features of your vehicle
Opening the hood
Open the hood after turning off the
engine on a flat surface, move the
shift lever to the P(Park) position
and set the parking brake.
1. Pull the release lever to unlatchthe hood. The hood should pop
open slightly. 2. Go to the front of the vehicle, raise
the hood slightly, pull up the sec-
ondary latch (1) inside of the hood
center and lift the hood (2).
3. Raise the hood. It will raise com- pletely by itself after it has been
raised about halfway.
Closing the hood
1. Before closing the hood, check thefollowing:
ment must be correctly installed.
bustible material must be
removed from the engine com-
partment.
2. Lower the hood halfway and push it down to securely lock in place.
HOOD
OHG040024OHG045025N
WARNING -Fire risk
Do not leave gloves, rags or any
other combustible material in
the engine compartment. Doing
so may cause a heat-induced
fire.
Page 112 of 521

Features of your vehicle
32
4
Closing the fuel filler lid
1. To install the cap, turn it clockwise
until it clicks one time. This indi-
cates that the cap is securely
tightened.
2. Close the fuel filler lid and push it lightly and make sure that it is
securely closed.
✽ ✽NOTICE
Tighten the cap until it clicks one
time, otherwise the warning light
“Check Fuel Cap” will illuminate on
the LCD display.
WARNING - Fire /
explosion risk
Read and follow all warnings
posted at the gas station facili-
ty. Failure to follow all warnings
will result in severe personal
injury, severe burns or death
due to fire or explosion.
WARNING
Always check that the fuel cap
is installed securely to prevent
fuel spillage in the event of an
accident. Spilled fuel in the
presence of an ignition source
could result in a fire.
WARNING - Static
electricity
Before touching the fuel noz- zle, you should eliminate
potentially dangerous static
electricity discharge by touch-
ing another metal part of the
vehicle, a safe distance away
from the fuel filler neck, noz-
zle, or other gas source. Static
electricity discharge can
ignite fuel vapors resulting in
rapid burning.
Do not get back into a vehicle once you have begun refuel-
ing since you can generate
static electricity by touching,
rubbing or sliding against any
item or fabric (polyester, satin,
nylon, etc.) capable of produc-
ing static electricity. Static
electricity discharge can
ignite fuel vapors resulting in
rapid burning.
(Continued)
WARNING - Refueling
Always remove the fuel cap
carefully and slowly. If the cap
is venting fuel or if you hear a
hissing sound, wait until the
condition stops before com-
pletely removing the cap.
If pressurized fuel sprays out, it
can cover your clothes or skin
and subject you to the risk of
fire and burns.
Page 114 of 521
Features of your vehicle
34
4
Make sure to refuel your vehicle
according to the “Fuel requirements”
suggested in section 1.
If the fuel filler cap requires replace-
ment, use only a genuine HYUNDAI
cap or the equivalent specified for
your vehicle. An incorrect fuel filler
cap can result in a serious malfunc-
tion of the fuel system or emission
control system.Emergency fuel filler lid
release
If the fuel filler lid does not open
using the remote fuel filler lid
release, you can open it manually by
pulling the handle outward slightly.
OHG040028
WARNING - Smoking
DO NOT use matches or a
lighter and DO NOT SMOKE or
leave a lit cigarette in your vehi-
cle while at a gas station espe-
cially during refueling.
Automotive fuel is highly flam-
mable and can, when ignited,
result in fire.
CAUTION
Do not pull the handle exces- sively, otherwise the luggagearea trim or release handle maybe damaged.
Page 123 of 521

443
Features of your vehicle
Electronic power steering (EPS)
The power steering uses a motor to
assist you in steering the vehicle. If
the engine is off or if the power steer-
ing system becomes inoperative, the
vehicle may still be steered, but it will
require increased steering effort.
The motor driven power steering is
controlled by a power steering con-
trol unit which senses the steering
wheel torque and vehicle speed to
command the motor.
The steering becomes heavier as
the vehicle’s speed increases and
becomes lighter as the vehicle’s
speed decreases for optimum steer-
ing control.
Should you notice any change in the
effort required to steer during normal
vehicle operation, have the power
steering checked by an authorized
HYUNDAI dealer.
✽ ✽NOTICE
The following symptoms may occur
during normal vehicle operation:
• The steering effort is high immedi-
ately after the engine starts. This
happens as the system performs
the EPS system diagnostics. When
the diagnostics is completed, the
steering wheel will return to its
normal condition.
• A click noise may be heard from the EPS relay after the ignition
switch is changed to the ON or
OFF position.
• Motor noise may be heard when the vehicle is at a stop or at a low
driving speed.
• When you operate the steering wheel in low temperature, abnor-
mal noise could occur. If tempera-
ture rises, the noise will disappear.
This is a normal condition. (Continued)(Continued)
• When the vehicle is stationary, if
you turn the steering wheel all the
way to the left or right continuous-
ly, the steering wheel effort
increases. This is not a system mal-
function. As time passes, the steer-
ing wheel effort will return to its
normal condition.
If the Electronic Power Steering
System does not operate normally,
the warning light ( ) will illuminate
on the instrument cluster. The steer-
ing wheel may become difficult to
control or operate abnormally. Take
your vehicle to an authorized
HYUNDAI dealer and have the
vehicle checked as soon as possible.
STEERING WHEEL
Page 124 of 521

Features of your vehicle
44
4
Tilt and telescopic steering
Tilt and telescopic steering allows
you to adjust the steering wheel
before you drive. You can also raise it
to give your legs more room when
you exit and enter the vehicle.
The steering wheel should be posi-
tioned so that it is comfortable for
you to drive, while permitting you to
see the instrument panel warning
lights and gauges.
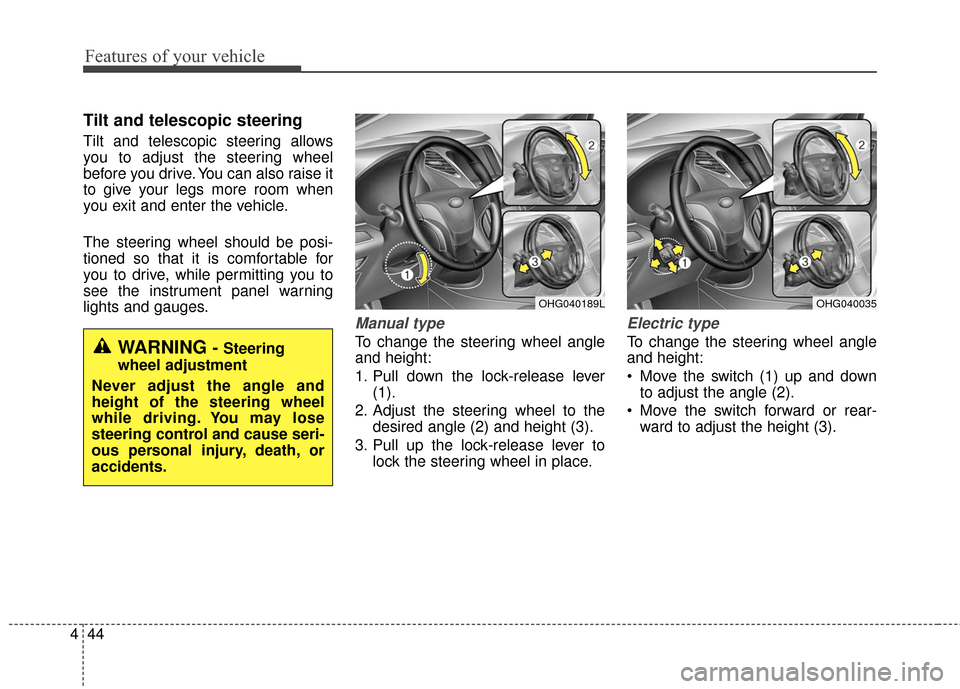
Manual type
To change the steering wheel angle
and height:
1. Pull down the lock-release lever
(1).
2. Adjust the steering wheel to the desired angle (2) and height (3).
3. Pull up the lock-release lever to lock the steering wheel in place.
Electric type
To change the steering wheel angle
and height:
Move the switch (1) up and downto adjust the angle (2).
Move the switch forward or rear- ward to adjust the height (3).
OHG040189LOHG040035
WARNING - Steering
wheel adjustment
Never adjust the angle and
height of the steering wheel
while driving. You may lose
steering control and cause seri-
ous personal injury, death, or
accidents.
Page 133 of 521

453
Features of your vehicle
Reprogramming a single
HomeLink®button
To program a device to HomeLink®
using a HomeLink®button previously
trained, follow these steps:
1. Press and hold the desired HomeLink
®button. DO NOT
release the button.
2. The indicator light will begin to flash after 20 seconds. Without
releasing the HomeLink
®button,
proceed with "Programming" step
2.
For questions or comments, contact
HomeLink
®at www.homelink.comor
1-800-355-3515. Erasing HomeLink
®buttons
Individual buttons cannot be erased.
However, to erase all three pro-
grammed buttons:
1. Press and hold the two outer HomeLink
®buttons until the indi-
cator light begins to flash after 10
seconds.
2. Release both buttons. Do not hold for longer than 20 seconds.
The Integrated HomeLink
®Wireless
Control System is now in the training
(learn) mode and can be pro-
grammed at any time following the
appropriate steps in the Programming
sections above. FCC ID: NZLTLMHL4
IC: 4112A-TLMHL4
This device complies with Part 15
of the FCC Rules.
Operation is subject to the following
two conditions:
1. This device may not cause harm-
ful interference, and
2. This device must accept any inter- ference received, including inter-
ference that may cause undesired
operation.
WARNING
The transceiver has been tested
and complies with FCC and
Industry Canada rules. Changes
or modifications not expressly
approved by the party responsi-
ble for compliance could void
the user's authority to operate
the device.
Page 138 of 521
Features of your vehicle
58
4
INSTRUMENT CLUSTER
1. Tachometer
2. Turn signal indicators
3. Speedometer
4. LCD display
5. Fuel gauge
6. Engine coolant temperature gauge
7. Warning and indicator lights
For more details, refer to "Gauges" in
the next pages.
OHG046046N/OHG045047NThe actual cluster in the vehicle may differ from the illustration.
■ Type A
■ Type B
Page 140 of 521

Features of your vehicle
60
4
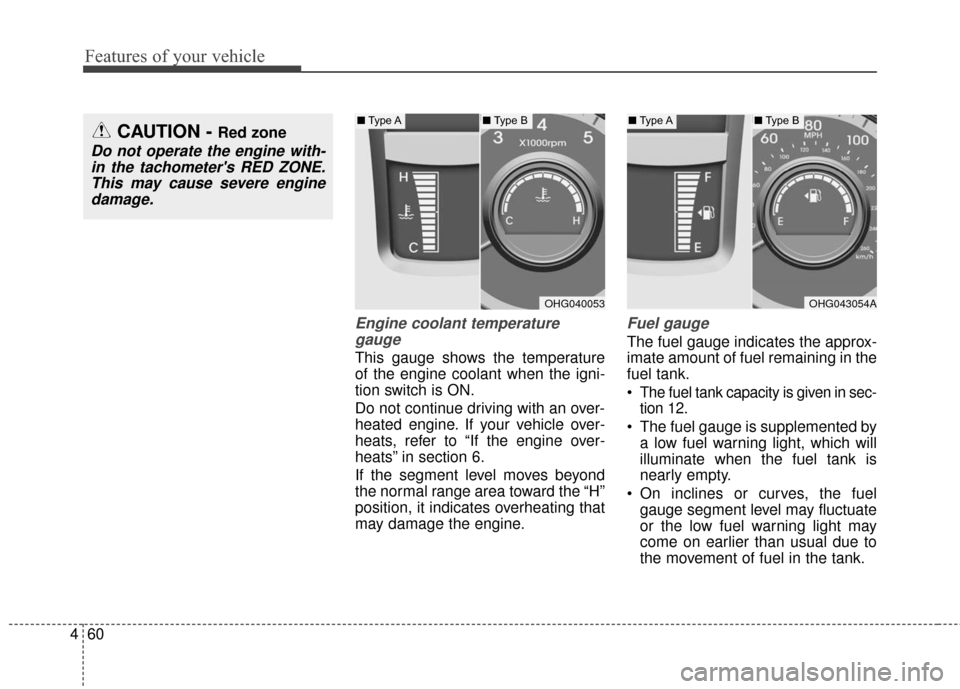
Engine coolant temperature
gauge
This gauge shows the temperature
of the engine coolant when the igni-
tion switch is ON.
Do not continue driving with an over-
heated engine. If your vehicle over-
heats, refer to “If the engine over-
heats” in section 6.
If the segment level moves beyond
the normal range area toward the “H”
position, it indicates overheating that
may damage the engine.
Fuel gauge
The fuel gauge indicates the approx-
imate amount of fuel remaining in the
fuel tank.
The fuel tank capacity is given in sec-
tion 12.
The fuel gauge is supplemented by a low fuel warning light, which will
illuminate when the fuel tank is
nearly empty.
On inclines or curves, the fuel gauge segment level may fluctuate
or the low fuel warning light may
come on earlier than usual due to
the movement of fuel in the tank.
CAUTION - Red zone
Do not operate the engine with-in the tachometer's RED ZONE.This may cause severe enginedamage.
OHG040053OHG043054A
■ Type A■Type B■Type A■Type B