Page 105 of 521
425
Features of your vehicle
(1) Driver’s door power windowswitch
(2) Front passenger’s door power window switch
(3) Rear door (left) power window switch
(4) Rear door (right) power window switch
(5) Window opening and closing
(6) Automatic power window up/down
(7) Power window lock switch
WINDOWS
OHG040020
Page 106 of 521

Features of your vehicle
26
4
Power windows
The ignition switch must be in the ON
position for power windows to operate.
Each door has a power window
switch that controls the door's win-
dow. The driver’s door has a master
power window switch that controls all
the windows in the vehicle. Also, the
driver has a power window lock
switch which can block the operation
of passenger windows.
The power windows can be operated
for approximately 30 seconds after
the ignition key is in the ACC or OFF
position. However, if the front doors
are opened, the power windows can-
not be operated within the 30 second
period.
✽ ✽
NOTICE
While driving with the rear windows
down or with the sunroof (if
equipped) in an open (or partially
open position), your vehicle may
demonstrate a wind buffeting or
pulsation noise. This noise is a nor-
mal occurrence and can be reduced
or eliminated by taking the follow-
ing actions. If the noise occurs with
one or both of the rear windows
down, partially lower both front
windows approximately one inch.
If you experience the noise with the
sunroof open, slightly reduce the
size of the sunroof opening.
Window opening and closing
To open or close a window, press
down or pull up the front portion of
the corresponding switch to the first
detent position(5).
OHG040021
Page 107 of 521

427
Features of your vehicle
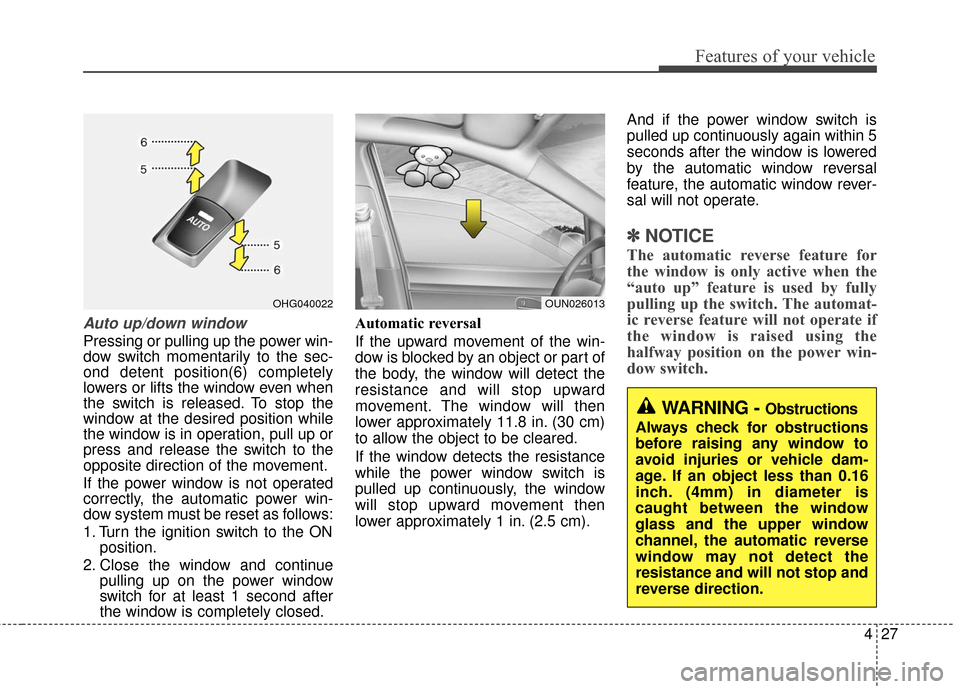
Auto up/down window
Pressing or pulling up the power win-
dow switch momentarily to the sec-
ond detent position(6) completely
lowers or lifts the window even when
the switch is released. To stop the
window at the desired position while
the window is in operation, pull up or
press and release the switch to the
opposite direction of the movement.
If the power window is not operated
correctly, the automatic power win-
dow system must be reset as follows:
1. Turn the ignition switch to the ONposition.
2. Close the window and continue pulling up on the power window
switch for at least 1 second after
the window is completely closed. Automatic reversal
If the upward movement of the win-
dow is blocked by an object or part of
the body, the window will detect the
resistance and will stop upward
movement. The window will then
lower approximately 11.8 in. (30 cm)
to allow the object to be cleared.
If the window detects the resistance
while the power window switch is
pulled up continuously, the window
will stop upward movement then
lower approximately 1 in. (2.5 cm). And if the power window switch is
pulled up continuously again within 5
seconds after the window is lowered
by the automatic window reversal
feature, the automatic window rever-
sal will not operate.
✽ ✽
NOTICE
The automatic reverse feature for
the window is only active when the
“auto up” feature is used by fully
pulling up the switch. The automat-
ic reverse feature will not operate if
the window is raised using the
halfway position on the power win-
dow switch.
OUN026013OHG040022
WARNING - Obstructions
Always check for obstructions
before raising any window to
avoid injuries or vehicle dam-
age. If an object less than 0.16
inch. (4mm) in diameter is
caught between the window
glass and the upper window
channel, the automatic reverse
window may not detect the
resistance and will not stop and
reverse direction.
Page 108 of 521

Features of your vehicle
28
4
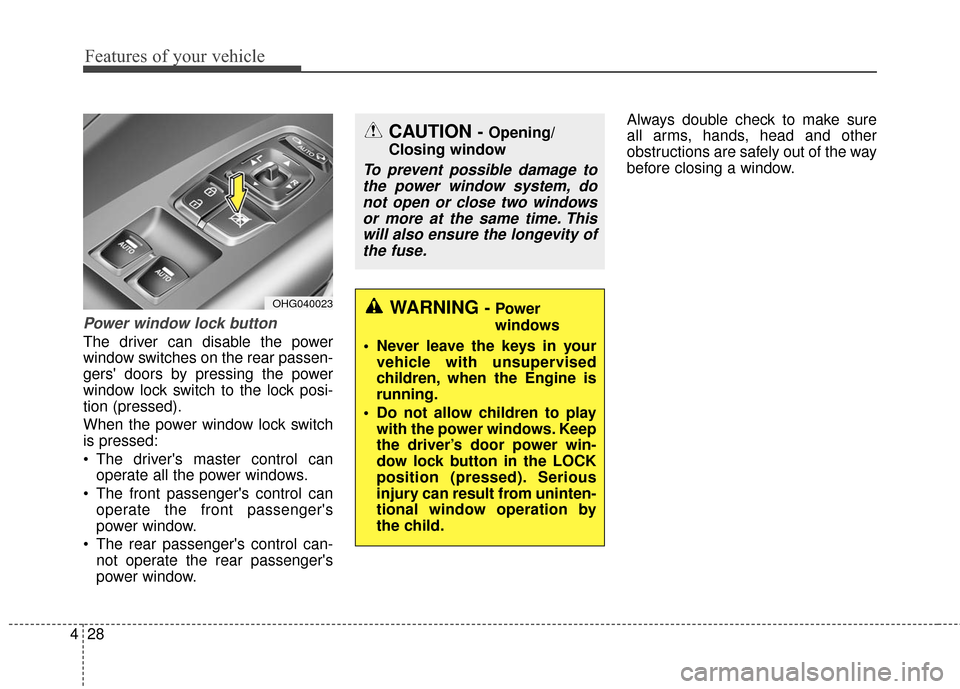
Power window lock button
The driver can disable the power
window switches on the rear passen-
gers' doors by pressing the power
window lock switch to the lock posi-
tion (pressed).
When the power window lock switch
is pressed:
The driver's master control can
operate all the power windows.
The front passenger's control can operate the front passenger's
power window.
The rear passenger's control can- not operate the rear passenger's
power window. Always double check to make sure
all arms, hands, head and other
obstructions are safely out of the way
before closing a window.
OHG040023
CAUTION - Opening/
Closing window
To prevent possible damage to the power window system, donot open or close two windowsor more at the same time. Thiswill also ensure the longevity ofthe fuse.
WARNING - Power
windows
Never leave the keys in your vehicle with unsupervised
children, when the Engine is
running.
Do not allow children to play with the power windows. Keep
the driver’s door power win-
dow lock button in the LOCK
position (pressed). Serious
injury can result from uninten-
tional window operation by
the child.
Page 126 of 521

Features of your vehicle
46
4
Inside rearview mirror
Adjust the rearview mirror so that the
center view through the rear window
is seen. Make this adjustment before
you start driving.
Do not place objects in the rear seat
or cargo area which would interfere
with your vision through the rear win-
dow.
Electric chromic mirror (ECM)
with HomeLink®system and
compass
Your vehicle may be equipped with a
Gentex Automatic-Dimming Mirror
with a Z-Nav™ Electronic Compass
Display and an Integrated
HomeLink
®Wireless Control
System. During nighttime driving,
this feature will automatically detect
and reduce rearview mirror glare
while the compass indicates the
direction the vehicle is pointed. The
HomeLink
®Universal Transceiver
allows you to activate your garage
door(s), electric gate, home lighting,
etc. (1) Telematics button
(2) Telematics button
(3) Telematics button
(4) Compass control button &
Dimming ON/OFF button
(5) Status indicator LED
(6) Channel 1 button
(7) Channel 2 button
(8) Channel 3 button
(9) Compass display
(10) Rear light sensor
MIRRORS
OYF042250N
Page 127 of 521

447
Features of your vehicle
Automatic-Dimming Night Vision
Safety™ (NVS®) Mirror
The NVS®Mirror in your vehicle is
the most advanced way to reduce
annoying glare in the rearview mirror
during any driving situation. For more
information regarding NVS
®mirrors
and other applications, please refer
to the Gentex website:
www.gentex.com
✽ ✽ NOTICE
The NVS®Mirror automatically
reduces glare during driving condi-
tions based upon light levels moni-
tored in front of the vehicle and
from the rear of the vehicle. These
light sensors are visible through
openings in the front and rear of the
mirror case. Any object that
obstructs either light sensor will
degrade the automatic dimming
control feature.
Automatic-dimming function
Your mirror will automatically dim
upon detecting glare from the vehi-
cles traveling behind you. The auto-
dimming function can be controlled
by the Dimming ON/OFF button:
1. Pressing and holding the button
for 3 seconds turns the autodim-
ming function OFF which is indi-
cated by the green Status
Indicator LED turning off.
2. Pressing and holding the button for 3 seconds again turns the
auto-dimming function ON which
is indicated by the green Status
Indicator LED turning on.
The mirror defaults to the ON posi-
tion each time the vehicle is started. Z-Nav™ Compass Display
The NVS™ Mirror in your vehicle is
also equipped with a Z-Nav™
Compass that shows the vehicle
Compass heading in the Display
Window using the 8 basic cardinal
headings (N, NE, E, SE, etc.).
Page 183 of 521
4103
Features of your vehicle
Auto light position
When the light switch is in the AUTO
light position, the parking lights and
headlights will be turned ON or OFF
automatically depending on the
amount of light outside the vehicle. Never place anything over sensor
(1) located on the instrument
panel. This will ensure better auto-
light system control.
Do not clean the sensor using a window cleaner. The cleaner may
leave a light film which could inter-
fere with sensor operation.
If your vehicle has window tint or other types of metallic coating on
the front windshield, the Auto light
system may not work properly.
High beam operation
To turn on the high beam headlights,
push the lever away from you. Pull it
back for low beams.
The high beam indicator will light
when the headlight high beams are
switched on.
To prevent the battery from being
discharged, do not leave the lights
on for a prolonged time while the
engine is not running.
OHG041115AOHG041113A
Page 192 of 521

Features of your vehicle
112
4
DEFROSTER
✽
✽ NOTICE
If you want to defrost and defog
the front windshield, refer to
“Windshield defrosting and defog-
ging” in this section.
Rear window defroster
The defroster heats the window to
remove frost, fog and thin ice from
the rear window, while the engine is
running.
To activate the rear window
defroster, press the rear window
defroster button located in the cen-
ter facia switch panel.
The indicator on the rear window defroster button illuminates when
the defroster is ON.
The rear window defroster auto- matically turns off after approxi-
mately 20 minutes or when the
ignition switch is turned off. To turn off the defroster, press the
rear window defroster button
again.
If there is heavy accumulation of
snow on the rear window, brush it off
before operating the rear defroster.
Outside rearview mirror defroster (if equipped)
If your vehicle is equipped with the
outside rearview mirror defrosters,
they will operate at the same time
you turn on the rear window
defroster.
CAUTION - Conductors
To prevent damage to the con-ductors bonded to the insidesurface of the rear window,never use sharp instruments orwindow cleaners containingabrasives to clean the window.
OHG045223