2016 HONDA PILOT change wheel
[x] Cancel search: change wheelPage 517 of 661
uuWhen Driving uVehicle Stability Assist (VSA® ), aka Electronic Stability Control (ESC), System
516
Driving
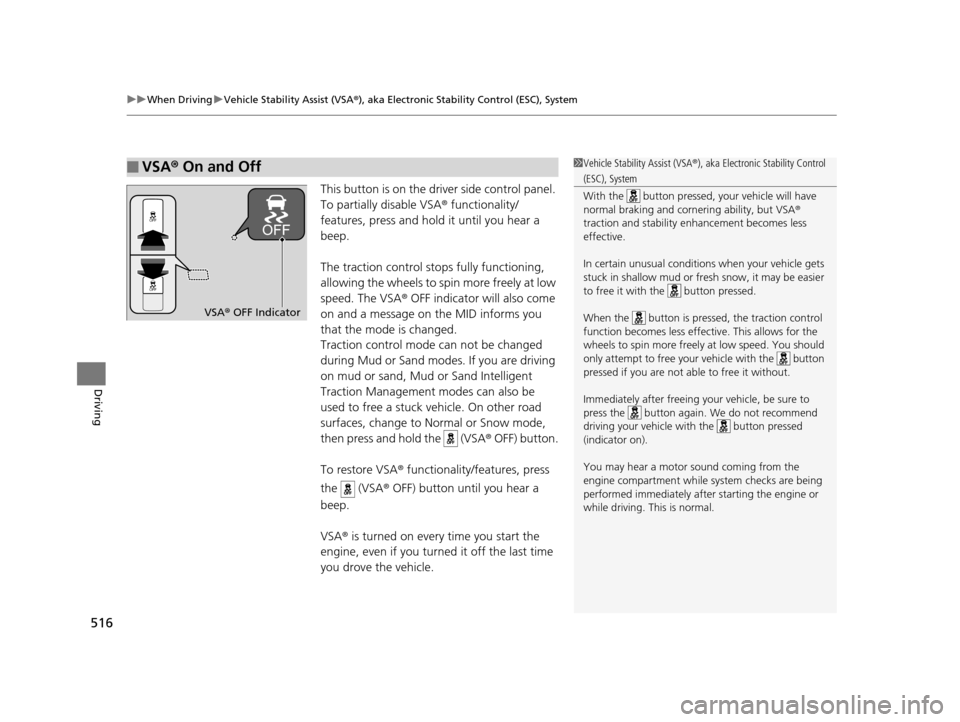
This button is on the driver side control panel.
To partially disable VSA ® functionality/
features, press and hold it until you hear a
beep.
The traction control stops fully functioning,
allowing the wheels to sp in more freely at low
speed. The VSA ® OFF indicator will also come
on and a message on the MID informs you
that the mode is changed.
Traction control mode can not be changed
during Mud or Sand modes. If you are driving
on mud or sand, Mud or Sand Intelligent
Traction Management modes can also be
used to free a stuck vehicle. On other road
surfaces, change to No rmal or Snow mode,
then press and hold the (VSA ® OFF) button.
To restore VSA ® functionality/features, press
the (VSA ® OFF) button until you hear a
beep.
VSA ® is turned on every time you start the
engine, even if you turned it off the last time
you drove the vehicle.
■VSA ® On and Off1 Vehicle Stability Assist (VSA ®), aka Electronic Stability Control
(ESC), System
With the button pressed, your vehicle will have
normal braking and corn ering ability, but VSA®
traction and stability enhancement becomes less
effective.
In certain unusual conditions when your vehicle gets
stuck in shallow mud or fr esh snow, it may be easier
to free it with the button pressed.
When the button is pressed, the traction control
function becomes less effective. This allows for the
wheels to spin more freely at low speed. You should
only attempt to free your vehicle with the button
pressed if you are not able to free it without.
Immediately after freeing your vehicle, be sure to
press the button again. We do not recommend
driving your vehicle wi th the button pressed
(indicator on).
You may hear a motor sound coming from the
engine compartment while system checks are being
performed immediately after starting the engine or
while driving. This is normal.
VSA ® OFF Indicator
16 PILOT-31TG76000.book 516 ページ 2015年6月15日 月曜日 午前11時30分
Page 521 of 661
520
uuWhen Driving uLaneWatchTM*
Driving
LaneWatchTM*
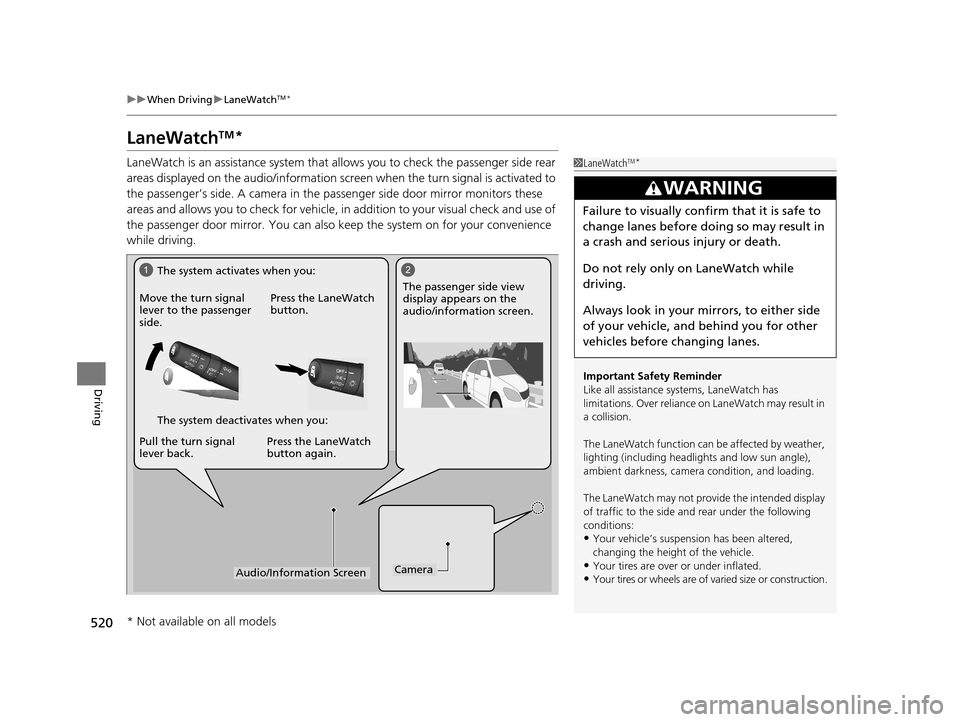
LaneWatch is an assistance system that allows you to check the passenger side rear
areas displayed on the audio/in formation screen when the turn signal is activated to
the passenger’s side. A camera in the passenger side door mirror monitors these
areas and allows you to check for vehicle, in addition to your visual check and use of
the passenger door mirror. You can also keep the system on for your convenience
while driving.1 LaneWatchTM*
Important Safety Reminder
Like all assistance systems, LaneWatch has
limitations. Over reliance on LaneWatch may result in
a collision.
The LaneWatch func tion can be affected by weather,
lighting (including headli ghts and low sun angle),
ambient darkness, camera condition, and loading.
The LaneWatch may not prov ide the intended display
of traffic to the side and rear under the following
conditions:
•Your vehicle’s suspension has been altered,
changing the height of the vehicle.
•Your tires are over or under inflated.
•Your tires or wheels are of varied size or construction.
3WARNING
Failure to visually confirm that it is safe to
change lanes before doing so may result in
a crash and serious injury or death.
Do not rely only on LaneWatch while
driving.
Always look in your mirrors, to either side
of your vehicle, and behind you for other
vehicles before changing lanes.
12
CameraAudio/Information Screen
Move the turn signal
lever to the passenger
side.
Press the LaneWatch
button.
Pull the turn signal
lever back. Press the LaneWatch
button again. The passenger side view
display appears on the
audio/information screen.
The system activates when you:
The system deactivates when you:
* Not available on all models
16 PILOT-31TG76000.book 520 ページ 2015年6月15日 月曜日 午前11時30分
Page 525 of 661
uuWhen Driving uTPMS with Tire Fill Assist
524
Driving
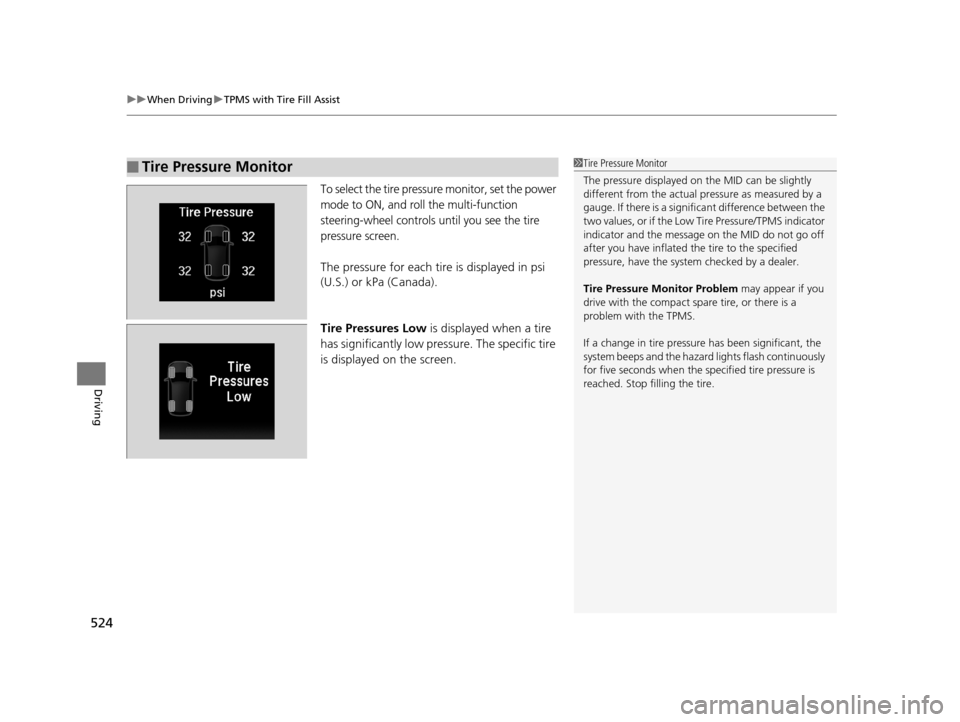
To select the tire pressure monitor, set the power
mode to ON, and roll the multi-function
steering-wheel controls until you see the tire
pressure screen.
The pressure for each tire is displayed in psi
(U.S.) or kPa (Canada).
Tire Pressures Low is displayed when a tire
has significantly low pressure. The specific tire
is displayed on the screen.
■Tire Pressure Monitor1Tire Pressure Monitor
The pressure displayed on the MID can be slightly
different from the actual pr essure as measured by a
gauge. If there is a signifi cant difference between the
two values, or if the Low Tire Pressure/TPMS indicator
indicator and the message on the MID do not go off
after you have inflated the tire to the specified
pressure, have the system checked by a dealer.
Tire Pressure Monitor Problem may appear if you
drive with the compact spare tire, or there is a
problem with the TPMS.
If a change in tire pressure has been significant, the
system beeps and the hazard lights flash continuously
for five seconds when the specified tire pressure is
reached. Stop filling the tire.
16 PILOT-31TG76000.book 524 ページ 2015年6月15日 月曜日 午前11時30分
Page 533 of 661

uuBraking uCollision Mitigation Braking SystemTM (CMBSTM)*
532
Driving
■When the system activates
At system’s earliest collision alert stage, you can change the distance ( Long/
Normal /Short) between vehicles at which alerts will come on through MID setting
options.
■Vibration alert on the steering wheel
When a potential collision to an oncoming detected vehicle is determined, the
system alerts you with rapid vibration on th e steering wheel, in addition to visual and
audible alerts. u Take appropriate action to prevent a co llision (apply the brakes, operate the
steering wheel, etc.).
1 When the system activates
The camera in the CMBS
TM is also designed to detect
pedestrians.
However, this pedestrian detection feature may not
activate or may not detect a pedestrian in front of
your vehicle under certain conditions.
Refer to the ones indicating the pedestrian detection
limitations from the list. 2 CMBS
TM Conditions and Limitations P. 535
The system provides visual, audible and Tac tile alerts of a possible collision, and
stops if the collision is avoided.
u Take appropriate action to prevent a collision (apply the brakes, change
lanes, etc.)
Beep Visual Alerts
Audible Alert
Tactile Alert
16 PILOT-31TG76000.book 532 ページ 2015年6月15日 月曜日 午前11時30分
Page 550 of 661
549
Driving
Multi-view rear camera*
About Your Multi-view rear camera
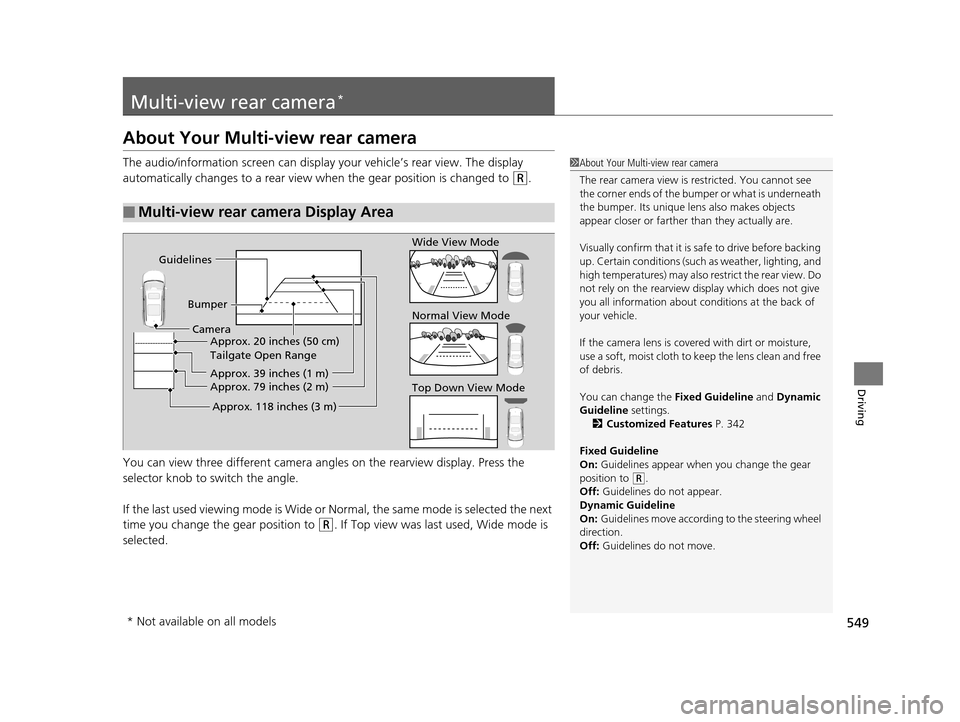
The audio/information screen can display your vehicle’s rear view. The display
automatically changes to a rear view when the gear position is changed to
(R.
You can view three differen t camera angles on the rearview display. Press the
selector knob to switch the angle.
If the last used viewing mode is Wide or Normal, the same mode is selected the next
time you change the gear position to
(R. If Top view was last used, Wide mode is
selected.
■Multi-view rear camera Display Area
1 About Your Multi-view rear camera
The rear camera view is restricted. You cannot see
the corner ends of the bum per or what is underneath
the bumper. Its unique le ns also makes objects
appear closer or farther than they actually are.
Visually confirm that it is safe to drive before backing
up. Certain conditions (such as weather, lighting, and
high temperatures) may also re strict the rear view. Do
not rely on the rearview display which does not give
you all information about conditions at the back of
your vehicle.
If the camera lens is cove red with dirt or moisture,
use a soft, moist cloth to keep the lens clean and free
of debris.
You can change the Fixed Guideline and Dynamic
Guideline settings. 2 Customized Features P. 342
Fixed Guideline
On: Guidelines appear when you change the gear
position to
( R.
Off: Guidelines do not appear.
Dynamic Guideline
On: Guidelines move according to the steering wheel
direction.
Off: Guidelines do not move.
Guidelines
BumperCamera Approx. 20 inches (50 cm)
Tailgate Open Range
Approx. 39 inches (1 m)
Approx. 79 inches (2 m)
Approx. 118 inches (3 m)
Wide View Mode
Normal View Mode
Top Down View Mode
* Not available on all models
16 PILOT-31TG76000.book 549 ページ 2015年6月15日 月曜日 午前11時30分
Page 608 of 661
607Continued
Handling the Unexpected
If a Tire Goes Flat
Changing a Flat Tire
If a tire goes flat while driving, grasp the steering wheel firmly, and brake gradually
to reduce speed. Then, stop in a safe plac e. Replace the flat tire with a compact
spare tire. Go to a dealer as soon as possib le to have the full-size tire repaired or
replaced.
1. Park the vehicle on firm, level, non-slip pery surface and apply the parking brake.
2. Change the gear position to
(P.
3. Turn on the hazard warning lights an d set the power mode to VEHICLE OFF
(LOCK).
1 Changing a Flat Tire
Periodically check the tire pressure of the compact
spare. It should be set to the specified pressure.
Specified Pressure: 60 psi (420 kPa, 4.2 kgf/cm
2)
When driving with the compact spare tire, keep the
vehicle speed under 50 mph (80 km/h). Replace with
a full-size tire as soon as possible.
The compact spare tire and wheel in your vehicle are
specifically for this model. Do not use them with
another vehicle. Do not us e another type of compact
spare tire or wheel with your vehicle.
Do not mount tire chains on a compact spare tire.
If a chain-mounted front tire goes flat, remove one of
the full-size rear tires and replace it with the compact
spare tire. Remove the flat front tire and replace it
with the full-size tire that was removed from the rear.
Mount the tire chains on the front tire.
Do not use a puncture-repairi ng agent on a flat tire,
as it can damage the tire pressure sensor.
16 PILOT-31TG76000.book 607 ページ 2015年6月15日 月曜日 午前11時30分
Page 612 of 661

Continued611
uuIf a Tire Goes Flat uChanging a Flat Tire
Handling the Unexpected
1. Place the jack under the jacking point
closest to the tire to be changed.
2. Turn the end bracket cl ockwise as shown in
the image until the top of the jack contacts
the jacking point.
u Make sure that the jacking point tab is
resting in the jack notch.
3. Raise the vehicle, using the jack handle bar
and the jack handle, until the tire is off the
ground.
■How to Set Up the Jack1How to Set Up the Jack
Do not use the jack with people or luggage in the
vehicle.
Use the jack provided in your vehicle.
Other jacks may not support the weight (“load”) or
may not fit the jacking point.
The following instructions must be followed to use
the jack safely:
•Do not use while the engine is running.
•Use only where the ground is firm and level.
•Use only at the jacking points.•Do not get in the vehicl e while using the jack.
•Do not put anything on top of or underneath the
jack.
3WARNING
The vehicle can easily roll off the jack,
seriously injuring anyone underneath.
Follow the directions for changing a tire
exactly, and never get under the vehicle
when it is supported only by the jack.
Jack Handle Bar
Wheel Nut Wrench as Jack Handle
16 PILOT-31TG76000.book 611 ページ 2015年6月15日 月曜日 午前11時30分
Page 618 of 661

617
uuEngine Does Not Start uEmergency Engine Stop
Handling the Unexpected
Emergency Engine Stop
The ENGINE START/STOP button may be used to stop the engine due to an
emergency situation even while driving. If you must stop the engine, do either of the
following operations:
• Press and hold the ENGINE START/STOP button for about two seconds.
• Firmly press the ENGINE START/STOP button twice.
The steering wheel will not lock. However, because turning off the engine disables
the power assist the engine provides to the steering and braking systems, it will
require significantly more physical effort an d time to steer and slow the vehicle. Use
both feet on the brake pedal to slow down the vehicle and stop immediately in a
safe place.
The gear position auto matically changes to
(P after the vehicle comes to a complete
stop. Then, the power mode changes to VEHICLE OFF.
The gear position auto matically changes to
(P after the vehicle comes to a complete
stop. Then press the ENGINE START/STOP button twice without depressing the
brake pedal to change the mode VEHICLE OFF.
The power mode is in ACCESSORY when the engine is stopped.
To change the mode to VEHICLE OF F, change the gear position to
(P after the
vehicle comes to a complete stop.
Then press the ENGINE START/STOP button twice without depressing the brake
pedal.
1 Emergency Engine Stop
Do not press the button while driving unless it is
absolutely necessary for th e engine to be switched
off.
Automatic transmission models with electronic gear selector for U.S. models
Automatic transmission models with elec tronic gear selector for Canadian models
Automatic transmission models with shift lever
Automatic transmission models with shift lever for Canadian models
16 PILOT-31TG76000.book 617 ページ 2015年6月15日 月曜日 午前11時30分