Page 463 of 565

uuMaintenance MinderTMuTo Use Maintenance MinderTM
462
Maintenance
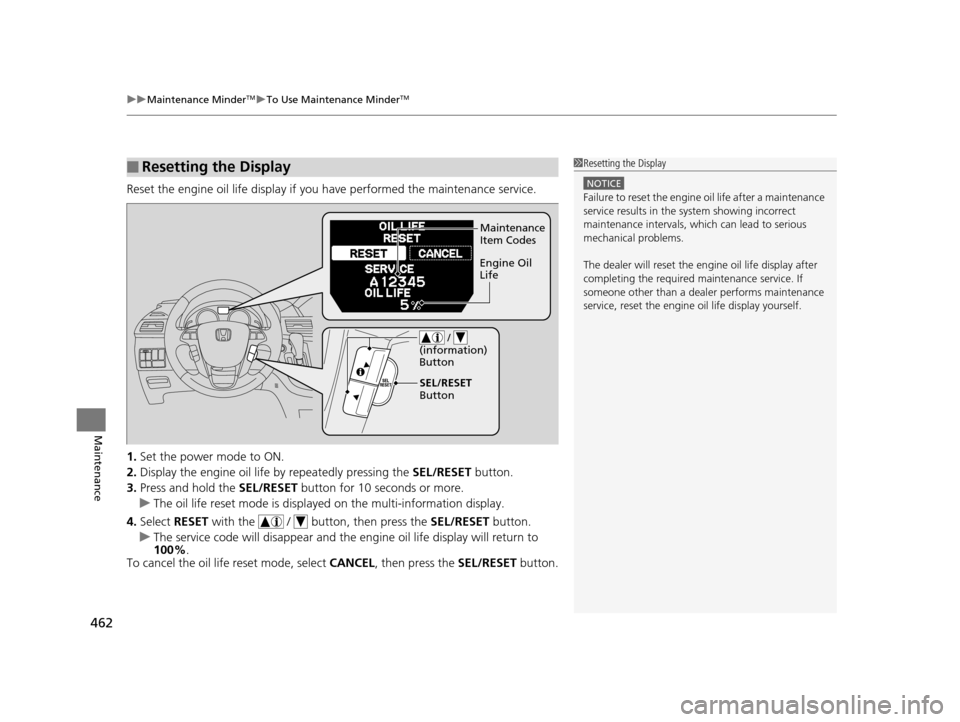
Reset the engine oil life display if yo u have performed the maintenance service.
1. Set the power mode to ON.
2. Display the engine oil life by repeatedly pressing the SEL/RESET button.
3. Press and hold the SEL/RESET button for 10 seconds or more.
u The oil life reset mode is displa yed on the multi-information display.
4. Select RESET with the / butto n, then press the SEL/RESET button.
u The service code will disappear and the en gine oil life display will return to
100% .
To cancel the oil life reset mode, select CANCEL, then press the SEL/RESET button.
■Resetting the Display1Resetting the Display
NOTICE
Failure to reset the engine oil life after a maintenance
service results in the sy stem showing incorrect
maintenance intervals, which can lead to serious
mechanical problems.
The dealer will reset the en gine oil life display after
completing the required ma intenance service. If
someone other than a deal er performs maintenance
service, reset the engine oil life display yourself.
Maintenance
Item Codes
Engine Oil
Life
/
(information)
Button
SEL/RESET
Button
16 US ODYSSEY-31TK86500.book 462 ページ 2015年6月24日 水曜日 午後3時0分
Page 494 of 565

493
uuChecking and Maintaining Tires uDOT Tire Quality Grading (U.S. Vehicles)
Continued
Maintenance
DOT Tire Quality Grading (U.S. Vehicles)
The tires on your vehicle m eet all U.S. Federal Safety
Requirements. All tires are also graded for treadwear, traction,
and temperature performance according to Department of
Transportation (DOT) standards. The following explains these
gradings.
Quality grades can be found where applicable on the tire sidewall
between tread shoulder and maximum section width.
The treadwear grade is a comparative rating based on the wear
rate of the tire when tested un der controlled conditions on a
specified government test course. For example, a tire graded 150
would wear one and one-half (1 1/2) times as well on the
government course as a tire graded 100. The relative performance
of tires depends upon the actual co nditions of their use, however,
and may depart significantly from the norm due to variations in
driving habits, service practi ces and differences in road
characteristics and climate.
■Uniform Tire Quality Grading
■Treadwear
1 Uniform Tire Quality Grading
For example:
Treadwear 200
Traction AA
Temperature A
All passenger car tires must conform
to Federal Safety Requirements in
addition to these grades.
16 US ODYSSEY-31TK86500.book 493 ページ 2015年6月24日 水曜日 午後3時0分
Page 496 of 565

495
uuChecking and Maintaining Tires uWear Indicators
Maintenance
Wear Indicators
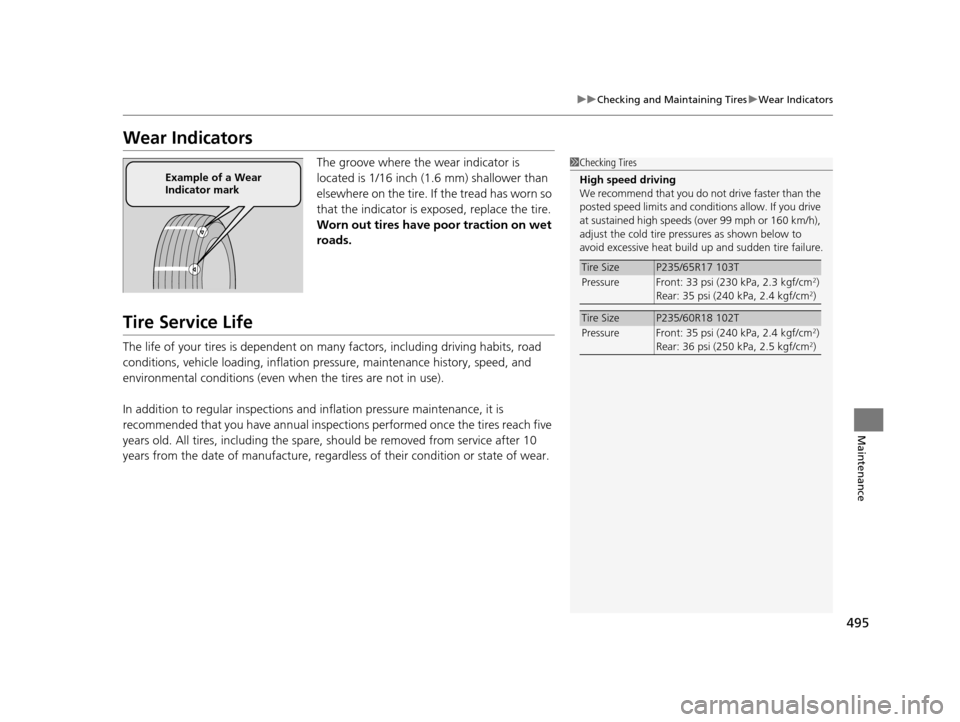
The groove where the wear indicator is
located is 1/16 inch (1.6 mm) shallower than
elsewhere on the tire. If the tread has worn so
that the indicator is ex posed, replace the tire.
Worn out tires have po or traction on wet
roads.
Tire Service Life
The life of your tires is dependent on many factors, including driving habits, road
conditions, vehicle loading, inflation pressure, maintenance history, speed, and
environmental conditions (even wh en the tires are not in use).
In addition to regular inspections and in flation pressure maintenance, it is
recommended that you have annual inspections performed once the tires reach five
years old. All tires, including the spare, should be removed from service after 10
years from the date of manufacture, regardle ss of their condition or state of wear.
1Checking Tires
High speed driving
We recommend that you do not drive faster than the
posted speed limits and condi tions allow. If you drive
at sustained high speeds (over 99 mph or 160 km/h),
adjust the cold tire pressures as shown below to
avoid excessive heat build up and sudden tire failure.
Tire SizeP235/65R17 103T
Pressure Front: 33 psi (230 kPa, 2.3 kgf/cm2)
Rear: 35 psi (240 kPa, 2.4 kgf/cm2)
Tire SizeP235/60R18 102T
Pressure Front: 35 psi (240 kPa, 2.4 kgf/cm2)
Rear: 36 psi (250 kPa, 2.5 kgf/cm2)
Example of a Wear
Indicator mark
16 US ODYSSEY-31TK86500.book 495 ページ 2015年6月24日 水曜日 午後3時0分
Page 525 of 565
524
uuJump Starting u
Handling the Unexpected
Once your vehicle's engine has started, re move the jumper cables in the following
order.
1. Disconnect the jumper cable from your vehicle's ground.
2. Disconnect the other end of the jumper cable from the booster battery -
terminal.
3. Disconnect the jumper cable from your vehicle's battery + terminal.
4. Disconnect the other end of the jumper cable from the booster battery +
terminal.
Have your vehicle inspected by a n earby service station or a dealer.
■What to Do After the Engine Starts
16 US ODYSSEY-31TK86500.book 524 ページ 2015年6月24日 水曜日 午後3時0分
Page 540 of 565
539
Handling the Unexpected
Emergency Towing
Call a professional towing service if you need to tow your vehicle.
■Flat bed equipment
The operator loads your vehicle on the back of a truck.
This is the best way to transport your vehicle.
■Wheel lift equipment
The tow truck uses two pivoti ng arms that go under the front tires and lift them off
the ground. The rear tires remain on the ground. This is an acceptable way to
tow your vehicle.
1 Emergency Towing
NOTICE
Trying to lift or tow your vehicle by the bumpers will
cause serious damage. The bumpers are not designed
to support the vehicle's weight.
NOTICE
Improper towing such as towing behind a
motorhome or other motor vehicle can damage the
transmission.
Never tow your vehicle with just a rope or chain.
It is very dangerous since ropes or chains may shift
from side to side or break.
16 US ODYSSEY-31TK86500.book 539 ページ 2015年6月24日 水曜日 午後3時0分
Page 542 of 565
541
Information
This chapter includes your vehicle's specifications, locations of identification numbers, and other
information required by regulation.
Specifications .................................... 542
Identification Numbers
Vehicle Identification Number (VIN), Engine
Number and Transmission Number .... 544
Devices that Emit Radio Waves ....... 545Reporting Safety Defects
................. 546
Emissions Testing Testing of Readiness Codes.............. 547
Warranty Coverages ........................ 549
Authorized Manuals ......................... 551
Customer Service Information ......... 552
16 US ODYSSEY-31TK86500.book 541 ページ 2015年6月24日 水曜日 午後3時0分
Page 552 of 565
551
Information
Authorized Manuals
■For U.S. Owners:
Manuals can be purchased from Helm Incorporated. You can order a manual by
phone at (800) 782-4356 (credit card orders only), or online at www.helminc.com.
■For Canadian Owners:
Please contact a dealer to order any manuals that you may require.
1Authorized Manuals
Service Manual:
Covers maintenance and recommended procedures
for repair to engine and chassis components. It is
written for the journeyman te chnician, but it is simple
enough for most mechanically inclined owners to
understand.
Electrical Troubleshooting Manual:
Complements the Service Manual by providing in-
depth troubleshooting inform ation for each electrical
circuit in your vehicle.
Body Repair Manual:
Describes the procedures involved in the replacement
of damaged body parts.
16 US ODYSSEY-31TK86500.book 551 ページ 2015年6月24日 水曜日 午後3時0分
Page 553 of 565

552
Information
Customer Service Information
Honda dealership personnel are trained professionals.
They should be able to answer all your questions. If you encounter a problem that
your dealership does not solve to your satisfaction, please discuss it with the
dealership's service manager or general manager. If you are dissatisfied with the
decision made by the dealership's management, contact Honda Customer Services.
U.S. Owners:
American Honda Motor Co., Inc.
Honda Automobile Customer Services
Mail Stop 500-2N-7A
1919 Torrance Blvd.
Torrance, CA 90501-2746
Tel: (800) 999-1009 Canadian Owners:
Honda Canada Inc.
Customer Relations
180 Honda Boulevard
Markham, ON
L6C 0H9
Tel: 1-888-9-HONDA-9
Fax: 1-877-939-0909
E-mail: [email protected]
In Puerto Rico and the U.S. Virgin
Islands:
Bella International
P.O. Box 190816
San Juan, PR 00919-0816
Tel: (787) 620-75461 Customer Service Information
When you call or write, please give us the following
information:
•Vehicle Identification Number
2Vehicle Identification Number (VIN),
Engine Number and Transmission
Number P. 544
•Date of purchase•Odometer reading of your vehicle
•Your name, address, and telephone number
•A detailed description of the problem•Name of the dealer who sold the vehicle to you
16 US ODYSSEY-31TK86500.book 552 ページ 2015年6月24日 水曜日 午後3時0分