2016 HONDA ODYSSEY buttons
[x] Cancel search: buttonsPage 327 of 565
uuHomeLink ® Universal Transceiver*u Training HomeLink
326
Features
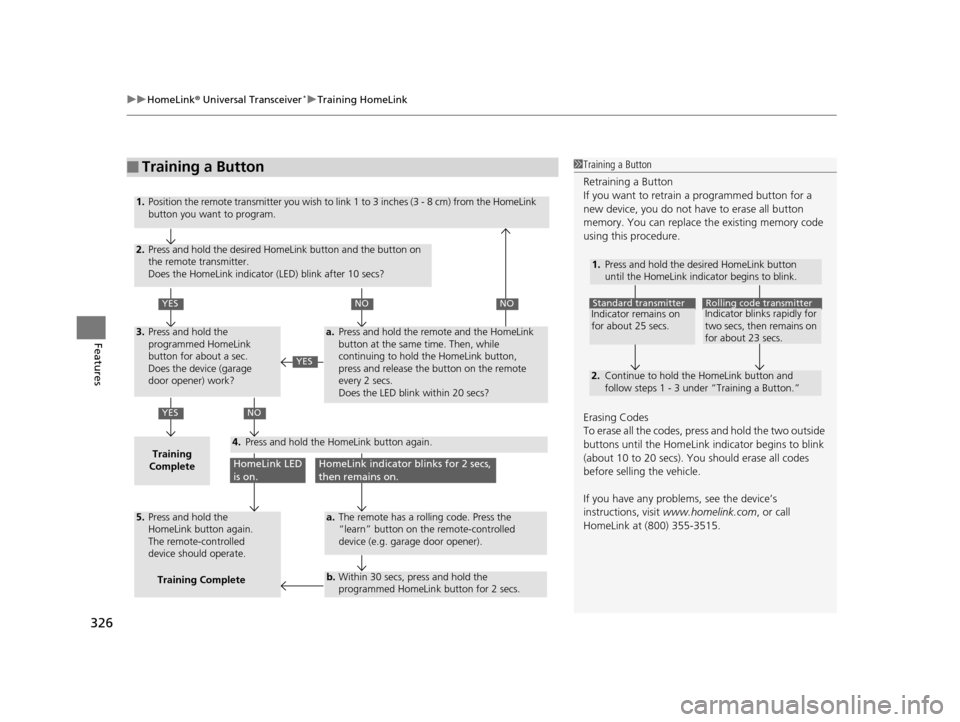
■Training a Button1Training a Button
Retraining a Button
If you want to retrain a programmed button for a
new device, you do not ha ve to erase all button
memory. You can replace the existing memory code
using this procedure.
Erasing Codes
To erase all the codes, press and hold the two outside
buttons until the HomeLink i ndicator begins to blink
(about 10 to 20 secs). You should erase all codes
before selling the vehicle.
If you have any problems, see the device’s
instructions, visit www.homelink.com , or call
HomeLink at (800) 355-3515.
1.
2.
Standard transmitterIndicator remains on
for about 25 secs.Rolling code transmitterIndicator blinks rapidly for
two secs, then remains on
for about 23 secs.
Press and hold the desired HomeLink button
until the HomeLink indicator begins to blink.
Continue to hold the HomeLink button and
follow steps 1 - 3 under “Training a Button.”
1.
2.
YES
YES
YES
NONO
NO
HomeLink LED
is on.HomeLink indicator blinks for 2 secs,
then remains on.
3.
Training
Complete4.
5.
a.
a.
b.
Position the remote transmitter you wish to link 1 to 3 inches (3 - 8 cm) from the HomeLink
button you want to program.
Press and hold the desired HomeLink button and the button on
the remote transmitter.
Does the HomeLink indicator (LED) blink after 10 secs?
Press and hold the
programmed HomeLink
button for about a sec.
Does the device (garage
door opener) work?
Press and hold the remote and the HomeLink
button at the same time. Then, while
continuing to hold the HomeLink button,
press and release the button on the remote
every 2 secs.
Does the LED blink within 20 secs?
The remote has a rolling code. Press the
“learn” button on the remote-controlled
device (e.g. garage door opener).
Within 30 secs, press and hold the
programmed HomeLink button for 2 secs.
Press and hold the HomeLink button again.
Press and hold the
HomeLink button again.
The remote-controlled
device should operate.Training Complete
16 US ODYSSEY-31TK86500.book 326 ページ 2015年6月24日 水曜日 午後3時0分
Page 328 of 565
327Continued
Features
Bluetooth® HandsFreeLink ®
See the Navigation System Manual for how to operate the Bluetooth® HandsFreeLink® .
Bluetooth ® HandsFreeLink ® (HFL) allows you to place and receive phone calls using
your vehicle’s audio system, without handling your cell phone.
Using HFL
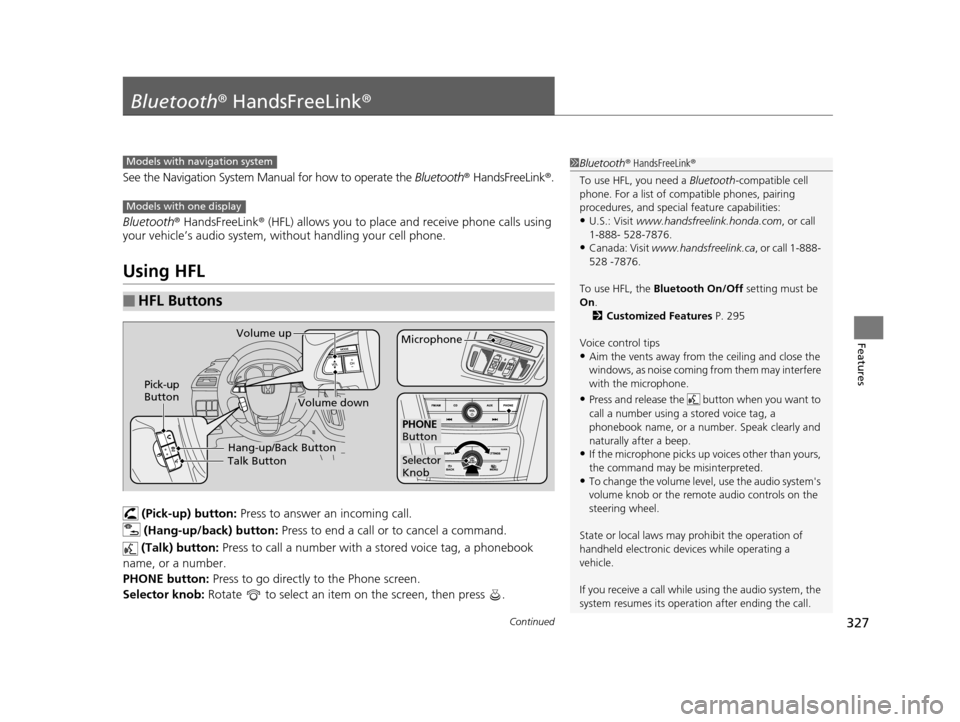
(Pick-up) button: Press to answer an incoming call.
(Hang-up/back) button: Press to end a call or to cancel a command.
(Talk) button: Press to call a number with a stored voice tag, a phonebook
name, or a number.
PHONE button: Press to go directly to the Phone screen.
Selector knob: Rotate to select an item on the screen, then press .
■HFL Buttons
1Bluetooth ® HandsFreeLink ®
To use HFL, you need a Bluetooth-compatible cell
phone. For a list of compatible phones, pairing
procedures, and special feature capabilities:
•U.S.: Visit www.handsfreelink.honda.com , or call
1-888- 528-7876.
•Canada: Visit www.handsfreelink.ca , or call 1-888-
528 -7876.
To use HFL, the Bluetooth On/Off setting must be
On .
2 Customized Features P. 295
Voice control tips
•Aim the vents away from the ceiling and close the
windows, as noise coming fr om them may interfere
with the microphone.
•Press and release the but ton when you want to
call a number using a stored voice tag, a
phonebook name, or a numbe r. Speak clearly and
naturally after a beep.
•If the microphone picks up vo ices other than yours,
the command may be misinterpreted.
•To change the volume level, use the audio system's
volume knob or the remote audio controls on the
steering wheel.
State or local laws may prohibit the operation of
handheld electronic devices while operating a
vehicle.
If you receive a call while using the audio system, the
system resumes its operati on after ending the call.
Models with navigation system
Models with one display
Talk ButtonVolume up
MicrophoneHang-up/Back Button
Pick-up
Button
Volume down
Selector
Knob
PHONE
Button
16 US ODYSSEY-31TK86500.book 327 ページ 2015年6月24日 水曜日 午後3時0分
Page 353 of 565
uuBluetooth ® HandsFreeLink ®u HFL Menus
352
Features
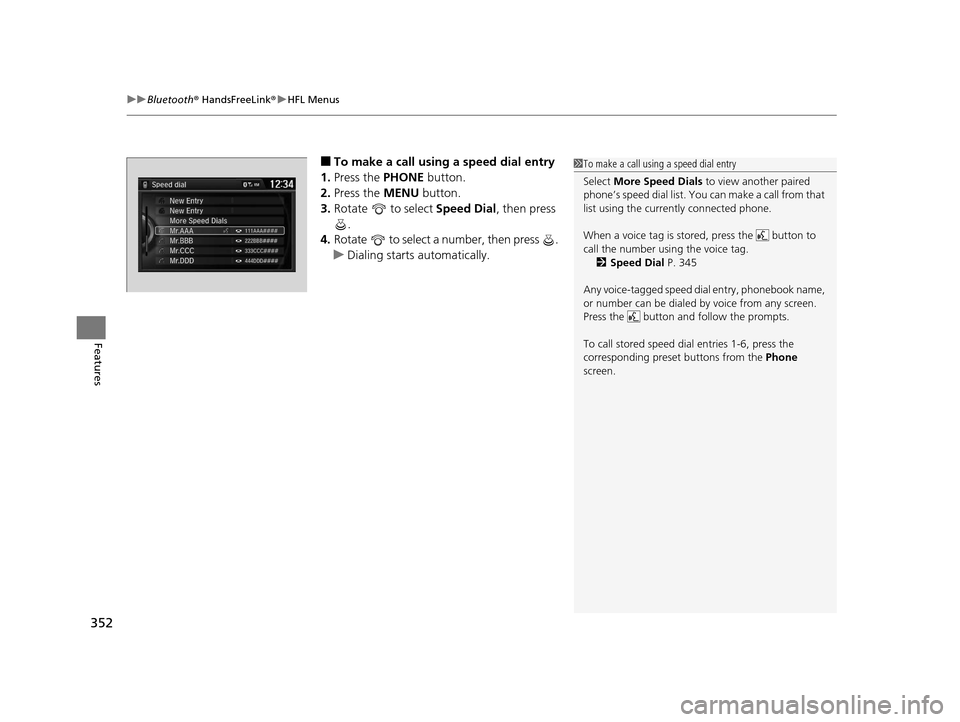
■To make a call using a speed dial entry
1. Press the PHONE button.
2. Press the MENU button.
3. Rotate to select Speed Dial, then press
.
4. Rotate to select a number, then press .
u Dialing starts automatically.1To make a call using a speed dial entry
Select More Speed Dials to view another paired
phone’s speed dial list. You ca n make a call from that
list using the currently connected phone.
When a voice tag is stored, press the button to
call the number using the voice tag.
2 Speed Dial P. 345
Any voice-tagged speed di al entry, phonebook name,
or number can be dialed by voice from any screen.
Press the button and follow the prompts.
To call stored speed dial entries 1-6, press the
corresponding preset buttons from the Phone
screen.
16 US ODYSSEY-31TK86500.book 352 ページ 2015年6月24日 水曜日 午後3時0分
Page 361 of 565
360
Features
Bluetooth® HandsFreeLink ®
See the Navigation System Manu al for how to operate the Bluetooth® HandsFreeLink ®.
Bluetooth ® HandsFreeLink ® (HFL) allows you to place and receive phone calls using
your vehicle’s audio system, without handling your cell phone.
Using HFL
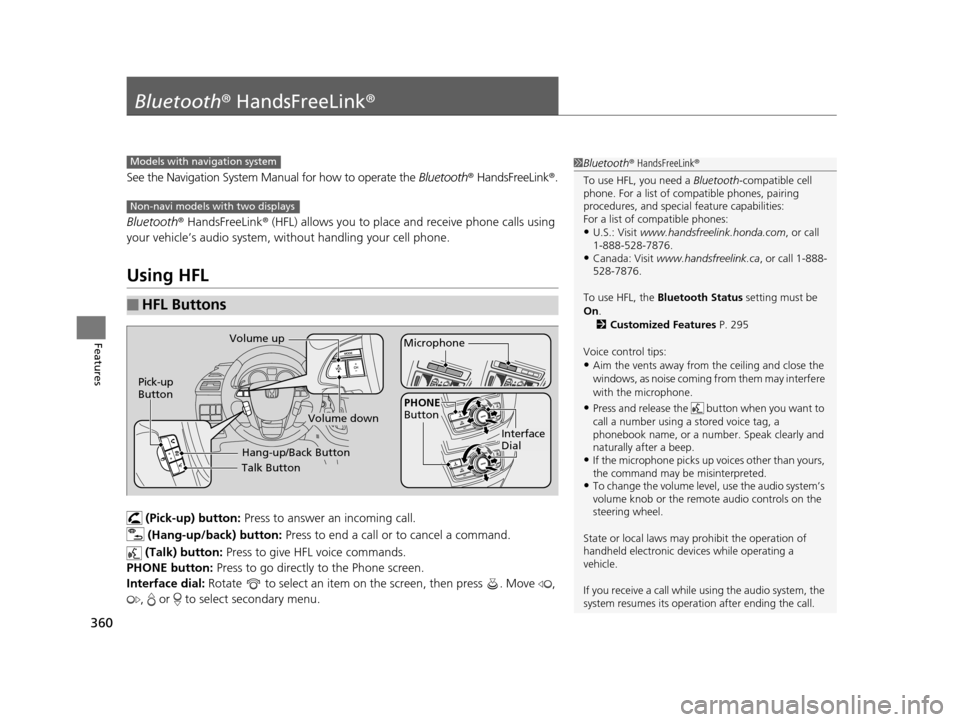
(Pick-up) button: Press to answer an incoming call.
(Hang-up/back) button: Press to end a call or to cancel a command.
(Talk) button: Press to give HFL voice commands.
PHONE button: Press to go directly to the Phone screen.
Interface dial: Rotate to select an item on the screen, then press . Move ,
, or to select secondary menu.
■HFL Buttons
1 Bluetooth ® HandsFreeLink ®
To use HFL, you need a Bluetooth-compatible cell
phone. For a list of compatible phones, pairing
procedures, and special feature capabilities:
For a list of compatible phones:
•U.S.: Visit www.handsfreelink.honda.com , or call
1-888-528-7876.
•Canada: Visit www.handsfreelink.ca , or call 1-888-
528-7876.
To use HFL, the Bluetooth Status setting must be
On .
2 Customized Features P. 295
Voice control tips:
•Aim the vents away from the ceiling and close the
windows, as noise coming fr om them may interfere
with the microphone.
•Press and release the but ton when you want to
call a number using a stored voice tag, a
phonebook name, or a numbe r. Speak clearly and
naturally after a beep.
•If the microphone picks up vo ices other than yours,
the command may be misinterpreted.
•To change the volume level, use the audio system’s
volume knob or the remote audio controls on the
steering wheel.
State or local laws may prohibit the operation of
handheld electronic devices while operating a
vehicle.
If you receive a call while using the audio system, the
system resumes its operati on after ending the call.
Models with navigation system
Non-navi models with two displays
Talk Button
Volume up
Microphone
Hang-up/Back Button
Pick-up
Button
Volume down
Interface
Dial
PHONE
Button
16 US ODYSSEY-31TK86500.book 360 ページ 2015年6月24日 水曜日 午後3時0分
Page 502 of 565
501
uuRemote Transmitter Care uReplacing the Button Battery
Maintenance
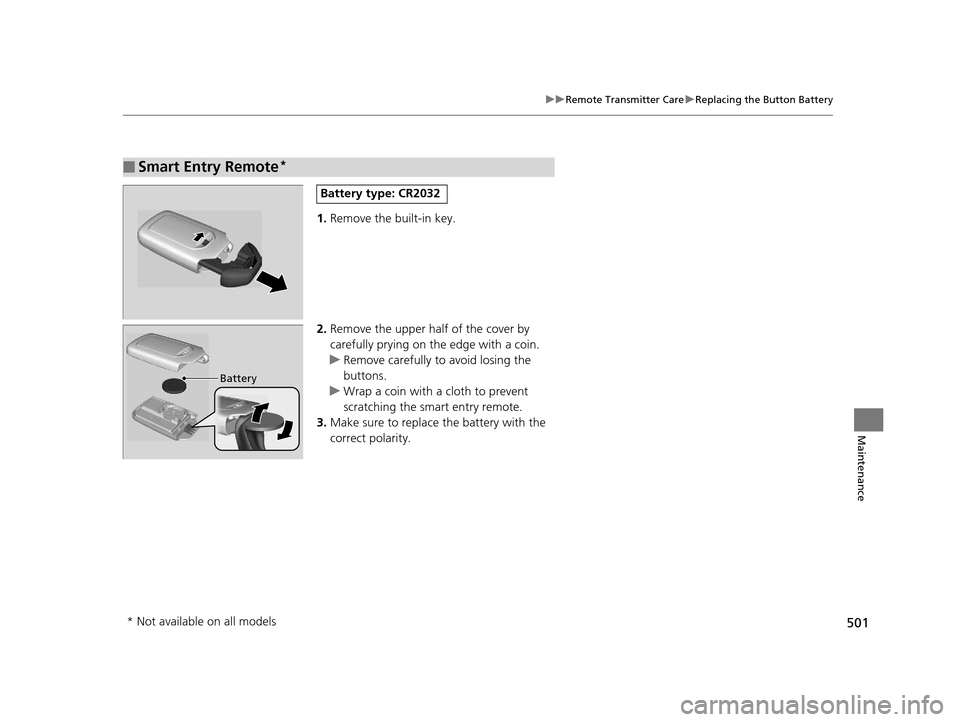
1. Remove the built-in key.
2. Remove the upper half of the cover by
carefully prying on the edge with a coin.
u Remove carefully to avoid losing the
buttons.
u Wrap a coin with a cloth to prevent
scratching the smart entry remote.
3. Make sure to replace the battery with the
correct polarity.
■Smart Entry Remote*
Battery type: CR2032
Battery
* Not available on all models
16 US ODYSSEY-31TK86500.book 501 ページ 2015年6月24日 水曜日 午後3時0分
Page 503 of 565
502
Maintenance
Remote Control and Wireless Headphone Care*
Replacing the Battery
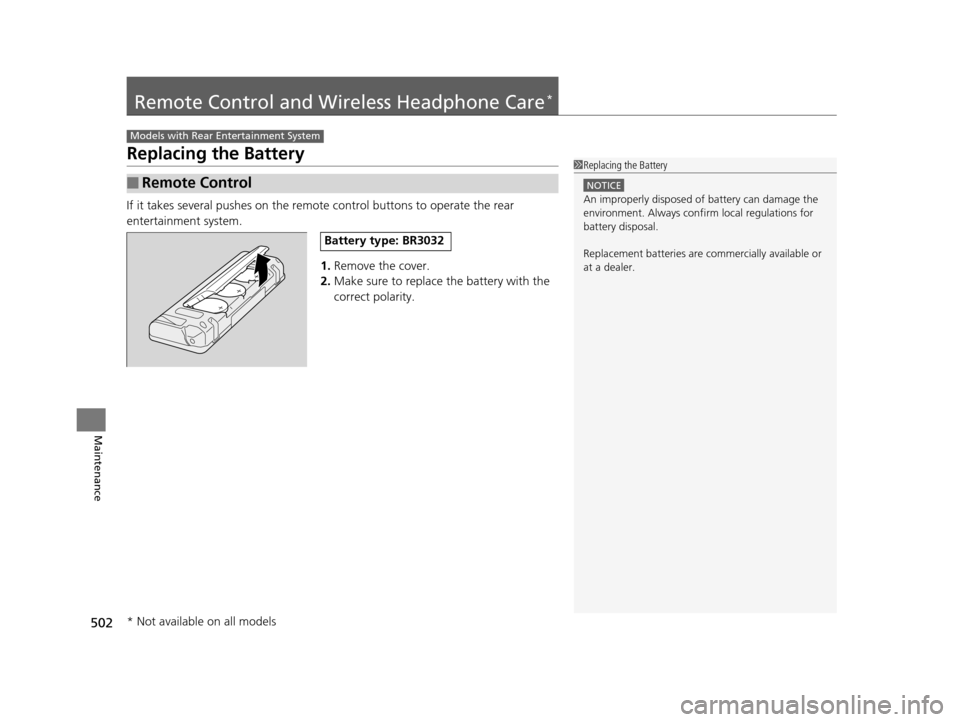
If it takes several pushes on the remote control buttons to operate the rear
entertainment system.
1.Remove the cover.
2. Make sure to replace the battery with the
correct polarity.
■Remote Control
Models with Rear Entertainment System
1 Replacing the Battery
NOTICE
An improperly disposed of battery can damage the
environment. Always conf irm local regulations for
battery disposal.
Replacement batteries are commercially available or
at a dealer.
Battery type: BR3032
* Not available on all models
16 US ODYSSEY-31TK86500.book 502 ページ 2015年6月24日 水曜日 午後3時0分
Page 522 of 565
521
uuEngine Does Not Start uIf the Smart Entry Remote Battery is Weak
Handling the Unexpected
If the Smart Entry Remote Battery is Weak
If the beeper sounds, the indicator on the ENGINE START/STOP button flashes,
and the engine won’t start.
The TO START, HOLD REMOTE NEAR START BUTTON message appears on the
multi-information display.
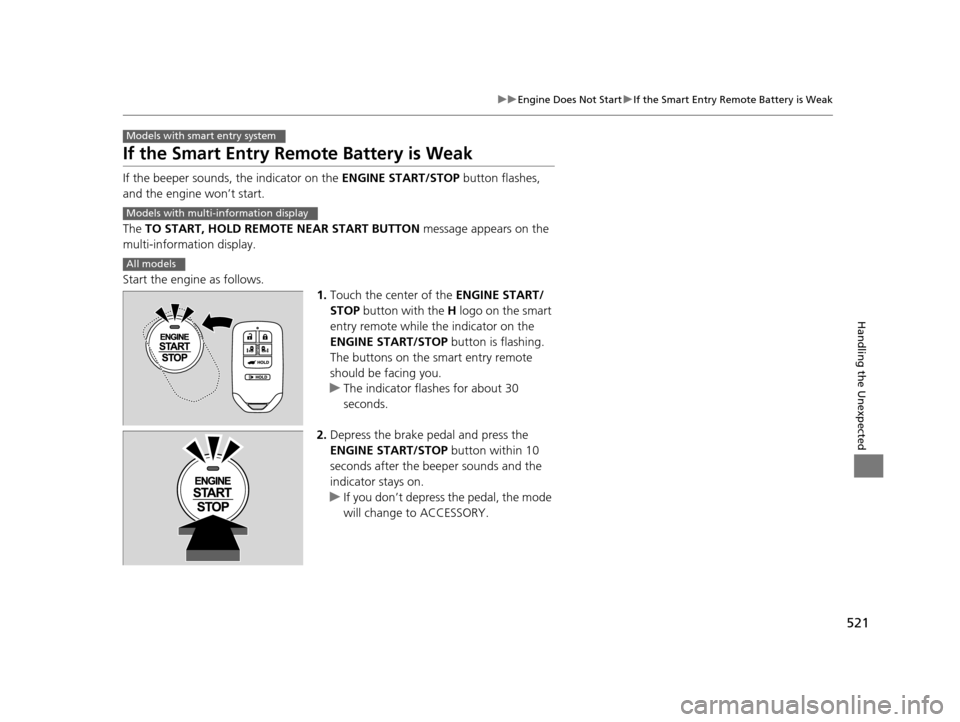
Start the engine as follows. 1.Touch the center of the ENGINE START/
STOP button with the H logo on the smart
entry remote while the indicator on the
ENGINE START/STOP button is flashing.
The buttons on the smart entry remote
should be facing you.
u The indicator flashes for about 30
seconds.
2. Depress the brake pedal and press the
ENGINE START/STOP button within 10
seconds after the beeper sounds and the
indicator stays on.
u If you don’t depress the pedal, the mode
will change to ACCESSORY.
Models with smart entry system
Models with multi- information display
All models
16 US ODYSSEY-31TK86500.book 521 ページ 2015年6月24日 水曜日 午後3時0分
Page 557 of 565
556
Index
Fuses.......................................................... 533
Inspecting and Changing ......................... 538
Locations ................. 533, 534, 535, 536, 537
G
Gasoline (Fuel)
Economy ................................................. 449
Gauge ....................................................... 92
Information ............................................. 446
Instant Fuel Economy ........................... 94, 97
Low Fuel Indicator ..................................... 73
Refueling ................................................. 446
Gauges ......................................................... 92
Gear Shift Lever Positions Automatic Transmission ........................... 413
Glass (care) ........................................ 505, 508
Glove Box .................................................. 178
Grocery Bag Hooks ................................... 187
H
Halogen Bulbs................................... 475, 479
Handling the Unexpected ........................ 509
HandsFreeLink® (HFL)....................... 327, 360
Auto Answer ................................... 342, 374
Automatic Import of Ce llular Phonebook and
Call History .................................... 344, 376
Automatic Transferring .................... 342, 374
Displaying e-mail messages ...................... 389
Displaying Text Me ssages................. 356, 388 HFL Buttons..................................... 327, 360
HFL Menus ...................................... 329, 362
HFL Status Display ........................... 328, 361
Limitations for Manual Operation .... 328, 361
Making a Call .................................. 348, 380
Options During a Call ...................... 354, 385
Phone Setup.................................... 334, 366
Receiving a Call ............................... 353, 384
Receiving a Text Message ........................ 355
Receiving a Text/E-mail Message.............. 386
Ring Tone........................................ 343, 375
Selecting a Mail Account ......................... 387
Speed Dial ....................................... 345, 377
To Create a Security PIN .................. 341, 373
To Set Up a Text Message Options .......... 339
To Set Up a Text/E-mail Message
Options ................................................. 371
Use Contact Photo .................................. 375
Hazard Warning Button .............................. 4
Head Restraints ........................................ 164
Headlights ................................................. 147
Aiming .................................................... 475
Automatic Operation............................... 148
Dimming ......................................... 147, 150
Operating................................................ 147
Heaters (Seat) ........................................... 189
Heating and Cooling System ................... 194
Cooling ................................................... 196
Defrosting the Windshield and Windows ............................................... 196
Dust and Pollen Filter............................... 504 Heating................................................... 195
HFL (HandsFreeLink ®) ...................... 327, 360
High Beam Indicator .................................. 77
HondaVAC
TM............................................. 191
I
Identification Numbers Engine and Transmission ......................... 544
Vehicle Identification............................... 544
Ignition Switch ......................................... 142
Illumination Control ................................ 153
Knob ...................................................... 153
Immobilizer System .................................. 135
Indicator ................................................... 78
Indicators .................................................... 70
Anti-lock Brake System (ABS) .................... 73
Blind spot information (BSI) ....................... 83
Brake System (Amber) ............................... 70
Charging System............................... 72, 528
CRUISE CONTROL ............................. 82, 416
CRUISE MAIN.................................... 82, 415
Daytime Running Lights ............................ 75
Door and Tailgate Open ...................... 29, 75
Fog Light .................................................. 78
Forward Collision Wa rning (FCW) ............. 80
Fuel Economy ........................................... 82
Hazard Warning........................................ 77
High Beam ................................................ 77
Immobilizer System ................................... 78
Lane Departure Warning (LDW) ................ 81
16 US ODYSSEY-31TK86500.book 556 ページ 2015年6月24日 水曜日 午後3時0分