Page 305 of 565
304
uuCustomized Features u
Features
Setup
Group Customizable Features
Description Selectable Settings
Info
Settings Clock/
Wall-
paper
type
Clock Type
See System Settings on P. 299 to P. 300
Wallpaper
Clock Adjustment
Clock Format
Default Cancels/Resets all cust
omized items in the Info
Settings group as default. Yes
/No
16 US ODYSSEY-31TK86500.book 304 ページ 2015年6月24日 水曜日 午後3時0分
Page 309 of 565
308
uuCustomized Features u
Features
■Customization flow
Models with two displays
Press the SETTINGS button.
Voice Prompt
Message Auto Reading
Volume
Interface Dial Feedback
Verbal Reminder
Brightness
Contrast
Black Level
Bluetooth Status
Bluetooth Device List
Edit Pairing Code
Default
Sound/Beep
Display
System
SettingsBluetooth
Voice
Recog.
System Device Information
Factory Data Reset
Background Color
Header Clock Display
Clock Reset
Clock
Clock Adjustment
Clock Format
Clock
Language
Voice Command Tips
Others
Wallpaper
Clock/Wallpaper
Type
16 US ODYSSEY-31TK86500.book 308 ページ 2015年6月24日 水曜日 午後3時0分
Page 312 of 565
311
uuCustomized Features u
Continued
Features
Add Bluetooth
Device
Disconnect
Default
PhoneConnect phone
Edit Bluetooth Device
Add Bluetooth Device
Bluetooth Device
List
Edit Speed Dial
Auto Transfer
Auto Answer
Ring Tone
Automatic Phone Sync
Use Contact Photo
Default
Default
Enable Text/Email
Select Account
New Text/Email Alert
Text/Email
Phone
Settings
Clock Reset
Info Screen Preference
Clock Format
Clock/Wallpaper Type
Clock Adjustment
Clock
Default
Other
Info
Settings
16 US ODYSSEY-31TK86500.book 311 ページ 2015年6月24日 水曜日 午後3時0分
Page 314 of 565
313
uuCustomized Features u
Continued
Features
*1:Default SettingSetup
Group Customizable Features Description Selectable Settings
System
Settings
Voice
Recog.Voice PromptTurns the voice prompt on and off.On*1/
Off
Clock
Clock/
Wallpaper
Type
ClockChanges the clock display type.Analogue/ Digital*1/
Small Digital/ Off
Wallpaper
●Changes the wallpaper type.●Imports an image file for a new wallpaper.●Deletes an image file for a wallpaper.2Wallpaper Setup P. 241
Blank/Galaxy*1/
Metallic
Clock AdjustmentAdjusts Clock.
2 Clock P. 108—
Clock FormatSelects the digital clock display from 12H to 24H.12H*1/24H
Clock ResetResets the settings of all items in the Clock group.—
16 US ODYSSEY-31TK86500.book 313 ページ 2015年6月24日 水曜日 午後3時0分
Page 315 of 565
314
uuCustomized Features u
Features
*1:Default SettingSetup
Group Customizable Features Descri
ption Selectable Settings
System
SettingsOthers
LanguageChanges the display language.English*1/French /
Spanish
Voice Command Tips
Alerts you when manual control of the system is
disabled to prevent distraction while driving. Only
voice commands are available.
On*1/ Off
Background ColorChanges the background color of the audio/
information screen and the audio with touch screen.Blue*1/Amber /Red/
Green
Header Clock DisplaySelects whether the clock display comes on or not.On*1/ Off
System Device InformationDisplays the system /Device information.—
Factory Data ResetResets all the settings to their factory default.
2Defaulting All the Settings P. 324—
DefaultCancels /Resets all customized items in the
System Settings group as default.Default/OK
16 US ODYSSEY-31TK86500.book 314 ページ 2015年6月24日 水曜日 午後3時0分
Page 324 of 565
323
uuCustomized Features u
Features
*1:Default SettingSetup
Group Customizable Features Description Selectable Settings
Info
Settings Clock
Clock/
Wallpaper
type
Clock
See System Settings on P. 312 to P. 314.
Wallpaper
Clock Adjustment
Clock Format
Clock Reset
Others Info Screen Preference Selects either of the fo
llowing to be displayed
when you press the INFO button.
●Info Top: Some of the available menu items pop up.●Info Menu : All available menu items pop up.●Off: The menu item you selected last time is displayed. Info Top/
Info
Menu
*1/ Off
Default Cancels/Resets all customized items in the
Info
Settings group as default. Default/
OK
16 US ODYSSEY-31TK86500.book 323 ページ 2015年6月24日 水曜日 午後3時0分
Page 472 of 565

471
uuMaintenance Under the Hood uEngine Coolant
Maintenance
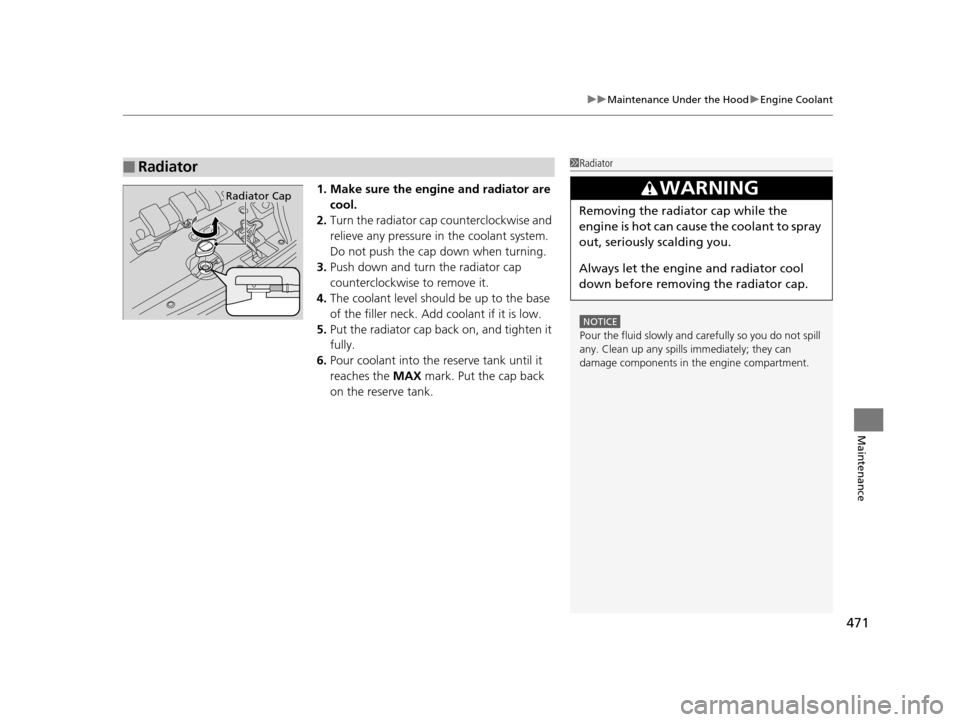
1. Make sure the engine and radiator are
cool.
2. Turn the radiator cap counterclockwise and
relieve any pressure in the coolant system.
Do not push the cap down when turning.
3. Push down and turn the radiator cap
counterclockwise to remove it.
4. The coolant level should be up to the base
of the filler neck. Add coolant if it is low.
5. Put the radiator cap back on, and tighten it
fully.
6. Pour coolant into the reserve tank until it
reaches the MAX mark. Put the cap back
on the reserve tank.
■Radiator1 Radiator
NOTICE
Pour the fluid slowly and ca refully so you do not spill
any. Clean up any spills immediately; they can
damage components in the engine compartment.
3WARNING
Removing the radiator cap while the
engine is hot can cause the coolant to spray
out, seriously scalding you.
Always let the engine and radiator cool
down before removing the radiator cap.
Radiator Cap
16 US ODYSSEY-31TK86500.book 471 ページ 2015年6月24日 水曜日 午後3時0分
Page 478 of 565
477
uuReplacing Light Bulbs uHeadlight Bulbs
Continued
Maintenance
2. Push the tab to remove the coupler.
3. Rotate the old bulb counterclockwise to
remove.
4. Insert a new bulb into the headlight
assembly and turn it clockwise.
5. Insert the coupler into the connector of the
bulb.
Tab
Coupler
Bulb
16 US ODYSSEY-31TK86500.book 477 ページ 2015年6月24日 水曜日 午後3時0分