2016 HONDA ODYSSEY brake light
[x] Cancel search: brake lightPage 422 of 565
421
uuWhen Driving uForward Collision Warning (FCW)*
Driving
FCW may not activate or may not detect a ve hicle in front of your vehicle, and may
activate even when you are aware of a ve hicle ahead of you, or when there is no
vehicle ahead under the following conditions.
■FCW Limitations
Condition
●The distance between your vehicle and the vehicle ahead of you is too short.●A vehicle cuts in front of you at a slow speed, and it brakes suddenly.●A vehicle suddenly crosses in front of you.●When either your vehicle or the vehicle ahead of you a ccelerates rapidly.●The vehicle ahead of you is a motorcycle, a small vehicle, or a unique vehicle such as a
tractor.
●When you drive off-road or on a mountain road, or curved and winding road for an
extended period that makes it difficult for the camera to properly dete ct a vehicle in front
of you.
●When there are pedestrians or an imals in front of your vehicle.●When you drive in bad weather (rain, fog, etc.).●A heavy load in the rear or modificati ons to the suspension tilts your vehicle.●An abnormal tire condition is detected (wrong tire size, flat tire, etc.).●When the windshield is blocked by dirt, mud, leaves, wet snow, etc.●When the temperature inside the system is high.●A sudden change between light and dark such as an entr ance or exit of a tunnel.●You drive into the sunlight (e.g. at dawn or dusk).●When the windshield is dirty or cloudy.●When streetlights are perceived as the ta illight of a vehicle in front of yours.●When driving at night, the vehi cle ahead of you is running with either taillight bulb burned
out.
●When you drive in the shadows of trees, buildings, etc.●When your vehicle is towing a trailer.
16 US ODYSSEY-31TK86500.book 421 ページ 2015年6月24日 水曜日 午後3時0分
Page 424 of 565
Continued423
uuWhen Driving uLane Departure Warning (LDW)*
Driving
The system begins to search for lane marki ngs when all the following conditions are met:
• The vehicle is traveling betw een 40-90 mph (64-145 km/h).
• The vehicle is on a straight or slightly curved road.
• The turn signals are off.
• The brake pedal is not depressed.
■How the System Activates1How the System Activates
LDW may automaticall y shut off and the LDW
indicator comes and stays on.
2 Indicators P. 70
16 US ODYSSEY-31TK86500.book 423 ページ 2015年6月24日 水曜日 午後3時0分
Page 438 of 565
437
uuBraking uBrake System
Driving
Your vehicle is equipped with disc brakes at all four wheels. A vacuum power assist
helps reduce the effort needed on the brake pedal. The brake assist system increases
the stopping force when you depress the brake pedal hard in an emergency
situation. The anti-lock brake system (ABS) helps you retain steering control when
braking very hard.
2 Brake Assist System P. 439
2 Anti-lock Brake System (ABS) P. 438
■Foot Brake1Foot Brake
Check the brakes after driving through deep water,
or if there is a buildup of road surface water. If
necessary, dry the brakes by lightly depressing the
pedal several times.
If you hear a continuous me tallic friction sound when
applying the brakes, the brake pads need to be
replaced. Have the vehicle checked by a dealer.
Constantly using the brak e pedal while going down a
long hill builds up heat, which reduces the brake
effectiveness. Apply engine braking by taking your
foot off the accelerator pe dal and downshifting to a
lower gear.
Do not rest your foot on the brake pedal while
driving, as it will lightly apply the brakes and cause
them to lose effectiveness over time and reduce pad
life. It will also conf use drivers behind you.
16 US ODYSSEY-31TK86500.book 437 ページ 2015年6月24日 水曜日 午後3時0分
Page 439 of 565
438
uuBraking uAnti-lock Brake System (ABS)
Driving
Anti-lock Brake System (ABS)
Helps prevent the wheels from locking up, a nd helps you retain steering control by
pumping the brakes rapidly, much faster than you.
The electronic brake distribution (EBD) system, which is part of the ABS, also
balances the front-to-rear braking distri bution according to vehicle loading.
You should never pump the brake pedal. Let the ABS work for you by always
keeping firm, steady pressure on the brake pe dal. This is sometimes referred to as
“stomp and steer.”
■ABS operation
The brake pedal may pulsate slightly when the ABS is working. Keep holding the
pedal firmly down. On dry pavement, you will need to press on the brake pedal very
hard before the ABS activates. However, you may feel the ABS activate immediately
if you are trying to stop on snow or ice.
When the vehicle speed goes unde r 6 mph (10 km/h), the ABS stops.
■ABS1Anti-lock Brake System (ABS)
NOTICE
The ABS may not function correctly if you use an
incorrect tire type and size.
When the ABS indicator comes on while driving,
there may be a problem with the system.
While normal braking is not affected, there is a
possibility of the ABS not operating. Have the vehicle
checked by a dealer immediately.
The ABS does not reduce the ti me or distance it takes
to stop the vehicle. It only helps with steering control
during hard braking.
In the following cases, yo ur vehicle may need more
stopping distance than a vehicle without the ABS:
•When driving on rough road surfaces, including
when driving on uneven surf aces, such as gravel or
snow.
•When snow chains are installed.
You may hear a motor sound coming from the
engine compartment while system checks are being
performed immediately after starting the engine or
while driving. This is normal.
16 US ODYSSEY-31TK86500.book 438 ページ 2015年6月24日 水曜日 午後3時0分
Page 440 of 565
439
uuBraking uBrake Assist System
Driving
Brake Assist System
Designed to assist the driver by generating greater braking force when you depress
the brake pedal hard during emergency braking.
■Brake assist system operation
Press the brake pedal firmly for more powerful braking.
When brake assist operates, the pedal may wiggle slightly and an operating noise
may be heard. This is normal. Keep holding the brake pedal firmly down.
16 US ODYSSEY-31TK86500.book 439 ページ 2015年6月24日 水曜日 午後3時0分
Page 452 of 565
451
Maintenance
This chapter discusses basic maintenance.
Before Performing MaintenanceInspection and Maintenance ............ 452
Safety When Performing Maintenance..... 453Parts and Fluids Used in Maintenance Service ........................................... 454
Maintenance Minder
TM..................... 455
Maintenance Under the Hood
Maintenance Items Under the Hood ..... 463Opening the Hood ........................... 464
Recommended Engine Oil ................ 465
Oil Check ......................................... 466
Adding Engine Oil ............................ 467
Changing the Engine Oil and Oil Filter ..... 468
Engine Coolant ................................ 470
Transmission Fluid ............................ 472
Brake Fluid ....................................... 473
Power Steering Fluid Check.............. 474
Refilling Window Wa sher Fluid......... 474
Replacing Light Bulbs ....................... 475
Checking and Maintaining Wiper Blades.... 486Checking and Maintaining Tires
Checking Tires ................................. 490
Tire and Loading Information Label ...... 491Tire Labeling .................................... 491DOT Tire Quality Grading (U.S. Vehicles)....... 493Wear Indicators................................ 495 Tire Service Life ................................ 495
Tire and Wheel Replacement ........... 496
Tire Rotation .................................... 497
Winter Tires ..................................... 498
Battery ............................................... 499
Remote Transmitter Care ................. 500
Remote Control and Wireless Headphone Care
*........................... 502
Heating and Cooling System*/Climate
Control System* Maintenance ....... 504
Cleaning Interior Care .................................... 505
Exterior Care.................................... 507
* Not available on all models
16 US ODYSSEY-31TK86500.book 451 ページ 2015年6月24日 水曜日 午後3時0分
Page 453 of 565
452
Maintenance
Before Performing Maintenance
Inspection and Maintenance
For your safety, perform all listed inspections and maintenance to keep your vehicle
in good condition. If you become aware of any abnormality (noise, smell, insufficient
brake fluid, oil residue on the ground, etc.), have your vehicle inspected by a dealer.
(Note, however, that service at a dealer is not mandatory to keep your warranties in
effect.)
■Daily inspections
Perform inspections before long distance tri ps, when washing the vehicle, or when
refueling.
■Periodic inspections
• Check the brake fluid level monthly.
2 Brake Fluid P. 473
•Check the tire pressure monthly. Examin e the tread for wear and foreign objects.
2Checking and Maintaining Tires P. 490
•Check the operation of the exterior lights monthly.
2 Replacing Light Bulbs P. 475
•Check the condition of the wiper bl ades at least every six months.
2Checking and Maintaining Wiper Blades P. 486
■Types of Inspection and Maintenance
1Inspection and Maintenance
Maintenance, replacement, or repair of
emissions control devices and systems may be
done by any automotive repair establishment or
individuals using parts that are “certified” to
EPA standards.
According to state and fede ral regulations, failure to
perform maintenance on the maintenance main
items marked with # will not void your emissions
warranties. However, all ma intenance services should
be performed in accordan ce with the intervals
indicated by the information display
*/multi-
information display*.
2 Maintenance Service Items P. 457, 461
If you want to perform complex maintenance tasks
that require more skills a nd tools, you can purchase a
subscription to the Service Express website at
www.techinfo.honda.com.
2 Authorized Manuals P. 551
If you want to perform ma intenance yourself, make
sure that you have the necessary tools and skills first.
After performing ma intenance, update the records in
the separate maintenance booklet.
U.S. models
* Not available on all models
16 US ODYSSEY-31TK86500.book 452 ページ 2015年6月24日 水曜日 午後3時0分
Page 465 of 565
464
uuMaintenance Under the Hood uOpening the Hood
Maintenance
Opening the Hood
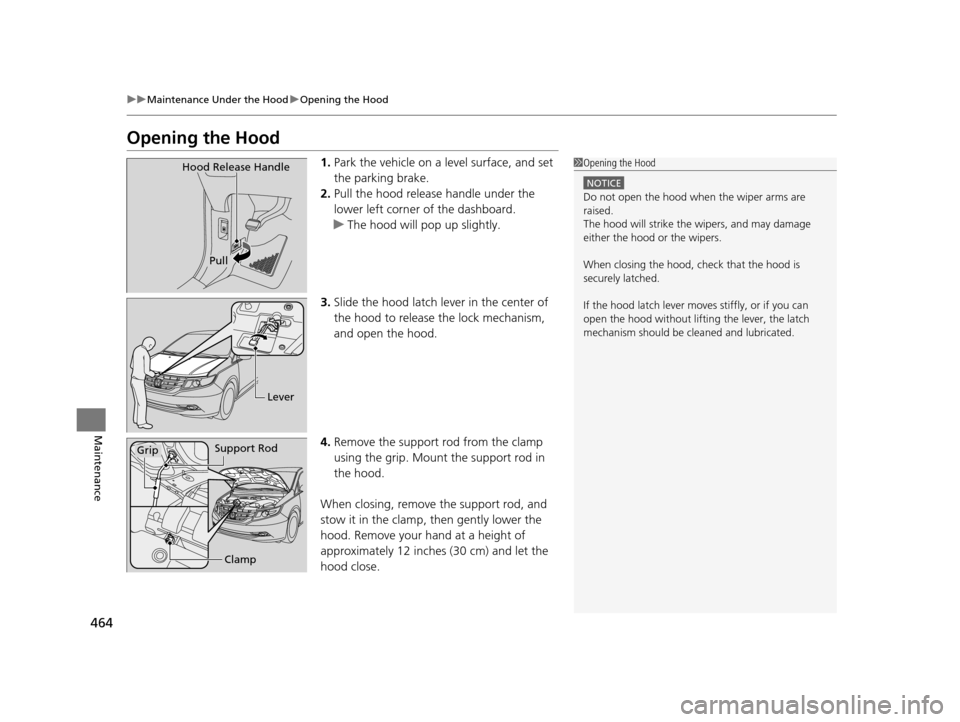
1. Park the vehicle on a level surface, and set
the parking brake.
2. Pull the hood release handle under the
lower left corner of the dashboard.
u The hood will pop up slightly.
3. Slide the hood latch lever in the center of
the hood to release the lock mechanism,
and open the hood.
4. Remove the support rod from the clamp
using the grip. Mount the support rod in
the hood.
When closing, remove the support rod, and
stow it in the clamp, then gently lower the
hood. Remove your hand at a height of
approximately 12 inches (30 cm) and let the
hood close.1 Opening the Hood
NOTICE
Do not open the hood when the wiper arms are
raised.
The hood will strike the wipers, and may damage
either the hood or the wipers.
When closing the hood, check that the hood is
securely latched.
If the hood latch lever moves stiffly, or if you can
open the hood without lifti ng the lever, the latch
mechanism should be cleaned and lubricated.
Hood Release Handle
Pull
Lever
Support RodGrip
Clamp
16 US ODYSSEY-31TK86500.book 464 ページ 2015年6月24日 水曜日 午後3時0分