Page 478 of 565
477
uuReplacing Light Bulbs uHeadlight Bulbs
Continued
Maintenance
2. Push the tab to remove the coupler.
3. Rotate the old bulb counterclockwise to
remove.
4. Insert a new bulb into the headlight
assembly and turn it clockwise.
5. Insert the coupler into the connector of the
bulb.
Tab
Coupler
Bulb
16 US ODYSSEY-31TK86500.book 477 ページ 2015年6月24日 水曜日 午後3時0分
Page 479 of 565
478
uuReplacing Light Bulbs uHeadlight Bulbs
Maintenance
High voltage can remain in the circuit for a long period of time after the light is
switched off. Do not attempt to inspect or replace the high voltage discharge type
bulbs yourself. Ask a dealer to insp ect and replace low beam headlights.
1. Push the tab to remove the coupler.
2. Rotate the old bulb counterclockwise to
remove.
3. Insert a new bulb into the headlight
assembly and turn it clockwise.
4. Insert the coupler into the connector of the
bulb.
■Low Beam Headlights
■Low Beam Headlights
Models with high voltage discharge tube bulbs
Models with halogen low beam headlight bulbs
Tab
Coupler
Bulb
16 US ODYSSEY-31TK86500.book 478 ページ 2015年6月24日 水曜日 午後3時0分
Page 480 of 565

479
uuReplacing Light Bulbs uFog Light Bulbs*
Maintenance
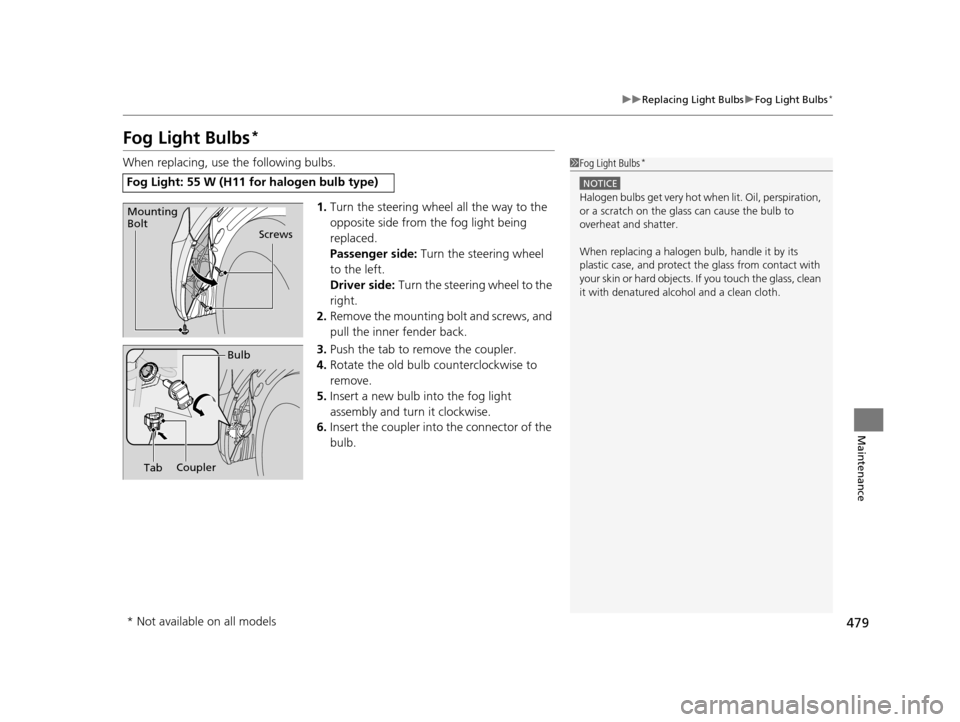
Fog Light Bulbs*
When replacing, use the following bulbs.
1.Turn the steering wheel all the way to the
opposite side from the fog light being
replaced.
Passenger side: Turn the steering wheel
to the left.
Driver side: Turn the steering wheel to the
right.
2. Remove the mounting bolt and screws, and
pull the inner fender back.
3. Push the tab to remove the coupler.
4. Rotate the old bulb counterclockwise to
remove.
5. Insert a new bulb into the fog light
assembly and turn it clockwise.
6. Insert the coupler into the connector of the
bulb.
Fog Light: 55 W (H11 for halogen bulb type)
1 Fog Light Bulbs*
NOTICE
Halogen bulbs get very hot when lit. Oil, perspiration,
or a scratch on the glass can cause the bulb to
overheat and shatter.
When replacing a halogen bulb, handle it by its
plastic case, and protect the glass from contact with
your skin or hard objects. If you touch the glass, clean
it with denatured alc ohol and a clean cloth.
Screws
Mounting
Bolt
Bulb
Coupler
Tab
* Not available on all models
16 US ODYSSEY-31TK86500.book 479 ページ 2015年6月24日 水曜日 午後3時0分
Page 481 of 565
480
uuReplacing Light Bulbs uFront Turn Signal/Parking/Side Marker Light Bulbs
Maintenance
Front Turn Signal/Parking/Side Marker Light Bulbs
When replacing, use the following bulbs.
1.Turn the socket c ounterclockwise and
remove it.
2. Remove the old bulb and insert a new bulb.
Side Turn Signal/Emergency Indicator Lights*
Side turn light bulbs are LED type. Have an authorized Honda dealer inspect and
replace the light assembly.
Front Turn Signal/Parking/Side Marker Light: 28/8 W
Bulb
Socket
* Not available on all models
16 US ODYSSEY-31TK86500.book 480 ページ 2015年6月24日 水曜日 午後3時0分
Page 482 of 565
481
uuReplacing Light Bulbs uBrake Light, Rear Turn Signal Light Bu lbs, and Rear Side Marker/Taillights
Continued
Maintenance
Brake Light, Rear Turn Signal Light Bulbs, and Rear
Side Marker/Taillights
When replacing, use the following bulbs.
1.Remove the mounting bolts.
Brake Light: 21 W
Rear Turn Signal Light: 21 W (Amber)
Rear Side Marker/Taillight: LED
1Brake Light, Rear Turn Signal Light Bulbs, and Rear Side Marker/
Taillights
Rear side marker /taillights are LED type. Have an
authorized Honda dealer in spect and replace the light
assembly.
Mounting
Bolts
16 US ODYSSEY-31TK86500.book 481 ページ 2015年6月24日 水曜日 午後3時0分
Page 483 of 565
uuReplacing Light Bulbs uBrake Light, Rear Turn Signal Light Bul bs, and Rear Side Marker/Taillights
482
Maintenance
2.Place one hand on the outer corner of the
taillight assembly and other hand on the
lower edge of the taillight, near the cargo
area.
3. Pull the outer corner of the taillight
assembly toward yo u while supporting the
assembly with the hand closest to the cargo
area.
4. Turn the socket c ounterclockwise and
remove it.
5. Remove the old bulb and insert a new bulb.1Brake Light, Rear Turn Signal Light Bulbs, and Rear Side Marker/
Taillights
To reinstall, insert the fasteners into the grommets
and push the assembly back into place.
u Do not reinstall the assembly if the grommets are
loose or out of the holes . Contact a dealer to
replace them.
Grommet
Bulb
Socket
Upper
Fastener
Lower
Fastener
16 US ODYSSEY-31TK86500.book 482 ページ 2015年6月24日 水曜日 午後3時0分
Page 484 of 565
483
uuReplacing Light Bulbs uBack-Up Light Bulbs/Taillights
Maintenance
Back-Up Light Bulbs/Taillights
When replacing, use the following bulbs.
1.Remove the cover by prying on the edge of
the cover using a flat-tip screwdriver.
u Wrap the flat-tip scre wdriver with a cloth
to prevent scratches.
2. Push the tab to remove the coupler.
3. Remove the base gasket.
4. Turn the socket counterclockwise and
remove it.
5. Remove the old bulb and insert a new bulb.
Back-Up Light: 21 W
Taillight: LED
1Back-Up Light Bulbs/Taillights
Taillights are LE D type. Have an authorized Honda
dealer inspect and replace the light assembly.
Cover
Bulb
CouplerTab
Socket Gasket
16 US ODYSSEY-31TK86500.book 483 ページ 2015年6月24日 水曜日 午後3時0分
Page 485 of 565
484
uuReplacing Light Bulbs uRear License Plate Light Bulbs
Maintenance
Rear License Plate Light Bulbs
When replacing, use the following bulbs.
1.Remove the cover by prying on the edge of
the cover using a fl at-tip screwdriver.
u Wrap the flat-tip screwdriver with a cloth
to prevent scratches.
2. Remove the license plate light assembly by
squeezing the tabs on both sides of the
socket.
3. Remove the old bulb and insert a new bulb.
Rear License Plate Light: 5 W
Cover
BulbSocket
16 US ODYSSEY-31TK86500.book 484 ページ 2015年6月24日 水曜日 午後3時0分