Page 472 of 565

471
uuMaintenance Under the Hood uEngine Coolant
Maintenance
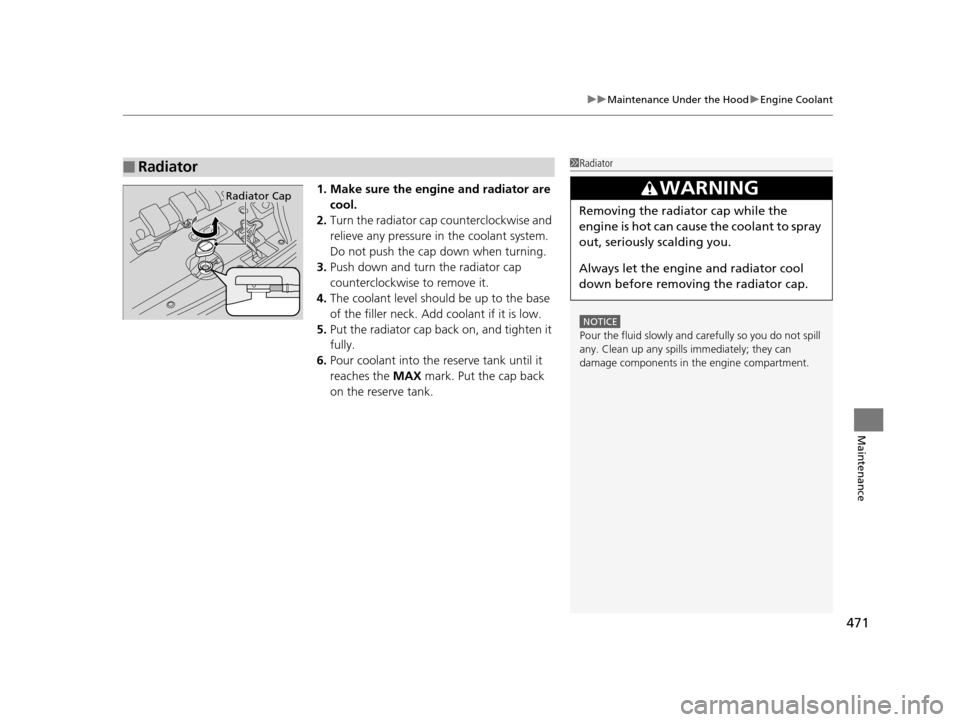
1. Make sure the engine and radiator are
cool.
2. Turn the radiator cap counterclockwise and
relieve any pressure in the coolant system.
Do not push the cap down when turning.
3. Push down and turn the radiator cap
counterclockwise to remove it.
4. The coolant level should be up to the base
of the filler neck. Add coolant if it is low.
5. Put the radiator cap back on, and tighten it
fully.
6. Pour coolant into the reserve tank until it
reaches the MAX mark. Put the cap back
on the reserve tank.
■Radiator1 Radiator
NOTICE
Pour the fluid slowly and ca refully so you do not spill
any. Clean up any spills immediately; they can
damage components in the engine compartment.
3WARNING
Removing the radiator cap while the
engine is hot can cause the coolant to spray
out, seriously scalding you.
Always let the engine and radiator cool
down before removing the radiator cap.
Radiator Cap
16 US ODYSSEY-31TK86500.book 471 ページ 2015年6月24日 水曜日 午後3時0分
Page 475 of 565

474
uuMaintenance Under the Hood uPower Steering Fluid Check
Maintenance
Power Steering Fluid Check
We recommend that you check the power st eering fluid level every time you refuel.
Check when the engi ne is not running.
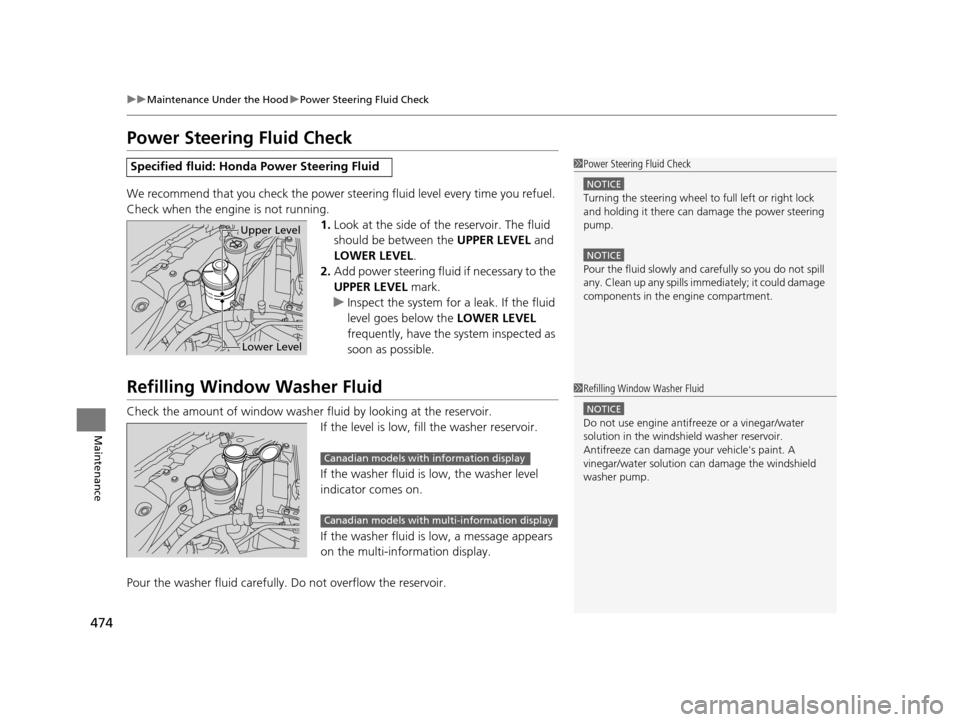
1.Look at the side of the reservoir. The fluid
should be between the UPPER LEVEL and
LOWER LEVEL .
2. Add power steering fluid if necessary to the
UPPER LEVEL mark.
u Inspect the system for a leak. If the fluid
level goes below the LOWER LEVEL
frequently, have the system inspected as
soon as possible.
Refilling Window Washer Fluid
Check the amount of window washer fluid by looking at the reservoir.
If the level is low, fill the washer reservoir.
If the washer fluid is low, the washer level
indicator comes on.
If the washer fluid is low, a message appears
on the multi-information display.
Pour the washer fluid carefully. Do not overflow the reservoir.
Specified fluid: Honda Power Steering Fluid1Power Steering Fluid Check
NOTICE
Turning the steering wheel to full left or right lock
and holding it there can da mage the power steering
pump.
NOTICE
Pour the fluid slowly and ca refully so you do not spill
any. Clean up any spills imme diately; it could damage
components in the e ngine compartment.
Upper Level
Lower Level
1Refilling Window Washer Fluid
NOTICE
Do not use engine antifreeze or a vinegar/water
solution in the windshield washer reservoir.
Antifreeze can damage y our vehicle's paint. A
vinegar/water solution ca n damage the windshield
washer pump.
Canadian models with information display
Canadian models with mu lti-information display
16 US ODYSSEY-31TK86500.book 474 ページ 2015年6月24日 水曜日 午後3時0分
Page 478 of 565
477
uuReplacing Light Bulbs uHeadlight Bulbs
Continued
Maintenance
2. Push the tab to remove the coupler.
3. Rotate the old bulb counterclockwise to
remove.
4. Insert a new bulb into the headlight
assembly and turn it clockwise.
5. Insert the coupler into the connector of the
bulb.
Tab
Coupler
Bulb
16 US ODYSSEY-31TK86500.book 477 ページ 2015年6月24日 水曜日 午後3時0分
Page 479 of 565
478
uuReplacing Light Bulbs uHeadlight Bulbs
Maintenance
High voltage can remain in the circuit for a long period of time after the light is
switched off. Do not attempt to inspect or replace the high voltage discharge type
bulbs yourself. Ask a dealer to insp ect and replace low beam headlights.
1. Push the tab to remove the coupler.
2. Rotate the old bulb counterclockwise to
remove.
3. Insert a new bulb into the headlight
assembly and turn it clockwise.
4. Insert the coupler into the connector of the
bulb.
■Low Beam Headlights
■Low Beam Headlights
Models with high voltage discharge tube bulbs
Models with halogen low beam headlight bulbs
Tab
Coupler
Bulb
16 US ODYSSEY-31TK86500.book 478 ページ 2015年6月24日 水曜日 午後3時0分
Page 480 of 565

479
uuReplacing Light Bulbs uFog Light Bulbs*
Maintenance
Fog Light Bulbs*
When replacing, use the following bulbs.
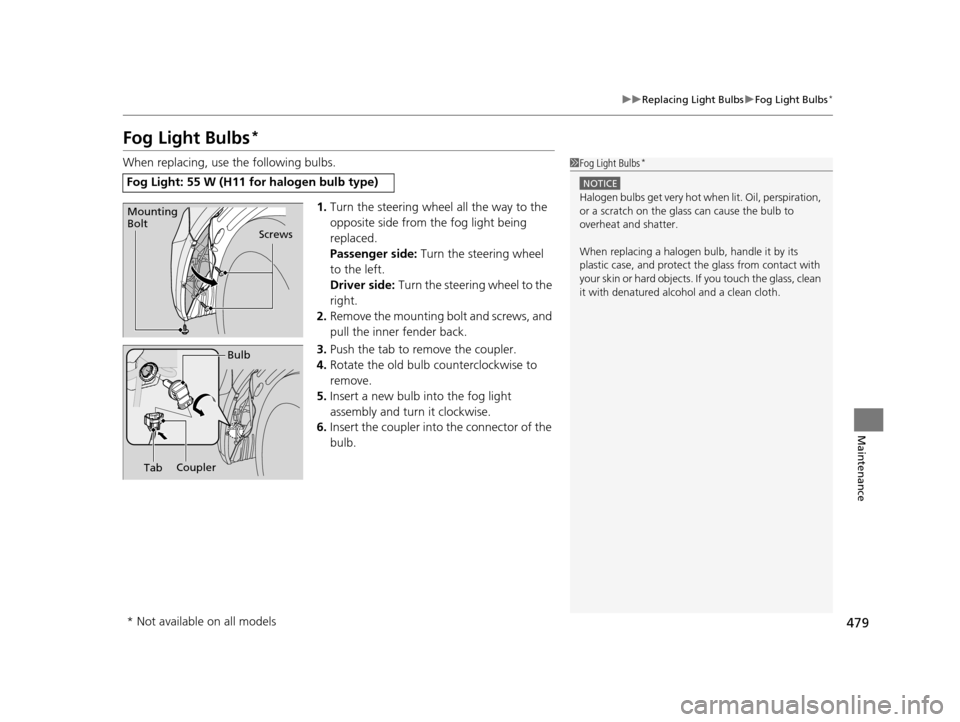
1.Turn the steering wheel all the way to the
opposite side from the fog light being
replaced.
Passenger side: Turn the steering wheel
to the left.
Driver side: Turn the steering wheel to the
right.
2. Remove the mounting bolt and screws, and
pull the inner fender back.
3. Push the tab to remove the coupler.
4. Rotate the old bulb counterclockwise to
remove.
5. Insert a new bulb into the fog light
assembly and turn it clockwise.
6. Insert the coupler into the connector of the
bulb.
Fog Light: 55 W (H11 for halogen bulb type)
1 Fog Light Bulbs*
NOTICE
Halogen bulbs get very hot when lit. Oil, perspiration,
or a scratch on the glass can cause the bulb to
overheat and shatter.
When replacing a halogen bulb, handle it by its
plastic case, and protect the glass from contact with
your skin or hard objects. If you touch the glass, clean
it with denatured alc ohol and a clean cloth.
Screws
Mounting
Bolt
Bulb
Coupler
Tab
* Not available on all models
16 US ODYSSEY-31TK86500.book 479 ページ 2015年6月24日 水曜日 午後3時0分
Page 481 of 565
480
uuReplacing Light Bulbs uFront Turn Signal/Parking/Side Marker Light Bulbs
Maintenance
Front Turn Signal/Parking/Side Marker Light Bulbs
When replacing, use the following bulbs.
1.Turn the socket c ounterclockwise and
remove it.
2. Remove the old bulb and insert a new bulb.
Side Turn Signal/Emergency Indicator Lights*
Side turn light bulbs are LED type. Have an authorized Honda dealer inspect and
replace the light assembly.
Front Turn Signal/Parking/Side Marker Light: 28/8 W
Bulb
Socket
* Not available on all models
16 US ODYSSEY-31TK86500.book 480 ページ 2015年6月24日 水曜日 午後3時0分
Page 483 of 565
uuReplacing Light Bulbs uBrake Light, Rear Turn Signal Light Bul bs, and Rear Side Marker/Taillights
482
Maintenance
2.Place one hand on the outer corner of the
taillight assembly and other hand on the
lower edge of the taillight, near the cargo
area.
3. Pull the outer corner of the taillight
assembly toward yo u while supporting the
assembly with the hand closest to the cargo
area.
4. Turn the socket c ounterclockwise and
remove it.
5. Remove the old bulb and insert a new bulb.1Brake Light, Rear Turn Signal Light Bulbs, and Rear Side Marker/
Taillights
To reinstall, insert the fasteners into the grommets
and push the assembly back into place.
u Do not reinstall the assembly if the grommets are
loose or out of the holes . Contact a dealer to
replace them.
Grommet
Bulb
Socket
Upper
Fastener
Lower
Fastener
16 US ODYSSEY-31TK86500.book 482 ページ 2015年6月24日 水曜日 午後3時0分
Page 484 of 565
483
uuReplacing Light Bulbs uBack-Up Light Bulbs/Taillights
Maintenance
Back-Up Light Bulbs/Taillights
When replacing, use the following bulbs.
1.Remove the cover by prying on the edge of
the cover using a flat-tip screwdriver.
u Wrap the flat-tip scre wdriver with a cloth
to prevent scratches.
2. Push the tab to remove the coupler.
3. Remove the base gasket.
4. Turn the socket counterclockwise and
remove it.
5. Remove the old bulb and insert a new bulb.
Back-Up Light: 21 W
Taillight: LED
1Back-Up Light Bulbs/Taillights
Taillights are LE D type. Have an authorized Honda
dealer inspect and replace the light assembly.
Cover
Bulb
CouplerTab
Socket Gasket
16 US ODYSSEY-31TK86500.book 483 ページ 2015年6月24日 水曜日 午後3時0分