Page 1 of 250

The information and specifications included in this publication were in effect at the time of approval for printing. Honda Motor Co., Ltd., reserves the right,
however, to discontinue or change specif ications or design at any time without notice and without incurring any obligation.
Accessories Precautions
The GPS antenna is located in the dashboard . Metall
ic front or side window tinting can seriously degrade or obstruct GPS recept ion.
Signal noise from devices such as radar detectors, vehicle trackin g
devices, remote starters, and additional amplifiers can disrupt the navigation system. If you
install any such item, install it away from the navigation display and antenna.
Important Safety Information
Avoid focusing on the screen or manually operating the system controls while driving.
Certain on-screen controls are disabled when driving, but most of the audi
ble instructions and voice commands continue to function. Pull to the side of the road
if you need to devote more atte ntion and time to look at the screen or access additional menus.
Route guidance may conflict with street closures, road cons tructi
on, detours, and out-of-date map data.
The system itself may also have limitations. Verify route information by carefully observing roads, signs, and signals. Always use your own judgment a
nd obey
traffic laws.
2
System Limitations P. 224
3 WARNING
Using the navigation system while driving can take your
attention away from the road, causing a crash in which you
could be seriously injured or killed.
Only operate system controls when the conditions permit you
to safely do so.
Page 8 of 250

7
Quick Reference GuideHOME Screen
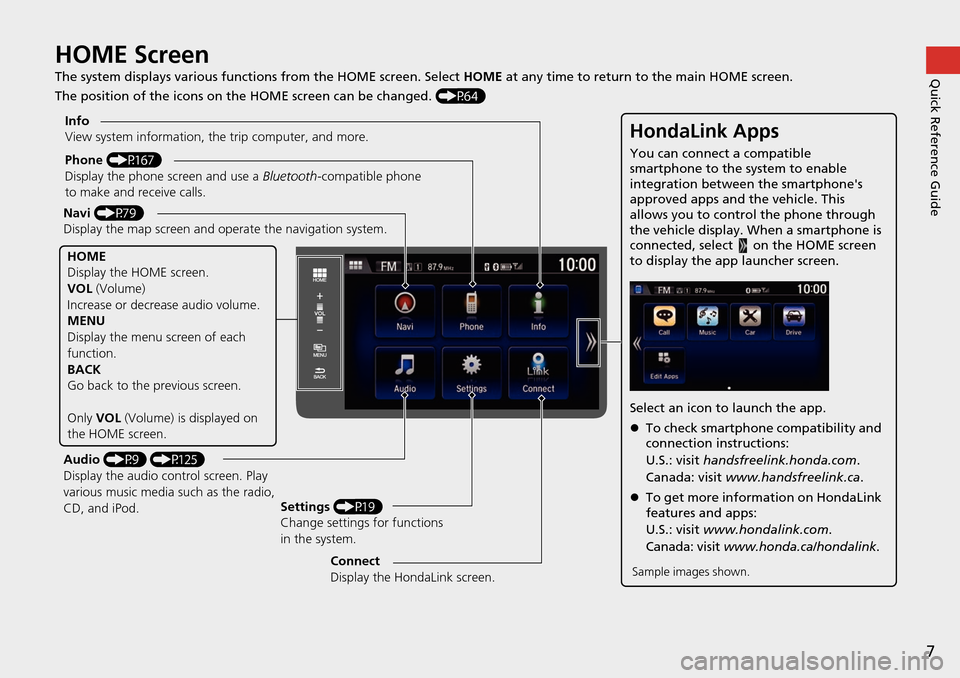
The system displays various functions from the HOME screen. Select HOME at any time to return to the main HOME screen.
The position of the icons on the HOME screen can be changed. (P64)
Phone (P167)
Display the phone screen and use a Bluetooth-compatible phone
to make and receive calls.
Navi (P79)
Display the map screen and ope rate the navigation system.
Audio (P9) (P125)
Display the audio control screen. Play
various music media such as the radio,
CD, and iPod. Settings
(P19)
Change settings for functions
in the system.
Info
View system information, the trip computer, and more.
HOME
Display the HOME screen.
VOL
(Volume)
Increase or decrea se audio volume.
MENU
Display the menu screen of each
function.
BACK
Go back to the previous screen.
Only VOL (Volume) is displayed on
the HOME screen.
HondaLink Apps
You can connect a compatible
smartphone to the system to enable
integration between the smartphone's
approved apps and the vehicle. This
allows you to control the phone through
the vehicle display. When a smartphone is
connected, select on the HOME screen
to display the app launcher screen.
Select an icon to launch the app.
To check smartphone compatibility and
connection instructions:
U.S.: visit handsfreelink.honda.com .
Canada: visit www.handsfreelink.ca .
To get more inform ation on HondaLink
features and apps:
U.S.: visit www.hondalink.com .
Canada: visit www.honda.ca/hondalink .
Sample images shown.Connect
Display the HondaLink screen.
Page 12 of 250
11
Quick Reference GuideDuring Route Guidance
During route guidance, route information is displayed on the map/guidance screen.
Select the map orientation icon to change the guidance mode.
Map Screen
Guidance Screen
Distance to destination
Distance of the actual
route.
Straight line guide (P55)
Calculated route
(P98)
Guidance indicator
Distance to the next
guidance point.
Estimated time to
destination
Destination/Waypoint icon (P112)Calculated route
(unverified roads)
(P102)
Street name of
guidance point
Distance to
guidance point
No entry icon
Map Screen during Scrolling
Select the open/close tab to view and
select map icon and street or traffic
information. Select the (Navi/Back)
icon to go back to the map screen.
(P 121)
List open/
close tab Selectable icons on
the cursor location
Page 21 of 250
20
System Setup
Start-up
The navigation system starts automatically when you set the power mode to
ACCESSORY or ON. At start-up, the follo wing Confirmation screen is displayed.
Select OK.
u The HOME screen is displayed.1Start-up
Do not use the smartphone while driving.
Avoid focusing on the scre en and drive safely
following the actual traffic restrictions.
If the navigation system lo ses power at any time, you
may need to press and hold the (Audio Power)
button for more than two seconds, or you may be
prompted for the 5-digit security code. 2 System Initialization P. 222
You can change the system language at any time. 2 Language P. 77
If you do not select OK on the Confirmation screen,
the HOME screen is displaye d after a certain period of
time.
OK on the Confirmation screen cannot be selected
by using a voice command.
If Remember Last Screen is set to On, the top
screen of the last mode is displayed after the HOME
screen. 2 Other Settings P. 76
U.S. models
Page 40 of 250
39
uu Routing u Route Preference
System Setup
Route Preference
H HOME u Settings u Navigation u Routing tab u R oute Preference
Change the route preference by selecting minimum or maximum driving methods. 1.Select an item.
2. Select MIN or MAX .
3. Select OK.1Route Preference
The calculated route may not be the shortest route or
the route you would choose. For safety reasons, the
system generally a pplies the following rules to your
route:
•Shortcuts through residential areas are avoided.
•Right turns are favored over left turns or U-turns.•Time-restricted turns (tur ns prohibited at certain
times of the day) are not used.
Check the ferry schedule when the calculated route
includes ferry route.
On Canadian models, Highways is displayed as
Freeways .
Page 64 of 250
63
System Setup
System Settings
HHOME u Settings u System
Select an item.
The following items are available:
• Home tab: Chan
ges the setting for the HOME screen.
Home Screen Edit Order : Changes the
position of icons on the HOME screen.
2Home Screen Edit Order P. 64
• Display tab: Adjusts the screen’s preferences and change the background color
of the menu screen.
2 Display Settings P. 65
• Sound/Beep tab: Changes the system sound and beep settings.
2 Sound and Beep Settings P. 67
• Voice Recog tab: Changes the setting for the vo ice control system and modifies
Song By Voice and phonebook voice commands.
2 Voice Recognition Settings P. 69
• Clock tab: Sets the automatic adjustment of the system clock for daylight saving
and international time zones.
2 Clock Adjustment P. 70
• Others tab: Sets other basic settings for the system.
2 Other Settings P. 76
1 System Settings
Select All tab to see the all items in a list.
Page 71 of 250

70
System Setup
Clock Adjustment
HHOME u Settings u Clock/Info u Clock tab
Set the automatic adjustment of the sy st
em clock for daylight saving and
international time zones.
Select an item.
The following items are available:
• Clock/Wallpaper Type: Changes the clock display
type and the wallpaper type.
2Clock Type P. 71
• Clock Adjustment : Adjust the current time manually.
2Adjust Time P. 75
•Clock Format : Sets the time notation to either 12-hour clock ( 12H, factory
default) or 24-hour clock ( 24H).
• Auto Time Zone :
The navigation system automa tically adjusts the clock when
driving through different time zones.
On (factory default): Adjust s
the clock automatically.
Off : Disables
the feature.
• Auto Daylight : The
navigation system automati cally adjusts the clock (“spring
ahead” or “fall back” by one hour) when a daylight saving time change occurs.
On (factory default): Adjust s
the clock automatically.
Off : Disables
the feature.
• Clock Display :
Sets whether to display the clock at the header of the screen.
1Clock Adjustment
You can check the time a nd date from any screen
using voice commands.
2 Global Commands P. 234
Auto Time Zone
If you live and work in tw o different time zones, you
may want to turn Auto Time Zone to Off. When
driving near a time zone boundary, the displayed
time zone may fluctuat e between the two zone
times.
Auto Daylight
This function is not activated in areas that have not
adopted daylight saving time , even if you have set
Auto Daylight to On.
Page 72 of 250
71
uu Clock Adjustment u Clock Type
System Setup
• Clock Location : Sets the location of the clock while playing a video through
HDMI ®.
•Clock Reset : Resets the settings of all items in the Clock settings.
Clock Type
HHOME u Settings u Clock/Info u Clock tab u Clock/Wallpaper Type
u Clock tab
Set the design of the clock. 1.Select an option to change
the
design.
2. Select OK.
1Clock Type
Even though the time on the clock screen is based on
the GPS, some errors may be observed.