2016 HONDA CR-Z remove seats
[x] Cancel search: remove seatsPage 11 of 64

14 || 15
S AFETY
S
AFETY
TABLE OF CONTENTS
INDEX
VISUAL INDEX
VOICE COMMAND
INDEX
SAFETY
INFORMATION
CUSTOMER
INFORMATION
INSTRUMENT PANEL
SPECIFICATIONS
VEHICLE
CONTROLS
MAINTENANCE
AUDIO AND
CONNECTIVITY
HANDLING THE UNEXPECTED
BLUETOOTH®
HANDSFREELINK®
DRIVING
HONDALINK®
NAVIGATION
Protecting Infants
An infant must be properly restrained in a rear-facing, reclining child seat until the
infant reaches the seat maker’s weight or height limit for the seat, and the infant is
at least one year old. Because rear-facing child seats should not be used in this
vehicle, you should never carry an infant in this vehicle.
Children who are unrestrained or improperly restrained can be seriously \
injured or killed in a crash.
Any child too small for a seat belt should be properly restrained in a c\
hild
seat. A larger child should be properly restrained with a seat belt, usi\
ng a
booster seat if necessary.
WARNING
Placing a rear-facing child seat in the passenger’s seat can result in serious
injury or death during a crash.
Never install a rear-facing child seat in this vehicle.
WARNING
Protecting Smaller Children
If a child is at least one year old and within the weight range indicate\
d by the child
seat manufacturer, the child should be properly restrained in a firmly secured
forward-facing child seat.
Since this vehicle does not have a back seat, Honda recommends that you \
do not
carry a child, age 12 or under, as a passenger.
This is because placing a forward-facing child seat in the passenger’\
s seat can
be hazardous, even with advanced front airbags that automatically turn t\
he
passenger’s front airbag off.
If you choose to ignore our warnings and transport a small child in this\
vehicle,
be sure to move the passenger seat as far to the rear as possible, and f\
ollow the
instructions and guidelines in the following pages.
Placing a forward-facing child seat in the passenger’s seat can result in
serious injury or death if the front airbag inflates.
If you must place a forward-facing child seat in the passenger’s seat, move
the vehicle seat as far back as possible, and properly restrain the chil\
d.
WARNING
Selecting a Child Seat Important considerations when selecting a child seat
Make sure the child seat meets the following three requirements:
•
The child seat is the correct type and size for the child.
•
The child seat is the correct type for the seating position.
•
The child seat is compliant with Federal Motor V
ehicle Safety Standard 213 or
Canadian Motor Vehicle Safety Standard 213.
Installing a Child Seat with a Lap/Shoulder Seat Belt
1.
Move the passenger seat to the rearmost
position.
2.
Place the child seat on the passenger seat.
3.
Route the seat belt through the child seat
according to the seat manufacturer’
s
instructions, and insert the latch plate into the
buckle. Insert the latch plate fully until it clicks.
4.
Slowly pull the shoulder part of the belt all the
way out until it stops. This activates the lockable
retractor
.
5.
Let the seat belt completely wind up into the
retractor
, then try to pull it out to make sure the
retractor is locked. If you are able to pull the
shoulder belt out, the lockable retractor is not
activated. Pull the seat belt all the way out, and
repeat steps 4 – 5.
6.
Grab the shoulder part of the seat belt near the
buckle, and pull up to remove any slack from
the lap part of the belt. When doing this, place
your weight on the child seat and push it into the
vehicle seat.
7.
Make sure the child seat is firmly secured by
rocking it forward and back and side to side; little
movement should be felt.
T
o deactivate a lockable retractor, release the
buckle and allow the seat belt to wind up all the
way.
Page 21 of 64

34 || 35
V EHICLE C ONTROLS
V
EHICLE C ONTROLS
TABLE OF CONTENTS
INDEX
VISUAL INDEX
VOICE COMMAND
INDEX
SAFETY
INFORMATION
CUSTOMER
INFORMATION
INSTRUMENT PANEL
SPECIFICATIONS
VEHICLE
CONTROLS
MAINTENANCE
AUDIO AND
CONNECTIVITY
HANDLING THE UNEXPECTED
BLUETOOTH®
HANDSFREELINK®
DRIVING
HONDALINK®
NAVIGATION
Failure to reinstall, or correctly reinstall, the head restraints can re\
sult in
severe injury during a crash.
Always replace the head restraints before driving.
WARNING
Head Restraints
Your vehicle is equipped with head restraints in both seating positions; \
however,
they are non-adjustable. Head restraints are most effective for protecti\
on against
whiplash and other rear-impact crash injuries. Head restraints can be removed for
cleaning or repair.
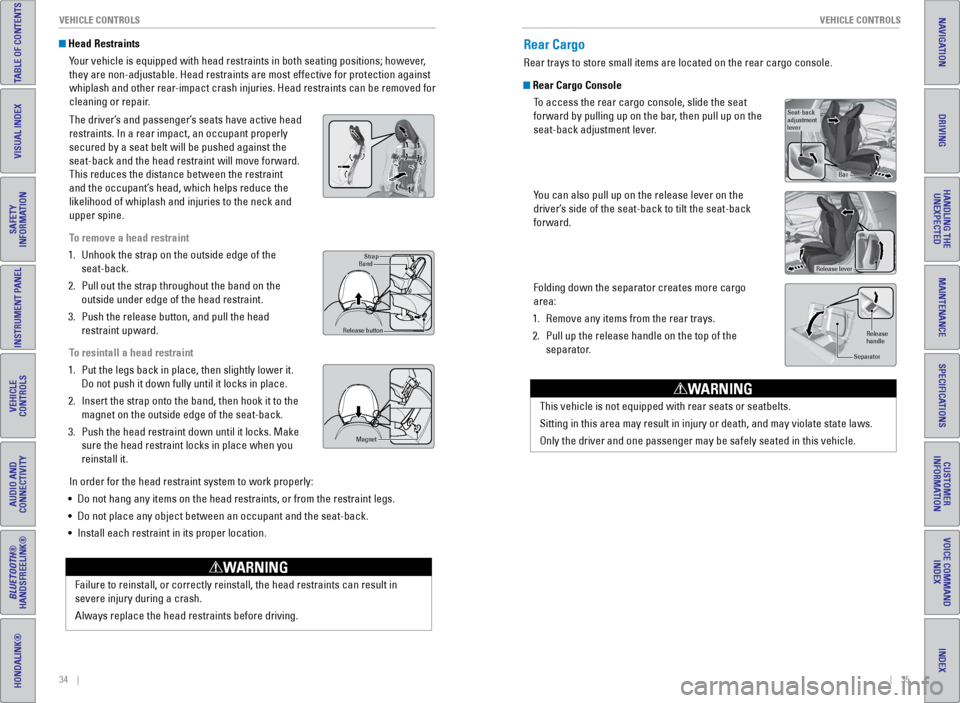
The driver’s and passenger’s seats have active head
restraints. In a rear impact, an occupant properly
secured by a seat belt will be pushed against the
seat-back and the head restraint will move forward.
This reduces the distance between the restraint
and the occupant’s head, which helps reduce the
likelihood of whiplash and injuries to the neck and
upper spine.
To remove a head restraint
1.
Unhook the strap on the outside edge of the
seat-back.
2.
Pull out the strap throughout the band on the
outside under edge of the head restraint.
3.
Push the release button, and pull the head
restraint upward.
T
o resintall a head restraint
1.
Put the legs back in place, then slightly lower it.
Do not push it down fully until it locks in place.
2.
Insert the strap onto the band, then hook it to the
magnet on the outside edge of the seat-back.
3.
Push the head restraint down until it locks. Make
sure the head restraint locks in place when you
reinstall it.
In order for the head restraint system to work properly:
•
Do not hang any items on the head restraints, or from the restraint legs\
.
•
Do not place any object between an occupant and the seat-back.
•
Install each restraint in its proper location.
Strap
Band
Release button
Magne t
Rear Cargo
Rear trays to store small items are located on the rear cargo console.
Rear Cargo Console
To access the rear cargo console, slide the seat
forward by pulling up on the bar, then pull up on the
seat-back adjustment lever.
You can also pull up on the release lever on the
driver’s side of the seat-back to tilt the seat-back
forward.
Folding down the separator creates more cargo
area:
1.
Remove any items from the rear trays.
2.
Pull up the release handle on the top of the
separator
.
Seat-back
adjustment
lever
Bar
Release lever
Release
handle
Separator
This vehicle is not equipped with rear seats or seatbelts.
Sitting in this area may result in injury or death, and may violate stat\
e laws.
Only the driver and one passenger may be safely seated in this vehicle.
WARNING
Page 35 of 64

62 || 63
DRIVING
DRIVING
TABLE OF CONTENTS
INDEX
VISUAL INDEX
VOICE COMMAND
INDEX
SAFETY
INFORMATION
CUSTOMER
INFORMATION
INSTRUMENT PANEL
SPECIFICATIONS
VEHICLE
CONTROLS
MAINTENANCE
AUDIO AND
CONNECTIVITY
HANDLING THE UNEXPECTED
BLUETOOTH®
HANDSFREELINK®
DRIVING
HONDALINK®
NAVIGATION
Learn about preparation for driving, as well as other features.
Before Driving
Check the following items before you begin driving.
Exterior Checks
•
Make sure there are no obstructions on the windows, door mirrors, exte
rior
lights, or other parts of the vehicle.
•
Remove any frost, snow
, or ice.
•
Make sure the hood is securely closed.
•
Heat from the engine and exhaust can ignite flammable materials left u\
nder
the hood, causing a fire. If you’ve parked your vehicle for an exte\
nded period,
inspect and remove any debris that may have collected, such as dried g
rass
and leaves that have fallen or have been carried in for use as a nest by\
a small
animal. Also check under the hood for leftover flammable materials aft\
er you or
someone else has performed maintenance on your vehicle.
•
Make sure the tires are in good condition.
•
Make sure there are no people or objects behind or around the vehicle.
Interior Checks•
Store or secure all items on board properly
.
•
Do not pile items in the cargo area higher than the seat-back height.
•
Do not place anything in the front seat footwells. Make sure to secure t\
he floor
mats.
•
If you have any animals on board, do not let them move freely around in \
the
vehicle.
•
Securely close and lock both doors and the hatch.
•
Adjust your seating position, mirrors, and steering wheel properly
.
•
Make sure items placed on the floor behind the seats cannot roll under\
the
seats.
•
Everyone in the vehicle must fasten their seat belt.
•
Make sure that the indicators in the instrument panel come on when you s\
tart
the vehicle, and go off soon after
.
DRIVING
If the doors are frozen shut, use warm water around the door edges to me\
lt any
ice. Do not try to force them open, as this can damage the rubber trim a\
round the
doors. When done, wipe dry to avoid further freezing.
NOTICE Improper accessories or modifications can affect your vehicle’s handling, and
stability, and performance, and cause a crash in which you can be seriously hurt
or killed.
Follow all instructions in the vehicle owner’s guide regarding accessories and
modifications.
WARNING
In addition:
•
During the first 600 miles (1,000 km) of operation, avoid sudden acc\
elerat
ion or
full throttle operation so as not to damage the engine or powertrain.
•
A
void hard braking for the first 200 miles (300 km). You should also follow this
when the brake pads are replaced.