2016 HONDA CR-Z steering
[x] Cancel search: steeringPage 22 of 64
36 || 37
V EHICLE C ONTROLS
V
EHICLE C ONTROLS
TABLE OF CONTENTS
INDEX
VISUAL INDEX
VOICE COMMAND
INDEX
SAFETY
INFORMATION
CUSTOMER
INFORMATION
INSTRUMENT PANEL
SPECIFICATIONS
VEHICLE
CONTROLS
MAINTENANCE
AUDIO AND
CONNECTIVITY
HANDLING THE UNEXPECTED
BLUETOOTH®
HANDSFREELINK®
DRIVING
HONDALINK®
NAVIGATION
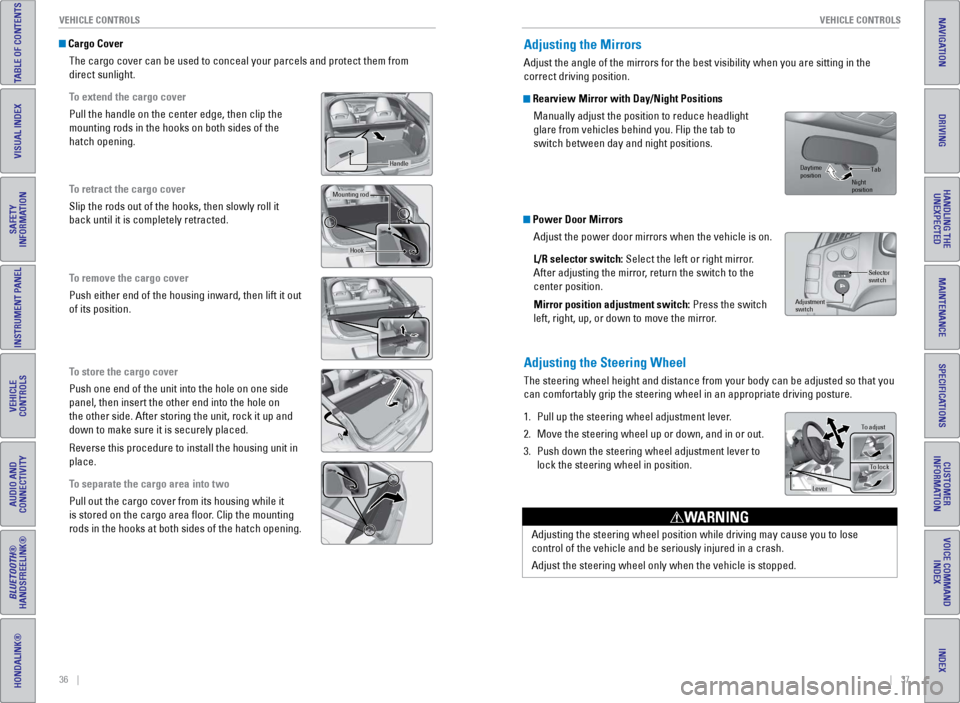
Cargo Cover
The cargo cover can be used to conceal your parcels and protect them fro\
m
direct sunlight.
To extend the cargo cover
Pull the handle on the center edge, then clip the
mounting rods in the hooks on both sides of the
hatch opening.
To retract the cargo cover
Slip the rods out of the hooks, then slowly roll it
back until it is completely retracted.
To remove the cargo cover
Push either end of the housing inward, then lift it out
of its position.
To store the cargo cover
Push one end of the unit into the hole on one side
panel, then insert the other end into the hole on
the other side. After storing the unit, rock it up and
down to make sure it is securely placed.
Reverse this procedure to install the housing unit in
place.
To separate the cargo area into two
Pull out the cargo cover from its housing while it
is stored on the cargo area floor. Clip the mounting
rods in the hooks at both sides of the hatch opening.
Handle
Mounting ro d
Hook
Adjusting the Mirrors
Adjust the angle of the mirrors for the best visibility when you are sit\
ting in the
correct driving position.
Rearview Mirror with Day/Night Positions
Manually adjust the position to reduce headlight
glare from vehicles behind you. Flip the tab to
switch between day and night positions.
Power Door MirrorsAdjust the power door mirrors when the vehicle is on.
L/R selector switch: Select the left or right mirror.
After adjusting the mirror, return the switch to the
center position.
Mirror position adjustment switch: Press the switch
left, right, up, or down to move the mirror.
Adjusting the Steering Wheel
The steering wheel height and distance from your body can be adjusted so\
that you
can comfortably grip the steering wheel in an appropriate driving postur\
e.
1.
Pull up the steering wheel adjustment lever
.
2.
Move the steering wheel up or down, and in or out.
3.
Push down the steering wheel adjustment lever to
lock the steering wheel in position.
Selector
switch
Adjustment
switch
Tab
Daytime
position Night
position
To adjust
To lock
Lever
Adjusting the steering wheel position while driving may cause you to los\
e
control of the vehicle and be seriously injured in a crash.
Adjust the steering wheel only when the vehicle is stopped.
WARNING
Page 24 of 64
40 || 41
AUDIO AND CONNECTIVITY
AUDIO AND CONNECTIVITY
TABLE OF CONTENTS
INDEX
VISUAL INDEX
VOICE COMMAND
INDEX
SAFETY
INFORMATION
CUSTOMER
INFORMATION
INSTRUMENT PANEL
SPECIFICATIONS
VEHICLE
CONTROLS
MAINTENANCE
AUDIO AND
CONNECTIVITY
HANDLING THE UNEXPECTED
BLUETOOTH®
HANDSFREELINK®
DRIVING
HONDALINK®
NAVIGATION
Learn how to operate the vehicle’s audio system.
Basic Audio Operation
Connect audio devices and operate buttons and displays for the audio sys\
tem.
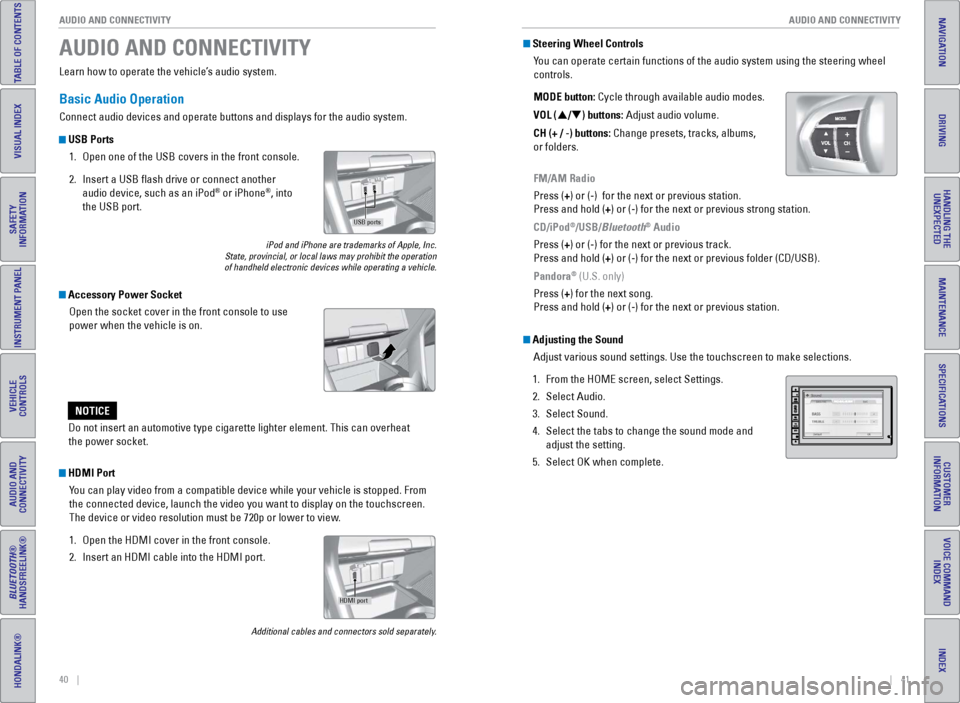
USB Ports
1.
Open one of the USB covers in the front console.
2.
Insert a USB flash drive or connect another
audio device, such as an iPod® or iPhone®, into
the USB port.
iPod and iPhone are trademarks of Apple, Inc.
State, provincial, or local laws may prohibit the operation
of handheld electronic devices while operating a vehicle.
AUDIO AND CONNECTIVITY
Do not insert an automotive type cigarette lighter element. This can ove\
rheat
the power socket.
NOTICE
HDMI Port
You can play video from a compatible device while your vehicle is stopped. From
the connected device, launch the video you want to display on the touchs\
creen.
The device or video resolution must be 720p or lower to view.
1.
Open the HDMI cover in the front console.
2.
Insert an HDMI cable into the HDMI port.
Additional cables and connectors sold separately.
Accessory Power SocketOpen the socket cover in the front console to use
power when the vehicle is on.
USB ports
HDMI port
Steering Wheel ControlsYou can operate certain functions of the audio system using the steering \
wheel
controls.
MODE button: Cycle through available audio modes.
VOL (p/q) buttons: Adjust audio volume.
CH (+ / -) buttons: Change presets, tracks, albums,
or folders.
FM/AM Radio
Press (+) or (-) for the next or previous station.
Press and hold (+) or (-) for the next or previous strong station.
CD/iPod
®/USB/Bluetooth® Audio
Press (+) or (-) for the next or previous track.
Press and hold (+) or (-) for the next or previous folder (CD/USB).
Pandora
® (U.S. only)
Press (+) for the next song.
Press and hold (+) or (-) for the next or previous station.
Adjusting the Sound Adjust various sound settings. Use the touchscreen to make selections.
1.
From the HOME screen, select Settings.
2.
Select Audio.
3.
Select Sound.
4.
Select the tabs to change the sound mode and
adjust the setting.
5.
Select OK when complete.
Page 30 of 64
52 || 53
TABLE OF CONTENTS
INDEX
VISUAL INDEX
VOICE COMMAND
INDEX
SAFETY
INFORMATION
CUSTOMER
INFORMATION
INSTRUMENT PANEL
SPECIFICATIONS
VEHICLE
CONTROLS
MAINTENANCE
AUDIO AND
CONNECTIVITY
HANDLING THE UNEXPECTED
BLUETOOTH®
HANDSFREELINK®
DRIVING
HONDALINK®
NAVIGATION
Making a Call
You can make a call using several methods.
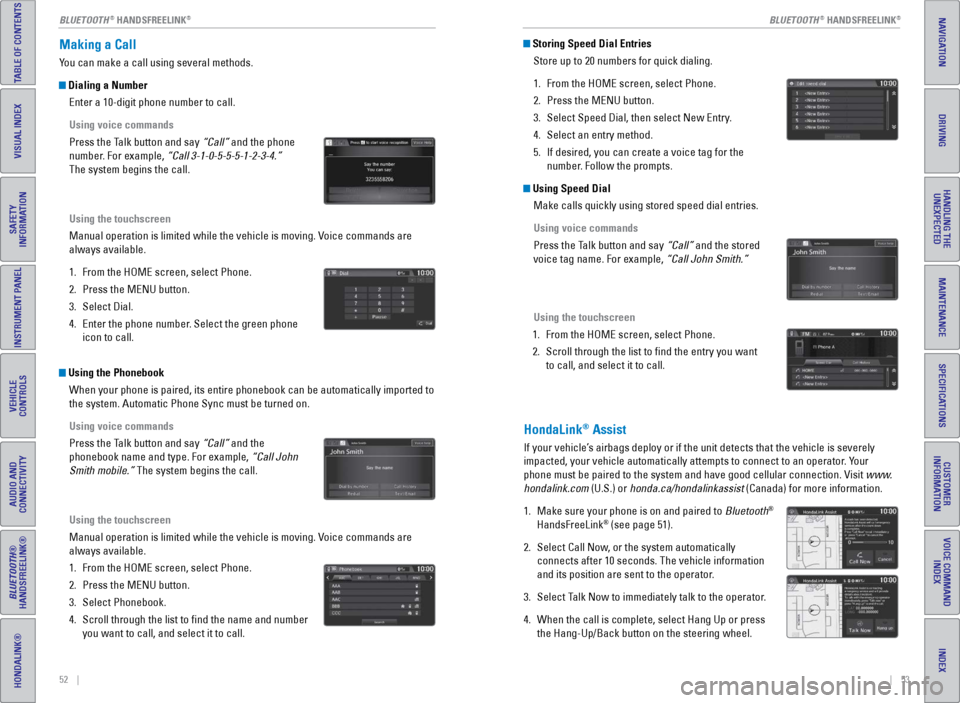
Dialing a Number
Enter a 10-digit phone number to call.
Using voice commands
Press the Talk button and say “Call” and the phone
number. For example, “Call 3-1-0-5-5-5-1-2-3-4.”
The system begins the call.
Using the touchscreen
Manual operation is limited while the vehicle is moving. Voice commands are
always available.
1.
From the HOME screen, select Phone.
2.
Press the MENU button.
3.
Select Dial.
4.
Enter the phone number
. Select the green phone
icon to call.
Using the Phonebook
When your phone is paired, its entire phonebook can be automatically imp\
orted to
the system. Automatic Phone Sync must be turned on.
Using voice commands
Press the Talk button and say “Call” and the
phonebook name and type. For example, “Call John
Smith mobile.” The system begins the call.
Using the touchscreen
Manual operation is limited while the vehicle is moving. Voice commands are
always available.
1.
From the HOME screen, select Phone.
2.
Press the MENU button.
3.
Select Phonebook.
4.
Scroll through the list to find the name and number
you want to call, and select it to call.
Storing Speed Dial EntriesStore up to 20 numbers for quick dialing.
1.
From the HOME screen, select Phone.
2.
Press the MENU button.
3.
Select Speed Dial, then select New Entry
.
4.
Select an entry method.
5.
If desired, you can create a voice tag for the
number
. Follow the prompts.
Using Speed DialMake calls quickly using stored speed dial entries.
Using voice commands
Press the Talk button and say “Call” and the stored
voice tag name. For example, “Call John Smith.”
Using the touchscreen
1.
From the HOME screen, select Phone.
2.
Scroll through the list to find the entry you want
to call, and select it to call.
HondaLink® Assist
If your vehicle’s airbags deploy or if the unit detects that the vehicle is severely
impacted, your vehicle automatically attempts to connect to an operator. Your
phone must be paired to the system and have good cellular connection. Vi\
sit www.
hondalink.com (U.S.) or honda.ca/hondalinkassist (Canada) for more information.
1.
Make sure your phone is on and paired to
Bluetooth
®
HandsFreeLink® (see page 51).
2.
Select Call Now
, or the system automatically
connects after 10 seconds. The vehicle information
and its position are sent to the operator.
3.
Select T
alk Now to immediately talk to the operator.
4.
When the call is complete, select Hang Up or press
the Hang-Up/Back button on the steering wheel.
BLUETOOTH® HANDSFREELINK®BLUETOOTH® HANDSFREELINK®
Page 32 of 64
56 || 57
NAVIGATION
NAVIGATION
TABLE OF CONTENTS
INDEX
VISUAL INDEX
VOICE COMMAND
INDEX
SAFETY
INFORMATION
CUSTOMER
INFORMATION
INSTRUMENT PANEL
SPECIFICATIONS
VEHICLE
CONTROLS
MAINTENANCE
AUDIO AND
CONNECTIVITY
HANDLING THE UNEXPECTED
BLUETOOTH®
HANDSFREELINK®
DRIVING
HONDALINK®
NAVIGATION
Learn how to enter a destination and operate the navigation system.
Basic Navigation Operation
A real-time navigation system uses GPS and a map database to show your current
location and help guide you to a desired destination. You can operate the system
using voice commands or the touchscreen.
To reduce the potential for driver distraction, certain manual functions \
may be
inoperable or grayed out while the vehicle is moving. Voice commands are always
available.
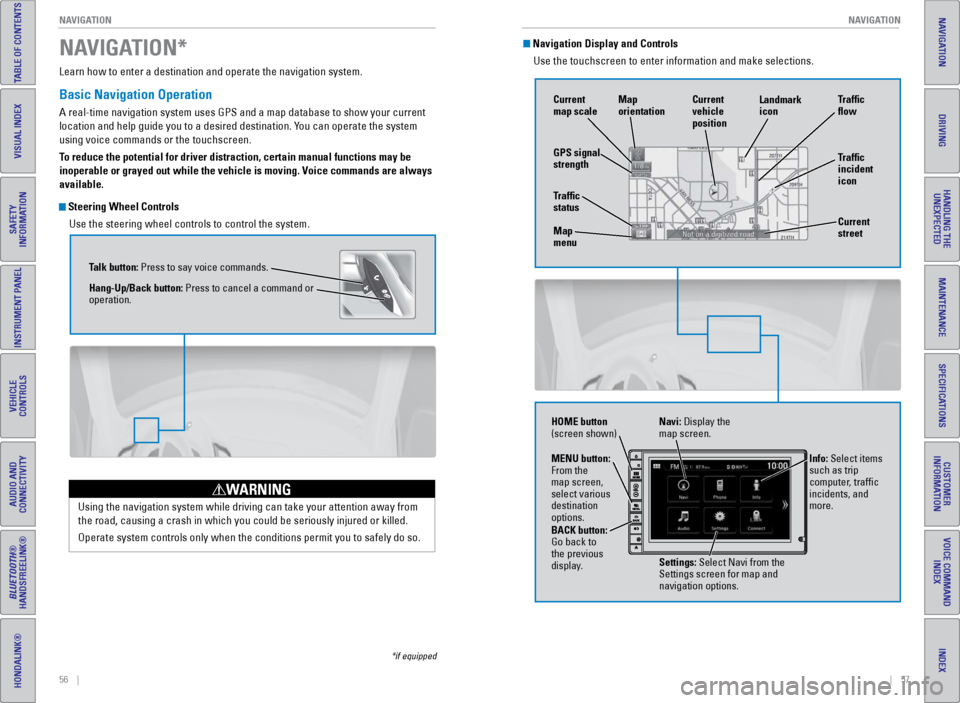
Steering Wheel Controls
Use the steering wheel controls to control the system.
NAVIGATION*
*if equipped
Using the navigation system while driving can take your attention away f\
rom
the road, causing a crash in which you could be seriously injured or kil\
led.
Operate system controls only when the conditions permit you to safely do\
so.
WARNING
Talk button: Press to say voice commands.
Hang-Up/Back button: Press to cancel a command or
operation.
Navigation Display and ControlsUse the touchscreen to enter information and make selections.
GPS signal
strength Traffic
incident
icon Traffic
flow
Current
map scale Current
vehicle
position
Map
orientation
Current
street
Traffic
status
Map
menu Landmark
icon
Navi: Display the
map screen.
HOME button
(screen shown)
Info: Select items
such as trip
computer, traffic
incidents, and
more.
BACK button:
Go back to
the previous
display. Settings: Select Navi from the
Settings screen for map and
navigation options.
MENU button:
From the
map screen,
select various
destination
options.
Page 35 of 64
62 || 63
DRIVING
DRIVING
TABLE OF CONTENTS
INDEX
VISUAL INDEX
VOICE COMMAND
INDEX
SAFETY
INFORMATION
CUSTOMER
INFORMATION
INSTRUMENT PANEL
SPECIFICATIONS
VEHICLE
CONTROLS
MAINTENANCE
AUDIO AND
CONNECTIVITY
HANDLING THE UNEXPECTED
BLUETOOTH®
HANDSFREELINK®
DRIVING
HONDALINK®
NAVIGATION
Learn about preparation for driving, as well as other features.
Before Driving
Check the following items before you begin driving.
Exterior Checks
•
Make sure there are no obstructions on the windows, door mirrors, exte
rior
lights, or other parts of the vehicle.
•
Remove any frost, snow
, or ice.
•
Make sure the hood is securely closed.
•
Heat from the engine and exhaust can ignite flammable materials left u\
nder
the hood, causing a fire. If you’ve parked your vehicle for an exte\
nded period,
inspect and remove any debris that may have collected, such as dried g
rass
and leaves that have fallen or have been carried in for use as a nest by\
a small
animal. Also check under the hood for leftover flammable materials aft\
er you or
someone else has performed maintenance on your vehicle.
•
Make sure the tires are in good condition.
•
Make sure there are no people or objects behind or around the vehicle.
Interior Checks•
Store or secure all items on board properly
.
•
Do not pile items in the cargo area higher than the seat-back height.
•
Do not place anything in the front seat footwells. Make sure to secure t\
he floor
mats.
•
If you have any animals on board, do not let them move freely around in \
the
vehicle.
•
Securely close and lock both doors and the hatch.
•
Adjust your seating position, mirrors, and steering wheel properly
.
•
Make sure items placed on the floor behind the seats cannot roll under\
the
seats.
•
Everyone in the vehicle must fasten their seat belt.
•
Make sure that the indicators in the instrument panel come on when you s\
tart
the vehicle, and go off soon after
.
DRIVING
If the doors are frozen shut, use warm water around the door edges to me\
lt any
ice. Do not try to force them open, as this can damage the rubber trim a\
round the
doors. When done, wipe dry to avoid further freezing.
NOTICE Improper accessories or modifications can affect your vehicle’s handling, and
stability, and performance, and cause a crash in which you can be seriously hurt
or killed.
Follow all instructions in the vehicle owner’s guide regarding accessories and
modifications.
WARNING
In addition:
•
During the first 600 miles (1,000 km) of operation, avoid sudden acc\
elerat
ion or
full throttle operation so as not to damage the engine or powertrain.
•
A
void hard braking for the first 200 miles (300 km). You should also follow this
when the brake pads are replaced.
Page 38 of 64

68 || 69
DRIVING
DRIVING
TABLE OF CONTENTS
INDEX
VISUAL INDEX
VOICE COMMAND
INDEX
SAFETY
INFORMATION
CUSTOMER
INFORMATION
INSTRUMENT PANEL
SPECIFICATIONS
VEHICLE
CONTROLS
MAINTENANCE
AUDIO AND
CONNECTIVITY
HANDLING THE UNEXPECTED
BLUETOOTH®
HANDSFREELINK®
DRIVING
HONDALINK®
NAVIGATION
Paddle Shifters*
Use the paddle shifters to change gears without removing your hands from\
the
steering wheel.
*if equipped
When driving in ECON or NORMAL mode: The vehicle goes into manual shift
mode temporarily, and the gear number appears in the shift indicator. When you
start traveling at a constant speed or accelerate, manual shift mode aut\
omatically
switches off, and the gear number goes off.
When driving in SPORT mode: The vehicle goes into manual shift mode, and
the M indicator and gear number appear in the shift indicator. If the vehicle
speed increases and the engine speed approaches the tachometer’s red zone,
the transmission automatically shifts up. As the vehicle speed slows down, the
transmission automatically shifts down accordingly. When the vehicle comes to a
stop, it automatically shifts down into 1st gear.
You can cancel manual shift mode by pressing any of the three driving mod\
e
buttons, or by pulling the (+ paddle shifter for a few seconds.
L mode operation: Use L mode when you want to increase engine braking to
maximum when in manual shift mode, when going up or down hills, or when the
IMA battery is low. Pull and hold both paddle shifters (+) and (-) at the same time.
The L indicator is displayed in the shift indicator. To cancel this mode, pull and
hold both paddle shifters again, or press any of the three driving mode \
buttons.
The L indicator goes off.
M indicator/gear
position indicator
Shift up1 to 215 mph (24 km/h)
2 to 3 25 mph (40 km/h)
3 to 440 mph (64 km/h)
4 to 5
5 to 652 mph (84 km/h)
6 to 7 57 mph (92 km/h)
Normal acceleration
47 mph (76 km/h)
Recommended shift points
(-) paddle shifter:
Pull to shift down
to a lower gear. (+) paddle shifter:
Pull to shift up to
a higher gear.
Manual Transmission*
Fully press the clutch pedal to operate the shift lever and change gears\
.
Do not shift to Reverse (R) before the vehicle comes to a complete sto\
p. This can
damage the transmission.
NOTICE
Before downshifting, make sure the engine will not go into the tachomete\
r’s red
zone. This can severely damage your engine.
NOTICE
Shift up1st to 2nd15 mph (24 km/h)
2nd to 3rd 25 mph (40 km/h)
3rd to 4th40 mph (64 km/h)
4th to 5th 47 mph (76 km/h)
5th to 6th52 mph (84 km/h)
Normal acceleration
Recommended shift points
*if equipped
Shift indicators
Indicates when a gear change is appropriate to
maintain the most fuel-efficient driving style while
driving in ECON or NORMAL mode.
Shift up indicator: Comes on when shifting up is
recommended.
Shift down indicator: Comes on when shifting down
is recommended.
READY
Page 39 of 64

70 || 71
DRIVING
DRIVING
TABLE OF CONTENTS
INDEX
VISUAL INDEX
VOICE COMMAND
INDEX
SAFETY
INFORMATION
CUSTOMER
INFORMATION
INSTRUMENT PANEL
SPECIFICATIONS
VEHICLE
CONTROLS
MAINTENANCE
AUDIO AND
CONNECTIVITY
HANDLING THE UNEXPECTED
BLUETOOTH®
HANDSFREELINK®
DRIVING
HONDALINK®
NAVIGATION
Braking
Slow down or stop your vehicle, and keep it from moving when parked.
Foot Brake
Press the brake pedal to slow down or stop your
vehicle from moving.
Brake Assist System During hard or emergency braking, the system
increases braking force. The brake pedal may move
slightly or make a noise; this is normal. Continue to
hold the brake pedal firmly down.
Anti-Lock Brake System (ABS) During hard or emergency braking, the system
rapidly pumps the brakes to prevent wheel lockup
and help you maintain steering control. The brake
pedal may pulsate slightly during ABS operation;
this is normal. Do not pump the brake pedal, and
continue to hold it firmly down.
Electric Parking Brake Keep your vehicle from moving while parked using a simple switch.
To apply: Pull up the switch. The parking brake
indicator appears in the instrument panel.
To release: Press the brake pedal and make sure
your seat belt is fastened. Press the switch down
to release.
You can also lightly press the accelerator
pedal (and release the clutch pedal for manual
transmission) if your seat belt is fastened, the
vehicle is on, and the shift lever is in Drive (D)
or Reverse (R) (or a gear is engaged for manual
transmission).
Brake pedal
CVT
Brake pedal
Manual transmission
Pull up to apply
Press down to release
The ABS may not function correctly if you use an incorrect tire type and\
size.
NOTICE
3-Mode Drive System
Change the drive mode based on your needs and the conditions.
Press the desired mode button. The corresponding mode indicator comes on\
in the
instrument panel, and the mode icon appears briefly on the multi-infor\
mation display.
SPORT mode button
NORMAL mode button
ECON mode button
SPORT mode: Increases engine performance and handling. Suitable for driving in
hilly or mountainous terrain.
NORMAL mode: Balances driving performance and fuel economy. Best for most
driving situations. This is the default drive mode at vehicle start-up.
ECON mode: Maximizes fuel economy. Provides longer Auto Idle Stop operating time
when the climate control system is in use. See page 73 for more information.
Page 40 of 64

72 || 73
DRIVING
DRIVING
TABLE OF CONTENTS
INDEX
VISUAL INDEX
VOICE COMMAND
INDEX
SAFETY
INFORMATION
CUSTOMER
INFORMATION
INSTRUMENT PANEL
SPECIFICATIONS
VEHICLE
CONTROLS
MAINTENANCE
AUDIO AND
CONNECTIVITY
HANDLING THE UNEXPECTED
BLUETOOTH®
HANDSFREELINK®
DRIVING
HONDALINK®
NAVIGATION
Plus Sport System
Helps the vehicle momentarily accelerate with more engine and electric m\
otor
assist power. This system can be used in any driving mode (SPORT, NORMAL, or
ECON).
When the vehicle speed is over 19 mph (30 km/h) and the IMA battery charge level
indicator shows more than four segments:
The Plus Sport System indicator comes on.
Depress the accelerator pedal. Only the Plus
Sport indicator blinks. The Plus Sport READY
indicator goes off. The system is in operation. Press the
(Plus Sport) button on th e
steering wheel. The Plus Sport indicator blinks.
The system stands by ready to be activated.
To cancel the Plus Sport System, release the accelerator pedal for more \
than 5 seconds,
press the Plus Sport button again, or press the brake or clutch pedal.
Eco Assist™ System
Can help improve fuel economy by adjusting the performance of the engine\
,
transmission, climate control system, and cruise control. Press the ECON\
mode
button to turn the system on or off (see page 71).
Ambient Meter
Color-coded bars change based on your driving style and brake or accelerator \
pedal operation.
Green: Fuel efficient driving
Blue-green: Moderate acceleration/deceleration
Blue: Aggressive acceleration/deceleration
Ambient mete r
Power Flow Monitor
Monitors engine and electric motor power flow and whether the system i\
s
assisting the engine or charging the battery. Press the Info (p/q) button on the
steering wheel to scroll to the screen.
Power flow monitor
Here are some examples of screens:
Power is supplied with
the engine and the
electric motor is assisting
the engine. The electric motor is
charging the IMA battery.
Power is supplied by the
engine.