2016 HONDA CR-Z light
[x] Cancel search: lightPage 3 of 64

TABLE OF CONTENTS
INDEX
VISUAL INDEX
VOICE COMMAND INDEX
SAFETY
INFORMATION
CUSTOMER
INFORMATION
INSTRUMENT PANEL
SPECIFICATIONS
VEHICLE
CONTROLS
MAINTENANCE
AUDIO AND
CONNECTIVITY
HANDLING THE UNEXPECTED
BLUETOOTH®
HANDSFREELINK®
DRIVING
HONDALINK®
NAVIGATION
Honda Automobile Customer Service
Your authorized Honda dealer should be able to answer any questions you h\
ave
about your vehicle. However, if you are dissatisfied with the information you receive,
you can call Honda Automobile Customer Service (see page 111).
Call (800) 999-1009 (U.S.) or (888) 946-6329 (Canada)
Honda Roadside Assistance
24-hour emergency road service is available to you in the United States \
and Canada
throughout your 3-year/36,000-mile warranty term. Services include jump starting,
flat tire and lockout assistance, towing, and more (limitations apply\
).
Call (866) 864-5211 (U.S.) or (800) 465-7587 (Canada)
This Owner’s Guide is intended to help you quickly get acquainted with your
2016 Honda CR-Z. It provides basic information and instructions on technology and
convenience features, as well as emergency procedures and how to get ass\
istance.
This guide is for vehicles sold in the United States and Canada. It cove\
rs all CR-Z
models, so you may find descriptions of features and equipment that ar\
e not in your
vehicle. Images throughout this guide are from U.S. vehicles and represe\
nt features
and equipment that are available on some, but not all, models.
This guide is not intended to be a substitute for the Owner’s Manual. The Owner
Information CD enclosed in your glove box kit includes the Owner’s Manual,
Navigation Manual, and vehicle and tire warranties in electronic format.\
This
information can be viewed on a computer (PC
or Mac platform) and saved or printed
for your reference. You can also visit owners.honda.com (U.S.) or myhonda.ca
(Canada) to view the complete and most current information.
If you are the first registered owner of your vehicle, you may request\
a complimentary
printed copy of the Owner’s Manual, Navigation Manual, or Vehicle Warranty within
the first six months of vehicle purchase. To request a copy, visit owners.honda.com
(U.S.) and create or log in to your account. In Canada, please request\
a copy from
your Honda dealer.
American Honda Motor Company strives to be proactive in protecting our
environment and natural resources. By using electronic delivery for a co\
nsiderable
portion of the information typically found in a vehicle owner’s manual, we are further
reducing our impact on the environment.
INTRODUCTION TABLE OF CONTENTS
*if equipped
VISUAL INDEX .......................................1
Steering Wheel and Nearby Controls ...1
Dashboard and Other Controls
...........2
SAFETY INFORMATION
........................3
Important Safety Information
..............3
Seat Belts
............................................... 5
Airbags
.................................................... 8
Child Safety
.......................................... 13
Safety Label Locations
.......................18
Reporting Safety Defects
...................19
INSTRUMENT PANEL
.........................20
Malfunction Indicators
......................20
Condition Indicators
...........................22
On/Off Indicators
................................. 23
IMA Battery Charge Level
.................23
Multi-Information Display
.................24
VEHICLE CONTROLS
...........................26
Using the Remote T
ransmitter ..........26
Smart Entry System
.............................27
Door Operation
.................................... 28
Power Window Operation
................29
One-Touch Turn Signal
.......................29
Interior and Exterior Lights
...............30
Wiper Operation
.................................. 31
Adjusting the Seats
............................32
Rear Cargo
........................................... 35
Adjusting the Mirrors
.........................37
Adjusting the Steering Wheel
..........37
Climate Control System
....................38
Seat Heaters*
...................................... 38
Setting the Clock
................................. 39
Customized Features
..........................39
AUDIO AND CONNECTIVITY
.............40
Basic Audio Operation
.......................40HondaLink™
........................................
43
FM/AM Radio ......................................44
Compact Disc (CD)
.............................45
iPod
®......................................................46
USB Flash Drive .................................. 47
Bluetooth
® Audio ................................ 48
Pandora
® .............................................. 49
BLUETOOTH
® HANDSFREELINK® .... 50
Basic HFL Operation
........................... 50
Pairing a Phone
................................... 51
Making a Call
...................................... 52
HondaLink
® Assist .............................. 53
SMS T
ext Messaging and E-Mail* ...54
Siri
® Eyes Free ..................................... 55
NA
VIGATION*
...................................... 56
Basic Navigation Operation
.............56
Entering a Destination
.......................59
Routing
.................................................. 61
DRIVING
................................................ 62
Before Driving
..................................... 62
Maximum Load Limit
..........................64
Starting to Drive
.................................. 66
Shifting
.................................................. 67
Braking
................................................. 70
3-Mode Drive System
.........................71
Plus Sport System
............................... 72
Eco Assist™ System
...........................73
V
ehicle Stability Assist (VSA
®), aka
Electronic Stability Control (ESC)
System
................................................... 75
Cruise Control
...................................... 76
LaneW
atch™*
..................................... 77
Multi-View Rear Camera
................... 78
Refueling
.............................................. 79
Page 4 of 64

| 1
V
ISUAL
I
NDEX
INDEX
VOICE COMMAND
INDEX
CUSTOMER
INFORMATION
SPECIFICATIONS
MAINTENANCE
HANDLING THE UNEXPECTED
DRIVING
NAVIGATION
TABLE OF CONTENTS
VISUAL INDEX
SAFETY
INFORMATION
INSTRUMENT PANEL
VEHICLE
CONTROLS
AUDIO AND
CONNECTIVITY
BLUETOOTH®
HANDSFREELINK®
HONDALINK®
Quickly locate items in the vehicle’s interior.
Steering Wheel and Nearby Controls
1 Lights/turn signals/LaneW atch
button* p. 30, p. 29, p. 77
2 Brightness control p. 30
3 Wipers/washers p. 31
4 Cruise control buttons p. 76
5 Horn
6 Bluetooth® HandsFreeLink®/
navigation* voice recognition buttons
p. 50, p. 57
7 Instrument panel p. 20
8 Multi-information display p. 24
9 Audio controls p. 41
10 3-mode drive buttons p. 71
11 Vehicle Stability Assist (VSA®) OFF
button
p. 75
12 Info (p/q) buttons p. 24
SEL/RESET button
p. 24
S+ (Plus Sport) button
p. 72
13 Door mirror controls p. 37
14 Climate control system p. 38
15 Paddle shifters* p. 68
VISUAL INDEX
*if equipped
*if equipped
7
12564
10
13
14111283
914
15
HANDLING THE UNEXPECTED ......... 80
Smart Entry Remote Battery
Strength
................................................ 80
Shift Lever Does Not Move*
.............80
Jump Starting
...................................... 81
Overheating
.......................................... 83
Emergency Engine Stop
.....................84
Emergency Towing
.............................84
T
ire Pressure Monitoring System
(TPMS)
.................................................. 85
Tire Repair Kit
...................................... 87
Fuse Locations
..................................... 88
MAINTENANCE
................................... 91
Safety Precautions
.............................91
Maintenance Minder™......................92
Under the Hood
.................................... 94
Engine Oil
............................................. 95
Engine Coolant
.................................... 97Brake/Clutch* Fluid
............................
98
Window W asher Fluid .......................98
Checking the Battery
..........................99
Changing Wiper Blades
...................100
Tire Information
.................................102
T
ire Labeling ......................................105
DOT Tire Quality Grading
.................106
Testing of Readiness Codes
............108
SPECIFICATIONS
...............................109
CUSTOMER INFORMA
TION .............110
Frequently Asked Questions/
Troubleshooting
................................110
Contact Us
..........................................111
Honda Roadside Assistance
...........112
Warranty Coverages
.........................112
VOICE COMMAND INDEX
................113
INDEX
..................................................119
Page 14 of 64

20 || 21
I NSTRUMENT P
ANELI
NSTRUMENT P
ANEL
TABLE OF CONTENTS
INDEX
VISUAL INDEX
VOICE COMMAND
INDEX
SAFETY
INFORMATION
CUSTOMER
INFORMATION
INSTRUMENT PANEL
SPECIFICATIONS
VEHICLE
CONTROLS
MAINTENANCE
AUDIO AND
CONNECTIVITY
HANDLING THE UNEXPECTED
BLUETOOTH®
HANDSFREELINK®
DRIVING
HONDALINK®
NAVIGATION
Learn about the indicators, gauges, and displays related to driving the \
vehicle.
Indicators briefly appear with each engine start and then go out. Red \
and amber
indicators are most critical. Blue and green indicators are used for gen\
eral
information.
Malfunction Indicators
These are the most critical indicators. If they come on and stay lit whi\
le driving or at
any other time, there may be a problem. See your dealer if necessary.
Brake system
• Brake fluid is low.
• The brake system has a problem.
Press the brake pedal lightly to check pedal pressure. If normal, check \
the brake fluid level when you stop. If abnormal, take immediate actio\
n. If
necessary, downshift the transmission to slow the vehicle using engine
braking. Have your vehicle repaired immediately.
Low oil pressure
Engine oil pressure is low. Stop in a safe place. Open the hood. Check the oil
level, and add oil if necessary (see page 96). If the indicator does n\
ot turn
off, have your vehicle repaired immediately.
Charging system
The battery is not charging. Turn off all electrical items, but do not turn off
the vehicle to prevent further battery discharge. Have your vehicle repa\
ired
immediately.
Supplemental Restraint System (SRS)
There is a problem with one of the airbag systems or seat belt tensioner\
s.
Canada
U.S.
INSTRUMENT PANELMalfunction indicator lamp (check engine light)
The emissions control system may have a problem, or the fuel cap is loos\
e
or missing. If the indicator blinks, a
misfire in the engine’s cylinders is
detected. Stop in a safe place, and wait for the engine to cool down.
Anti-lock Brake System (ABS)
There is a problem with the anti-lock brake system. Your vehicle still has
normal braking ability, but no anti-lock function.
Tire Pressure Monitoring System (TPMS) (U.S. models only)
If the indicator blinks for one minute and then stays on, there is a pro\
blem
with the system.
Vehicle Stability Assist (VSA
®)
There is a problem with the VSA system or hill start assist system.
Brake system
There is a problem with a braking system component or the electric parking
brake.
Electric power steering
There is a problem with the system. Stop in a safe place, and restart th\
e
vehicle.
IMA (Integrated Motor Assist)
There is a problem with the system. Avoid high speed driving and have your
vehicle repaired immediately.
High temperature
The engine coolant temperature is high. Drive slowly to prevent overheat\
ing.
If the indicator remains on, immediately stop the vehicle in a safe plac\
e (see
page 83).
Low temperature
The engine coolant temperature is low. If the indicator remains on after the
engine has reached normal operating temperature, there may be a problem \
with temperature sensors.
Canada U.S.
Page 15 of 64

22 || 23
I NSTRUMENT P
ANELI
NSTRUMENT P
ANEL
TABLE OF CONTENTS
INDEX
VISUAL INDEX
VOICE COMMAND
INDEX
SAFETY
INFORMATION
CUSTOMER
INFORMATION
INSTRUMENT PANEL
SPECIFICATIONS
VEHICLE
CONTROLS
MAINTENANCE
AUDIO AND
CONNECTIVITY
HANDLING THE UNEXPECTED
BLUETOOTH®
HANDSFREELINK®
DRIVING
HONDALINK®
NAVIGATION
Condition Indicators
These indicators may require you to perform an action.
Parking brake
Release the parking brake before driving. You will hear a beep if you drive
with it not fully released.
Seat belt reminder
Make sure seat belts are fastened for you and all passengers. The indica\
tor
blinks and beeps sound continuously if you or your front passenger has not
fastened your seat belts when you begin driving. If the indicator remain\
s on
after seat belts are fastened, see your dealer.
Door/hatch open
A door or the hatch is open. A beep sounds if any door or the hatch is o\
pen
while driving.
Low fuel
Refuel as soon as possible. If the indicator blinks, there is a problem \
with the
fuel gauge. See your dealer.
Low tire pressure
Stop in a safe place, check tire pressures, and inflate tire(s) if n\
ecessary. If
the indicator remains on after tire inflation, you need to calibrate t\
he system
(see page 85).
System message
When a condition or malfunction indicator comes on, a message also
appears on the multi-information display. Check the display for more
information.
Immobilizer
Your remote transmitter cannot be recognized by the vehicle. If the indic\
ator
blinks, you may not be able to start the engine. Turn the vehicle off, and then
on again. If it continues to blink, there may be a problem with the syst\
em.
See your dealer.
Canada
U.S.
On/Off Indicators
These indicators remind you when an item is on or off.
VSA off
VSA on (blinks)
Side airbag off
CRUISE
MAIN on
CRUISE
CONTROL on
Turn signals/hazards on
Fog lights* on High beams on
Exterior lights on
ECON mode on
SPORT mode on
NORMAL mode on
Auto idle stop on (blinks)
Plus Sport system on
CanadaU.S.
*if equipped
IMA Battery Charge Level
The remaining battery charge level is displayed as a bar graph.
Electric Motor Assist
The degree to which the electric motor is assisting
the engine is displayed by the ASST indicator bar.
Battery ChargeThe degree to which the IMA battery is being
charged is displayed by the CHRG indicator bar.
IMA battery charge
level indicator
CHRG indicato rASST indicato r
Page 18 of 64

28 || 29
V EHICLE C ONTROLS
V
EHICLE C ONTROLS
TABLE OF CONTENTS
INDEX
VISUAL INDEX
VOICE COMMAND
INDEX
SAFETY
INFORMATION
CUSTOMER
INFORMATION
INSTRUMENT PANEL
SPECIFICATIONS
VEHICLE
CONTROLS
MAINTENANCE
AUDIO AND
CONNECTIVITY
HANDLING THE UNEXPECTED
BLUETOOTH®
HANDSFREELINK®
DRIVING
HONDALINK®
NAVIGATION
Door Operation
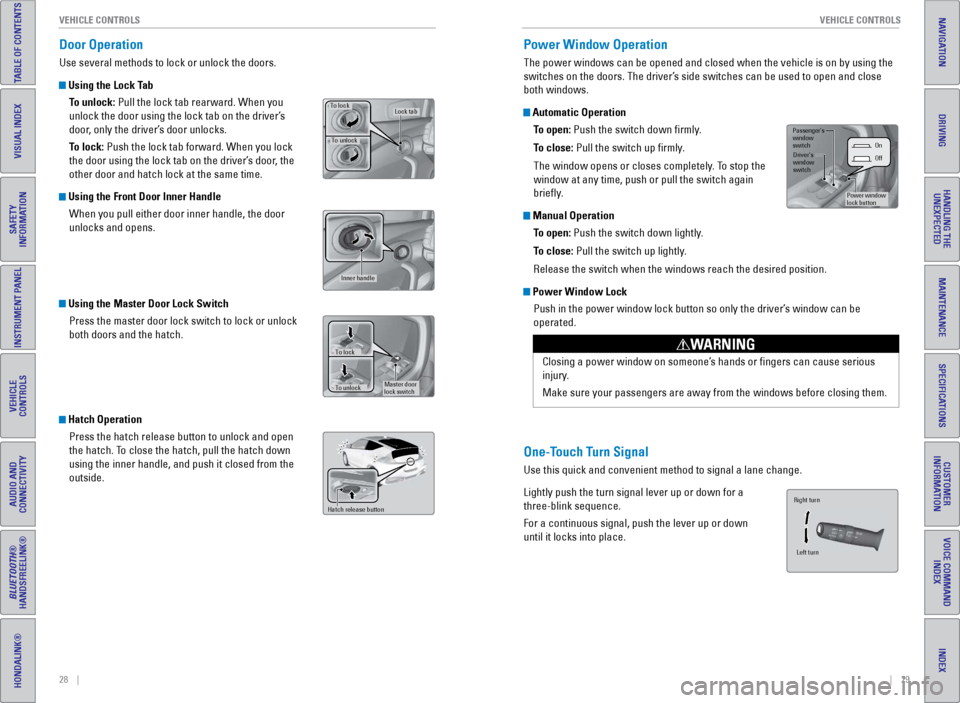
Use several methods to lock or unlock the doors.
Using the Lock Tab
To unlock: Pull the lock tab rearward. When you
unlock the door using the lock tab on the driver’s
door, only the driver’s door unlocks.
To lock: Push the lock tab forward. When you lock
the door using the lock tab on the driver’s door, the
other door and hatch lock at the same time.
Using the Front Door Inner HandleWhen you pull either door inner handle, the door
unlocks and opens.
Using the Master Door Lock SwitchPress the master door lock switch to lock or unlock
both doors and the hatch.
Hatch OperationPress the hatch release button to unlock and open
the hatch. To close the hatch, pull the hatch down
using the inner handle, and push it closed from the
outside.
To unlock
Lock tabTo lock
Inner handle
Master door
lock switch
To lock
To unlock
Hatch release button
Power Window Operation
The power windows can be opened and closed when the vehicle is on by usi\
ng the
switches on the doors. The driver’s side switches can be used to open and close
both windows.
Automatic Operation
To open: Push the switch down firmly.
To close: Pull the switch up firmly.
The window opens or closes completely. To stop the
window at any time, push or pull the switch again
briefly.
Manual OperationTo open: Push the switch down lightly.
To close: Pull the switch up lightly.
Release the switch when the windows reach the desired position.
Power Window LockPush in the power window lock button so only the driver’s window can be
operated.
Closing a power window on someone’s hands or fingers can cause serious
injury.
Make sure your passengers are away from the windows before closing them.
WARNING
One-Touch Turn Signal
Use this quick and convenient method to signal a lane change.
Lightly push the turn signal lever up or down for a
three-blink sequence.
For a continuous signal, push the lever up or down
until it locks into place.
On
Of f
Power window
lock button
Driver’s
window
switch
Passenger’s
window
switch
Right turn
Left turn
Page 19 of 64

30 || 31
V EHICLE C ONTROLS
V
EHICLE C ONTROLS
TABLE OF CONTENTS
INDEX
VISUAL INDEX
VOICE COMMAND
INDEX
SAFETY
INFORMATION
CUSTOMER
INFORMATION
INSTRUMENT PANEL
SPECIFICATIONS
VEHICLE
CONTROLS
MAINTENANCE
AUDIO AND
CONNECTIVITY
HANDLING THE UNEXPECTED
BLUETOOTH®
HANDSFREELINK®
DRIVING
HONDALINK®
NAVIGATION
Interior and Exterior Lights
Operate interior and exterior lights when the vehicle is on or off.
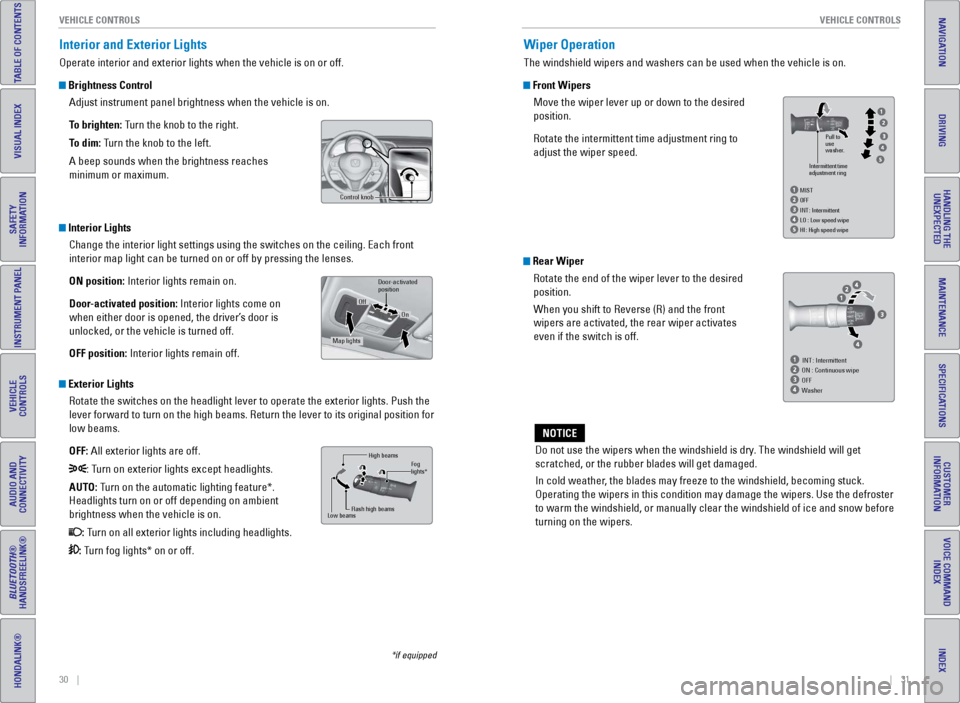
Brightness Control
Adjust instrument panel brightness when the vehicle is on.
To brighten: Turn the knob to the right.
To dim: Turn the knob to the left.
A beep sounds when the brightness reaches
minimum or maximum.
Interior LightsChange the interior light settings using the switches on the ceiling. Ea\
ch front
interior map light can be turned on or off by pressing the lenses.
ON position: Interior lights remain on.
Door-activated position: Interior lights come on
when either door is opened, the driver’s door is
unlocked, or the vehicle is turned off.
OFF position: Interior lights remain off.
Exterior LightsRotate the switches on the headlight lever to operate the exterior light\
s. Push the
lever forward to turn on the high beams. Return the lever to its origina\
l position for
low beams.
OFF: All exterior lights are off.
: Turn on exterior lights except headlights.
AUTO: Turn on the automatic lighting feature*.
Headlights turn on or off depending on ambient
brightness when the vehicle is on.
: Turn on all exterior lights including headlights.
: Turn fog lights* on or off.
*if equipped
Control knob
High beams
Flash high beams
Low beamsFog
lights*
Door- activated
positio n
On
Off
Map lights
Wiper Operation
The windshield wipers and washers can be used when the vehicle is on.
Front Wipers
Move the wiper lever up or down to the desired
position.
Rotate the intermittent time adjustment ring to
adjust the wiper speed.
Do not use the wipers when the windshield is dry. The windshield will get
scratched, or the rubber blades will get damaged.
In cold weather, the blades may freeze to the windshield, becoming stuck.
Operating the wipers in this condition may damage the wipers. Use the de\
froster
to warm the windshield, or manually clear the windshield of ice and snow before
turning on the wipers.
NOTICE
Intermittent time
adjustment ring
HI : High speed wipe Pull to
use
washer.
LO
: Low speed wipe
INT
: Intermittent
OF
F
MIST
INT : Intermittent
ON : Continuous wipe
OFF
Washer
Rear Wiper
Rotate the end of the wiper lever to the desired
position.
When you shift to Reverse (R) and the front
wipers are activated, the rear wiper activates
even if the switch is off.
Page 21 of 64

34 || 35
V EHICLE C ONTROLS
V
EHICLE C ONTROLS
TABLE OF CONTENTS
INDEX
VISUAL INDEX
VOICE COMMAND
INDEX
SAFETY
INFORMATION
CUSTOMER
INFORMATION
INSTRUMENT PANEL
SPECIFICATIONS
VEHICLE
CONTROLS
MAINTENANCE
AUDIO AND
CONNECTIVITY
HANDLING THE UNEXPECTED
BLUETOOTH®
HANDSFREELINK®
DRIVING
HONDALINK®
NAVIGATION
Failure to reinstall, or correctly reinstall, the head restraints can re\
sult in
severe injury during a crash.
Always replace the head restraints before driving.
WARNING
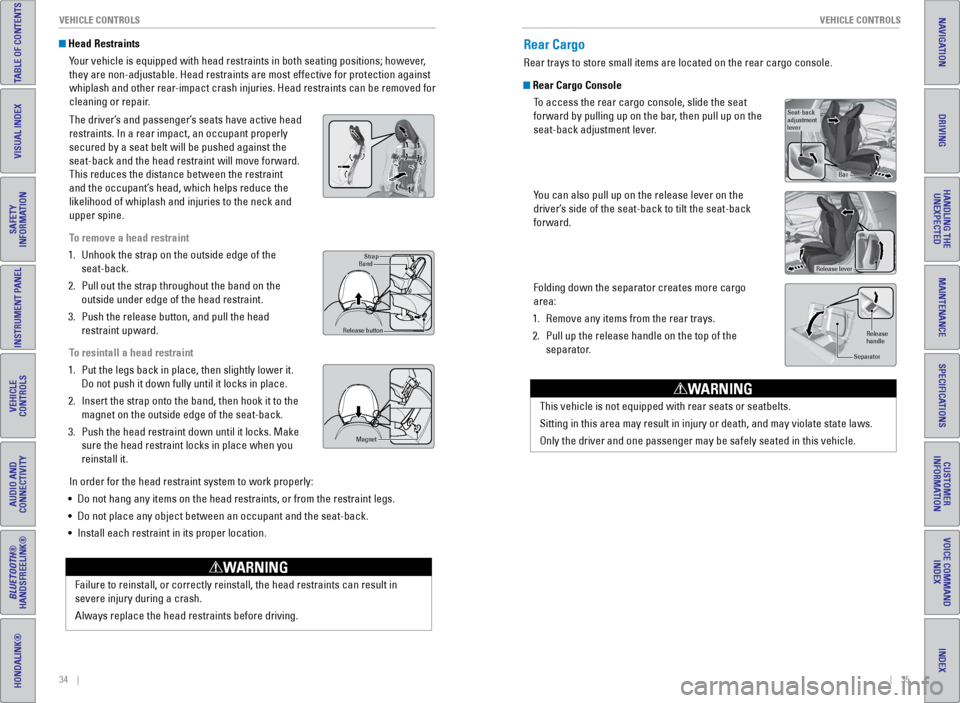
Head Restraints
Your vehicle is equipped with head restraints in both seating positions; \
however,
they are non-adjustable. Head restraints are most effective for protecti\
on against
whiplash and other rear-impact crash injuries. Head restraints can be removed for
cleaning or repair.
The driver’s and passenger’s seats have active head
restraints. In a rear impact, an occupant properly
secured by a seat belt will be pushed against the
seat-back and the head restraint will move forward.
This reduces the distance between the restraint
and the occupant’s head, which helps reduce the
likelihood of whiplash and injuries to the neck and
upper spine.
To remove a head restraint
1.
Unhook the strap on the outside edge of the
seat-back.
2.
Pull out the strap throughout the band on the
outside under edge of the head restraint.
3.
Push the release button, and pull the head
restraint upward.
T
o resintall a head restraint
1.
Put the legs back in place, then slightly lower it.
Do not push it down fully until it locks in place.
2.
Insert the strap onto the band, then hook it to the
magnet on the outside edge of the seat-back.
3.
Push the head restraint down until it locks. Make
sure the head restraint locks in place when you
reinstall it.
In order for the head restraint system to work properly:
•
Do not hang any items on the head restraints, or from the restraint legs\
.
•
Do not place any object between an occupant and the seat-back.
•
Install each restraint in its proper location.
Strap
Band
Release button
Magne t
Rear Cargo
Rear trays to store small items are located on the rear cargo console.
Rear Cargo Console
To access the rear cargo console, slide the seat
forward by pulling up on the bar, then pull up on the
seat-back adjustment lever.
You can also pull up on the release lever on the
driver’s side of the seat-back to tilt the seat-back
forward.
Folding down the separator creates more cargo
area:
1.
Remove any items from the rear trays.
2.
Pull up the release handle on the top of the
separator
.
Seat-back
adjustment
lever
Bar
Release lever
Release
handle
Separator
This vehicle is not equipped with rear seats or seatbelts.
Sitting in this area may result in injury or death, and may violate stat\
e laws.
Only the driver and one passenger may be safely seated in this vehicle.
WARNING
Page 22 of 64

36 || 37
V EHICLE C ONTROLS
V
EHICLE C ONTROLS
TABLE OF CONTENTS
INDEX
VISUAL INDEX
VOICE COMMAND
INDEX
SAFETY
INFORMATION
CUSTOMER
INFORMATION
INSTRUMENT PANEL
SPECIFICATIONS
VEHICLE
CONTROLS
MAINTENANCE
AUDIO AND
CONNECTIVITY
HANDLING THE UNEXPECTED
BLUETOOTH®
HANDSFREELINK®
DRIVING
HONDALINK®
NAVIGATION
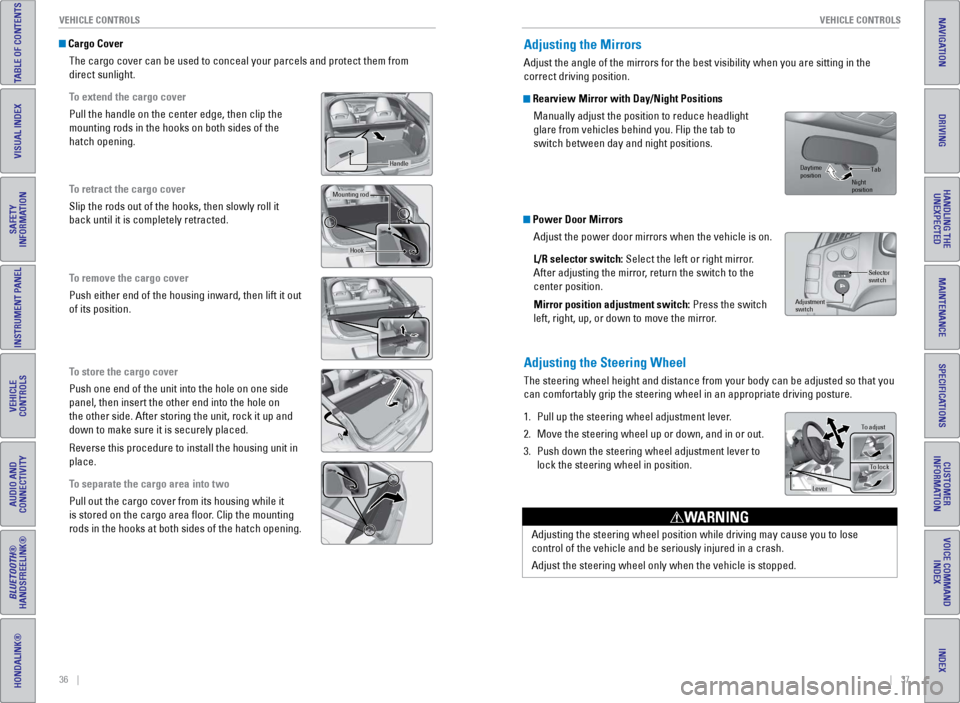
Cargo Cover
The cargo cover can be used to conceal your parcels and protect them fro\
m
direct sunlight.
To extend the cargo cover
Pull the handle on the center edge, then clip the
mounting rods in the hooks on both sides of the
hatch opening.
To retract the cargo cover
Slip the rods out of the hooks, then slowly roll it
back until it is completely retracted.
To remove the cargo cover
Push either end of the housing inward, then lift it out
of its position.
To store the cargo cover
Push one end of the unit into the hole on one side
panel, then insert the other end into the hole on
the other side. After storing the unit, rock it up and
down to make sure it is securely placed.
Reverse this procedure to install the housing unit in
place.
To separate the cargo area into two
Pull out the cargo cover from its housing while it
is stored on the cargo area floor. Clip the mounting
rods in the hooks at both sides of the hatch opening.
Handle
Mounting ro d
Hook
Adjusting the Mirrors
Adjust the angle of the mirrors for the best visibility when you are sit\
ting in the
correct driving position.
Rearview Mirror with Day/Night Positions
Manually adjust the position to reduce headlight
glare from vehicles behind you. Flip the tab to
switch between day and night positions.
Power Door MirrorsAdjust the power door mirrors when the vehicle is on.
L/R selector switch: Select the left or right mirror.
After adjusting the mirror, return the switch to the
center position.
Mirror position adjustment switch: Press the switch
left, right, up, or down to move the mirror.
Adjusting the Steering Wheel
The steering wheel height and distance from your body can be adjusted so\
that you
can comfortably grip the steering wheel in an appropriate driving postur\
e.
1.
Pull up the steering wheel adjustment lever
.
2.
Move the steering wheel up or down, and in or out.
3.
Push down the steering wheel adjustment lever to
lock the steering wheel in position.
Selector
switch
Adjustment
switch
Tab
Daytime
position Night
position
To adjust
To lock
Lever
Adjusting the steering wheel position while driving may cause you to los\
e
control of the vehicle and be seriously injured in a crash.
Adjust the steering wheel only when the vehicle is stopped.
WARNING