Page 273 of 532
272
uuCustomized Features u
Features
■Customization Flow
Models with two displays
Press the button.
Select Settings .
HomeHome Screen Edit Order
Background Color
DisplayDisplay SettingsBrightness
Contrast
Black Level
Beep Volume
Sound/BeepVolume
Volume
Voice Recog.Voice Prompt
Automatic Phone Sync
Phonebook Phonetic Modification
Default
Factory Data Reset
Clock Format
ClockClock/Wallpaper TypeClock
Wallpaper
Clock Adjustment
Clock Display
Clock Location
Clock Reset
Keyboard Layout
OthersLanguage
Remember Last Screen
Voice Command Tips
System
Compass Setting
15 CR-V-31T0A6300.book 272 ページ 2015年2月2日 月曜日 午前10時35分
Page 277 of 532

276
uuCustomized Features u
Features
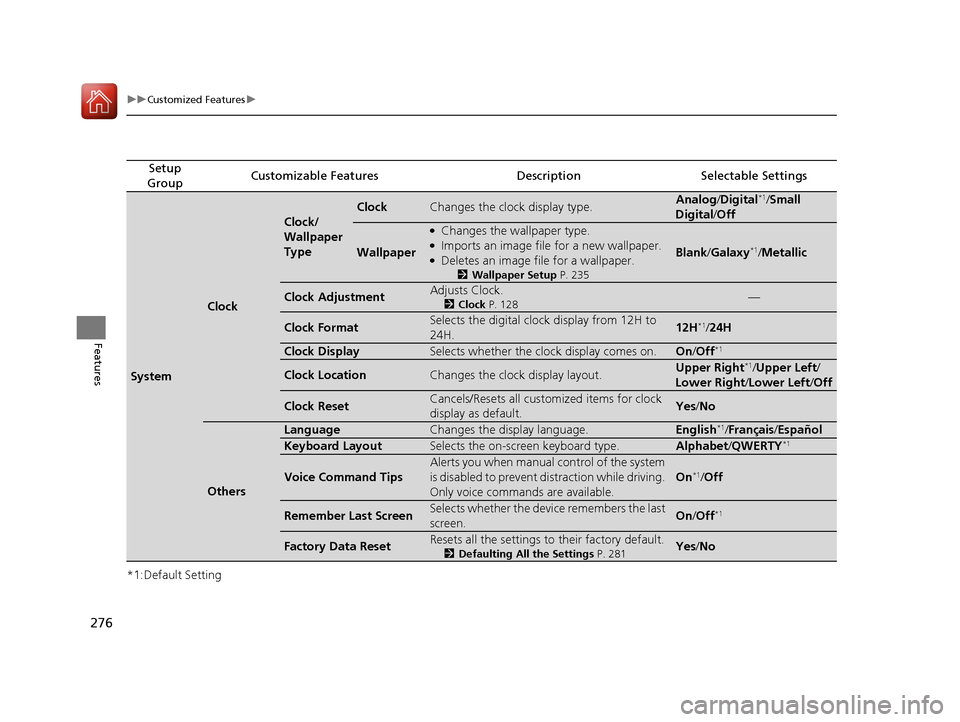
*1:Default Setting
Setup
GroupCustomizable FeaturesDescriptionSelectable Settings
System
Clock
Clock/
Wallpaper
Type
ClockChanges the clock display type.Analog /Digital*1/Small
Digital /Off
Wallpaper
●Changes the wallpaper type.●Imports an image file for a new wallpaper.●Deletes an image file for a wallpaper.
2 Wallpaper Setup P. 235
Blank/Galaxy*1/ Metallic
Clock AdjustmentAdjusts Clock.
2 Clock P. 128—
Clock FormatSelects the digital clock display from 12H to
24H.12H*1/24H
Clock DisplaySelects whether the clock display comes on.On /Off*1
Clock LocationChanges the clock display layout.Upper Right*1/Upper Left /
Lower Right /Lower Left/ Off
Clock ResetCancels/Resets all customized items for clock
display as default.Yes/No
Others
LanguageChanges the display language.English*1/Français /Español
Keyboard LayoutSelects the on-screen keyboard type.Alphabet /QWERTY*1
Voice Command Tips
Alerts you when manual control of the system
is disabled to prevent distraction while driving.
Only voice commands are available.
On*1/ Off
Remember Last ScreenSelects whether the device remembers the last
screen.On /Off*1
Factory Data ResetResets all the settings to their factory default.
2 Defaulting All the Settings P. 281Yes/No
15 CR-V-31T0A6300.book 276 ページ 2015年2月2日 月曜日 午前10時35分
Page 332 of 532

Continued331
uuBluetooth ® HandsFreeLink ®u HFL Menus
Features
■To make a call us ing the imported
phonebook
1. Go to the Phone menu screen.
2Phone menu screen P. 318
2.Select Phonebook.
3. Select a name.
u You can also search by letter. Select
Search .
u Use the keyboard on the touch screen for
entering letters.
4. Select a number.
u Dialing starts automatically.
■To make a call using a phone number
1. Go to the Phone menu screen.
2Phone menu screen P. 318
2.Select Dial.
3. Select a number.
u Use the keyboard on the touch screen for
entering numbers.
4. Select .
u Dialing starts automatically.
1To make a call using the imported phonebook
This function is disabled while the vehicle is moving.
However, you can call a stored voice-tagged speed
dial number using voice commands. 2 Limitations for Manual Operation P. 314
2 Speed Dial P. 328
1To make a call using a phone number
This function is disabled while the vehicle is moving.
However, you can call a stored voice-tagged speed
dial number using voice commands. 2 Limitations for Manual Operation P. 314
2 Speed Dial P. 328
15 CR-V-31T0A6300.book 331 ページ 2015年2月2日 月曜日 午前10時35分
Page 349 of 532

348
Driving
Before Driving
Driving Preparation
Check the following items before you start driving.
• Make sure there are no obstructions on th e windows, door mirrors, exterior
lights, or other parts of the vehicle.
u Remove any frost, snow, or ice.
u Remove any snow on the roof, as this can slip down and obstruct your field of
vision while driving. If frozen solid , remove ice once it has softened.
u When removing ice from around the wheel s, be sure not to damage the wheel
or wheel components.
• Make sure the hood is securely closed.
u If the hood opens while driving, your front view will be blocked.
• Make sure the tires are in good condition.
u Check air pressures, and check for damage and excessive wear.
2Checking and Maintaining Tires P. 465
•Make sure there are no people or ob jects behind or around the vehicle.
u There are blind spots from the inside.
■Exterior Checks1Exterior Checks
NOTICE
When doors are frozen s hut, use warm water around
the door edges to melt any ice. Do not try to force
them open, as this can damage the rubber trim
around the doors. When done, wipe dry to avoid
further freezing.
Do not pour warm water into the key cylinder.
You will be unable to insert the key if the water
freezes in the hole.
Heat from the engine and exhaust can ignite
flammable material s left under the hood, causing a
fire. If you've parked y our vehicle for an extended
period, inspect and remove any debris that may have
collected, such as dried grass and leaves that have
fallen or have been carried in for use as a nest by a
small animal. Also check under the hood for leftover
flammable materials after you or someone else has
performed maintenance on your vehicle.
15 CR-V-31T0A6300.book 348 ページ 2015年2月2日 月曜日 午前10時35分
Page 362 of 532

361
uuWhen Driving uStarting the Engine
Driving
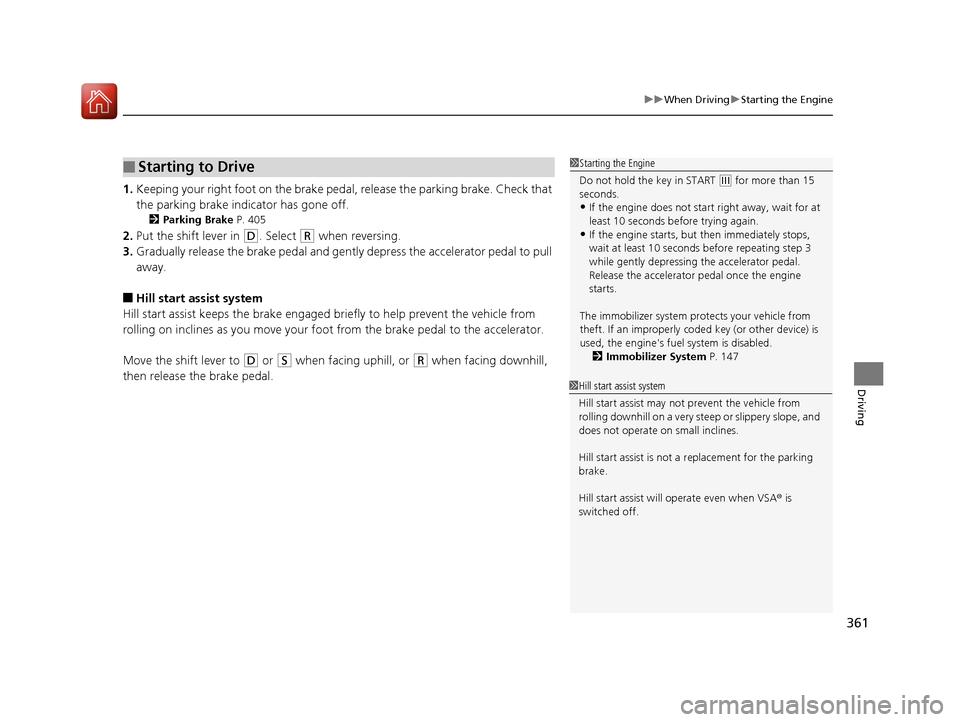
1. Keeping your right foot on the brake pedal, release the parking brake. Check that
the parking brake indicator has gone off.
2 Parking Brake P. 405
2.Put the shift lever in (D. Select (R when reversing.
3. Gradually release the brake pedal and gently depress the accelerator pedal to pull
away.
■Hill start assist system
Hill start assist keeps the brake engaged br iefly to help prevent the vehicle from
rolling on inclines as you move your foot from the brake pedal to the accelerator.
Move the shift lever to
(D or (S when facing uphill, or (R when facing downhill,
then release the brake pedal.
■Starting to Drive1 Starting the Engine
Do not hold the key in START
(e for more than 15
seconds.
•If the engine does not sta rt right away, wait for at
least 10 seconds before trying again.
•If the engine starts, but then immediately stops,
wait at least 10 seconds before repeating step 3
while gently depressing the accelerator pedal.
Release the accelerator pedal once the engine
starts.
The immobilizer system pr otects your vehicle from
theft. If an improperly code d key (or other device) is
used, the engine's fuel system is disabled.
2 Immobilizer System P. 147
1Hill start assist system
Hill start assist may not prevent the vehicle from
rolling downhill on a very steep or slippe ry slope, and
does not operate on small inclines.
Hill start assist is not a replacement for the parking
brake.
Hill start assist will operate even when VSA ® is
switched off.
15 CR-V-31T0A6300.book 361 ページ 2015年2月2日 月曜日 午前10時35分
Page 369 of 532
368
uuWhen Driving uShifting
Driving
Shifting
Change the shift position in accordance with your driving needs.
■Shift lever positions
1Shifting
You cannot turn the ignition switch to LOCK
(0*1
and remove the key unless the shift lever is in
( P.
The vehicle may move forward very slightly even in
(N while the engine is cold.
Depress the brake pe dal firmly and, when necessary,
apply the parking brake.
*1: Models with the smart entry system have an
ENGINE START/STOP button instead of an ignition
switch.
Drive
Used for normal driving
Park
Used when parking or starting the engine
Reverse
Used when reversing
Neutral
Used when idling
Drive (S)
Used:
●For better acceleration●To increase engine braking●When going up or down hills
Release Button
Low
●Used to further increase engine braking●Used when going up or down hills
15 CR-V-31T0A6300.book 368 ページ 2015年2月2日 月曜日 午前10時35分
Page 476 of 532
475Continued
Maintenance
Remote Transmitter Care
Replacing the Button Battery
If the indicator does not come on when the button is pressed, replace the battery.
1. Unscrew the cover with a small Phillips-
head screwdriver.
2. Open the remote transmitter.
u Wrap the small flat-tip screwdriver with a
cloth to prevent scratching the
transmitter.
3. Remove the button battery with the small
flat-tip screwdriver.
4. Make sure to replace the battery with the
correct polarity.
■Master Keys with Remote Transmitter*
1Replacing the Button Battery
NOTICE
An improperly disposed of battery can damage the
environment. Always conf irm local regulations for
battery disposal.
Replacement batteries are commercially available or
at a dealer.
ScrewBattery type: CR1620
Battery
* Not available on all models
15 CR-V-31T0A6300.book 475 ページ 2015年2月2日 月曜日 午前10時35分
Page 477 of 532
476
uuRemote Transmitter Care uReplacing the Button Battery
Maintenance
1. Remove the built-in key.
2. Remove the upper half of the cover by
carefully prying on the edge with a coin.
u Remove carefully to avoid losing the
buttons.
u Wrap a coin with a cloth to prevent
scratching the smart entry remote.
3. Make sure to replace the battery with the
correct polarity.
■Smart Entry Remote*
Battery type: CR2032
Battery
* Not available on all models
15 CR-V-31T0A6300.book 476 ページ 2015年2月2日 月曜日 午前10時35分